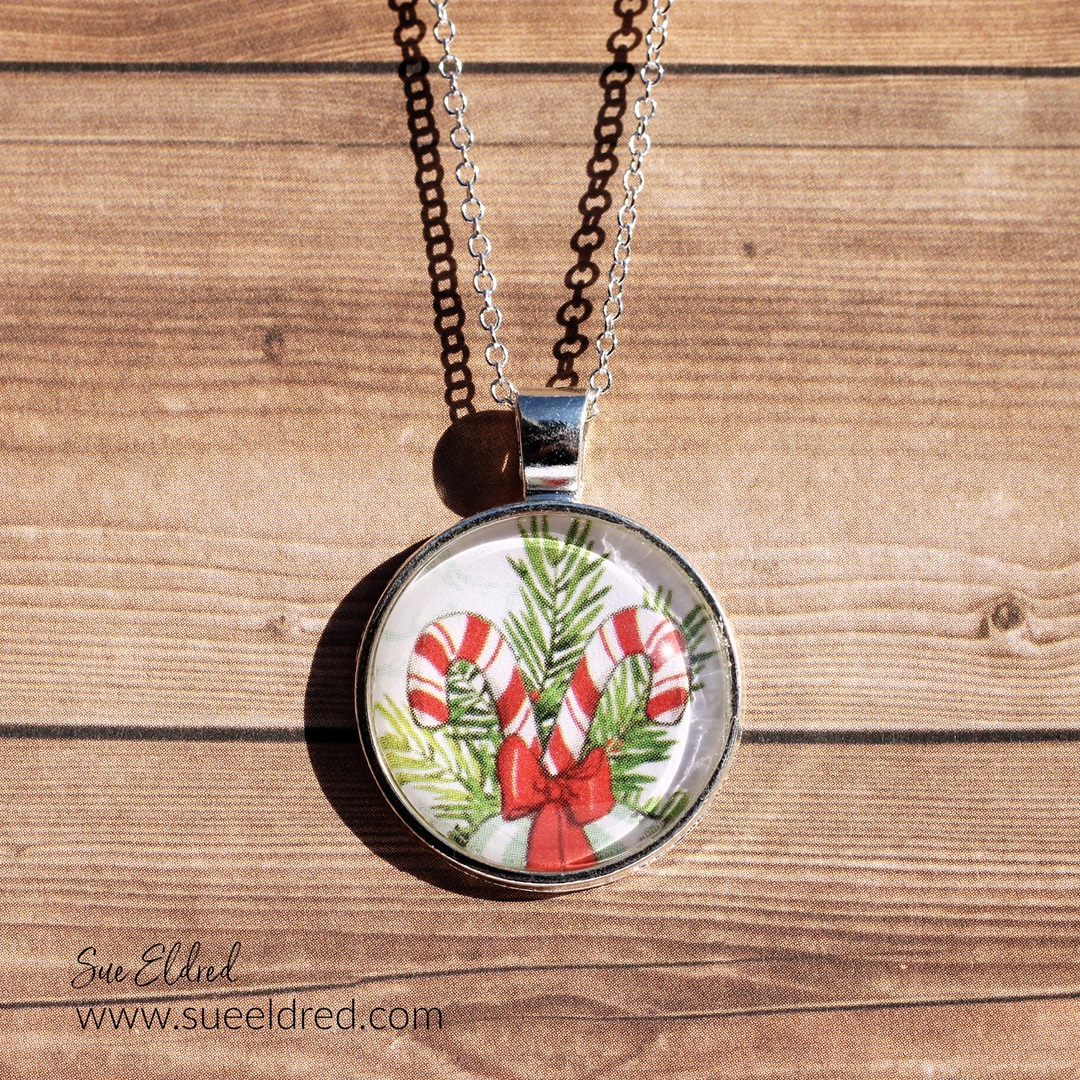
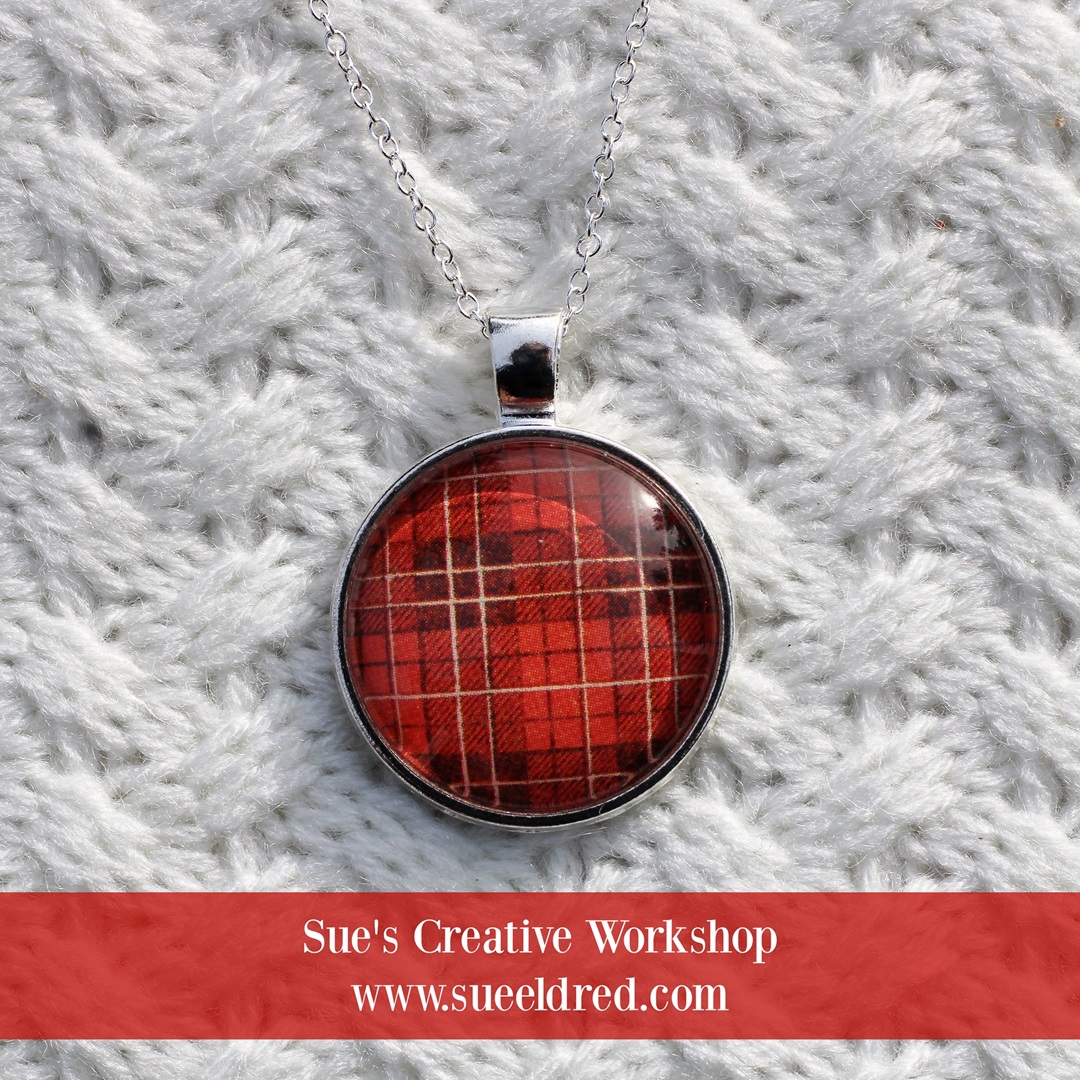
Holiday Stationery Gift Box How to Video

Holiday Stationary Gift Box

The Holiday Stationery Gift Box

A Holiday “How To” video on how to make this fun and festive Stationery

Gift Box using the Sizzix XL Card Caddy die by Eileen Hull*.  

I used an older Holiday Collection from Simple Stories for my Gift Box.  

But the new Simple Stories Vintage Holly Jolly Collection* would also

be an adorable collection to use.  That’s what I love about this project. 

It’s so easy to personalize it to your style.

Here is a list of some of the products I used:  (*affiliate links)

*Disclosure:  This blog uses ads and affiliate links.  If you choose to make a purchase using one of the links, I receive a small commission (at no additional cost to you) that helps offset the costs of maintaining this blog.  Thanks for your support!

Holiday Stationary Gift Box

Eileen Hull Educator Logo

Disclosure:  This is a sponsored post.  As a member of the Eileen Hull Educator Team, I have been provided product in exchange for my creative ideas.  The view and opinions are my own. 

Simple Wedding Card Box

Wedding Card Box

How to make a Quick and Easy Wedding Card Box.

I recently got the honor of helping my sister personalize

the card box for my niece’s wedding reception.

They wanted to keep it simple and requested the

letters to spell the word “CARDS”.

Simple enough.

Wedding Card Box

She found a Clear Glass Terrarium* on Amazon, which perfectly matched the tabletop decorations.

*Disclosure:  This blog uses ads and affiliate links.  If you choose to make a purchase using one of the links, I receive a small commission (at no additional cost to you) that helps offset the costs of maintaining this blog.  Thanks for your support!

Wedding Card Box

I used StyleTechCraft Black Matte Removable Vinyl*

and a Silhouette Cameo Electronic Die Cutting Machine*

to design and cut the letters for the Card Box.

Since I used removable vinyl, they can easily remove the letters

and use the Terrarium* for plants after the wedding.

StyletechCraft products brought to you by ATSM Craft*

Wedding Card Box

They added Shredded Paper* and Fairy Lights* to the bottom of the card box.

Wedding Card Box

The Fairy Lights* made the card box glow.  (until it was full of cards)

Materials Used:  (*affiliate links)

“This is a sponsored post.  As a member of the StyleTechCraft Design Team I have been provided product and compensation in exchange for my creative ideas.  The views and opinions are my own.

Holiday Paper Crafting Workshop Samples & Important Update

Sue's 2024 Holiday Paper Crafting Workshop Update-Sue's Creative Workshop www.sueeldred.com (2)

Our First Workshop Date Has Sold Out!

I’m excited to announce that we have added another date

for Sue’s 2024 Holiday Paper Crafting Workshop.

I will be doing a second Workshop on Friday, November 8th.

If there is enough interest, we are considering adding a third

workshop on the following weekend, Saturday, November 16th.

Black Holiday Door Card-Sue's Creative Workshop www.sueeldred.com 6828Snowflake Christmas Tree-Sue's Creative Workshop www.sueeldred.com 6834

Red Holiday Door Card-Sue's Creative Workshop www.sueeldred.com 6825Holiday Necklace-Sue's Creative Workshop www.sueeldred.com 6865

Cardinal Card-Sue's Creative Workshop www.sueeldred.com 6863Embossed Snowflake Card-Sue's Creative Workshop www.sueeldred.com 6845

Here is a sampling of some of the projects we will be making.  

Class Description:

Looking for a jumpstart to the holiday season? Sue is hosting a Holiday Paper Crafting Workshop! Join with other paper crafters for a fun afternoon of creating together.  In the workshop, we will be making 6-8 Christmas Cards, a 3D Snowflake Christmas Tree Decoration, and a quick and easy Holiday Necklace. Come and enjoy the relaxed atmosphere, before the busy hustle and bustle of the holidays.

Cost is only $30

Call Tremont Gallery to Sign Up:  309-925-4438 (Store Open Wednesday-Friday)

(Leave them a message, and they will get back to you.)

For more information you can email me at suesholidayworkshop@yahoo.com 

Disclosure:  This blog uses ads and affiliate links.  If you choose to make a purchase using one of the links, I receive a small commission (at no additional cost to you) that helps offset the costs of maintaining this blog.  Thanks for your support!

Mr. One-derful’s First Birthday Card

Mr. One-derful's First Birthday Card

Milo’s First Birthday Card

My husband and I recently got invited to my nephew Milo’s First Birthday Soiree.

It’s not every day that you get invited to a Fancy Party for a one-year-old.

So, when that happens, you need to make a “fancy card”.

Mr. One-derful's First Birthday Card

  • I used a Silhouette Cameo Electronic Die Cutting Machine and simple fonts to design the card.
  • I cut out the words for the outside of the card using StyleTechCraft Gold Metallic vinyl.  I cut the large number one using StyleTechCraft Black Glossy Craft Vinyl.

Materials:

StyletechCraft products brought to you by ATSM Craft*

*Disclosure:  This blog uses ads and affiliate links.  If you choose to make a purchase using one of the links, I receive a small commission (at no additional cost to you) that helps offset the costs of maintaining this blog.  Thanks for your support!

Mr. One-derful's First Birthday Card

  • To transfer the large number one onto the gold number one, (which is slightly larger) I used StyleTechCraft transfer tape.
  • Place transfer paper over the vinyl and rub with a vinyl scraper tool to help the vinyl cling to the Vinyl Transfer Tape*.
  • Center the vinyl onto the cardstock and again rub over the vinyl to transfer.
  • Remove the transfer tape.

Mr. One-derful's First Birthday Card

  • To make the layered number one stand out, I added thin foam mounting squares to the back.

Mr. One-derful's First Birthday Card

  • Add the gold chrome words “Mr. One’derful” to the front of the number one with transfer tape.
  • Place the number one onto the front of a simple white card with a gold layer.  I added Milo’s name for fun.

Mr. One-derful's First Birthday Card

The Party was an auspicious event that included

displays of the guest of honor’s fabulous art pieces,

a caricature artist, hors d’oeuvres, and live music.

Formal attire was strongly encouraged, so,

my husband wore a jacket, and I wore a black dress with pearls.

“This is a sponsored post.  As a member of the StyleTechCraft Design Team I have been provided product and compensation in exchange for my creative ideas.  The views and opinions are my own.

Mini Chest of Drawers for Little Essentials

Mini Chest of Drawers using the Sizzix Stacking Drawers Die by Eileen Hull

“Eileen Hull’s Top-Drawer Challenge”

This month, the Eileen Hull Design Team was challenged to make

something using the Sizzix Stacking Drawers Die designed by Eileen*.

I LOVE MAKING MINIATURES!  

So, true to my “miniature-loving” self, I made a Mini Chest of Drawers

for the Little Essentials that I have sitting on my desk.

Eileen Hull Educator Logo

Disclosure:  This is a sponsored post.  As a member of the Eileen Hull Educator Team, I have been provided product in exchange for my creative ideas.  The view and opinions are my own. 

Mini Chest of Drawers using the Sizzix Stacking Drawers Die by Eileen Hull

Materials Used:  (*affiliate links)

*Disclosure:  This blog uses ads and affiliate links.  If you choose to make a purchase using one of the links, I receive a small commission (at no additional cost to you) that helps offset the costs of maintaining this blog.  Thanks for your support!

Little Gift Box made with the Sizzix Stacking Drawers Die by Eileen Hull.

To make the Mini Chest of Drawers…

Mini Chest of Drawers using the Sizzix Stacking Drawers Die by Eileen Hull

  • I painted the Mat Board* and small wood cubes with Apple Barrel Black Multi-Surface Acrylic Paint* before I assembled the box.
  • Fold the matboard and adhere to the ends of the die-cut using Scor-Tape*.
  • FYI…Place the drawer bottom inside drawer so that the drawer slides more easily.  (You can also rub a piece of clear wax on the bottom of the drawer.)
  • Adhere the two boxes together.
  • Retouch the paint if necessary.

Buy Crafting Supplies Now at Dollar Tree starting at $1.25!

Mini Chest of Drawers using the Sizzix Stacking Drawers Die by Eileen Hull

  • I measured and cut side and top pieces for my dresser using Mat Board*.
  • I painted the Mat Board* black and cut smaller pieces of woodgrain scrapbook paper to adhere to the Mat Board*.

Mini Chest of Drawers using the Sizzix Stacking Drawers Die by Eileen Hull

  • One trick I like to use is to color the edge of the paper with a dark gray marker to hide the white core of the paper.
  • Cut the back off the decorative brads and glue them to the front of the drawers.

Mini Chest of Drawers using the Sizzix Stacking Drawers Die by Eileen Hull

  • I cut an extra layer of mat board for the top of the dresser for added dimension.

Mini Chest of Drawers using the Sizzix Stacking Drawers Die by Eileen Hull

If you have a little girl in your life,

the mini dresser would be great for little barrettes or even Barbie shoes.

“Hello Autumn” a Fall Dollar Tree DIY

"Hello Autumn" a Fall Dollar Tree DIY

Hello Autumn Home Decor Sign

is an easy Fall Dollar Tree DIY.

With all the beautiful new Fall items on display everywhere you go,

I decided it was time to start working on my fall decorating.

"Hello Autumn" a Fall Dollar Tree DIY

I found this Harvest Pumpkin Hanging Wooden Circle Sign* at Dollar Tree*.  

It measures approximately 11″.

I knew it would be a great piece to hang on a wreath

or to use in my Fall decorating.

*Disclosure:  This blog uses ads and affiliate links.  If you choose to make a purchase using one of the links, I receive a small commission (at no additional cost to you) that helps offset the costs of maintaining this blog.  Thanks for your support!

"Hello Autumn" a Fall Dollar Tree DIY

I used acrylic paint to paint the pumpkin and leaves.  

Just follow the etched lines of the leaves.

I blended my paint for a more realistic look.

"Hello Autumn" a Fall Dollar Tree DIY

Rub over the wood sign with walnut stain* or ink.

Use Mod Podge Satin Sealer* to give the sign a satin finish.

Lightly rub over the sign with an extra fine sanding block* to smooth the grains.

"Hello Autumn" a Fall Dollar Tree DIY

Cut the words “Hello Autumn” using StyleTechCraft Brown Glossy Craft Vinyl*

and a Silhouette Cameo Electronic Die Cutting Machine*.

StyletechCraft products brought to you by ATSM Craft*

"Hello Autumn" a Fall Dollar Tree DIY

Place vinyl transfer paper over the words.

Rub over the words using a vinyl scraper tool to help

the vinyl cling to the Vinyl Transfer Tape*.

"Hello Autumn" a Fall Dollar Tree DIY

Place the Vinyl Transfer Tape* onto the wood circle.

Gently rub over the design and remove the Vinyl Transfer Tape*.

"Hello Autumn" a Fall Dollar Tree DIY

The sign has two holes on the top for hanging.

I added a simple bow to the top between the two holes.

It would look great in the center of a Large Fall Wreath.

"Hello Autumn" a Fall Dollar Tree DIY

I can’t decide whether to leave it on the table or add it to the mantle. 

(Maybe I’ll just hang it from the wreath.)

“This is a sponsored post.  As a member of the StyleTechCraft Design Team I have been provided product and compensation in exchange for my creative ideas.  The views and opinions are my own.

Bait & Tackle Gift Box

Bait & Tackle Gift Box

DIY Bait & Tackle Gift Box.

Create a miniature tackle box gift box for the Fisherman in your life.

The Bait and Tackle Gift Box is a clever little box made using the

Sizzix Treasure Box Die by Eileen Hull*.

Bait & Tackle Gift Box

Directions:

  • Die-cut the pieces to make the treasure box using the Sizzix Treasure Box Die* and Sizzix Mat Board*.  You will need to cut two of everything.
  • I wanted this box to be shorter so that the dimensions looked more like a tackle box.  I adapted the box by cutting 1″ off the top of the die-cut sides before adhering it together.  (If I were to make this box again, I would probably cut an extra 1/2″ off.)
  • Use Scor-Tape* on the scored tabs and assemble the box lid and bottom.
  • I wanted my box to have fewer seams, so I applied Embossing Paste* with a Palette Knife* over the edges of the box and smoothed it.  Allow the embossing paste to dry before painting.

*Disclosure:  This blog uses ads and affiliate links.  If you choose to make a purchase using one of the links, I receive a small commission (at no additional cost to you) that helps offset the costs of maintaining this blog.  Thanks for your support!

Bait & Tackle Gift Box

Materials Used:  (*affiliate links)

Bait & Tackle Gift Box

Bait & Tackle Gift Box

  • I attached the lid to the box with two small brass hinges* that I distressed with black paint.
  • I used small black mini brads to attach the hinges instead of screws.

Bait & Tackle Gift Box

Bait & Tackle Gift Box

  • I die-cut the “label” using the Sizzix Mini Book Die* to create the handle for the box.
  • The handle is made from faux leather paper.  (leather would be good also)
  • Attach the handle to the box using black mini brads.

Bait & Tackle Gift Box

Fill the Bait & Tackle Box with Fishing Lures, Gift Cards, and Gummy Worms

and give to your favorite fisherman.

Eileen Hull Educator Logo

Disclosure:  This is a sponsored post.  As a member of the Eileen Hull Educator Team, I have been provided product in exchange for my creative ideas.  The view and opinions are my own. 

Gnome Flower Garden Pop Up Card

Gnome Flower Garden Pop Up Card

3D Gnome Flower Gard Card

I found this cute 3D Gnome Flower Garden SVG Design at the Silhouette Store.

I knew it would be a fun Summer Card to make.

Gnome Flower Garden Pop Up Card

  • I used my Silhouette Cameo Electronic Die-Cutting Machine to cut the base of the pop-up card out of cardstock.

Gnome Flower Garden Pop Up Card

  • I noticed the perforation lines on the layers but didn’t give it much thought.  I figured that’s how I was supposed to create the dimension.
  • If you’re a card maker like me, you’ve learned that sometimes you’ve got to adapt.
  • I was preparing to assemble the pop-up card when I realized the perforations were for making a 3D Gnome Flower “Box” card.   So… I adapted.  (Keep reading to see my adaptation.)

Gnome Flower Garden Pop Up Card

Add some Glitter and Glam to your cards with Ultra Metallic Vinyl from StyleTechCraft.  

  • I cut the layering pieces of the card using StyleTech Craft Ultra Metallic Vinyl.

Gnome Flower Garden Pop Up Card

Materials Used:  (*affiliate links)

StyletechCraft products brought to you by ATSM Craft*

*Disclosure:  This blog uses ads and affiliate links.  If you choose to make a purchase using one of the links, I receive a small commission (at no additional cost to you) that helps offset the costs of maintaining this blog.  Thanks for your support!

Gnome Flower Garden Pop Up Card

  • Add the vinyl to the cardstock using clear transfer tape.

Gnome Flower Garden Pop Up Card

  • Here are the three main card layers with the vinyl added.
  • I wasn’t as accurate as I wanted to be.  (I needed to take more time.) I will say that it’s not as noticeable on the finished card.

Gnome Flower Garden Pop Up Card

Here’s how I made the layers a pop-up card.  

  • I put the three layers together using 3d foam squares for added dimension.
  • I made a 1/2″ four-sided cube that was approximately 5″ long. (I used a scoring board tool for consistency.)
  • I added adhesive to three sides of the cube and adhered it onto my layers and card.

Gnome Flower Garden Pop Up Card

Isn’t this little Garden Gnome the cutest?

Do you see what I mean?

It’s not as noticeable once it’s all put together.

Gnome Flower Garden Pop Up Card

  • I added Ultra Metallic Vinyl to the inside of a white cardstock card for my card base.
  • I used the Silhouette Cameo to cut the words using StyleTechCraft Glossy White Vinyl.

Gnome Flower Garden Pop Up Card

Believe in Magic, Celebrate the Little Things, Stand Tall, Live in the Garden!

How to use the Watercolor Flowers & Lattice Stencil

How to use the Watercolor Flowers & Lattice Stencil

How to Stencil a Beautiful and Simple Floral Card

using the Sizzix Watercolour Flowers & Lattice 4 pc Stencil Set by Eileen Hull*.

Did you know that Sizzix has created several layered Stencil Sets to use

with their New Stencil & Stamp Tool*?

The NEW dual-purpose Stencil & Stamp Tool from Sizzix*

makes both stenciling and stamping easier than ever before!

*Disclosure:  This blog uses ads and affiliate links.  If you choose to make a purchase using one of the links, I receive a small commission (at no additional cost to you) that helps offset the costs of maintaining this blog.  Thanks for your support!

How to use the Watercolor Flowers & Lattice Stencil

Materials Used:  (*affiliate links)

How to use the Watercolor Flowers & Lattice Stencil

Since I don’t have the New Tool* yet, I thought I would show you how I used the stencils without the tool.

How to use the Watercolor Flowers & Lattice Stencil:

  • I started with a Watercolor Paper* base for my card front.
  • Cut the paper longer than the stencil.
  • Center and tape the stencil onto the paper.
  • Using a pencil, fill in the holes to create a guide to line up the remaining stencils.

How to use the Watercolor Flowers & Lattice Stencil

Stencil #1 Lattice Background

  • Line up the holes of the lattice stencil with the pencil guide marks.
  • Put a piece of tape to hold the stencil in place.  
  • Rub an Ink Applicator* over the Gathered Twigs Distress Inkpad*.  I wanted a subtle background, so I rubbed some of the ink onto scrap paper before using it on the stencil.  
  • Remove stencil.

How to use the Watercolor Flowers & Lattice Stencil

Stencil #2 Flowers

How to use the Watercolor Flowers & Lattice Stencil from Sizzix and Eileen Hull

Stencil #3 Leaves

How to use the Watercolor Flowers & Lattice Stencil from Sizzix and Eileen Hull

I could have stopped right here after removing the third stencil. 

It looks beautiful.  But as we all know it’s all about the details.

So, onto Stencil #4 to add the details.

How to use the Watercolor Flowers & Lattice Stencil from Sizzix and Eileen Hull

Stencil #4 Details

How to use the Watercolor Flowers & Lattice Stencil from Sizzix and Eileen Hull

The finished stenciled flowers.

  • Cut the stenciled flowers to size and layer onto coordinating cardstock for a beautiful floral card.

How to use the Watercolor Flowers & Lattice Stencil from Sizzix and Eileen Hull

You can use the Sizzix Watercolour Flowers & Lattice 4 pc Stencil Set by Eileen Hull* to make cards, scrapbook layouts, mini albums, and so much more.  

Eileen Hull Educator Logo

Disclosure:  This is a sponsored post.  As a member of the Eileen Hull Educator Team, I have been provided product in exchange for my creative ideas.  The view and opinions are my own. 

Simple Reverse Painting Technique on Acrylic

Reverse Painting Technique on Acrylic-How to make a Mandala Suncatcher

How to make a Mandala Suncatcher using a Simple Reverse Paint Technique on Acrylic

Are you looking for a fun and easy project to make this summer

that both kids and adults will enjoy.

The Mandala Suncatcher is an easy project that uses a reverse paint technique,

paint markers, and StyleTechCraft vinyl.

“This is a sponsored post.  As a member of the StyleTechCraft Design Team I have been provided product and compensation in exchange for my creative ideas.  The views and opinions are my own.

Reverse Painting Technique on Acrylic-How to make a Mandala Suncatcher

Materials Used:  (*affiliate links)

StyletechCraft products brought to you by ATSM Craft*

*Disclosure:  This blog uses ads and affiliate links.  If you choose to make a purchase using one of the links, I receive a small commission (at no additional cost to you) that helps offset the costs of maintaining this blog.  Thanks for your support!

Reverse Painting Technique on Acrylic-How to make a Mandala Suncatcher

Directions:

  • The mandala design was cut out of black glossy adhesive vinyl using a Silhouette Cameo Electronic Die Cutting Machine*.
  • After the design has been cut, remove the excess vinyl in and around the design using a vinyl weeding tool*.
  • My acrylic circle* had a protective coating on both sides. Remove the protective layer from one side of the circle.  Place vinyl transfer paper over the mandala design. Rub over the design using a vinyl scraper tool to help the vinyl cling to the transfer paper.
  • Place the transfer paper with the mandala design centered on the acrylic circle.
  • Gently rub over the design and remove the Vinyl Transfer Tape*.

Reverse Painting Technique on Acrylic-How to make a Mandala Suncatcher

  • Turn the acrylic circle over.
  • Remove the protective layer on the back of the circle.
  • You will do a reverse painting technique on the back of the circle.
  • Starting in the center of the design, color using the paint markers.

Reverse Painting Technique on Acrylic-How to make a Mandala Suncatcher

  • Make sure to color to the edge of the lines and get the colors as close as possible.
  • Here is the back of the circle with the mandala design colored in.

Reverse Painting Technique on Acrylic-How to make a Mandala Suncatcher-Sue's Creative Workshop www.sueeldred.com 5502

  • I added a gold edge to the suncatcher using a DecoColor Gold Calligraphy Pen*. (I think it helps the design stand out.)
  • The best part of the reverse paint technique is that when you flip the circle back over, you’ll have crisp black lines.
  • Add gold and white twine to the top of the acrylic circle to hang.

A reverse painting option… for those who don’t have an electronic die-cutter would be to trace a pattern onto the acrylic before painting.  (see below↓)

REVERSE GLASS PAINTING TECHNIQUE WITH DECOCOLOR MARKERS

You can see the original Reverse Glass Painting Technique with DecorColor Markers post here.