DIY Spring Bunny Door Hanger

How to make a Spring Bunny Door Hanger

How to Make a Spring Bunny Door Hanger with Acrylic Paint and StyleTechCraft Vinyl.

I love changing out my decorations with the seasons.

For Spring this year, I decided I needed a new bunny.

This cute little bunny door hanger makes me smile every time I see him.

Dollar Tree* always seems to have the perfect wood cut out for me to use.

And when it only costs $1.25, it’s affordable too.

*Disclosure:  This blog uses ads and affiliate links.  If you choose to make a purchase using one of the links, I receive a small commission (at no additional cost to you) that helps offset the costs of maintaining this blog.  Thanks for your support!

How to make a Spring Bunny Door Hanger with a Dollar Tree Bunny, Acrylic Paint, and StyleTechCraft Glossy Craft Vinyl.

Materials Used to Make Bunny Door Hanger:   (*affiliate links)
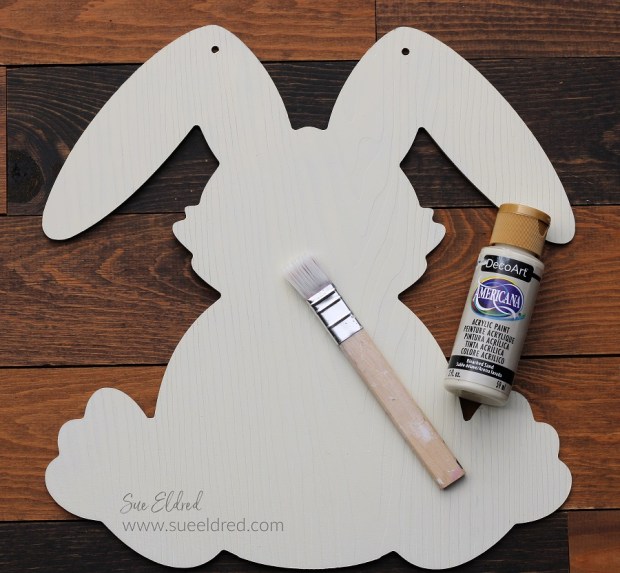
StyletechCraft products brought to you by ATSM Craft*

How to make a Spring Bunny Door Hanger with a Dollar Tree Bunny, Acrylic Paint, and StyleTechCraft Glossy Craft Vinyl.

How to make The Spring Bunny Door Hanger:

How to Make a Spring Bunny Door Hanger with Acrylic Paint and StyleTechCraft Vinyl-Sue's Creative Workshop www.sueeldred.com 9785

  • My project was inspired by a Large Floral Rabbit Decoration that I saw at Michael’s Craft Store.  I liked the look of the painted flowers on the rabbit.  But since my hand-painting skills are not that good, a floral stencil would have to do.
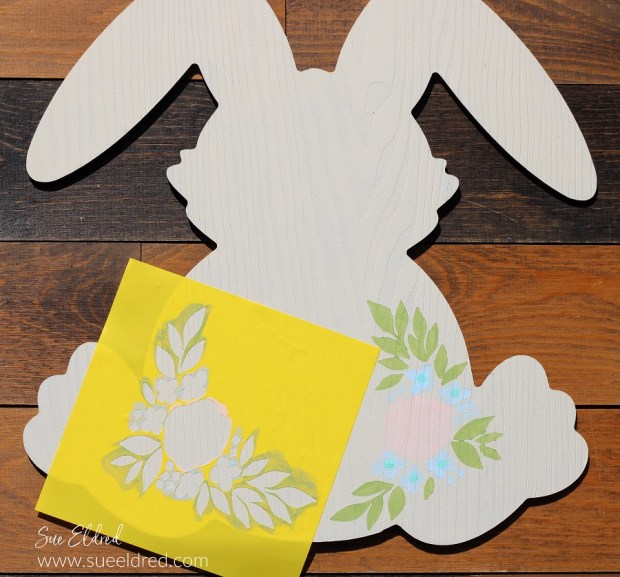
How to make a Spring Bunny Door Hanger with a Dollar Tree Bunny, Acrylic Paint, and StyleTechCraft Glossy Craft Vinyl.

How to make a Spring Bunny Door Hanger with a Dollar Tree Bunny, Acrylic Paint, and StyleTechCraft Glossy Craft Vinyl.

“This is a sponsored post.  As a member of the StyleTechCraft Design Team I have been provided product and compensation in exchange for my creative ideas.  The views and opinions are my own.

How to make a Spring Bunny Door Hanger with a Dollar Tree Bunny, Acrylic Paint, and StyleTechCraft Glossy Craft Vinyl.

How to make a Spring Bunny Door Hanger with a Dollar Tree Bunny, Acrylic Paint, and StyleTechCraft Glossy Craft Vinyl.

  • For the florals, line up the vinyl over the painted area.
  • Gently rub over the transfer tape with the scraper tool.
  • Remove the transfer tape.

How to make a Spring Bunny Door Hanger with a Dollar Tree Bunny, Acrylic Paint, and StyleTechCraft Glossy Craft Vinyl.

  • To create the handle, paint several wood beads with the same acrylic paint as the flowers.
  • String the beads onto a piece of natural twine*.  
  • An Easy DIY Tip: Dip the end of the twine into craft glue. Twirl the fibers with your fingers tips to make the strands tight. Once the glue dries, it’s easy to add the beads.

How to make a Spring Bunny Door Hanger with a Dollar Tree Bunny, Acrylic Paint, and StyleTechCraft Glossy Craft Vinyl.

  • I rubbed a little pink paint onto the face before adding the whiskers.

How to make a Spring Bunny Door Hanger with a Dollar Tree Bunny, Acrylic Paint, and StyleTechCraft Glossy Craft Vinyl.

  • I added adhesive rhinestones to the inside of the smaller flowers.
  • A Hello Spring Greeting finishes off the door hanger.

How to Make a Spring Bunny Door Hanger with Acrylic Paint and StyleTechCraft Vinyl-Sue's Creative Workshop www.sueeldred.com 9894

I decided to add the Bunny Door Hanger to the inside of my Boxwood Wreath.

I think it looks cute hanging on my front door.

Spring Party Collection

Spring Watercolor Bouquet Card

Spring Watercolor Bouquet

I love the soft look of a handmade water-colored card.

This card was made using the Hello Spring Stamp and Die Set from the Maker’s Movement.

Just for you…I’ve created simple step by step instructions on how to make the card.

How to make a Spring Watercolor Bouquet Card

Materials Used:                (*affiliate link)

*Disclosure:  This blog uses ads and affiliate links.  If you choose to make a purchase using one of the links, I receive a small commission (at no additional cost to you) that helps offset the costs of maintaining this blog.  Thanks for your support!

  • In the Hello Spring Stamp and Die Set, there are several stamps that have a coordinating die that matches the stamp.
  • Stamp a flower using blue ink onto a piece of watercolor paper.

  • Place the mask onto the stamped flower image and stamp a second flower image slightly overlapping the first flower.

  • By using the mask, you create the look of one flower behind the other.

  • Place masks on both of the stamped flower image.  Start adding the background images by stamping small pink flowers, ferns, and leaves.

  • Remove masks and watercolor the stamped flowers using a water-brush*.
  • I like to use dye ink to watercolor.  I apply the ink to a simple grid that I printed onto copy paper and laminated.   Dip the wet tip of the water-brush* into the ink and paint your images.  (You can also use a small paintbrush and water.)

  • Cut frames using the Nested Stitched Rectangles Dies.
  • Adhere water-colored image, frames, and layers onto a 4 ½” x 5 ½” blue dot card.
  • Stamp another flower with blue ink onto watercolor paper.  Watercolor the flower as before.  Cut the flower out using the coordinating die and the Crossover II Fabric & Paper Cutting System*.
  • Mount onto the lower right corner of the card using a thin foam mounting square.
  • Stamp “Hello” onto a small white banner cut from the small banner die found in the Hello Spring set.  Trim banner to size and adhere under the raised flower.
  • Add a simple sheer ribbon to the top of the card to finish.

*FTC Disclosure… “This is a sponsored post for The Maker’s Movement.  I have been provided product and compensation in exchange for my creative ideas.  The views and opinions are my own.”

Save

How to make a Chippy Window for Spring

Happy Spring!

To celebrate the first day of Spring I’m sharing how I made this cute little Chippy Window.

To make the Chippy Window…

I started with a 7gypsies 8×8 Shadowbox Insert that I painted with white acrylic paint


To achieve the look of an aged, worn, old chipped painted window…

I alternated layers of Deco Art Media White Crackle Paint* and

Deco Art Media White Crackle Paste* from DecoArt.

Allow plenty of drying time between each coat.

*Disclosure:  This blog uses ads and affiliate links.  If you choose to make a purchase using one of the links, I receive a small commission (at no additional cost to you) that helps offset the costs of maintaining this blog.  Thanks for your support!

For the background of the window…                                                                          

I cut a piece of 7 3/4″ x 7 3/4″ decorative scrapbook paper and adhered it to a thick piece of

mat-board.  I cut down  a couple of 3″ x 4″ journaling cards from the

“Tealightful” collection from Pebbles Inc. and adhered it to the back of the window

frame before attaching the covered mat-board.  Because the mat board is heavy,

I used a Beacon Adhesive Quick Grip Glue* to attach it to the frame.

I added loop screws onto each side of the window frame approx. 1/2″ in and added a thin chain

to the loop screws for hanging.  Ribbon would also work.

To create the floral swag

I snipped a few sprigs of artificial flowers and attached them together in the center with

a thin floral wire.  I tied a simple bow to cover the wire.

I attached the floral swag and wood embellishments to the front of the frame with

Beacon Adhesive Quick Grip Glue*   

FYI…I found the “Welcome” and “Butterfly” embellishments at Michaels.

I added the Spring Window to the center of a wreath and hung it on the front door.

I found the greenery wreath yesterday at Homegoods.  It was just what I was looking for,

the perfect backdrop for my Chippy Spring Window.

FYI…Having a problem finding a window pane to use or would like one that’s even bigger?

  (*affiliate link)

Hampton Art Jillibean Soup Mix The Media Window Frame-14 X16 White* 

Shop Your Fav Brands at Scrapbook.com