Crafting with Nick…Under the Sea

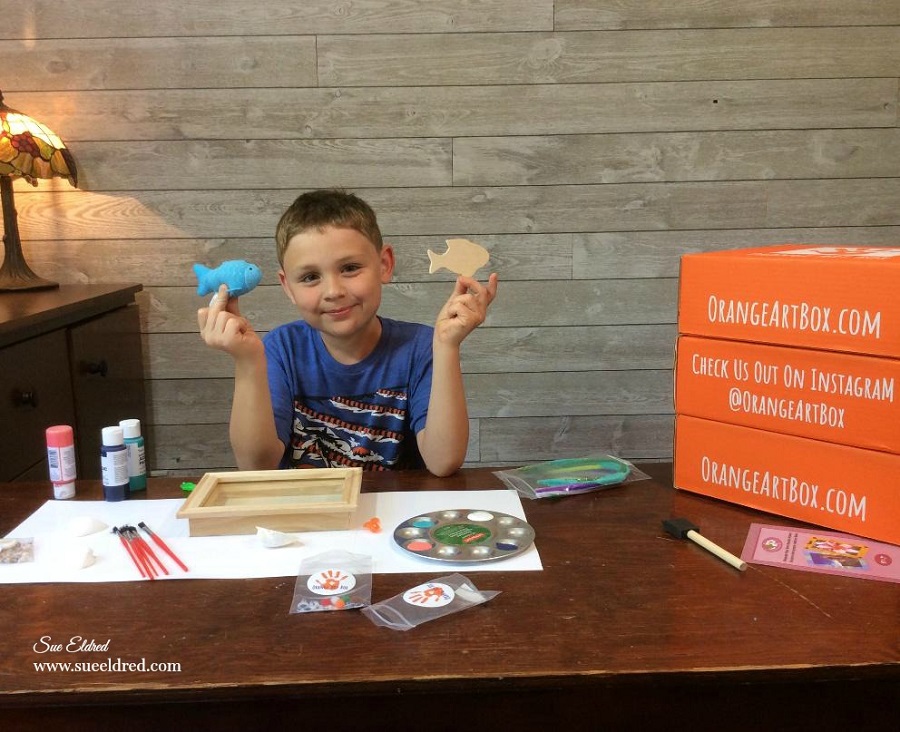
Nick’s back with a fun project using the June Orange Art Box.

I think this month’s kit has been our favorite Orange Art Box so far.

The theme for the June Box is “Under the Sea” and Nick had a really fun

time creating his fish inspired Shadow Box.

Check out Nick’s video below.

The Orange Art Box is a subscription art box for kids.

*Disclosure:  “This is a sponsored post.  I have been provided product in exchange for my creative ideas.  The views and opinions are my own.”   

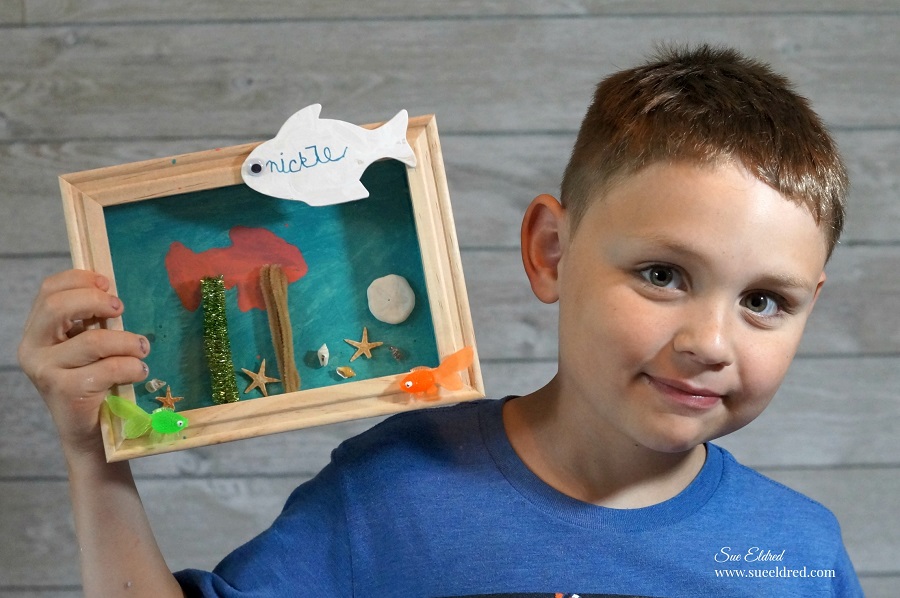
Nick’s finished project.

I think the Shadow Box would make a great vacation memory project with a cute beach

photograph included inside the frame.

Orange Art Box Giveaway

Got a Creative Kid in you Life?  

Looking for something different to keep them busy this summer?

I’m giving away the May Orange Art Box Kit to one lucky person.

To enter all you need to do is leave a comment telling me who you’d give the kit to.

Deadline to enter is tomorrow, Wednesday 5-01-19    (US only)

For extra chances you can also leave a comment on my Facebook and Instagram pages.

Here’s a silly video of my grandson’s opening up the April Orange Art Box.

To see what the boys made click here.

If you are looking for something different for your kids to do this summer

you might want to look into the Orange Box Kit.

It’s available to purchase as a 1, 3, 6 or 12 month subscription.

Perfect gift for that budding artist.

*Disclosure:  “This is a sponsored post.  I have been provided product in exchange for my creative ideas.  The views and opinions are my own.”

Organizing… the Kids Craft Cabinet

Organizing the kids craft cabinet-Sue's Creative Workshop-www.sueeldred.com 1282

I have this awkward wall cabinet between my kitchen and dining room.

It opens fully on the dining  room side and only partially on the kitchen side.

Not completely functional, it doesn’t get used all that much.

Organizing the Kids Craft Cabinet Before-Sue's Creative Workshop-www.sueeldred.com 1275

It’s been the dumping spot of misc. household and kid crafts for the past two decades.

My very active grandsons are always wanting to make something, do something.

I thought a more organized easily accessed spot would be a good idea.

Organizing a kids craft cabinet-Sue's Creative Workshop-www.sueeldred.com 1292

After a little sorting and purging, it’s nice and neat.

Organizing the kids craft cabinet-Sue's Creative Workshop-www.sueeldred.com 1287

Everything’s labeled.  It’s easy to find everything they’ll need.

Organizing a Kids Craft Cabinet-Sue's Creative Workshop-www.sueeldred.com 1294

Here’s the products I used to organize my Kid’s Craft Cabinet from Deflecto Craft:

“This is a sponsored post. As a member of the Deflecto Design Team I have been provided product in exchange for my creative ideas, views and opinions.”

Shop Your Fav Brands at Scrapbook.com

*Disclaimer:  This blog uses ads and affiliate links.  If you choose to make a purchase using one of the links, I receive a small commission (at no additional cost to you) that helps offset the costs of maintaining this blog.  Thanks for your support!

Sweet Baby BOO!

My sweet little grandson will be celebrating his first Halloween soon…

Inspired by our newest game, I decided to make him a cute little shirt to wear.

With the help of Iron-on Embroidered letters from Joy making the shirt was super easy.

  • prewash cotton t-shirt
  • set iron to cotton setting
  • position letters with shiny side down on garment
  • cover letters with a fine cloth
  • with firm pressure iron cloth over the letters for 25 seconds
  • turn shirt inside out and iron the back of the letters for 25 seconds
  • allow to cool for 1 minute before cooling

Isn’t he adorable?

Looking at this picture, I’m thinking really big googly eyes would look cute inside the “O’s”.

My “Sweet Baby Boo” shirt was created for and sponsored by Joy SA.

*Disclaimer:  This post uses ads and affiliate links.  If you choose to make a purchase using one of the links, I receive a small commission (at no additional cost to you) that helps offset the costs of maintaining this blog.  Thanks for your support!

Try Amazon Prime 30-Day Free Trial

Patriotic Tie Dyed Shirts for the 4th of July

We’re at it again.

This past week, my daughter in law and I did a little Summer Tie Dying.

(see last year’s shirts here)

Inspired by photo’s she saw on Pinterest,

Bonnie made these cute Patriotic Tie Dyed shirts for the boys.

DSC08616

We used Tie Dye Kits that come with the premeasured squeeze bottles.

She gathered the shirt at one corner and rubber banded it in three sections and squeezed the

dye directly onto the shirt and then covered it with Saran Wrap.

We allowed several hours before rinsing out the dye.

Too Cute!  (don’t you agree?)

For more summer fun… click on ad below.

Slimer

Disclaimer:  This blog uses ads and affiliate links.  If you choose to make a purchase using one of the links, I receive a small commission (at no additional cost to you) that helps offset the costs of maintaining this blog.  Thanks for your support!

Join Amazon Kindle Unlimited 30-Day Free Trial

Making a Playhouse Banner with oly*fun

Making a Playhouse Banner with Oly Fun 9634My grandson Nicholas is celebrating his 5th birthday in just a few days.  (but who’s counting?)

He’s having two parties this Saturday.  One for the kids and the other for family.

Such a lucky little guy.  (Born on his Daddy’s birthday.)

Since the family party is at his house, I had an idea to make a bright colorful banner to decorate

the new playhouse.

I had recently received a selection of oly*fun to work with and thought it would be perfect to use.

It was super easy to put together.

Playhouse 9651

What exactly IS oly*fun? 

oly*fun is a specially engineered material that features some of the best things about fabrics AND

papers.  Easy to cut or die-cut and it will not fray.  It is great for outdoors

Supplies 9625

 Here’s what I used:

Supplies 9631

Directions:

  1. Stencil the check pattern using the black acrylic paint on the orange oly*fun.
  2. Create a banner pattern on cardstock.
  3. Cut out the banner pattern and trace onto the stenciled oly*fun.
  4. Trace and cut several banners out of the black and green oly*fun.
  5. Cut strips and circles to decorate the banners.  Glue onto banner with Fabri Tac Glue.
  6. Fold top of the banner and staple onto the piece of twine.
  7. Tie the banner onto the top of the playhouse and watch the kids play.

Playhouse 9644

A Special Thanks to Fairfield World for generously providing the oly*fun for this project.


Preserving Summer Memories

Summer Layout 9108

I’m holding on to Summer as long as I can.

This summer Nicholas learned how to swim the entire length of the pool without the aid

of a floatie and he learned how to float on his back.

Warren learned how to jump off the side of the pool.

Pretty impressive when you consider they’re only 4 and 1 1/2.

Nicholas loves the water, we call him a polar bear because it doesn’t matter how

cold the water is.

Yesterday… we had our last pool party of the season.  Thanks to a little 95º heat wave.

I’m going to miss summer.

My Summer Layout uses:

  • Simple Stories Collections: Summer Vibes and Freedom
  • Bo Bunny’s Boardwalk

Join Amazon Kindle Unlimited 30-Day Free Trial

Disclaimer:  This blog uses ads and affiliate links.  If you choose to make a purchase using one of the links, I receive a small commission (at no additional cost to you) that helps offset the costs of maintaining this blog.  Thanks for your support!

Tie Dying for the 4th of July

This may be the last Tie Dye Post from me.  (or not?)

On Father’s Day we tie dyed shirts with the kids.  It turned out to be a really great group activity.

Because we had to let the shirts set, rinse and then be washed….

I was not able to get pictures of all the kids and their shirts.  (you know…the big kids)

Last Wednesday my sister brought my niece over for a play date with my grandsons and

I was able to get a few cute ones.

You may be wondering why only one kid got the last red white and blue popsicle.

Well…. the really cute and innocent looking littlest one had just recently taken a good hard

bite on the tip of his big brothers nose.  “Ouch!”

It didn’t take long before he forgave his little brother and was sharing his popsicle.

Little brother wouldn’t have had it any other way.

Isn’t she adorable?

On her shirt, the dye was painted directly onto the shirt with a paintbrush.