ADORNit: “Embrace Each Day” card

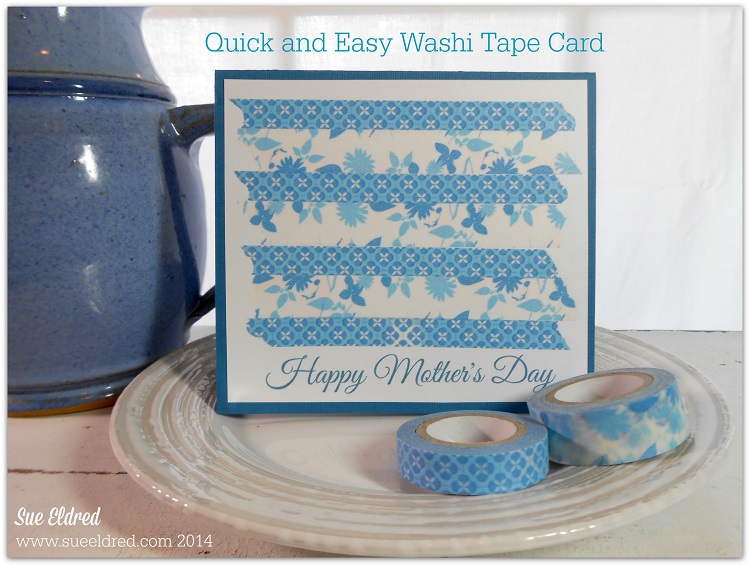
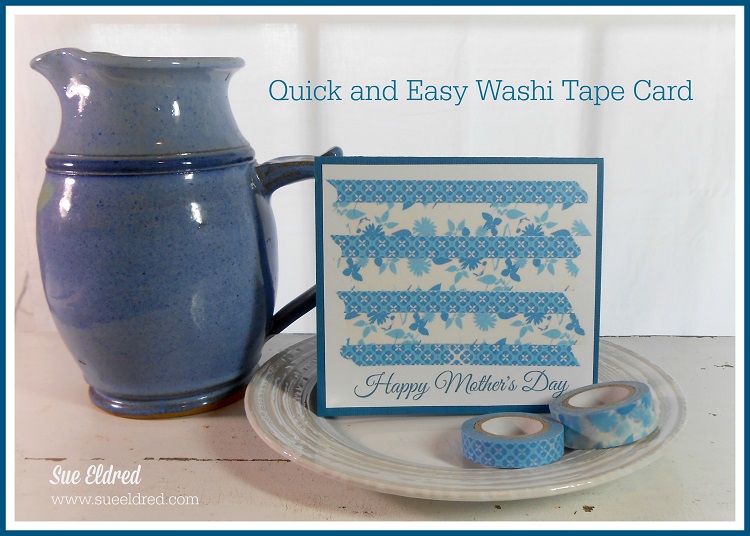
A bright and cheerful card for all you Moms out there.

It doesn’t matter if put your feet up, take a walk, plant those flowers or hug those little ones…

What ever you need to do to embrace the day.  (fyi…I plan on doing all the above)

Happy Mother’s Day.

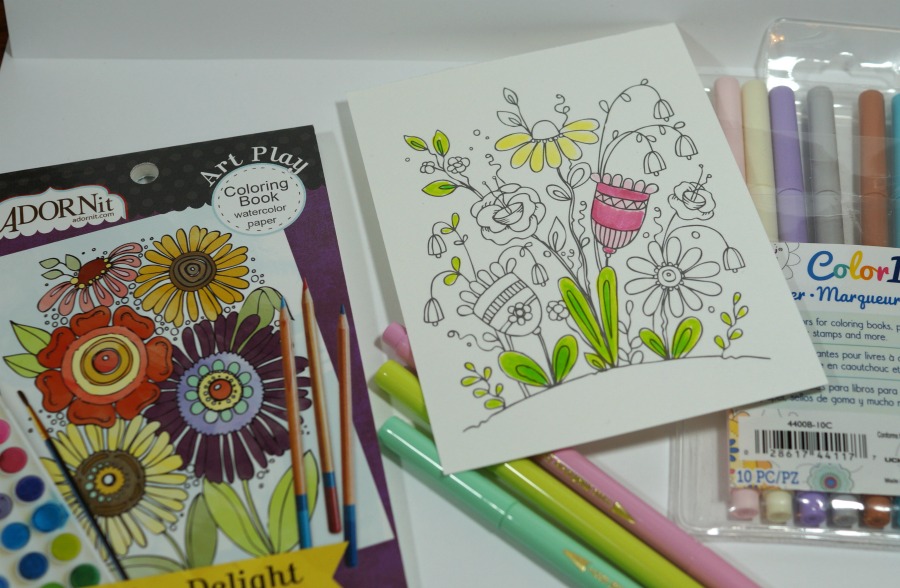
Card Details…                                                                          (*affiliate link)

This card was sponsored by ADORNit as part of being an ADORNit “it girl” ambassador.

Disclaimer:  This blog uses ads and affiliate links.  If you choose to make a purchase using one of the links, I receive a small commission (at no additional cost to you) that helps offset the costs of maintaining this blog.  Thanks for your support!

How to make a Relaxing Guy Card

I’ve always found making cards for a guy  to be tricky. 

Making feminine cards come easy to me.

For the upcoming summer season, I decided to make a “guy” card

that would make a perfect birthday, Father’s Day and even  Retirement.

To make the Relaxing Guy Card…

TIP:  Before removing the back off the 3D foam mounting squares.  Brush baby powder to the back of the stickers to remove the tackiness.  The stickers become like die cuts and will only stick where you want them too.


Materials Used:                                                                   (*affiliate link)

 
Directions:
  1. Cut a 4″ x 6″ piece of green scrapbook (dock on the lake) layer.  Add border sticker strip onto the top and bottom of the layer leaving approx. 1/8″ border.
  2. Adhere the green layer onto a 4 1/4″ x 6 1/4″ piece of brown scrapbook paper (day at the lake) and then onto a 4 1/2″ x 6 1/2″ piece of red (lake time) scrapbook paper.
  3. Create a 5″ x 7″ side fold card from the kraft cardstock.
  4. Adhere scrapbook layers onto kraft card.

5.  Create dimensional stickers by adding and layers stickers with 3D foam mounting squares.  Add stickers to the front of the card.

6.  Wrap twine around the left side of the card and tie with a knot.

Mini Tape Runners

*Disclaimer:  This blog uses ads and affiliate links.  If you choose to make a purchase using one of the links, I receive a small commission (at no additional cost to you) that helps offset the costs of maintaining this blog.  Thanks for your support!

The new guy in my life…

There’s a new guy in my life and I’m in love.

Meet the newest member of our family, my sweet little grandson Emerson.

Emerson is my third grandchild, my third grandson and the littlest brother.

He has already stolen all of our hearts.

I’m so excited to have a new love in my life.

For Emerson’s layout, I used the Lullaby Collection from Pebbles Inc.

    • I created a lacey border for the photo using the Spellbinders Captivating Squares Die Templates* and cutting and piecing six squares together.
    • I wanted some small floral accents for my layouts so I fussy cut small flowers from the floral scrapbook paper.  I used thin 3D foam mounting squares on a few of the flowers.

Disclaimer:  This post uses affiliate links.  If you choose to make a purchase, I will receive a small commission that helps offset the cost of running this blog.  Thanks for your support!

Shop Amazon – Create an Amazon Baby Registry

Quick and Easy Washi Tape Mother’s Day Card

Mothers Day is just a few days away.  Your Mom is expecting a special handmade card.

Here’s a Quick and Easy Mother’s Day card that you can make in minutes.

First, I’m assuming like any good paper crafter, you have washi tape on hand.

If not, there’s still time to run out and get some.  (visit your local scrapbook store)

Here’s what you need to do:

  • Using your computer, print your Mother’s Day greeting on a piece of white cardstock.  Make sure it prints approx. half way down the page.
  • Cut the white cardstock 1/4″ smaller than the size you want your card to be.
  • Then tear the washi tape into strips and alternate onto the white cardstock.
  • Adhere it to a cut and folded coordinating colored card that is 1/4″ larger than the white cardstock.

(My finished card is 4 1/2″ x 5″)

Voila!  Now run out and get her a bouquet of fresh flowers from the grocery store and your done.

To my kids:

If you are reading this post, the supplies are on my desk.

Help yourself.

Love, Mom

*Disclosure:  This blog uses ads and affiliate links.  If you choose to make a purchase using one of the links, I receive a small commission (at no additional cost to you) that helps offset the costs of maintaining this blog.  Thanks for your support!