Graphic 45… A Time to Celebrate Frame

Time to Celebrate 4599

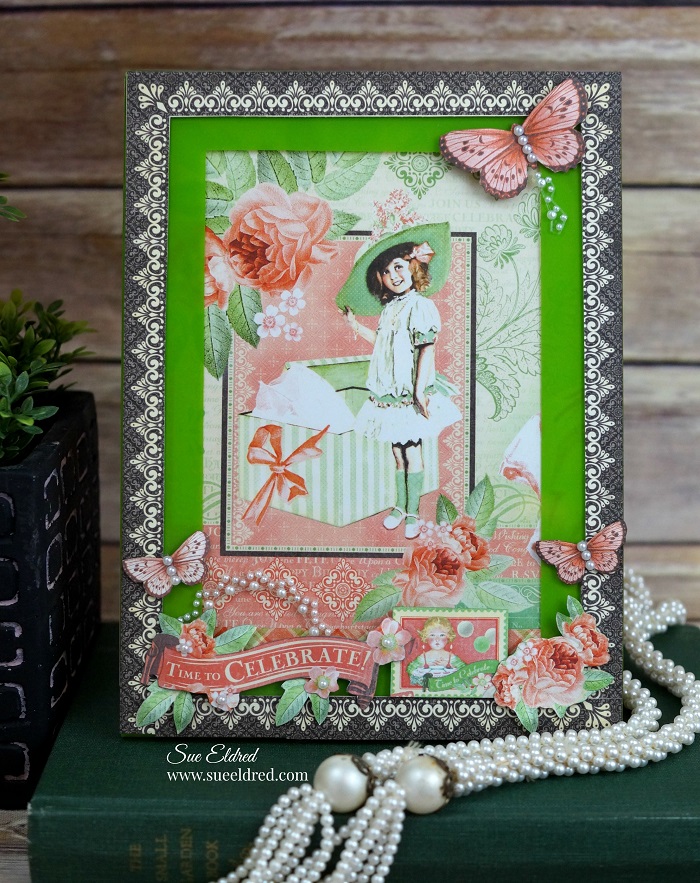
I have a hard time resisting the beautiful patterns of Graphic 45 paper and love using

it in my creations whenever possible. The other day, while I was shopping at my local

Scrapbook Store  I picked up a few sheets of the “Time to Celebrate Collection”.

I thought it would be perfect for a Spring Frame I wanted to make.  I couldn’t decide on

which way I wanted to go with the frame so I created two looks for the same frame.

Time to Celebrate Frame 4709

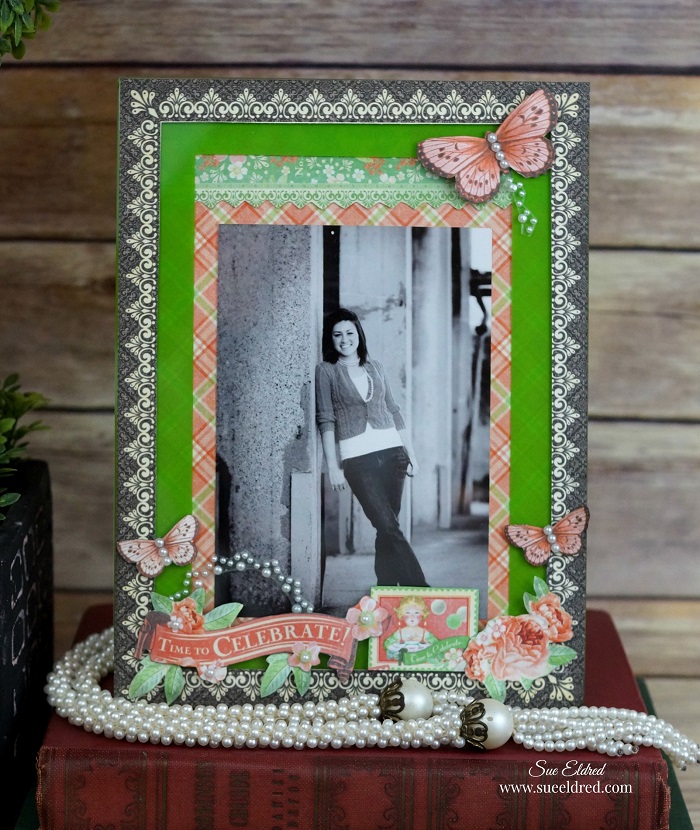
For a slightly more contemporary look….

I used a older black and white picture of my daughter.  (I love the contract.)

Time to Celebrate Frame Close Up 4835

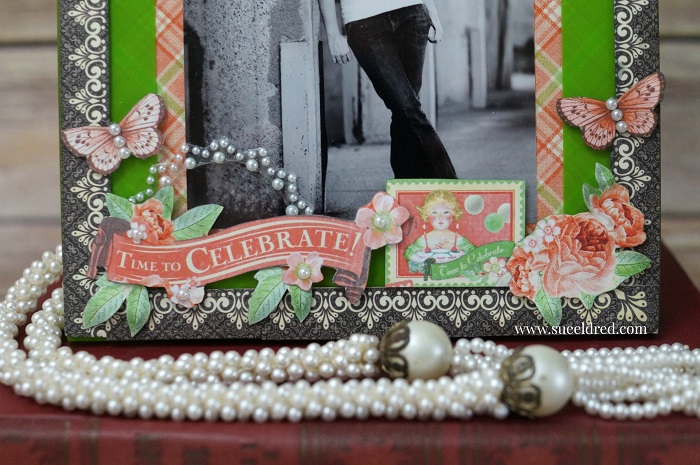
There’s a bit of fussy cutting involved with this frame.

I used the border on the Time to Celebrate paper to create a border around my green frame.

Then, I started cutting out the butterflies and flowers, giving them slight bends with my fingers

before layering them onto the frame with foam mounting squares.

The finished frame is 6″ x 8″ and is made to hold a 4″ x 6″ picture.
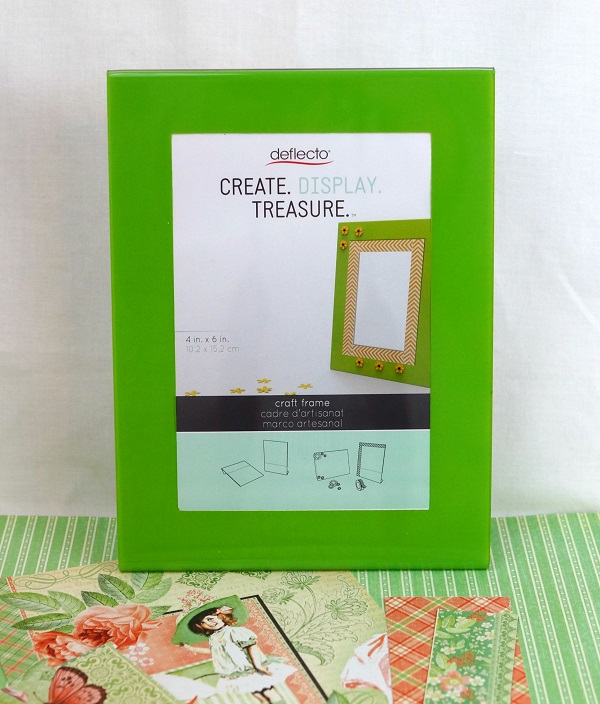
Green Craft Frame 2

Here’s what I used:

Deflecto Craft Frame, Green Border, 4x 6 Inches (69574CR)

I used two sheets of paper from Graphic 45’s “Time to Celebrate” collection.


Graphic 45 Time To Celebrate Paper Pad, 12 by 12-Inch(available on Amazon*)


“This is a sponsored post. As a member of the Deflecto Design Team I have been
provided product in exchange for my creative ideas, views and opinions.”

*This post uses Amazon Affiliate links.  I am an Amazon Affiliate


Pretty Pink Birthday Party Sign

Pink Birthday Party Frame 4299

A quick share today of a Pretty Pink Birthday Party Sign…

I made the sign using the Deflecto Craft Frame, Pink Border, 8.5 x 11 Inches (69771CR)

from Deflecto Craft Solutions and the new Flamingo ColorWay paper and stickers from

Paper House Productions.  I love the way they look like they were made for each other.

After the Party is over, add a couple cute photo’s of the birthday girl for a fun memory.

Happy Monday Everybody! 


“This is a sponsored post. As a member of the Deflecto Design Team I have been
provided product in exchange for my creative ideas, views and opinions.”

This post uses Amazon Affiliate links.  I am an Amazon Affiliate

Cupcake Stand or Craft Supply Storage?

Cupcake Stand or Craft Supply Storage 3310

Deflecto Craft Solutions has several new items debuting at CHA this week in Anaheim, California.

(CHA being the annual Craft and Hobby Association Trade Show.)

One of my favorites products being shown is this Three Tier Desert Stand.

Acrylic Stand and Supplies

The stand features adjustable heights and a easy knock down compact design for storage.

It is perfect for holding cupcakes and even comes with little holes to insert cake pops.  (Pretty Clever.)

The Cupcake Stand will be available January 2016 through local art, craft and educational stores.


Because I don’t make a lot of cupcakes, I decided to use mine for storage instead.

tracing circles

This is what I used to personalize the stand:

  1. Trace each of the tiers onto the back of the kraft paper.
  2. Loosely cut around each circle.
  3. Liberally apply the glue-stick onto the back of the paper around and inside the circle.
  4. Lay tier onto the glued circle and trim excess paper with craft knife.
  5. Smooth paper onto tier.
  6. Cut out the center channels of the tiers with a craft knife.

Washi Tape Border

Apply washi tape around the outside lip.

decorated stand with out paint

Assemble stand and fill craft supplies.  (or maybe even your favorite cupcakes)


“This is a sponsored post. As a member of the Deflecto Design Team I have been
provided product in exchange for my creative ideas, views and opinions.”

This post uses Amazon links if you choose to purchase from Amazon, I get a very small commission.

Christmas Brag Book

Christmas Brag Book

This year make a Christmas Brag Book for all your fun Holiday Memories.

For my brag book I used clear flexible pouches from Deflecto Craft Solutions and paper

from Canvas Corp Brands Farmhouse Christmas Collection for a Quick and Easy project.

A Great Gift Idea for the Grandparents.

Christmas Mini Album Stephanie and Zach 7413

A fun way to share Holiday Silliness and the Sweet Little Moments shared between generations.

Christmas Mini Album Inside Back Cover 7414

The Christmas Brag Book was created for Craft Ideas Magazine’s Holiday Issue

and has my Christmas photo’s from last year.

Craft Ideas Holiday 2015

Craft Ideas is a great magazine for creative inspiration.

Christmas Mini Album Inside Pages 7411

Finished Size: 3 1/4” x 6”

Christmas Mini Album Supplies 7388

Materials:

  • Deflecto 20019CR Flexible Pouch (1 package of 10)
  • Canvas Corp Brands CCP2827 Farmhouse Christmas Tags on Ivory 12 x 12 paper
  • Canvas Corp Brands CCP2826 Farmhouse Christmas Stripe on Ivory 12 x 12 paper
  • Canvas Corp Brands CCP2638 Red & Ivory Mini Dot Reverse 12 x 12 paper
  • Canvas Corp Brands CCP2639 Red & Ivory Ribbon Stripe 12 x 12 paper
  • Canvas Corp Brands Binding Ring-Small Antique Silver
  • Canvas Corp Brands Optical Lens Antique Brass
  • Canvas Corp Brands PaperTape: Christmas Wrap
  • Paper Source 5/8” Ivory/Red Striped Ribbon
  • Red Mini Rick Rack
  • Small Red Button
  • Photos
  • Black Cardstock

Basic Supplies:

  • Paper Cutter
  • 1 11/16” Circle Punch
  • Scissors
  • 1/8” Hole Punch
  • Double Stick Tape Runner
  • Glue Stick
  • Craft Glue
  • Thermo Web Mini Glue Dot

Directions:

  1. For the Cover: Cut a piece of black cardstock 3” x 5 1/4”. Cut “It’s the most Wonderful Time…” from the Farm House Christmas Tags just slightly smaller than 3” x 5 1/4” and adhere to the black cardstock. Add a 1/2” x 3” strip of Red and Ivory Dots to the left side of the tag. Glue a 3” piece of red mini rick rack onto the right side of the tag.
  2. On the Inside Front Cover: Cut a piece of black cardstock 3” x 5 1/4”. Cut a 3” x 5 1/4” piece of Red & Ivory Ribbon Stripe just slightly smaller than the 3” x 5 1/4” and adhere to the black cardstock. Adhere two strips of 1/2” x 5 1/4” Red and Ivory Dots to the top and bottom of the striped paper. Adhere “I’ll be Home…” from the Farmhouse Christmas Stripe layered on black cardstock onto the center of the striped paper.
  3. Insert Cover and Inside Front Cover into the Flexible Pouch.
  4. Add Paper Tape around the plain end of the Flexible Pouch.
  5. Punch a 1 11/16” Snowflake Circle from the Farmhouse Christmas Tags and glue onto the back of the Optical Lens by adding craft glue along the outside edges of the lens. Glue small red button onto front of the lens in the middle of the snowflake.
  6. Cut a 10” piece of Ivory Red Striped Ribbon. Tie onto front cover adding the Optical Lens.
  7. Choose pictures that can easily be cut down to 3” x 5 1/4”. Add to inside of flexible pouches.
  8. Create Back Cover using the Red & Ivory Mini Dot Paper, Red & Ivory Striped Paper and Farmhouse Christmas Strip.
  9. Add Paper Tape to each of the pouches.
  10. Mark and re-punch the holes using 1/8” hole punch on each of the pouches and gather the mini album together using a small book ring.

Christmas Mini Album Inside front cover 7412

Christmas Mini Album Back Cover 7417

This project was created for Craft Ideas and was sponsored by Deflecto Craft Solutions

and Canvas Corp Brands.

A little Holiday Sparkle…

Sue Eldred's Holiday Sparkle Frame

Thinking of adding a little Holiday Sparkle this year?

Adding a little Holiday Sparkle doesn’t get much easier than this.

Holiday Sparkle Bow 2007

Gather up a few sparkly holiday sprigs…

tie them together with a jingle bell and satin ribbon and then glue them onto

your favorite frame.  Your frame will be dressed to impress.

Holiday Sparkle Frame in the Snow

I loved the way this frame turned out, so sweet and simple. 

But let me tell you… I really struggled trying to get a good picture to show you.

Taking good pictures of clear acrylic frames is really hard.

I took over 150 pictures of this frame.  (no joke)

When it started snowing yesterday morning, I decided to try again.

It was such a beautiful snow, I didn’t even mind getting cold.

Holiday Sparkle Supplies 1808

For my Holiday Sparkle Frame I used the NEW Clear Magnetic Curved frame

that will be available from Deflecto Craft Solutions in January 2016.

I love the original curved magnetic frame* and I am so happy that they decided to

make it in a smaller size without a border.  (can’t wait to get my hands on a few more)

This new frame measures 5″ x 7″ and is perfect for a 4″ x 6″ picture or graphic.

(you can find the larger size here*)

“Tis the Season to Sparkle” comes from the 4×6 Horizontal Journaling Card Elements

from Simple Stories “Claus & Co.” collection layered on red glitter cardstock.

*Disclaimer: “This is a sponsored post. As a member of the Deflecto Design Team I have been provided product in exchange for my creative ideas, views and opinions.” This post uses Affiliate links if you choose to make a purchase, I receive a very small commission that helps maintain this site.  Thank You for your support!

Warren’s Masterpiece

Warren's Masterpiece

I love watching little kids as they create.

At almost two, Warren doesn’t always get to use markers.

He just quietly worked on his Masterpiece for at least 10 minutes or more.

Just happy creating.

I wish I had that freedom.  (my head gets in the way)

My Masterpiece

For Warren’s frame I decorated a clear flat acrylic frame from Deflecto Craft Solutions by adding a

couple strips of Washi Tape along with some Lime Green Iron-on Letters from Joy SA Inc.

I glued the letters onto the frame (since I couldn’t iron them) and added a couple magnet strips

to the back.

My Masterpiece 9759

Warren was so proud of his Masterpiece. 


*This project was created for Joy SA Inc. and sponsored by Joy SA Inc. and Deflecto Craft Solutions.

Home Sweet Home Recipe Book Class

Graphic Home Sweet Home Recipe Book 215

♥ “Home Sweet Home” Recipe Book

at The Paper Forest in Washington, IL

Tuesday, December 8th from 5:30-7:30 p.m.

Cost:  $35

Create a spiral bound recipe book using Graphic 45’s “Home Sweet Home” scrapbook paper and stickers.  Inside the album is several heavy duty pouches from Deflecto just waiting for your own special recipes.  Perfect Gift Idea!

Contact The Paper Forest www.thepaperforest.com or 1-309-745-3440 to sign up.

Graphic 45 Home Sweet Home Cookbook with Deflecto Pouches 4744 Sue Eldred's Graphic 45's Home Sweet Home Cookbook with Deflecto Pouches 4737

How to make a Holly Jolly Flip Album…

Holly Jolly Flip Book

I wanted to share with you today one of my favorite projects from my Holiday Workshop

last Saturday.  It is the “Holly Jolly Flip Album” using paper from Canvas Corp Brands

Farmhouse Christmas Collection and a 5″ x 7″ Black Acrylic Frame from Deflecto Craft Solutions.

It’s a fairly simple project and the ladies were able to complete the album in just a couple of hours.

Farmhouse Christmas Flip Book Front Cover7638  Farmhouse Flip Book Supplies 07392

Holly Jolly Flip Album

Here’s the complete supply list:

Directions:

  1. Mark and measure hole placement on black acrylic frame.
  2. Drill 3/8” holes into frame.
  3. Cut a 7” x 9” piece of Red & Kraft Ribbon Stripe paper and insert into frame.
  4. Album Cover: Cut the “Holly Jolly Christmas” section from the Better Not Pout Tags on Kraft. Layer it onto black cardstock, kraft corrugated paper and then another back cardstock layer.
  5. Cut a 4 3/4” x 6 3/4” piece of Red & Black Stitched Diamonds and adhere it onto a piece of 5” x 7” Red Cardstock layer. Add a 3/4” x 4 3/4” strip of Red & Kraft Ribbon Stripe. Adhere “Holly Jolly” layers onto the Red & Black Stitched Diamonds.
  6. Punch a 1 11/16” circle from the Better Not Pout Tags and glue onto the back of the Optical lens by adding craft glue along the outside edges of the lens. Add jump ring to Optical Lens.
  7. Mark and measure holes to line up with black acrylic frame on the Album Cover and punch holes. Add eyelets to holes with the Crop-a-dile.
  8. Tie a piece of gold ribbon around the front of the album cover.
  9. Cut several pieces of black 5” x 7” cardstock layers to use as the pages of the album. Decorate album pages using additional scrapbook paper layers, strips, flips, pockets, trim, cords, tickets and mini bags.
  10. Align, measure and punch holes in the top of the album pages.
  11. Add album cover and pages to the black acrylic frame using medium book rings. Add Optical lens to ring.
  12. Embellish the stand by adding gold decorative trim with Fabri-Tac glue.

Pg. #4 Farmhouse Christmas Flip Book Special Delivery Side view 07658    Pg #1 Farmhouse Christmas Flip Book Made with Love Pocket Page 7646


“This is a sponsored post.  As a member of the Deflecto Design Team I have been provided product in exchange for my creative ideas, views and opinions.”

Welcome Trick or Treaters

Welcome Trick or Treaters 9833

When it comes to Halloween Decorating, I’m not one to go all out.

Usually a couple of jack-o-lanterns and that’s it.  (I’m pretty low-key)

How do you Welcome Trick or Treaters?

I remember the year my oldest decided that he was too old for trick or treating…

He dressed up in costume… sat in the chair on the porch with a big bowl of candy to pass out.

He sat very, very still.

All the kids thought he was a decoration.

When they’d start to reach and grab the candy he’d scare them.

As I was walking down our street from taking my daughter Trick or Treating that night,

we were warned about the house on the end of the street.

I think that might of been his favorite Halloween.

black craft frame

Deflecto Craft Frame, Black Border, 8.5 x 11 Inches (69775CR)

My “Welcome Trick or Treaters” sign was made using a large frame from Deflecto Craft Solutions

and computer graphics.

The bat and pumpkin chipboard was old K & Company embellishments.

deflecto logo

"This is a sponsored post. As a member of the Deflecto Design Team I have been 
provided product in exchange for my creative ideas, views and opinions."

Shoot for your Goals

Shoot for your Goals 9260

This is one of my favorite Soccer pictures of Nicholas taken by his daddy last Spring.

Today was a big day for Nicholas…

First Day of Pre-School

First Day in a new Dance Class and…

First Soccer Game of the Fall Season.

He’s one pretty busy boy.


I made my Soccer Frame for my Deflecto Design Team Project using:


Deflecto Beveled Frame, Metal Knobs, 5 x 7 Inches (799593CR)*

game on

Kaisercraft’s Game On Collection P1496 First Place

*Disclosure:  I am a Amazon Affiliate.


“This is a sponsored post. As a member of the Deflecto Design Team I have been provided product in exchange for my creative ideas, views and opinions.”