Merry Little Sticky Note Holder

Need a inexpensive gift idea to give a teacher or co-worker?

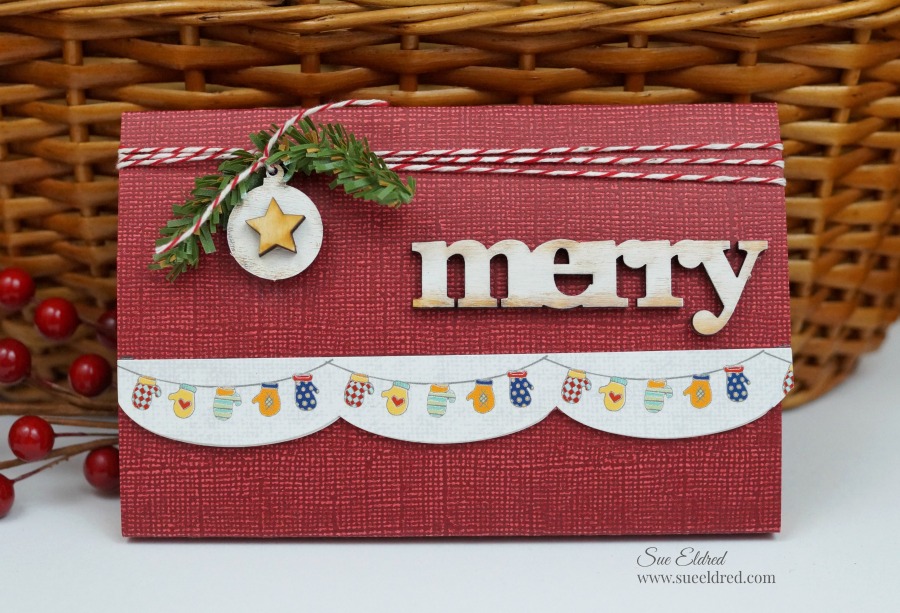
The Merry Little Sticky Note Holder is a quick and easy project that you can make

in just minutes.

How to make a Merry Little Sticky Note Holder

Supplies Needed:                 (*affiliate link)

*Disclaimer:  This post uses ads and affiliate links.  If you choose to make a purchase using one of the links, I receive a small commission (at no additional cost to you) that helps offset the costs of maintaining this blog.  Thanks for your support!

Directions:

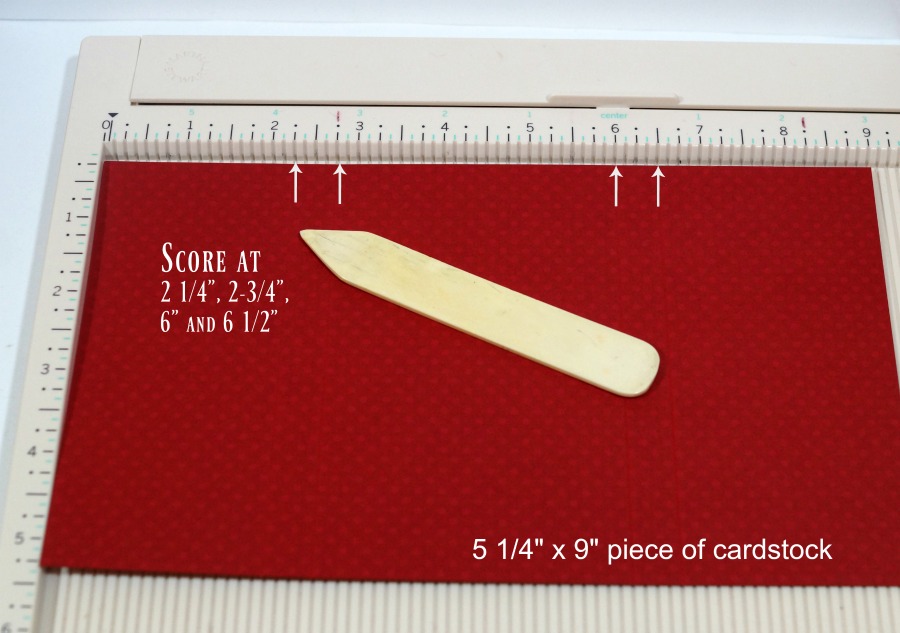
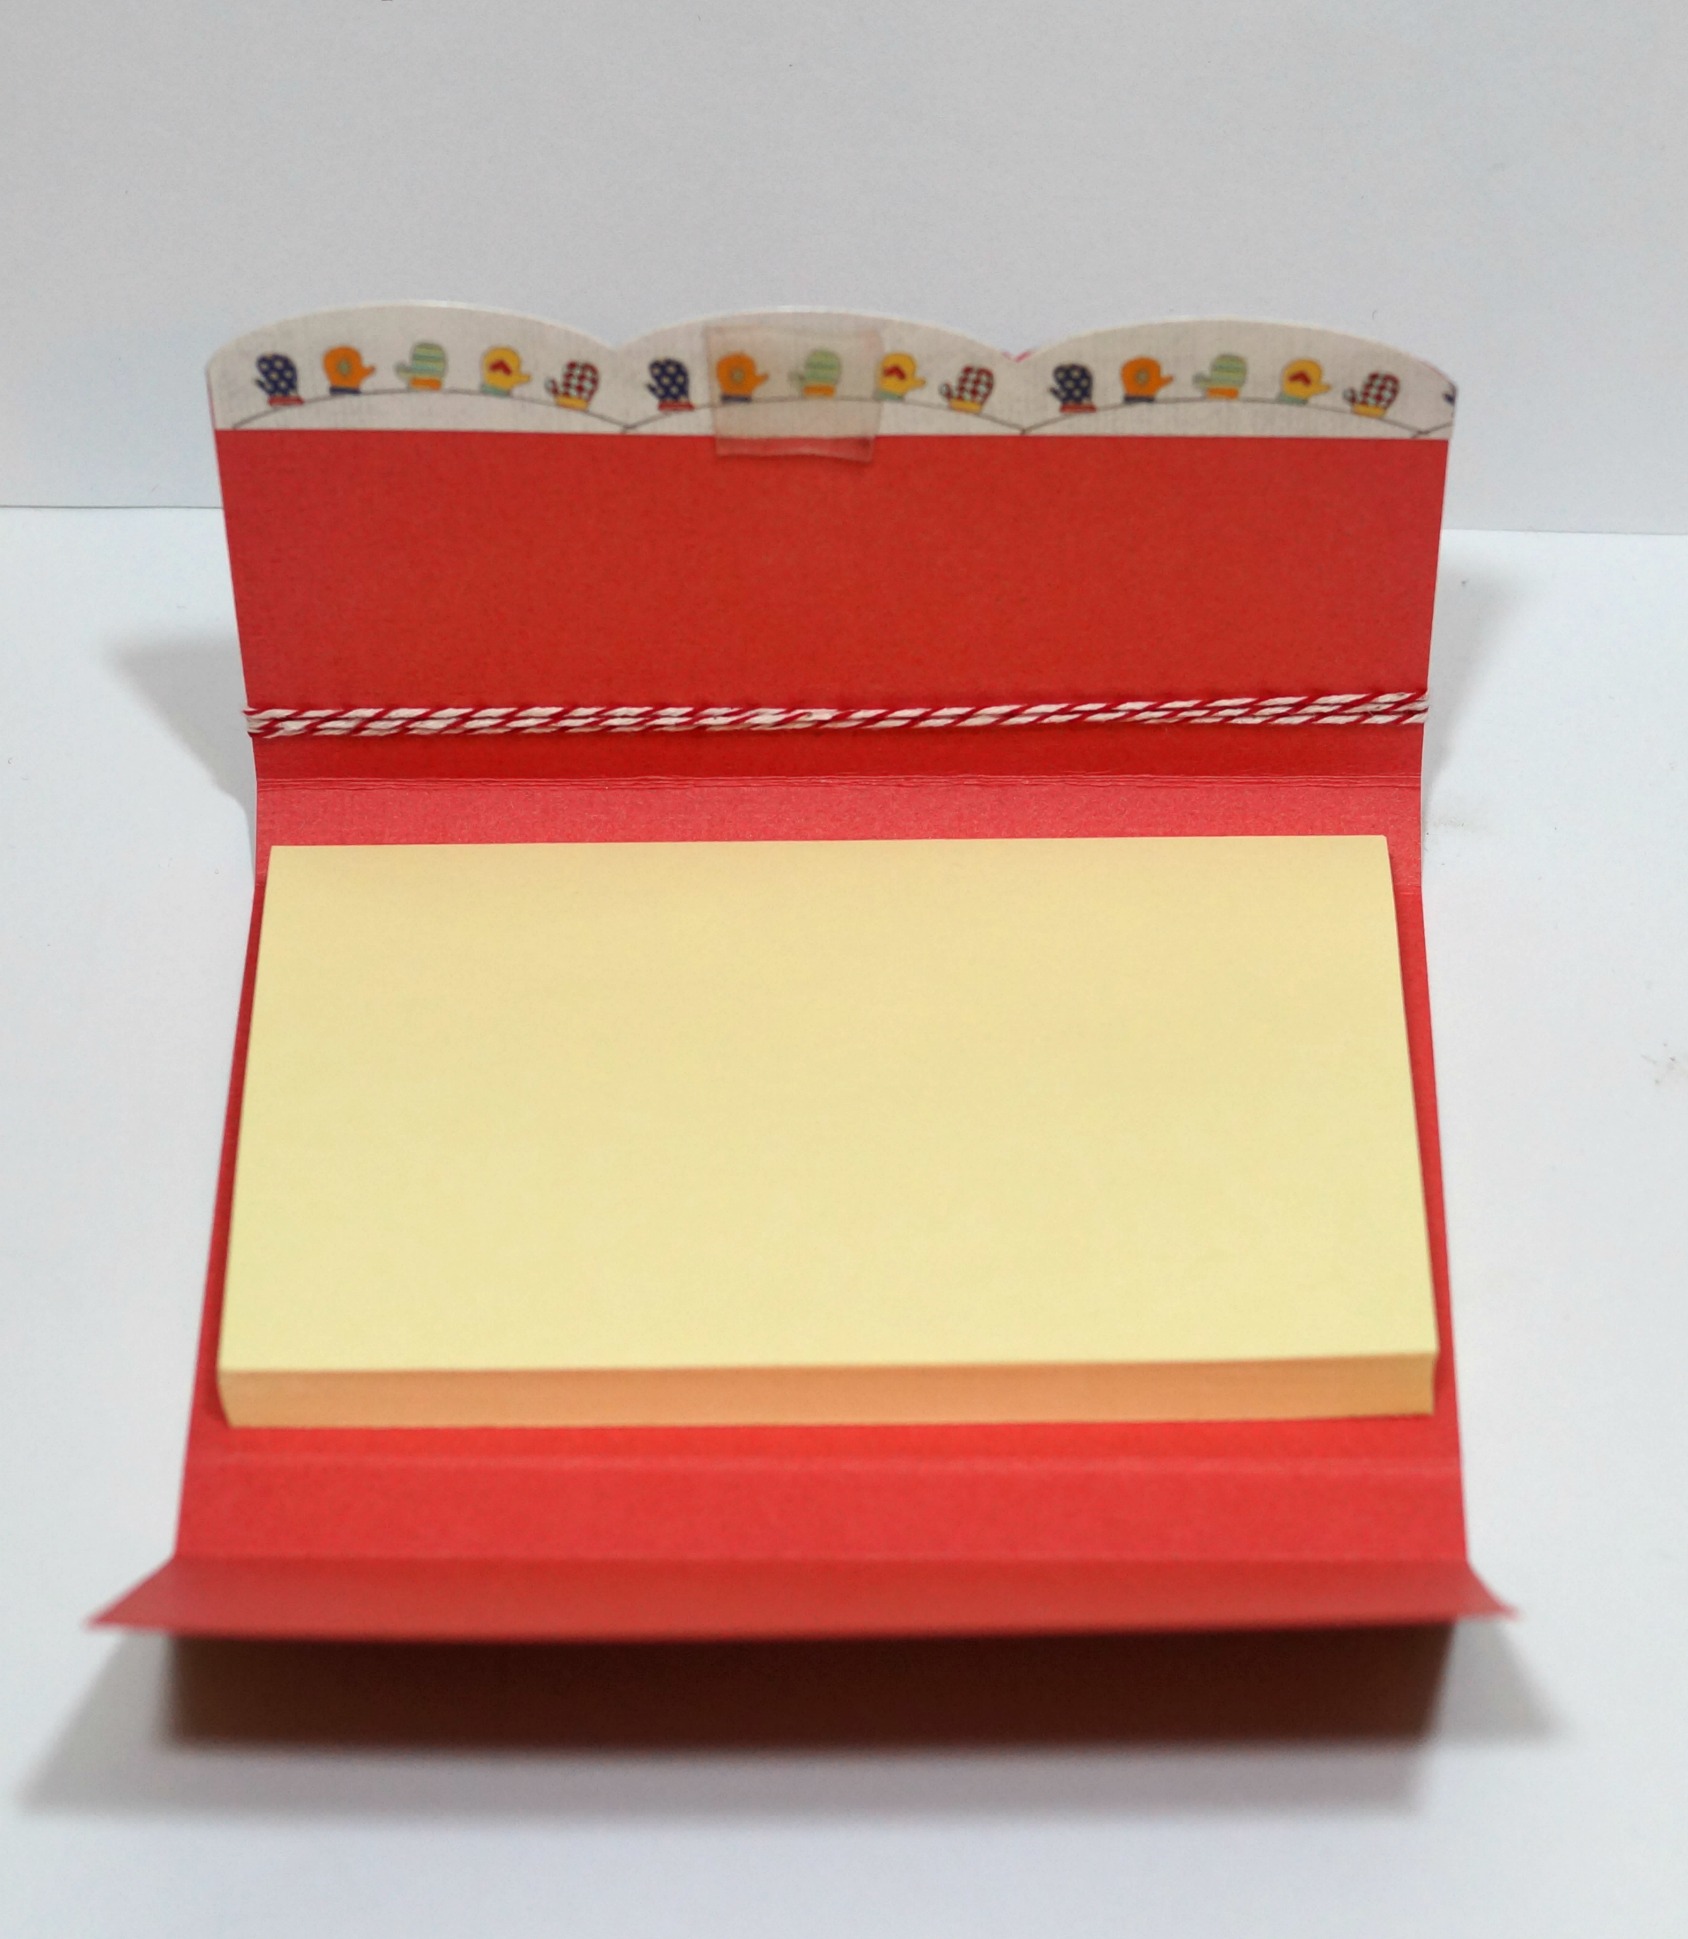
  1. Score a 5 ¼” x 9” piece of cardstock at the 2 ¼”, 2 ¾”, 6” and 6 ½” mark.
  2. Fold along scored lines.
  3. Make a ½” guide line on end of the scored cardstock for applying sticker border. Apply a small border on the guide line. Add a second border to the back of the first.
  4. Paint “merry” and “small ornament” from wood cut outs with white acrylic paint.
  5. Wrap red and white twine around top flap and tie ornament and greenery. Glue merry onto front flap.
  6. Add restickable mini tab to the inside of the flap and add sticky notes.

You can purchase the Warm My Heart Sticker Sheet and Christmas Wood Shapes from Adornit.com.

Shop Amazon Scrapbooking Supplies*

A Very Merry Christmas Frame

Everyone in my family thinks of me whenever they see red buffalo plaid…

I’m not sure why?

But seriously… what’s not to love?

To make my Very Merry Christmas Frame…

I picked up a few sheets of the Simple Stories Very Merry line of scrapbook paper

from my local Scrapbook Store.   Along with a few embellishments and a

Deflecto Clear Frame, 8″ x 10″ (597901CR)*     (*affiliate link)

I made a cute and simple Very Merry Christmas frame.

If I decide to change the look next year, I have a great start to an awesome scrapbook layout.

“This is a sponsored post. As a member of the Deflecto Design Team I have been provided product in exchange for my creative ideas, views and opinions.”

Shop Amazon Scrapbooking Supplies*

*Disclaimer:  This post uses ads and affiliate links.  If you choose to make a purchase using one of the links, I receive a small commission (at no additional cost to you) that helps offset the costs of maintaining this blog.  Thanks for your support!

Grateful for Fall Frame

Grateful for Fall Frame.

When the days and nights start to get a little cooler… I start looking for simple ways to bring

Fall into my home.  One simple way is by adding beautiful graphics found on scrapbook paper

and adding it into a frame.

I made my “Grateful for Fall” frame using the Deflecto 5″ x 7″ Beveled Edge Acrylic Frame* 

and beautiful fall paper from Authentique Bountiful Collection*.  (*affiliate link)

After cutting and matting the fall graphics from the Authentique Bountiful Collection*,

I added resin acorns to the metal knobs with Zots Adhesive Dots*.

Simple Fall Decorating.  (and a simple reminder to be grateful)

“This is a sponsored post. As a member of the Deflecto Design Team I have been provided product in exchange for my creative ideas, views and opinions.”

Zots Adhesive Dots

*Disclaimer:  This post uses ads and affiliate links.  If you choose to make a purchase using one of the links, I receive a small commission (at no additional cost to you) that helps offset the costs of maintaining this blog.  Thanks for your support!

Try Amazon Prime 30-Day Free Trial

Little League Champs

Watching Little League Baseball games are fun…

When they move up from tee ball to coach pitch, it’s a really big jump.

They go from playing in the dirt to actually making some good plays.

Watching the growth from the first games to the last is amazing.

This adorable group of 6 year olds made it all the way to the final championship.

And won 1st place.  I couldn’t be  prouder.

(FYI…My layout was made using paper and stickers from Paper House Productions.)

Shop Amazon Scrapbooking Supplies*

Disclaimer:  This blog uses ads and affiliate links.  If you choose to make a purchase using one of the links, I receive a small commission (at no additional cost to you) that helps offset the costs of maintaining this blog.  Thanks for your support!

For summer fun…click on Slimer ad below

Slimer

Architextures Vintage Market Collage

Vintage Market Collage

I had so much fun playing around with the 7 Gypsies Architext Paper Pad*

It’s my new favorite.  It reminds me of going to the Flea Market with my daughter.

So much Vintage Goodness.

The project was basically put together with paper, glue and chipboard.

To begin…I glued the background paper to a thick piece of chipboard for stability.

I can easily add it to an 8″ x 8″  frame later if I want too.

I added several layers of chipboard on the back of each of the images to give dimension.

I also aged each piece by rubbing Vintage Photo Distress Ink* to the edges using a

Ink Blending Tool*.    (*amazon affiliate link)

My favorite piece is the vintage crate.  I added the second layer of chipboard with three small

strips, so that I could leave an opening on the top to add dried flowers from last years garden.

So realistic, it looks like a teeny tiny crate.  I just love it.


                  7 Gypsies Architextures Paper Pad

The Architextures™ Paper Collection was inspired by the all the wonder of found objects, displays, signs, sayings, artwork, creative bliss and sheer beauty found at vintage fairs, flea markets, salvage yards, barn sales, antique shops, old book stores, garage sales, market days and more.

Such a fun collection.  Makes me want to go treasure hunting.

Notice the 7 Gypsies Mini Library Drawer* in the background of the picture?    (so stinkin cute)

The Vintage Market Collage was sponsored by Canvas Corp Brands.

Shop Your Fav Brands at Scrapbook.com

Disclaimer:  This blog uses ads and affiliate links.  If you choose to make a purchase using one of the links, I receive a small commission (at no additional cost to you) that helps offset the costs of maintaining this blog.  Thanks for your support!


The new guy in my life…

There’s a new guy in my life and I’m in love.

Meet the newest member of our family, my sweet little grandson Emerson.

Emerson is my third grandchild, my third grandson and the littlest brother.

He has already stolen all of our hearts.

I’m so excited to have a new love in my life.

For Emerson’s layout, I used the Lullaby Collection from Pebbles Inc.

    • I created a lacey border for the photo using the Spellbinders Captivating Squares Die Templates* and cutting and piecing six squares together.
    • I wanted some small floral accents for my layouts so I fussy cut small flowers from the floral scrapbook paper.  I used thin 3D foam mounting squares on a few of the flowers.

Disclaimer:  This post uses affiliate links.  If you choose to make a purchase, I will receive a small commission that helps offset the cost of running this blog.  Thanks for your support!

Shop Amazon – Create an Amazon Baby Registry

Discover USA Mini Album

roadtripsuitcase

No matter what part of the country you visit, Paper House Production’s

New Discover USA collection has you covered.  I used this new collection along with

Eileen Hull’s adorable suitcase die from Sizzix, for a cute little make and take project

in the Paper House Productions booth at Creativation.

destinations-suitcase-back-sues-creative-workshop

It’s a fun project that could be used with Vacation Memorabilia or even as a going away present for someone getting ready to retire and travel the good ole’ USA.

Products Used:            (*affiliate link)

*This post uses Affiliate links.  If you choose to make a purchase from using one of the links, I will receive a small commission that helps offset the cost of running this blog.  Thanks!

 destinations-suitcase-inside-sues-creative-workshop-3115
Directions: 
  1. Cut a 6″ x 12″ piece of  P-2123 “woodgrain” scrapbook paper.
  2. Run the paper woodgrain side up through the Xyron Creative Station using permanent adhesive.
  3. Adhere paper onto the mat board.
  4. Die-cut covered mat board using the suitcase die and Big Shot Machine.
  5. Fold each piece along score lines.
  6. The larger of the four pieces is the suitcase body.  Using extreme double sided tape, adhere and secure the four corner pieces.
  7. The next largest piece is the lid.  Apply extreme double sided tape to the flap.  Place the lid over the opening of the suitcase body and slide into position.  Adhere the flap.
  8. Attach the closure flap at the top of the lid using extreme tape.  Leave approximately twice the thickness of the mat board used between the hinge of the flap and the top edge of the lid.  The lightly folded tab will press against the inside of the suitcase to keep it closed.
  9. Attach the handle and embellish with the 3D stickers.destinations-mini-album-inside-sues-creative-workshop
  10. Cut a piece of brown cardstock 3 3/4″ x 11″.  Using a score board and the scoring tool, score the cardstock lengthwise 2 3/4″, 5 1/2″ and 8 1/4″.  Fold along score lines to create a mini accordion book.
  11. Choose one of the Discover USA tag 12″ double sided scrapbook paper.  Cut tags just slightly smaller than 2 3/4″ x 3 3/4″
  12. Adhere tags onto the mini book using the tape runner and embellish with 3 D stickers.

destinations-suitcase-and-mini-album-sues-creative-workshop

Christmas Photo Shoot

christmas-card-photo-layout-3140

On a unseasonably warm day in early November…

when my daughter was home visiting,

I made the family sit down for our first ever Christmas Card Photo Shoot.

I had all the props and seating planned out.  It was going to be fun.

With some being less than enthusiastic, this is what I had to deal with…

because of the warmth, my husband would not change into long pants,

my oldest forgot that we were going to be doing this, so he too had on shorts.

Once captured, my youngest grandson would not be in the picture without the

Target Toy Ad and my youngest son insisted on wearing his bandana.

Maybe next year, I’ll go back to making homemade cards. (sounds easier)

Merry Christmas from my family to yours.

christmas-card-photo-layout-close-up-3157


My “Christmas Card Photo Shoot” layout was created with papers and stickers

from Paper House Productions.

The Christmas Card Photo Shoot Layout was created for and sponsored by Paper House Productions.

Sue’s Family Flip Album Video

As soon as I received this new flip book from Paper House I fell in love.

This interactive album has plenty of room for photos, and lots of places to write

down memories, plus it has special pockets for keepsakes.

Since mere pictures wouldn’t show you how fun this album is…

I decided to make a short video.

I actually spent more time editing and uploading the pictures to be printed than it took me to put this

album together.  I decided to keep my album simple with just a few stickers.

I’ll go back later and add some journaling.

But…with the extra large spine, you’ll be able to get carried away embellishing. (if you’d like)


The album I used in the video is…

Paper House Productions FB-0004E Flipbook Interactive Album, Wedding Day*

Since the pages of the album are neutral they worked perfect for my family pictures.

To embellish my album I used the Wedding Day 12″ Cardstock stickers.


*This project was created for and sponsored by Paper House Productions.

This post uses Amazon Affiliate links.  If you would choose to purchase an item from Amazon

using this link I will receive a small commission that helps offsets the costs of running this blog.


Sometimes all you need to do is IMPROVISE

playing-in-the-pine-needles-layout-sues-creative-workshop-2266

When the boys came over to visit the other day, Nick had it in his mind that he was going to

rake a huge pile of leaves to play in.  Since the maple tree in the front yard had yet to drop it’s leaves

I suggested he rake up the Pine Needles.  (I figured a win-win for both of us)

playing-in-the-pine-needles-sues-creative-workshop1872

They raked, they threw, they had a really good time.  They IMPROVISED!

and…there were pine needles everywhere.

I love this picture of the boys.  So much fun.

paper-house-fall-blog-hop

This week the Paper House Design Team is having a Fall Blog Hop with a chance to win a fun prize.

Make sure to stop by the Paper House Blog to join in the fun.

fall-blog-hop-banner

My “Playing in the Pine Needles” layout was created for and sponsored by Paper House Productions.

The paper and stickers used in the layout were from the Autumn Woods Collection.