Eileen Hull & Sizzix New Chapter 3 Release Party

Eileen Hull & Sizzix New Chapter 3 Release Dies

Join me and the Eileen Hull teams in sharing the

New Release Chapter 3 Dies from Sizzix and Eileen Hull.

This is a fun new collection that I think you will enjoy.

And the samples from the entire team are phenomenal.

New Chapter 3 Dies from Sizzix and Eileen Hull

First off is my vintage style Treasure Box.  

I used the Slotted Treat Box Die* to make my Treasure Box. I adapted the box by adding a 1″ strip of matboard* around the existing box lid. The extra strips allowed the box to have a lip that fits over the edge of the box.

*Disclosure:  This blog uses ads and affiliate links.  If you choose to make a purchase using one of the links, I receive a small commission (at no additional cost to you) that helps offset the costs of maintaining this blog.  Thanks for your support!

New Chapter 3 Dies from Sizzix and Eileen Hull

The Bigz Plus Slotted Treat Box Die* measures 6 1/2” x 5” x 3 1/2” and can hold so many things- a set of cards, journals, doll clothes, ephemera storage or you can even use it as a gift box! This is a Scoreboards die which is specially designed to cut and score thick material like matboard, chipboard, leather, felt, fabric and metal. *A 9” wide machine is required to cut this die.

Eileen Hull Educator Logo

Disclosure:  This is a sponsored post.  As a member of the Eileen Hull Educator Team, I have been provided product in exchange for my creative ideas.  The view and opinions are my own. 

New Chapter 3 Dies from Sizzix and Eileen Hull

I rarely make masculine cards.  They’re a little bit of a challenge for me.  I loved using the key’s embossing folder for this card.  The key details are perfect.  I made them pop by adding Luster Wax over the raised design.  I used a combination of Ivory and Charcoal Luster Wax.

When we finished cleaning out my dad’s house, I came home with a huge ring of old keys.  I guess I’m not the only one.  Eileen shared that the Keys 3D Embossing Folder* is special to her because they all came from her dad’s house.

New Chapter 3 Dies from Sizzix and Eileen Hull

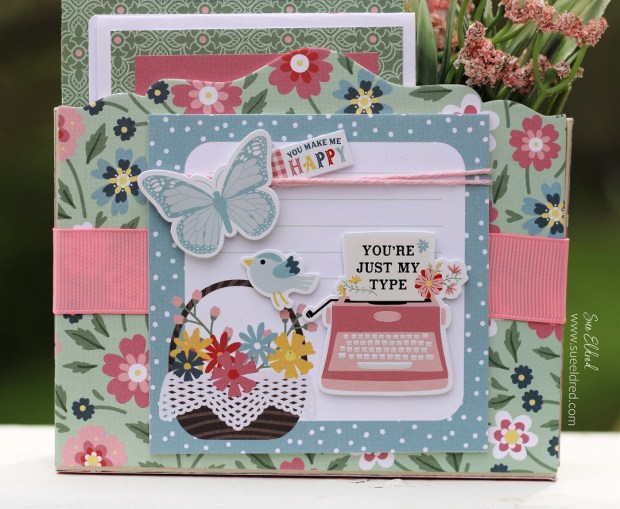
The Floral Album was made using Eileen’s New Field Notes and Specimen Card Die* and paper from 49 and Market’s Rouge Collection*.  The spine was covered using some of my hoarded faux leather paper.

The Field Notes and Specimen Card Die* is a Bigz XL die that holds 5” x 7” pages or photos- a new orientation! The Specimen Card may be used to hold photos, as a journaling card or a shaker. Holes are pre-cut into the book spine which is adjustable from 1/2” to 1 1/2 in width. *XL Cutting Pads will be needed to cut the book cover.

New Chapter 3 Dies from Sizzix and Eileen Hull

I used the Specimen Card from Eileen’s Field Notes Journal* along with the Sizzix Thinlets Envelope, Folder & Flowers Die Set* to create the embellishment on the inside front pocket of the album.  The inside pages of the album were decorated using Rub-Ons Transfers from the 49 and Market Rouge Collection*.

New Chapter 3 Dies from Sizzix and Eileen Hull

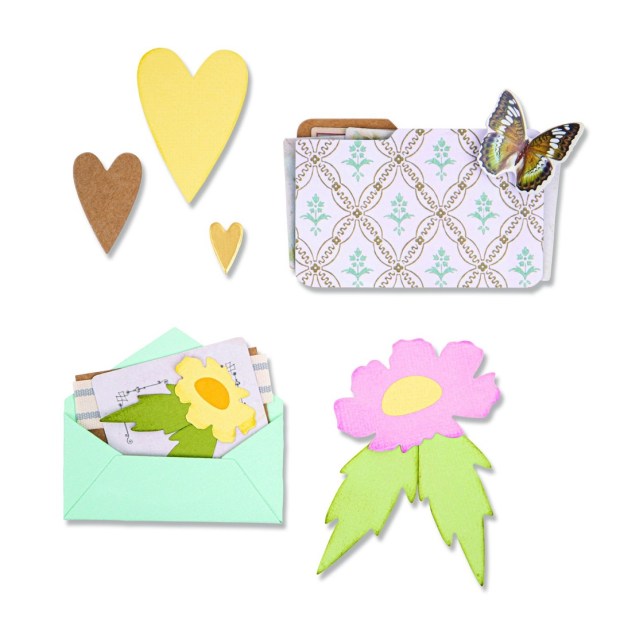
The Sizzix Thinlets Envelope, Folder & Flowers Die Set* is made up of nine dies- an adorable mini envelope, file folder, set of small, medium and large hearts, and a large and small flower and leaf set. This die set will be perfect to create ephemera using your scraps!

New Chapter 3 Dies from Sizzix and Eileen Hull

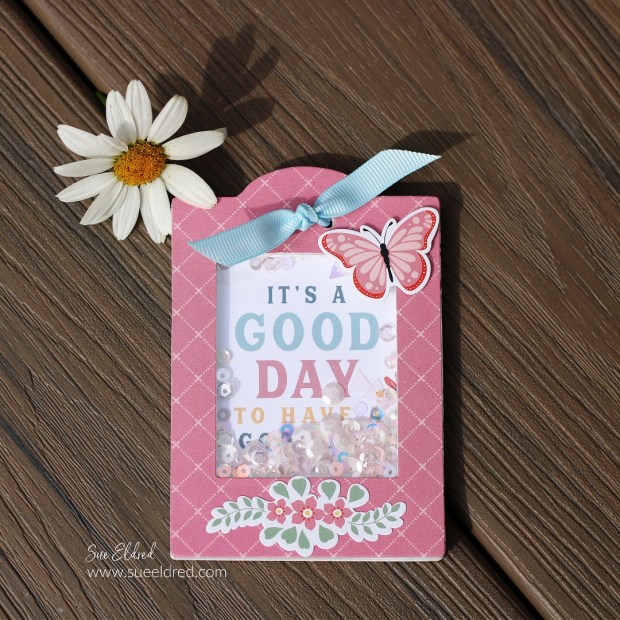
It’s a Good Day to Have a Good Day!

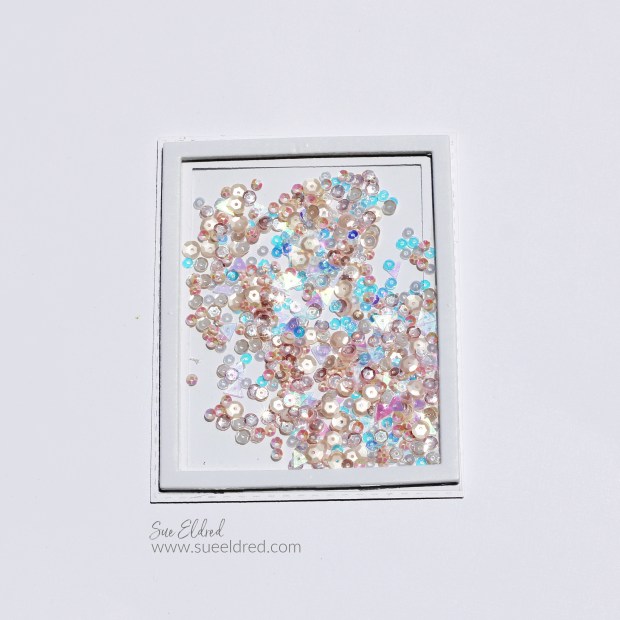
The Shaker Tag was made using Specimen Card from Eileen’s Field Notes Journal* foam strips, sequins, and paper from Echo Park’s Life is Beautiful Collection Kit*.

New Chapter 3 Dies from Sizzix and Eileen Hull

This a Sneak Peak of just a few of the amazing projects that the team has made.  

For more information click on the picture below.  ↓

New Chapter 3 Dies from Sizzix and Eileen Hull

Join us for our Chapter 3 Release Party on Tuesday, July 11 at 12:00 pm ET!

It will be streamed on Eileen Hull Designs on Facebook and Eileen’s YouTube channel. Meet the team and see their fantastic makes using these dies and make sure to follow our blog hop. We have prizes! Just comment in the Release Party chat and let us know which is your new favorite die or folder and what you would make with it and be eligible to win something from this collection!

Here’s the list of participating designers:

Jennie Atkinson
Sarah Lizzie
Lisa Hoel
Jenny Marples
Maggi Harding
Karen Bearse
Elizabeth Robinson
Susie Bentz
Teresita Arvelo
Cheryl Bodkin-Waters
Tonya Trantham
Sue Eldred  (that’s me)

Shimmer & Shake Birthday Card

Shimmer & Shake Birthday Card

How to make a Sparkly, Shimmery Shaker Birthday Card.

Shimmer & Shake Birthday Card

One of the great things about being a cardmaker is making fun cards

for special people. I made a quick and easy card for my cousin’s birthday

over the weekend and forgot to take any process shots.

So, I decided to make another one, slightly different.

Making Sparkly Shimmery Cards are fun to make.

Taking photographs of those kind of cards are not.

To give the cards the extra sparkle and shine, I used StyletechCraft’s Chrome Vinyls.

Shimmer & Shake Birthday Card

Materials Used:  (*affiliate links)

StyletechCraft products brought to you by ATSM Craft*

*Disclosure:  This blog uses ads and affiliate links.  If you choose to make a purchase using one of the links, I receive a small commission (at no additional cost to you) that helps offset the costs of maintaining this blog.  Thanks for your support!

Shimmer & Shake Birthday Card

Directions:

  • Usually, when I’m working with vinyl, I use it as a sticker. This time I wanted to use the vinyl to make a dimensional piece. Before die-cutting, I placed the vinyl onto the cardstock.  
  • Die-cut the words Happy Birthday using Pink Chrome Adhesive Vinyl*.
  • Die-cut the birthday background using Silver Chrome Adhesive Vinyl*.  
  • Cut the Small 3D Foam Squares* in half and place them onto the back of the letters. Use tweezers to add each of the letters to the background.

Shimmer & Shake Birthday Card

  • Die-cut a frame using white cardstock.
  • Cut a piece of clear acetate slightly smaller than the frame.
  • Use a double tape roller to add adhesive around the frame.
  • Remove the protective film from the acetate and place it inside the frame.
  • Place double-sided adhesive strips over the acetate.
  • Cut a piece of Holographic Mist Chrome Adhesive Vinyl* slightly smaller than the frame.

Shimmer & Shake Birthday Card

Shimmer & Shake Birthday Card

  • Add 3D foam squares to the back of the die-cut background.
  • Place “Happy Birthday” onto the front of the frame.
  • Adhere the frame layers on a white card.
  • Add a simple white sheer bow to finish the card.

Shimmer & Shake Birthday Card

I love how the Holographic Vinyl sparkles and changes color in the sun.

Shimmer & Shake Birthday Card-Sue's Creative Workshop www.sueeldred.com 1457

The perfect card for anyone who loves a little sparkle and shine.

$1.50 Thrift Store Chair Make Over

$1.50 Thrift Store Chair Make Over

I can’t seem to pass up a good bargain thrift store chair.

I found this one last year when visiting my daughter in Wisconsin.

My daughter loves thrifting even more than me,

so, whenever we’re together, we like to check out her favorite Thrift Store.

This particular store always seems to have great bargains,

especially on furniture.

$1.50 Thrift Store Chair Make Over

I wasn’t necessarily looking for another chair,

but when I saw the $1.50 price tag,

I immediately did the “sit and wiggle” test.

The chair was smaller in size but sturdy. (just like me)

There were four chairs in all, so I picked the best one.

In retrospect, I should have taken them all.

I may have if I didn’t have to travel so far with them.

Bargain Thrift Store Chair Make Over

The chair covering was an ugly, dingy green fabric.

The wood was also grimy from years of use.

After removing the seat from the chair,

I gave the wood a light cleaning using Murphy’s Oil Soap*

and a soft rag.

I was careful not to remove all the great old worn patina.

Spring Baking Cups

*Disclosure:  This blog uses ads and affiliate links.  If you choose to make a purchase using one of the links, I receive a small commission (at no additional cost to you) that helps offset the costs of maintaining this blog.  Thanks for your support!

$1.50 Thrift Store Chair Make Over

After removing all the tack nails used to hold down the

fabric, I found this neat, brown patterned vinyl.

$1.50 Thrift Store Chair Make Over

After scrubbing the vinyl clean, I seriously contemplated

stopping at this point. The pattern wasn’t that bad.

But to match it with the other dining room chairs I was recovering,

I decided to go with the plain brown vinyl instead.

I purchased the brown vinyl with a 50% off coupon

at JoAnn Fabrics and foam on sale for 40% off.

It cost me under $5.00 for materials.

$1.50 Thrift Store Chair Make Over

If you were wondering…

I left the old vinyl underneath the new vinyl in case I ever change my mind.

I quickly covered it with the new vinyl using a

Staple Gun and Metal Staples*.

I love finding a little history when redoing a piece.

Underneath the chair in old handwriting, it says… “South end of the table.”

Makes you wonder why that bit of information was important.

$1.50 Thrift Store Chair Make Over

The chair currently sits next to the fireplace in the dining room.

It’s petite and easy to pull up when extra seating is needed.

Not a bad investment.

Amazon prime

Amazon Prime Days are July 11-12th.

Simple DIY Patio Side Table from Scraps

Simple DIY Patio Side Table from Scraps

How to make a Simple DIY Patio Side Table from Scraps.

I love a simple, easy, and inexpensive DIY project.

Add in a little recycling, and that makes me super happy.

Simple DIY Patio Side Table from Scraps

We recently had a new deck built using composite decking materials.

When I saw the leftover scraps, I asked them to save a few larger pieces

of the thick wood and composite fascia boards.

(FYI…Fascia boards are the large boards that go around the outside of the deck.)

I knew they would be perfect for a small bench or side table.

Simple DIY Patio Side Table from Scraps

The fascia board was the same width as the wood board.

So, I used the wood board scrap as it came.

I asked my husband to cut the fascia board the same length as the wood board.

Simple DIY Patio Side Table from Scraps

I stained the wood board using Varathane’s Carbon Grey Stain*

that I had left over from a previous project.

The wood is pretreated. So, I didn’t use a sealer on the wood.

I can always go back and do that later.

We screwed the composite fascia board onto the wood board using decking screws.

*Disclosure:  This blog uses ads and affiliate links.  If you choose to make a purchase using one of the links, I receive a small commission (at no additional cost to you) that helps offset the costs of maintaining this blog.  Thanks for your support!

Simple DIY Patio Side Table from Scraps

I went to a couple of yard sales searching for table legs that I could use,

I wanted it to be a complete recycling project.

After no luck, I purchased these black hairpin legs from Amazon*.

I love how they look, and they go perfectly with the black railing on my new deck.

Simple DIY Patio Side Table from Scraps

After marking and measuring the placement of the legs,

we predrilled the screw holes before screwing them onto the wood.

Simple DIY Patio Side Table from Scraps

The table went together in a few minutes.

I love using scraps to make something useful.

Simple DIY Patio Side Table from Scraps

This table is the perfect side table between a couple of chairs.

A great place to set a drink down.

It’s also sturdy enough to be used as a small bench for one.

Simple DIY Patio Side Table from Scraps

Even after spending $20 on the legs,

I still have a very inexpensive custom table.

As my daughter-in-law reminded me,

“you can easily spend $20 or more for a small patio table”.

Simple DIY Patio Side Table from Scraps

FYI…I found my Solar Lantern at Homegoods, but you can

easily find other great Solar Lanterns on Amazon*.

Amazon prime

Amazon Prime Days are July 11-12th.

Summer Fun with Sun Changing Vinyl

Summer Fun with StyleTechCraft Sun Changing Vinyl

Looking for a fun activity to create with the kids?

Create Cups that change with the sun.

Summer Fun with StyleTechCraft Sun Changing Vinyl

I used Sun Changing Vinyl from StyleTechCraft* and my

Silhouette Cameo Electronic Die Cutting Machine*

to create fun shape stickers for the kids to decorate the cups.

The Sun-Changing Vinyl* is available in four fun colors.

StyletechCraft products brought to you by ATSM Craft*

*Disclosure:  This blog uses ads and affiliate links.  If you choose to make a purchase using one of the links, I receive a small commission (at no additional cost to you) that helps offset the costs of maintaining this blog.  Thanks for your support!

Summer Fun with StyleTechCraft Sun Changing Vinyl

Fun kiddie cocktails are great when all the grown-ups are sitting

around the pool drinking adult beverages.

For the kids, I bought drink cups, stir sticks, plates, pretzels, and

cute little light-up flamingoes*, and pineapples* at Dollar Tree*.

It makes a day at the pool feel like a party.

Shop Summer Essentials starting at $1.25 at Dollar Tree!

Summer Fun with StyleTechCraft Sun Changing Vinyl

For smaller letters, we used StyleTechCraft Vinyl Transfer Tape* to add the vinyl to the cup.

Summer Fun with StyleTechCraft Sun Changing Vinyl

The bigger stickers they can just peel and stick.

Summer Fun with StyleTechCraft Sun Changing Vinyl

Here’s a bad photo of the cup before we took it outside.

I wanted to show you how it looked before it changed with the sun’s UV rays.

The vinyl all looks pretty much the same.

Summer Fun with StyleTechCraft Sun Changing Vinyl

The Kids LOVE the Color Changing Cups!

Great for drinks around the pool.

The Sun Changing Vinyl is perfect for water bottles too.

Summer Fun with StyleTechCraft Sun Changing Vinyl

It’s the perfect way to celebrate Summer Fun.  

And it eliminates the endless summer cups because they can’t remember if it’s their cup or not.

Ready for the Beach with Sun Changing Vinyl

Here’s another fun Color-Changing project I made a couple of years ago.

Click on the link here to view the project and tutorial.

“This is a sponsored post.  As a member of the StyleTechCraft Design Team I have been provided product and compensation in exchange for my creative ideas.  The views and opinions are my own.

DIY Floral Notepad Holder

DIY Floral Notepad Holder

Create a Handy Floral Notepad Holder using Sizzix Dies by Eileen Hull.

I am a list maker!

I usually have several lists going at one time.

And, if the list gets too messy, I’ll create a new one.

Lists are my way of keeping me organized.

Post-it notes* are another favorite of mine.

This Floral Notepad Holder is a great place to put my Post-it notes.

DIY Floral Notepad Holder

The theme for this month’s Eileen Hull Teams is Die Cut Mania.

The best part about Eileen’s dies is you can mix them with other Eileen dies to create one great project.

Eileen Hull Educator Logo

Disclosure:  This is a sponsored post.  As a member of the Eileen Hull Educator Team, I have been provided product in exchange for my creative ideas.  The view and opinions are my own. 

DIY Floral Notepad Holder using Eileen Hull & Sizzix Dies.

Materials Used:  (*affiliate links)

Directions: 

  • I used a piece of white mat board* as the base to create the pieces for the Notepad Holder. To adhere the paper to the mat board, I like to run the decorative paper through the Xyron Creative Station* to add a complete adhesive to the back. It makes everything lay wonderfully smooth with no peeling up corners.
  • Die Cut the pieces for the stand using the Phone Stand Die* for the base, Frame Pocket Journal Die* for the pocket, and the Journal Die* for the decorative plaque. (as shown in the picture above)

*Disclosure:  This blog uses ads and affiliate links.  If you choose to make a purchase using one of the links, I receive a small commission (at no additional cost to you) that helps offset the costs of maintaining this blog.  Thanks for your support!

DIY Floral Notepad Holder using Eileen Hull & Sizzix Dies.

  • Gently fold the die-cut pieces on their scorelines.
  • Adhere the pieces together using a strong adhesive. My favorite for adhering mat board is Dap Liquid Adhesive*.  All you need to do is hold the glued piece in place for 30 seconds, and it stays secure.

DIY Floral Notepad Holder using Eileen Hull & Sizzix Dies.

  • To add a decorative element to the edge of the center plaque, use the flat end of a gold calligraphy pen* to add a gold edging.  (It may take a little practice to make your lines smooth.)

DIY Floral Notepad Holder using Eileen Hull & Sizzix Dies.

  • Cut the letters “NOTES” for the front of the pocket using the Alpha Numeric Die* and StyleTechCraft Gold Craft Vinyl*.
  • Want a matching gold pen for the notepad holder? Measure the length of the barrel. Cut the vinyl 1 1/4″ wide. Carefully adhere the gold vinyl to the barrel. It adds personality to a simple everyday pen.

DIY Floral Notepad Holder

  •  Place the letters on the back of a small piece of gridded transfer tape* to line them up straight.
  • Place the transfer paper onto the small plaque and rub over the transfer paper to transfer the letters.

StyletechCraft products brought to you by ATSM Craft*

DIY Floral Notepad Holder

  • Add a decorative strip of coordinating paper onto the front of the pocket and adhere the floral plaque using Rapid Fuse Adhesive*.

DIY Floral Notepad Holder

The Floral Notepad Holder looks great on my desk and now I’m even more organized.

Amazon prime

Sizzix 70% Mega Spring Clearance Sale

Sizzix 70% Mega Spring Clearance Sale

You know me, I have to share a good deal when I see one.

Sizzix is having their Spring Mega Sale with up to 70% off dies,

including several of my favorite Eileen Hull Dies.

(Consider it an early Mother’s Day present to yourself.)

*Disclosure:  This blog uses ads and affiliate links.  If you choose to make a purchase using one of the links, I receive a small commission (at no additional cost to you) that helps offset the costs of maintaining this blog.  Thanks for your support!

“If Friends Were Flowers” Shelf Sitter

"If Friends were Flowers" DIY Mason Jar Shelf Sitter

DIY yourself A Happy Little Mason Jar Shelf Sitter.

As Spring turns into Summer, I get inspired to change my decor to happy colors.

I like to open the windows and let in the fresh air.

And…I love to bring in fresh blooms whenever I can.

Flowers make me HAPPY!

"If Friends were Flowers" DIY Mason Jar Shelf Sitter

The Wood Mason Jar Cut-Out…

Sometimes when I see an item at the store, I have a vision of what I want to do.

Sometimes it works out, and other times it does not.

This particular time was the latter.

When I first saw the wood mason jar with flowers cut out,

I saw it stained with only the flowers painted.

So, I stained the wood.

It might have been the stain I used, but I wasn’t pleased with the result.

"If Friends were Flowers" DIY Mason Jar Shelf Sitter

After letting it sit overnight, I decided a little acrylic paint might help.

So, I watered down my paints so they didn’t look too heavy and painted away.

While it isn’t what I originally had planned, it’s not too bad.

It’s bright and cheery.

"If Friends were Flowers" DIY Mason Jar Shelf Sitter

Doesn’t vinyl make everything just a little better?

For extra personality, I added vinyl lettering using my favorite StyletechCraft* adhesive vinyl.

Materials Used:    (*affiliate links)

StyletechCraft products brought to you by ATSM Craft*

*Disclosure:  This blog uses ads and affiliate links.  If you choose to make a purchase using one of the links, I receive a small commission (at no additional cost to you) that helps offset the costs of maintaining this blog.  Thanks for your support!

"If Friends were Flowers" DIY Mason Jar Shelf Sitter

  • I used a Silhouette Cameo Electronic Die Cutting Machine* with the “Monsoon Font” from The Silhouette Store to create the words.
  • Cut the words using StyleTech Craft Glossy Vinyl.
  • After cutting, remove the excess vinyl using a Vinyl Weeding Tool*.
  • Lay the transfer paper over the words.
  • Rub over the transfer paper with a vinyl scraper tool and lift the design from the white paper backing.
  • Lay the transfer paper onto the sign and rub over the design.  Remove the transfer paper.

"If Friends were Flowers" DIY Mason Jar Shelf Sitter

  • To make it a shelf sitter, I glued a small block, “borrowed” from the kid’s block basket, onto the back.
  • I painted the block with matching acrylic paint.

"If Friends were Flowers" DIY Mason Jar Shelf Sitter

Now that it’s finished, I think the shelf sitter would also make a cute Mother’s Day or Teacher’s gift.

So many possibilities.

Spring Tabletop Kit  New Products at Scrapbook.com!

Life is Beautiful Mini Card & Envelope Stationery Caddy

Mini Card and Envelope Stationery Caddy

The Life is Beautiful Mini Card & Envelope Stationery Caddy

is a great gift idea for anyone who loves to send cards.

It would also make a sweet and thoughtful Mother’s Day Gift Idea.

Echo Park's Life is Beautiful Collection Kit.

I used the “Life is Beautiful” Collection Kit from Echo Park*.

I also used a few Eileen Hull dies by Sizzix to make the caddy.

Eileen Hull Educator Logo

Disclosure:  This is a sponsored post.  As a member of the Eileen Hull Educator Team, I have been provided product in exchange for my creative ideas.  The view and opinions are my own. 

Materials Used:    (*affiliate links)

*Disclosure:  This blog uses ads and affiliate links.  If you choose to make a purchase using one of the links, I receive a small commission (at no additional cost to you) that helps offset the costs of maintaining this blog.  Thanks for your support!

Mini Card and Envelope Stationery Caddy

Directions:

  • For the base of the stationery caddy, cut two coordinating 6″ x 10½” pieces of scrapbook paper. (One is for the front, and one is for the inside.)
  • Cut a 6″ x 10½” piece of Sizzix Mat Board*.
  • Place the paper design side up into the Xyron Creative Station*. Crank the handle to run the paper through the machine. As the paper runs through the Xyron Creative Station*, it adds a complete layer of adhesive to the backside of the paper.
  • Adhere the paper onto the front and back of the Mat Board*.

Mini Card and Envelope Stationery Caddy

  • Place the mat board with the outside design face down on the Card Caddy Die*.
  • Sandwich the die between the two cutting places and run the die through the Big Shot Die-Cutting Machine*.
  • Die-cut the two caddy sides using mat board and paper.
  • Gently fold the caddy base along the outer score lines and glue the caddy sides to the caddy base using Rapid Fuse Adhesive*.

Life is Beautiful Mini Card and Envelope Stationery Caddy

Life is Beautiful Journaling Cards by Echo Park

Mini Card and Envelope Stationery Caddy

  • I trimmed and layered the Journaling Cards* onto cardstock to create mini cards to fit into the envelopes.
  • The finished cards are 3¼” x 4¼”.

Life is Beautiful Sticker Sheet from Echo Park

Mini Card and Envelope Stationery Caddy

  • I added a piece of 1″ pink grosgrain ribbon around the middle of the caddy case.
  • I cut apart the Life is Beautiful 4″ x 4″ journal cards* and adhered the “basket card” onto the matboard for sturdiness. I trimmed the matboard to 3½” x 3½” and adhered it to the front of the caddy.
  • I added stickers to the front of the caddy and popped them up with foam squares for added dimension.
  • To complete the caddy, add a fun set of colorful pens and a coordinating faux flower stem.

Purchase scrapbooking supplies from Scrapbook.com!

Upcycling an Old Painted Canvas

Upcycling an Old Painted Canvas

Upcycling an Old Painted Canvas is a satisfying Trash to Treasure Project.

Turn an unused/unwanted canvas into an easy DIY.

Upcycling an Old Painted Canvas

Several years ago, I got the opportunity to try Splatter Painting at a Trade Show.

As fun and exhilarating (and messy) as it was, abstract art is not my style.

While I would never typically do this with a painting,

this just-for-fun painting left me with no guilt.  (splatter painting post here)

I have been using Lang Wall Calendars for years.

And every year, at the end of the year, I have a hard time throwing them away.

I combined the frame under the canvas with the calendar page

for some inexpensive framed art.

Reusing items around the house in new ways is fun for me.

I don’t have to get rid of things I love, and It’s a new way to enjoy them.

And if I change my mind, which I often do, I can always upcycle it again.

It’s super easy to do.

Upcycling an Old Painted Canvas

Here’s what I used:  (*affiliate links)

*Disclosure:  This blog uses ads and affiliate links.  If you choose to make a purchase using one of the links, I receive a small commission (at no additional cost to you) that helps offset the costs of maintaining this blog.  Thanks for your support!

Upcycling an Old Painted Canvas

  • Use a small flat head screwdriver* to remove the staples from the back of the canvas.
  • FYI…Some frames will come with staples in the corner to hold them together instead of glue.
    In that case, you have a decision to make. But because I wasn’t attached to the painting, I had nothing to lose.
  • Give the frame a light sanding with a sanding block*.

Upcycling an Old Painted Canvas

  • Paint or stain the wood to match your decor.
  • Rub the finished frame with a clear wax using a soft, clean rag.

Upcycling an Old Painted Canvas

  • Cut the calendar page a little larger than the inside of the frame.
  • To give the picture more stability and a finished look, I adhered it to a piece of chipboard before gluing it onto the back of the frame.
  • Glue the picture inside the frame using a strong adhesive. I like using Rapid Fuse Adhesive*. It is a quick-setting glue and very strong. It works well with paper.

Upcycling an Old Painted Canvas

I put my “New” framed print on my mantel with a couple of old pots for a fun, fresh Spring look.

Spring Tabletop Kit  New Products at Scrapbook.com!