Bloom with Grace Card

How to Make Soft and Delicate Looking Paper Roses…

Bloom with Grace…A sweet and simple card using the In Full Bloom Stamp & Die Set

from the Maker’s Movement and the Spring Farmhouse paper from Simple Stories.

A great card for feminine Birthdays or Graduations

or anytime you want to send a little encouragement.

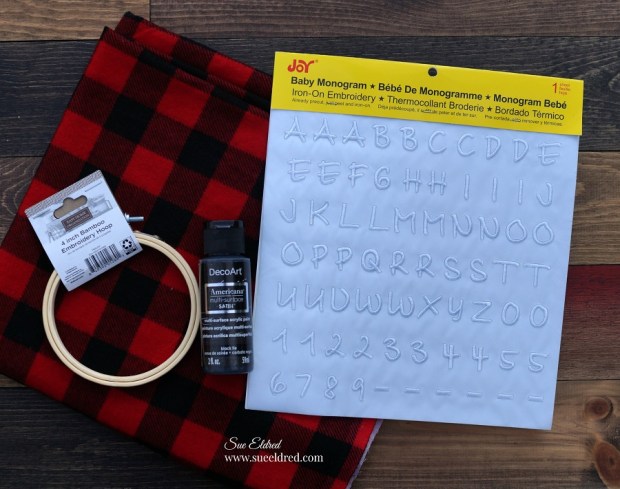
Bloom with Grace Products Used:                                  (*affiliate link)

*Disclosure:  This blog uses ads and affiliate links.  If you choose to make a purchase using one of the links, I receive a small commission (at no additional cost to you) that helps offset the costs of maintaining this blog.  Thanks for your support!

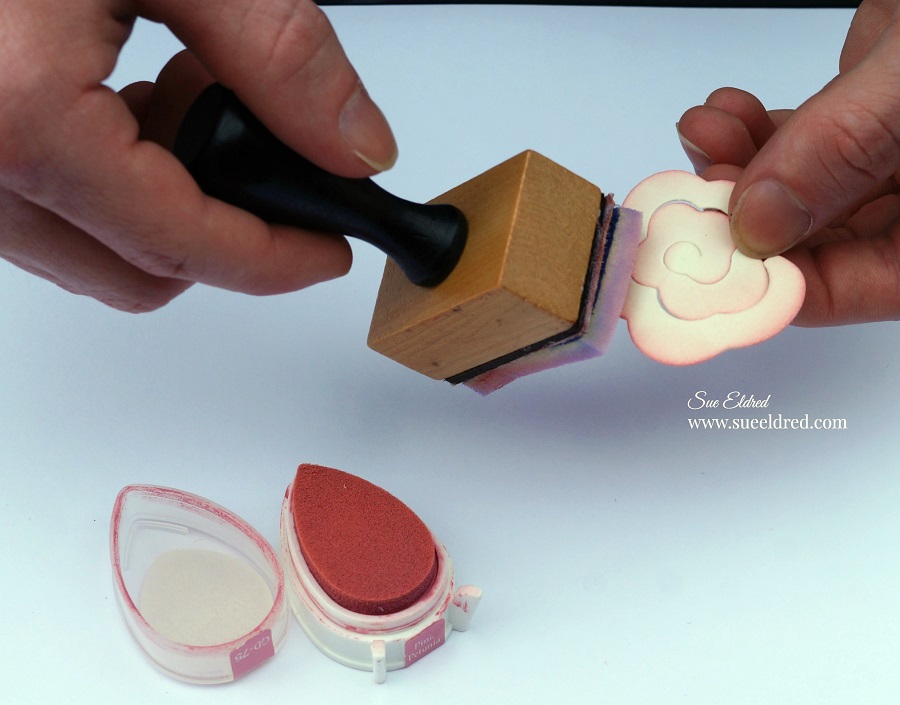
To Create a Soft Realistic Looking Tea Rose…

  • Place the flower cut out on the craft molding mat*.  (approximately the thickness of a computer mouse pad)
  • Using a large ball stylus tool*, press down on the center of the shape until the paper starts to bow.  This helps the paper when you start to manipulate the shape.

  • Start at the outside end of the flower and use the reverse grip tweezers* to start slowly rolling the spiral.

  • When your finished rolling, glue the bottom tab to the rose shape to hold the flower in place.

  • Use the reverse grip tweezers* to grasp the side of the flower and roll it back to form the natural curve of a petal.

It’s really quick and easy to make these delicate looking roses.  

To finish the card…

  • Die-cut a  vase using the Spring Farmhouse scrapbook paper.
  • Assemble a card base using  coordinating decorative scrapbook paper.
  • Glue the small roses over the top of the vase.
  • Add stamped leaves and the die-cut words “bloom” .
  • Finish with a small cream tag with the words “with grace” stamped in green.

Maker's Movement

*FTC Disclosure… “This is a sponsored post.  I have been provided product and compensation in exchange for my creative ideas.  The views and opinions are my own.”

Save

Save

Plaid Tidings Embroidery Hoop Ornament

Plaid Tidings Embroidery Hoop Ornament-Sue's Creative Workshop www.sueeldred.com 6361

How to make a Plaid Tidings Embroidery Hoop Ornament

I guess you might say I’ve gone a little overboard on the Buffalo Plaid this year.

How can I help myself, I just love it all.

I got a little inspired by a Christmas ad I saw for clothes and decided to make this ornament.

It’s another quick and easy Holiday Ornament to make.

A perfect little gift for your Plaid Loving friends like me.

Plaid Tidings Embroidery Hoop Ornament-Sue's Creative Workshop www.sueeldred.com 6340

Supplies Needed:                 (*affiliate link)

Disclosure:  This blog uses affiliate links.  If you choose to make a purchase using one of the links, I receive a small commission (at no additional cost to you) that helps offset the costs of maintaining this blog.  Thanks for your support!

Plaid Tidings Embroidery Hoop Ornament-Sue's Creative Workshop-www.sueeldred.com 6353

Directions:

  • Paint the embroidery hoop with black acrylic paint.
  • Cut a piece of flannel that is larger than the hoop.
  • Arrange the Joy® Baby Monogram Embroidered Iron On Letters shiny side down onto the flannel and inside the hoop to make sure they fit.
  • Set iron to cotton setting, approx. 350° or follow fabric care label.
  • Cover letters with a fine cloth.  With firm pressure iron cloth over the letters for 25 seconds.
  • Turn flannel over and iron the back of the letters for 25 seconds.
  • Allow 1 minute to cool before handling.

Plaid Tidings Embroidery Hoop Ornament-Sue's Creative Workshop www.sueeldred.com 6354

  • Insert the flannel into the embroidery hoop and tighten.
  • Trim the excess flannel from around the embroidery hoop.
  • Glue pine craft stem around the outside edge of the hoop.
  • Embellish the hoop with ribbon and jingle bell.
  • Add a piece of red twine to hang.

You can find a wide selection of Joy® embroidered iron-on letters and alphabet sheets in different sizes at your local craft stores!

“This is a sponsored post.  As a member of the Joy® Design Team I have been provided product and compensation in exchange for my creative ideas.  The views and opinions are my own.

How to make a Plaid Tidings Embroidery Hoop Ornament-Sue's Creative Workshop www.sueeldred.com

Give the Gift of Amazon Prime*

Creating a Summertime Essentials Bag

 With Summer and Vacation time here…

it’s a good idea to make a Safe Travels Essentials Bag to pack in the car.

There are so many things to remember when taking a vacation.

So…whenever we take a road trip I like to pack a few essentials to have handy.

When you have kids you never know what can happen.

For my Safe Travels Bag I used:

  1. If you use a fabric bag… cover with a soft clean cloth and iron on cotton settings for 30 seconds. Turn bag inside out and iron for an additional 30 seconds.
  2. Because I used a leather bag… I glued the letters onto the bag using a craft glue.

There are so many items that you might need to have on hand this summer.

These are just a few:

  • band-aids or first aid kit
  • sunscreen
  • anti itch spray
  • bug spray
  • rain poncho
  • scissors
  • small sewing kit
  • tweezers
  • toilet paper?


“This is a sponsored post.  As a member of the Joy® Design Team I have been provided product and compensation in exchange for my creative ideas.  The views and opinions are my own.

Look for Joy® iron-on embroidered alphabet letter sheets at your local craft store.

Shop Your Fav Brands at Scrapbook.com

*Disclosure:  This blog uses ads and affiliate links.  If you choose to make a purchase using one of the links, I receive a small commission (at no additional cost to you) that helps offset the costs of maintaining this blog.  Thanks for your support!