How to make a Mini Christmas Dollhouse

Mini Christmas Dollhouse-Sue's Creative Workshop www.sueeldred.com 3502

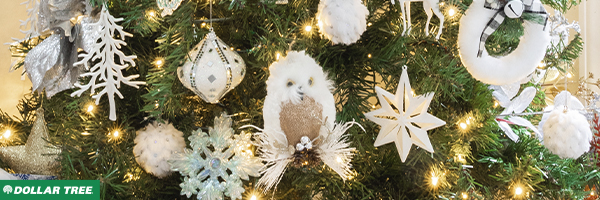
How to make a Miniature Christmas House using a Dollar Tree Dollhouse*.

On Instagram the other day, I saw a reel by Jessica Grant on how to make a

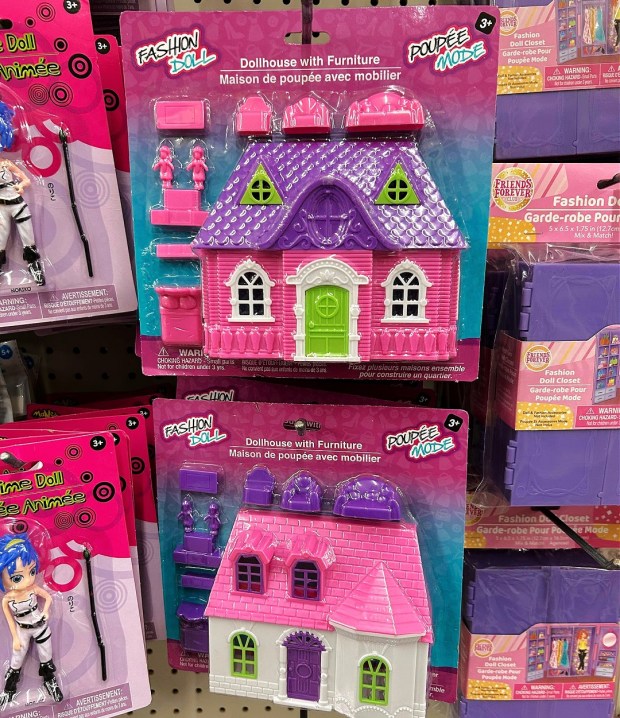
Gingerbread House using a Dollhouse she purchased at Dollar Tree*.

(It was so adorable, you need to check it out.)

*Disclosure:  This blog uses ads and affiliate links.  If you choose to make a purchase using one of the links, I receive a small commission (at no additional cost to you) that helps offset the costs of maintaining this blog.  Thanks for your support!

Dollar Tree Dollhouse

I love miniatures, doll houses, and Christmas.

So, of course, I had to run over the next day and pick up a couple for myself.

There were two different dollhouses* to choose from.  (I bought one of each.)

How to make a Dollar Tree Dollhouse into a Miniature Christmas House.

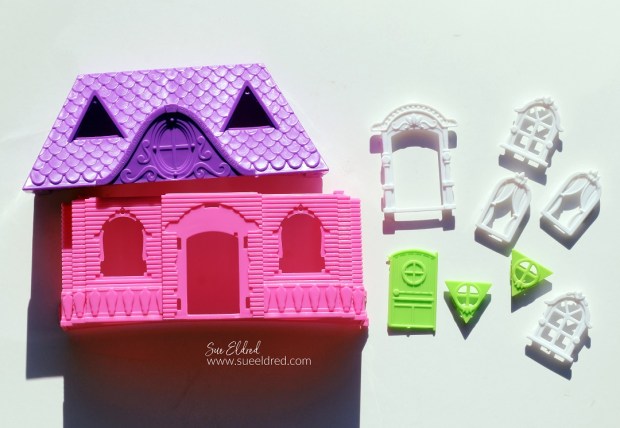
The house was simple to dissasemble, which makes it perfect for painting.

How to make a Dollar Tree Dollhouse into a Miniature Christmas House.

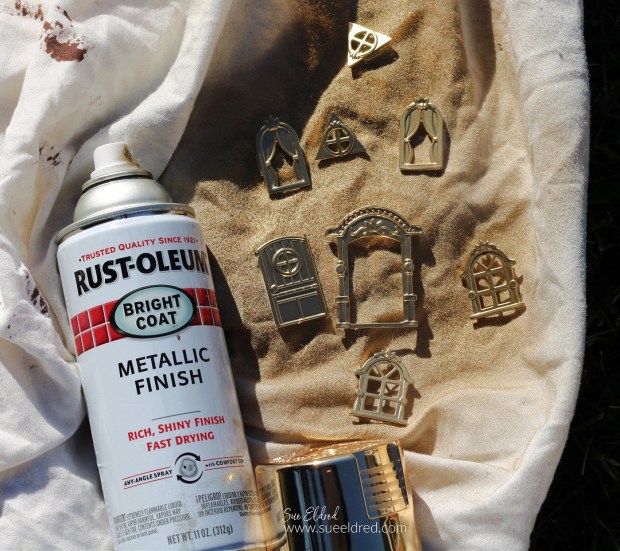
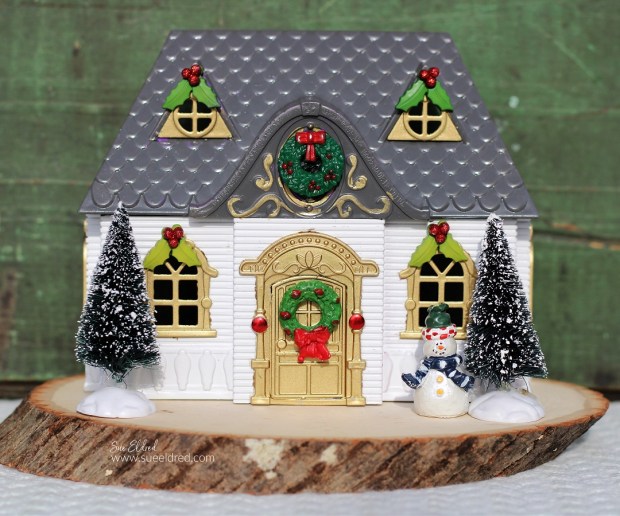
I spray painted the pink house white, the roof gray, and the windows and doors gold.

It’s important to use a paint that sticks well to plastic.

Because I am an impatient crafter and couldn’t’ wait to put it together,

I have a few scratches on my house.

I sealed the paint on my house with a clear matte finish sealer*.

Mini Christmas Dollhouse

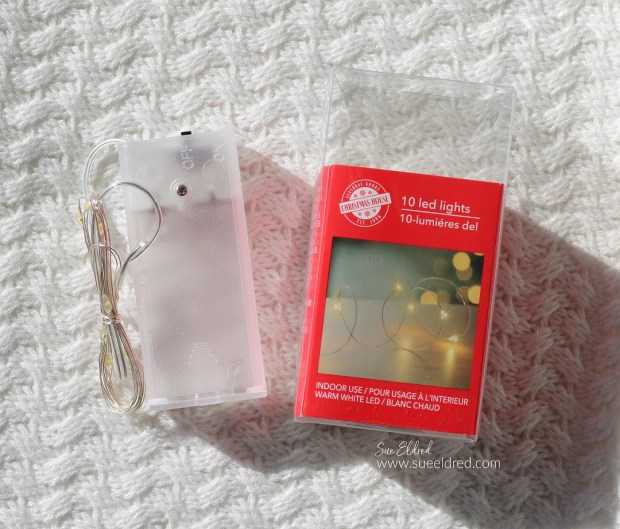
I also picked up these fairy lights*.

I’m not sure if I’m going to use them or not.

The pink of the original dollhouse shows through when the lights are on.

(I should have given the house an additional coat of paint.)

Mini Christmas Dollhouse

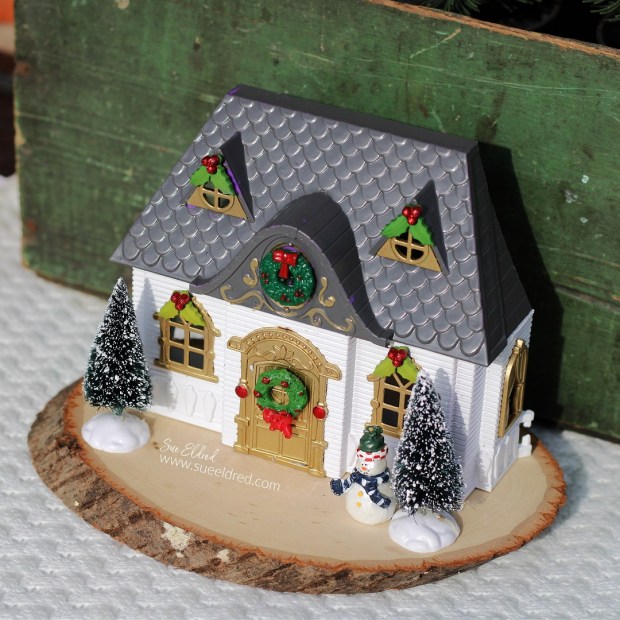
As a crafter, I have a stash of Christmas miniatures I’ve collected over the years.

They really came in handy this time.  (You can always check out your local craft store.)

I glued them onto the front of the house using Rapid Fuse All Purpose Adhesive*.

Mini Christmas Dollhouse

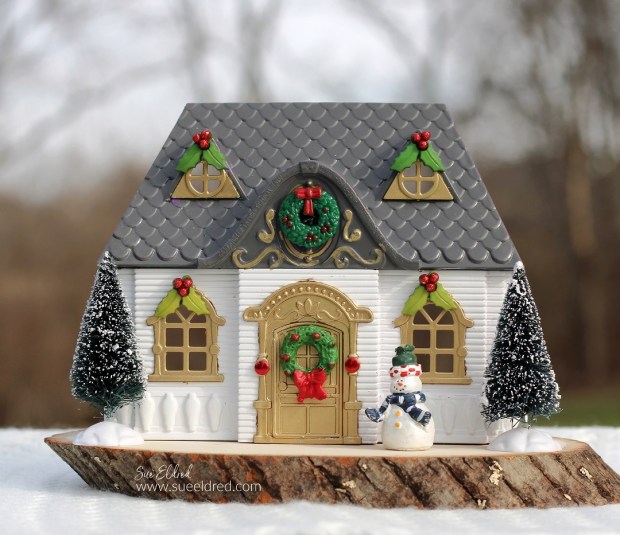
I’m in love with this Christmas Dollhouse.

It looks so real.  I want to live in that house.

Upcycled Brass Christmas Ornament

Simple Christmas Ornament Makeover

A Simple Christmas Ornament Make Over.

I ran across a couple of brass Christmas Ornaments from several years ago.

I was cleaning out my excess Christmas decorations when I found them.

I first threw them away before retrieving them from the trash.

They’re not especially valuable.

Simple Christmas Ornament Makeover

They were a 1982 Norman Rockwell promotional ornament from McDonald’s.

Because 1982 was a significant year (for me) I couldn’t throw them away.

So, I decided to try painting them.  (I had nothing to lose.)

Spring Baking Cups

*Disclosure:  This blog uses ads and affiliate links.  If you choose to make a purchase using one of the links, I receive a small commission (at no additional cost to you) that helps offset the costs of maintaining this blog.  Thanks for your support!

Simple Christmas Ornament Makeover

Here’s what I did to update the ornament:

  • Lightly sand the ornament with an extra fine sanding block* to remove dirt and grim.
  • The sanding smoothed the ornament and removed the brassy gold finish. Sanding also made the ornament silver, which I liked better.
  • Paint the ornament with a multi-Media paint* that will adhere to the metal.
  • I used Deco Art’s Multi-Media Paint in Birch.
  • Once the paint dries, lightly sand the ornament to expose the details.
  • While sanding, I made sure not to remove all the white paint from the face of the ornament. I like the “snowy look” of the white.
  • It’s also probably a good idea to spray the ornament with a matte spray sealer*.

Now the ornament looks great and compliments the other decorations on my Christmas Tree.

Buy Your Crafting Supplies Now at Dollar Tree starting at $1.25!

How to Create a “Merry” Holiday Banner

How to Create a Merry Holiday Banner

How to make a “Merry” Banner to add to your Holiday Decorations.

Now that the weather has turned cooler, I’m starting to plan my Holiday decorating.

If you love banners and quick and easy projects, this one’s for you.

How to Create a Merry Holiday Banner

Materials Used:  (*affiliate links)

*Disclosure:  This blog uses ads and affiliate links.  If you choose to make a purchase using one of the links, I receive a small commission (at no additional cost to you) that helps offset the costs of maintaining this blog.  Thanks for your support!

StyletechCraft products brought to you by ATSM Craft*

How to Create a Merry Holiday Banner

Directions:

  • Cut the scrapbook paper slightly larger than the wood banner pieces.
  • Place the scrapbook paper design side up in the Xyron Creative Station®*

How to Create a Merry Holiday Banner

  • Turn the handle of the Creative Station to run the paper through.  As it runs through, it adds complete adhesive covering on the underneath side of the paper.

How to Create a Merry Holiday Banner

How to Create a Merry Holiday Banner

How to Create a Merry Holiday Banner

  • Lay the Transfer paper over the vinyl and gently rub with a vinyl scraper tool.

How to Create a Merry Holiday Banner

How to Create a Merry Holiday Banner

  • Paint the wood beads with red and green acrylic paint.
  • String the banner and wood beads onto ribbon or twine.

I wanted to keep the banner pieces simple. 

But you could add Holiday Flowers and embellishments to make it special.

“This is a sponsored post.  As a member of the StyleTechCraft Design Team I have been provided product and compensation in exchange for my creative ideas.  The views and opinions are my own.

“Autumn Leaves & Pumpkin Please” Album

Autumn Leaves & Pumpkins Please Album

Autumn Leaves & Pumpkins Please

I love all the beautiful colors of Fall.

As the saying goes, Fall is my favorite color.

They make such a bright and cheery Fall album.

This simple album is the perfect place to add all your apple picking,

leaf peeping, trick-or-treating pictures this Fall.

The “Autumn Leaves & Pumpkins Please” album was made using

Eileen Hull’s Field Notes Journal Die by Sizzix*.

I used paper from Echo Parks “Fall Fever” Collection*.

Eileen Hull Educator Logo

Disclosure:  This is a sponsored post.  As a member of the Eileen Hull Educator Team, I have been provided product in exchange for my creative ideas.  The view and opinions are my own. 

Autumn Leaves & Pumpkins Please Album

Materials Used:  (*affiliate links)

*Disclosure:  This blog uses ads and affiliate links.  If you choose to make a purchase using one of the links, I receive a small commission (at no additional cost to you) that helps offset the costs of maintaining this blog.  Thanks for your support!

Autumn Leaves & Pumpkins Please Album

A few tidbits of information:

  • Before I die-cut the mat board, I like to use the Xyron Creative Station* to add adhesive to the back of the paper.  It gives the paper a complete layer of adhesive with no bubbles.  It really is easy to use.
  • The spine of the album comes with three sections.  I cut the first section off to make the album thinner.  It leaves two holes to add binding.
  • I wanted to try something different with how I added the pages to my album.  I inserted two mini book rings through the holes to hold my pages.
  • The mini book rings are approx. ¾” and with a little maneuvering they fit in the two side holes.
  • I used the cut off section to mark where I would need to punch the holes on my pages.

Autumn Leaves & Pumpkins Please Album

I wanted to make my album vertical instead of horizontal.

I love how versatile the Field Notes Die* is.

Autumn Leaves & Pumpkins Please Album

I created the word “autumn” using a Silhouette Cameo Electronic Die Cutting Machine*.

I cut it the letters out using StyleTechCraft Gold Chrome Vinyl*.

StyletechCraft products brought to you by ATSM Craft*


Mini Fall Charcuterie Board

How to make a Mini Fall Charcuterie Board

How to make a Stenciled Mini Fall Charcuterie Board

using StyleTechCraft removable vinyl.  This is my first attempt at

a Charcuterie Board, so, in true “Sue” fashion, I went miniature.

How to make a Mini Fall Charcuterie Board

I picked up this miniature cutting board at Hobby Lobby earlier this Season.

(With their fall sale it cost under $2.)

Materials Used:  (*Affiliate Links)

*Disclosure:  This blog uses ads and affiliate links.  If you choose to make a purchase using one of the links, I receive a small commission (at no additional cost to you) that helps offset the costs of maintaining this blog.  Thanks for your support!

StyletechCraft products brought to you by ATSM Craft*

How to make a Mini Fall Charcuterie Board

  • I like to use StyleTechCraft adhesive vinyl to customize everything I can.  It’s so fun and satisfying.  But there are a few instances where vinyl isn’t the only option.  Did you know you can use your cut files with vinyl to create custom stencils?
  • I used an SVG cut file, my Silhouette Cameo Electronic Die Cutting Machine*, and StyleTechCraft Matte Removable Vinyl* to create the perfect fall stencil for my mini cutting board project.

How to make a Mini Fall Charcuterie Board

  • I gave the cutting board and leaf a light sanding with fine-grit sandpaper.

How to make a Mini Fall Charcuterie Board

  • I rubbed Walnut Gel Stain* on both sides of the leaf.  It will make a great package tag.

How to make a Mini Fall Charcuterie Board

  • Lay the Transfer paper over the vinyl and gently rub with a vinyl scraper tool.  Make sure all the little inside letter pieces transfer.
  • Place the Vinyl Transfer Tape* and vinyl onto the wood pieces.  Rub over Vinyl Transfer Tape* and gently remove from the vinyl.

How to make a Mini Fall Charcuterie Board

  • Paint the inside area of the vinyl with Black Multi-Purpose Acrylic Paint*.  (You may need two coats.)
  • Carefully remove the vinyl from the wood.  Use a sharp point to remove the vinyl from the inside of the lettering.
  • Once the lettering is fully dry, lightly sand to smooth the design.

How to make a Mini Fall Charcuterie Board

The black paint makes it look like it has been wood burned.  (but it’s not!)

I debated back and forth whether to seal the wood or not.

I didn’t know if it mattered for use.

I used a Multi-Purpose Sealer* on both the board and the leaf.

I reasoned that the board is more decorative than it is utilitarian.

So, it was just a matter of preference.

Mini Fall Charcuterie Board

Wouldn’t it look cute with a mini loaf of pumpkin bread?  

Just wrap it up with a ribbon and add the Hello Fall Tag for an

adorable Fall Hostess Gift.

Or use it for a mini party for two.

Welcome Autumn Pillow

for another fun Fall Stenciled project click here.

“This is a sponsored post.  As a member of the StyleTechCraft Design Team I have been provided product and compensation in exchange for my creative ideas.  The views and opinions are my own.

“Gnome for Christmas” 2023 Holiday Workshop

"Gnome for Christmas" 2023 Holiday Workshop

“Gnome for Christmas” Holiday Workshop

Saturday November 11th, from 10:00 am to 2:00 pm

Looking for a jumpstart to the Holiday Season?  Join me for a fun day of Christmas Crafting in lovely, historic downtown Washington, IL.

In the workshop we will be making a variety of fun Holiday projects:

  • Holiday Cards using Echo Park’s Gnome for Christmas Collection
  • Holiday Notepad Holder using Eileen Hull’s Notepad Die
  • Christmas Tea Folder
  • 3D Hot Cocoa Stand Card
  • Yarn Santa Gnome Ornament
  • Mini Farmhouse Christmas Door Hanger

The Cost of the Workshop is only $40 which includes class materials*, lunch, and prizes.

(*a list of basic supplies will be provided before the workshop)

The workshop is held at St. Mark’s Lutheran Church in their spacious Family Life Center.

For more information or to sign up email me at suesholidayworkshop@yahoo.com

Make a Pumpkin Treat Box for your Favorite Trick or Treaters

How to make a Pumpkin Treat Box

How to make a Pumpkin Gift Box

using the XL Card Caddy Die* from Sizzix and Eileen Hull.

It’s a fun little Halloween Treat Box for your favorite Trick or Treaters.

Eileen Hull Educator Logo

Disclosure:  This is a sponsored post.  As a member of the Eileen Hull Educator Team, I have been provided product in exchange for my creative ideas.  The view and opinions are my own. 

How to make a Pumpkin Gift Box

Materials Used:       (*affiliate links)

*Disclosure:  This blog uses ads and affiliate links.  If you choose to make a purchase using one of the links, I receive a small commission (at no additional cost to you) that helps offset the costs of maintaining this blog.  Thanks for your support!

How to make a Pumpkin Gift Box using the XL Card Caddy Die from Sizzix and Eileen Hull.

Directions:

How to make a Pumpkin Gift Box using the XL Card Caddy Die from Sizzix and Eileen Hull.

StyletechCraft products brought to you by ATSM Craft*

How to make a Pumpkin Gift Box using the XL Card Caddy Die from Sizzix and Eileen Hull.

  • Adhere the sides to the card caddy base using Rapid Fuse Adhesive*.  The Die comes with scored side pieces that are perfect for putting the box together.  I wasn’t thinking and cut two pieces of matboard for my sides.  Both will work.  (the one that comes with the die would have been a lot easier)

How to make a Pumpkin Treat Box-Sue's Creative Workshop www.sueeldred.com 2459

  • Create a handle for the pumpkin treat box using wire and small wood beads.
  • Punch a hole on both sides of the box and attach the handle.

Hello Fall Shadow Box Frame

Hello Fall Shadow Box Frame

How to make an Easy Fall Dollar Store DIY.

I can’t resist an Easy Fall Dollar Store Project,

while I’m sitting here hanging onto Summer for as long as I can.

Hello Fall Shadow Box Frame

Materials Used:  (*affiliate links)

StyletechCraft products brought to you by ATSM Craft*

*Disclosure:  This blog uses ads and affiliate links.  If you choose to make a purchase using one of the links, I receive a small commission (at no additional cost to you) that helps offset the costs of maintaining this blog.  Thanks for your support!

Hello Fall Shadow Box Frame

Directions:

  • Remove the picture hanger hardware and the twine hanger from the wood shadow box.
  • Paint the shadow box with Royal Ruby Metallic Paint*.
  • Lightly sand over the paint using an extra fine sanding block*.
  • I felt the Metallic Paint was a little too metallic for me, so I went over the paint with a light coat of walnut gel stain.  Wipe off the stain with a soft rag.

Hello Fall Shadow Box Frame

Hello Fall Shadow Box Frame

Hello Fall Shadow Box Frame

Add Fall Embellishments to the bottom of the shadowbox frame.

The shadow box frame makes a cute little shelf sitter to add to

your Fall Decorations.

“This is a sponsored post.  As a member of the StyleTechCraft Design Team I have been provided product and compensation in exchange for my creative ideas.  The views and opinions are my own.

Teach Love Inspire-BTS Teacher Sign

How to make a BTS Teacher Sign using StyleTechCraft Vinyl

How to make a BTS Teacher Sign using StyleTechCraft Vinyl.

It’s August.

Summer Vacation is wrapping up. 

There are School Supplies on the Store Shelves.

And teachers are working overtime to make sure their

classrooms are ready for the first day of school.

How to make a BTS Teacher Sign using StyleTechCraft Vinyl

Why do teachers work so hard?

Because they love to Teach, Love, and Inspire.  

How to make a BTS Teacher Sign using StyleTechCraft Vinyl

Materials Used to make the BTS Teacher Sign:  (*Affiliate Links)

StyletechCraft products brought to you by ATSM Craft*

*Disclosure:  This blog uses ads and affiliate links.  If you choose to make a purchase using one of the links, I receive a small commission (at no additional cost to you) that helps offset the costs of maintaining this blog.  Thanks for your support!

How to make a BTS Teacher Sign using StyleTechCraft Vinyl

How to make a BTS Teacher Sign using StyleTechCraft Vinyl…

  • Paint the wood sign with Black Multi-Surface Acrylic Paint*.
  • To make the sign look like a chalkboard, water down a small amount of white acrylic paint.  Paint over the black sign with the watered-down white paint.  Quickly wipe over the painted sign to remove some of the white paint.
  • Lightly sand over sign with sanding black to smooth out the grain of the wood.

How to make a BTS Teacher Sign using StyleTechCraft Vinyl

How to make a BTS Teacher Sign using StyleTechCraft Vinyl

  • After cutting, remove the excess vinyl from the design using a Vinyl Weeding Tool*.
  • To apply the vinyl to the sign, lay the transfer paper over the vinyl.
  • Rub over the transfer paper with a vinyl scraper tool and lift the design from the white paper backing.
  • Lay the transfer paper onto the sign and rub over the design.

How to make a BTS Teacher Sign using StyleTechCraft Vinyl

  • Gently remove the transfer paper.

How to make a BTS Teacher Sign using StyleTechCraft VinylThe back to school sign is a great gift for the favorite teacher in your life.

Back to School Inspiration

StyleTechCraft Vinyl is great for labeling all sorts of items in the classroom.  

“This is a sponsored post.  As a member of the StyleTechCraft Design Team I have been provided product and compensation in exchange for my creative ideas.  The views and opinions are my own.

a little Pocket Full of Holiday Cheer

Mini Pocket of Cheer Christmas Ornament

How to make a Pocket Full of Holiday Cheer Christmas Ornament.

I’m Enveloping the Christmas in July Holiday Season with a Pocket Full of Holiday Cheer.

Mini Pocket of Cheer Christmas Ornament

Materials Used: (*affiliate links)

*Disclosure:  This blog uses ads and affiliate links.  If you choose to make a purchase using one of the links, I receive a small commission (at no additional cost to you) that helps offset the costs of maintaining this blog.  Thanks for your support!

Mini Pocket of Cheer Christmas Ornament

To make the Ornament:

  • Die cut two small envelopes using the Eileen Hull Envelope, Folder & Flowers Die Set* from Sizzix using red and green faux leather paper.  (you could also use scrapbook paper)
  • Cut the sides off the green envelope and glue it to the inside of the red envelope.  
  • Fold the envelope on the score lines and glue the bottom sides together.

Mini Pocket of Cheer Christmas Ornament

  • Punch two small holes on each side of the envelope flap.  Add a small piece of twine for hanging.
  • Hot glue small pieces of faux greenery and berries to the inside of the envelope. 
  • Place a small holiday greeting on the bottom of the envelope.  
  • Adhere a small holiday sticker to the greenery.  

Mini Pocket of Cheer Christmas Ornament

  • Add another Holiday Greeting Sticker to the back of the envelope.  I added 3D foam squares to the back of the sticker for added dimension.

Mini Pocket of Cheer Christmas Ornament

It is a quick and easy Holiday Ornament to add to the front of a package.

Or you could make several to hang on your Christmas Tree.  (you’ve got time)

Eileen Hull Educator Logo

Disclosure:  This is a sponsored post.  As a member of the Eileen Hull Educator Team, I have been provided product in exchange for my creative ideas.  The view and opinions are my own.