Life’s a Journey

Of all the goodies I received from ADORNit as part of being an “it girl”  this wood plaque

was the first project I wanted to tackle.

So…on a night when I had so many things I could/should have done,

I spent a relaxing evening just painting.

I haven’t done this in such a long time.  It was just what I needed.

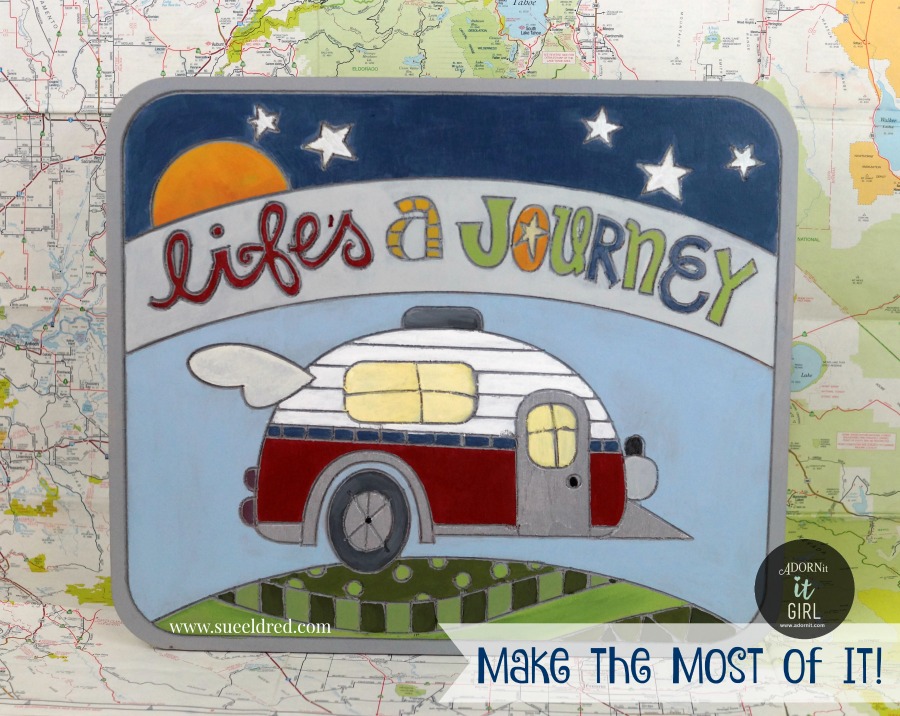
I started with this plain life’s journey plaque from ADORNit.           (measures 11″ x 13″)

I used a small flexible nail file to run through the grooved channels to clean it up a bit.

I base coated the entire plaque with gray acrylic paint.

Having the gray paint, deep in the grooves of the plaque, works as the outline between colors

to make the colors stand out.

For me, having grooved channels made it so easy to paint and stay in the lines.

FYI…You might want to seal coat your project once your finished.

I’ll be honest… I’ve never been camping in my life. 

I’m not sure what drew me to this plaque so much.

My idea of roughing it is a bad hotel room.

Hmmm…Maybe if I had a cute little camper like this, I might even try it.

Life’s a Journey, Make the Most of it!

Cupcake Stand or Craft Supply Storage?

Cupcake Stand or Craft Supply Storage 3310

Deflecto Craft Solutions has several new items debuting at CHA this week in Anaheim, California.

(CHA being the annual Craft and Hobby Association Trade Show.)

One of my favorites products being shown is this Three Tier Desert Stand.

Acrylic Stand and Supplies

The stand features adjustable heights and a easy knock down compact design for storage.

It is perfect for holding cupcakes and even comes with little holes to insert cake pops.  (Pretty Clever.)

The Cupcake Stand will be available January 2016 through local art, craft and educational stores.


Because I don’t make a lot of cupcakes, I decided to use mine for storage instead.

tracing circles

This is what I used to personalize the stand:

  1. Trace each of the tiers onto the back of the kraft paper.
  2. Loosely cut around each circle.
  3. Liberally apply the glue-stick onto the back of the paper around and inside the circle.
  4. Lay tier onto the glued circle and trim excess paper with craft knife.
  5. Smooth paper onto tier.
  6. Cut out the center channels of the tiers with a craft knife.

Washi Tape Border

Apply washi tape around the outside lip.

decorated stand with out paint

Assemble stand and fill craft supplies.  (or maybe even your favorite cupcakes)


“This is a sponsored post. As a member of the Deflecto Design Team I have been
provided product in exchange for my creative ideas, views and opinions.”

This post uses Amazon links if you choose to purchase from Amazon, I get a very small commission.