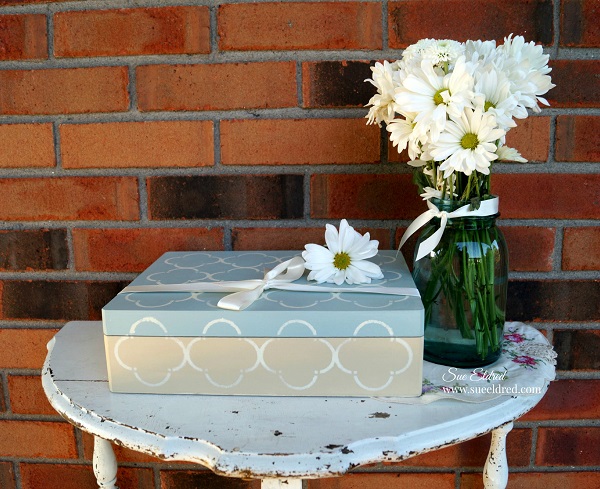
I am honored to have had my Wedding Memories Card Box featured as a special project in
DIY Wedding Magazine’s Holiday Issue.
The Wedding Memories Cards Box is a dual-purpose box to hold cards at the Reception
and then to be used later to store the Wedding Memories to be cherished for years to come.
I started with a plain wood box from Walnut Hollow and Chalky Finish Paint from Deco Art to create a soft timeless finish.
Supplies Used: (*amazon affiliate links)
- Walnut Hollow Unfinished Wood Box, Cornice*
- DecoArt Americana Decor® Chalky Finish Paint: Vintage, Timeless and Whisper
- Deco Art Americana Decor Clear Crème Wax*
- DecoArt Americana Decor Stencil 12 x 12 in. Mod Quatrefoil*
- Americana Stencil 6″”X18″”-Simple Script Alphabet 3“*
- Graphic 45 Deluxe Collector’s Edition Pack, 12 by 12-Inch, Baby 2 Bride*
- Offray Ribbon: 7/8” Antique White Double-face Satin Ribbon
- Canvas Corp Mini Clothespin 25-Pack: White*
- Cream Cardstock
- Paintbrush
- Sanding Block*
- Stipple Brush or Stencil Brush*
- Removable Blue Painters Tape*
- Soft Clean Rag
- Paper Cutter
- Scissors
- 3M Advanced Tape Glider*
Finished Size: 9” x 12” x 3 1/2”
Directions:
- Paint the top portion of the cornice box with “Vintage” Chalky Finish paint and the bottom portion of the box with “Timeless” Chalky Finish paint. (Inside and out)
- Lightly sand the box to smooth out the finish.
- Position “Mod Quatrefoil” stencil over the top of the box. Secure the stencil in place with the painter’s tape to prevent slipping. Use stipple brush to apply “Whisper” Chalky Finish paint inside open stencil areas.
- Remove stencil.
- Position and stencil “Mod Quatrefoil” pattern onto the sides of box.
- Allow paint to dry for a few hours and lightly sand over the stenciled area to give a slightly worn look.
- Apply clear crème wax onto the inside and outside of the box.
- Wait one hour and buff box using a soft, clean rag.
- Measure and apply decorative paper onto the inside of the box.
- Tie a long length of Antique White Satin ribbon around the top of the box, tying a bow on the top.
- Cut cream cardstock into five 2 1/4” x 3 1/2” pieces.
- Stencil the letters to spell “CARDS” onto cream cardstock using the 3” Simple Script Alphabet.
- On the inside of the box: Clip the letters onto the ribbon using the mini clothespins.
This project was sponsored by Deco Arts and Walnut Hollow.
Shop Handmade – The Wedding Store
Disclaimer: This blog uses ads and affiliate links. If you choose to make a purchase using one of the links, I receive a small commission (at no additional cost to you) that helps offset the costs of maintaining this blog. Thanks for your support!


