Eileen Hull/Sizzix Chapter 4 Release Party

Eileen Hull Sizzix Chapter 4 Release Party

New Chapter 4 Dies by Eileen Hull and Sizzix

The Eileen Hull teams are having a New Release Blog Hop

using the New Eileen Hull/Sizzix Chapter 4 Dies.

Faux Stone Geometric Box

Looking to add a little dimension to your paper crafting projects?

The Faux Stone Geometric Box was made with Eileen Hull’s new

Eileen Hull Geometric Box Die by Sizzix*, Sizzix Matboard*

and Deco Arts Dimensional Effects Texture Paste*.

See the full tutorial here for the Faux Stone Geometric Box.

*Disclosure:  This blog uses ads and affiliate links.  If you choose to make a purchase using one of the links, I receive a small commission (at no additional cost to you) that helps offset the costs of maintaining this blog.  Thanks for your support!

How to make a dimensional Sunflower-Sue's Creative Workshop www.sueeldred.com 6165

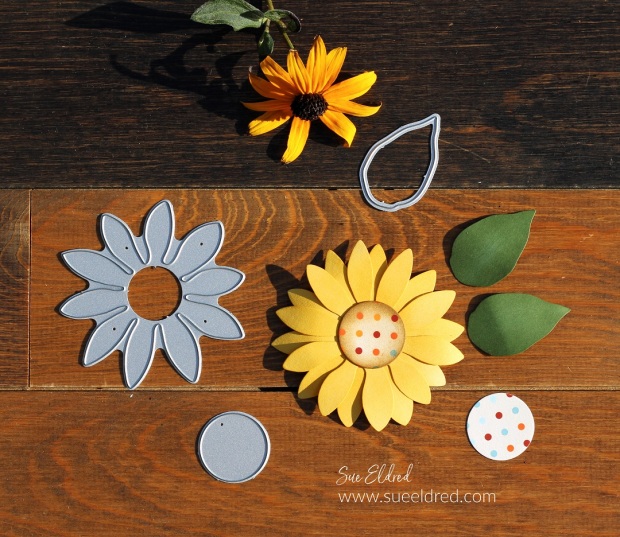
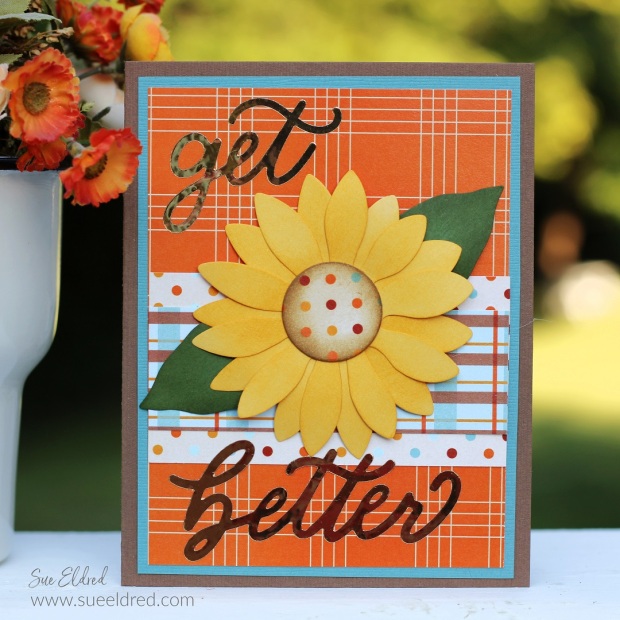
The Simple Country Sunflower…

was made using Eileen Hull Large Sunflower Die by Sizzix*,

acrylic paint, and mod podge*.

I will share tutorials on each project on my blog later in the week.  

Eileen Hull and Sizzix Chapter 4 Release Party

Check out the Eileen Hull’s Blog for the Blog Hop and even more ideas. 

Eileen Hull Sizzix Release Blog Hop:

Pam Bray
Jennie Atkinson
Sarah Lizzie
Lisa Hoel
Sharon Curtis
Tonya Trantham
Elizabeth Robinson
Jenny Marples
Maggi Harding
Sue Eldred  (you are here)
Karen Bearse

Eileen Hull Educator Logo

Disclosure:  This is a sponsored post.  As a member of the Eileen Hull Educator Team, I have been provided product in exchange for my creative ideas.  The view and opinions are my own. 

Sizzix Craft Box

Fall Floral Stained Glass Card

Fall Floral Stained Glass Card

Fall Floral Stained Glass Card made with the Sizzix Skinny Mini Elements Thinlet Die by Eileen Hull.

I was lying in bed the other night when I got the idea for this card.

(That’s when I get some of my best ideas.)

It was perfect for the Eileen Hull Card Bonanza Month over on her blog.

Eileen Hull Educator Logo

Disclosure:  This is a sponsored post.  As a member of the Eileen Hull Educator Team, I have been provided product in exchange for my creative ideas.  The view and opinions are my own. 

Xyron Creative Station

The Fall Floral Stained-Glass Card is a fairly simple card to make.

The one thing that made this card easy was using my Xyron Creative Station*

on the cardstock before die-cutting.

Fall Floral Stained Glass Card

Directions:

  • Cut a piece of gold cardstock slightly larger than the Skinny Mini Elements Die* to use as the base of the card.
  • Choose a dark gray cardstock for the outline and three pieces of fall-colored cardstock for the inside pieces.
  • Place the cardstock into the Xyron Creative Station* and crank the handle to run the paper through the machine. The Xyron Creative Station* adds a complete layer of adhesive to the cardstock making each little piece a sticker. That made assembling the card simple or “simple-ish.”
  • Place the die on the cardstock and die-cut the gray and the fall-colored paper using a Sizzix Big Shot Die-Cutting Machine*.
  • Trim the gray paper to the size of the die.  Remove and discard all the tiny inside pieces using a craft pick*.  Remove the protective liner from the back of the cardstock and center it onto the gold cardstock layer.
  • Use a craft pick* to place the inside flower pieces from the colored cardstock.

Materials Used:

*Disclosure:  This blog uses ads and affiliate links.  If you choose to make a purchase using one of the links, I receive a small commission (at no additional cost to you) that helps offset the costs of maintaining this blog.  Thanks for your support!

Fall Floral Stained Glass Card

  • Finish creating your flower pattern and add several cardstock layers to a cream card.
  • Add a sheer cream bow.

Fall Floral Stained Glass Card

There’s so much more that you could add to the card, like a greeting or a small tag.

But I decided to keep it simple. (or as I mentioned before…”simple-ish”.)

Fall Floral Stained Glass Card

I thought I was finished with this card.

But then again, sometimes things just evolve.  

A stained-glass card needed rhinestones.

I added Clear Enamel Dots from Hero Arts* to the center of each flower.

Fall Floral Stained Class Card

For another card idea using the Sizzix Skinny Mini Elements Die,

check out the Skinny Mini Christmas Poinsettia Card below.

Skinny Mini Elements Christmas Poinsettia Card.

Skinny Mini Elements Christmas Poinsettia Card

Shop Scrapbook.com

“I only have Pies for You” happy day tag

"I Only Have Pies for You" tag.

My sister-in-law loves to bake pies.

When it comes to Thanksgiving, there is almost a pie-per-person ratio.

It’s not just pumpkin, but peanut butter (my favorite),

cherry, and chocolate pies. (To name a few.)

So, when I saw the new “I only have pies for you” soap from Bath and Body,

I knew I needed to pick it up for her.

It’s not only perfect, but it smells wonderful too.

"I Only Have Pies for You" tag.

Since her birthday is right around the corner,

I thought I’d make her a special pie tag to go with it.

The Hey, Pumpkin Stamp & Die Set from

The Maker’s Movement was just the die to make the tag.

Maker's Movement

Disclosure:  This is a sponsored post for The Maker’s Movement*.  I have been provided product and compensation in exchange for my creative ideas.  The view and opinions are my own. 

"I Only Have Pies for You" tag.

Materials Used:      (*Affiliate Links)

*Disclosure:  This blog uses ads and affiliate links.  If you choose to make a purchase using one of the links, I receive a small commission (at no additional cost to you) that helps offset the costs of maintaining this blog.  Thanks for your support!

"I Only Have Pies for You" tag.

Two of my favorite hardworking little machines.

  • Before I die-cut all the small pieces, I ran the cardstock through the Xyron Create a Sticker Mini*.  It makes all the die-cuts into stickers and that makes assembling the card easy.
  • The Mini Maker Die Cutting Machine* makes quick work of die cutting.  And it doesn’t take up a lot of space.

"I Only Have Pies for You" tag.

A special tag for my favorite pie maker.

Fall Sunflower Get Well Card

Fall Sunflower Get Well Card

A Bright and Cheery Card to brighten someone’s day.

This simple Get-Well card uses dies and paper from The Maker’s Movement.

Maker's Movement

Disclosure:  This is a sponsored post for The Maker’s Movement.  I have been provided product and compensation in exchange for my creative ideas.  The view and opinions are my own. 

Fall Sunflower Get Well Card

Materials Used:  (*affiliate links)

*Disclosure:  This blog uses ads and affiliate links.  If you choose to make a purchase using one of the links, I receive a small commission (at no additional cost to you) that helps offset the costs of maintaining this blog.  Thanks for your support!

Fall Sunflower Get Well Card

Directions:

  • Die-cut the pieces for the flower out of cardstock. You will need two flowers cut from the large flower die.
  • Ink the cardstock flower with yellow ink to give the petals a little color variation and depth.

Fall Sunflower Get Well Card

  • Use the side of a pencil to gently round the edges of the petals.

Fall Sunflower Get Well Card

  • Glue the center of the flowers together using Tombow Mono Aqua Liquid Glue*.
  • Instead of a brown center for the sunflower, I cut a circle using polka dot paper from the Autumn Breeze Paper Pad.

Fall Sunflower Get Well Card

  • Die-cut the words “get better” using StyleTechCraft Gold Chrome Adhesive Vinyl*and the Get Better Die Set.
  • The card uses simple layers using the Autumn Breeze Paper Pad.
  • Finished Card Size 4 1/4″ x 5 1/2″.

StyletechCraft products brought to you by ATSM Craft*

Super Mario Bros. Inspired Bedroom

Super Mario Bros. Inspired Bedroom

A bedroom makeover for a couple of boys obsessed with all things Super Mario Bros.

Super Mario Bros. Inspired Bedroom

Bedroom Makeover-Before

My daughter-in-law has been hard at work transitioning her oldest son into his new tween room

and the younger boys into a new bedroom together.

Since the boys are obsessed with all things Super Mario Bros.,

she decided to create a Super Mario Bros. Inspired Bedroom.

She had everything planned out but only needed help with one thing.

She wanted super large letters for the wall.  (She figured I was the person to ask.)

Super Mario Bros. Inspired Bedroom

To make the Super Mario Bros. inspired letters…

Super Mario Bros. Inspired Bedroom

Products used to make the letters:

StyletechCraft products brought to you by ATSM Craft*

*Disclosure:  This blog uses ads and affiliate links.  If you choose to make a purchase using one of the links, I receive a small commission (at no additional cost to you) that helps offset the costs of maintaining this blog.  Thanks for your support!

Super Mario Bros. Inspired Bedroom

  • Place the cut vinyl letters onto the slightly larger black letters using the Vinyl Transfer Tape*.

Super Mario Bros. Inspired Bedroom

  • The room was painted “Big Sky Country” with Dutch Boy’s Duraclean Paint, in eggshell.
  • Use a strip of removable blue painter’s tape* as a guide to place the letters.
  • Leave the paper backing on the back of the black letters.  Cut around the letters and place them on the wall with the blue painter’s tape*.

Super Mario Bros. Inspired Bedroom

  • Gently rub over the letters with the vinyl scraper tool to ensure the letters have stuck to the vinyl transfer tape.
  • Carefully peel up the transfer tape, keeping the transfer tape in place, and remove the paper backing from the letter.
  • Rub over the letter to help it stick to the wall.

Super Mario Bros. Inspired Bedroom

For even more Super Mario Bros. Fun…

  • My daughter-in-law used decals and Super Mario Bros. characters hand cut from the wallpaper to create the decorations around the room.
  • She trimmed the white outline off the decals and cut out by hand the characters from the wallpaper.
Super Mario Bros. Inspired Bedroom

Super Mario Bros. Bedroom-After

Super Mario Bros. Bedroom

  • The room wouldn’t be complete without Super Mario Bros. Comforters*, Pillows, and of course their favorite “stuffies”.  (Unbelievably, I know quite a few of their names.)

Super Mario Bros. Bedroom

I was there when the boys saw the finished room for the first time.

One of them exclaimed “it’s like a whole level of Super Mario World”.

They were a little excited!  (Good Job, Mom!)

Click on pictures below for the products used to create the Super Mario Bros. Inspired Bedroom.


Yoshi Pillow Buddy

Sending Sunshine on a Cloudy Day

Sending Sunshine on a Cloudy Day

Everyone can use a little Sunshine on a cloudy day.

This simple card is made with stamps and dies from The Maker’s Movement.

The card uses a little subtle play with different patterns.

Maker's Movement

Disclosure:  This is a sponsored post for The Maker’s Movement.  I have been provided product and compensation in exchange for my creative ideas.  The view and opinions are my own. 

Sending Sunshine on a Cloudy Day

Materials Used:       (*affiliate links)

*Disclosure:  This blog uses ads and affiliate links.  If you choose to make a purchase using one of the links, I receive a small commission (at no additional cost to you) that helps offset the costs of maintaining this blog.  Thanks for your support!

Sending Sunshine on a Cloudy Day

  • I die-cut pieces using the Stacking Flowers Die out of yellow patterned paper from the Cloudy Day paper pad.
  • The flower was assembled using 3D Thin Foam Squares*.

Sending Sunshine on a Cloudy Day

  • I used the “Hello Sunshine Stamp & Die Set” for the sunshine layers on the bottom of the card.
  • I also used the “Hello Sunshine Stamp & Die Set for the small banner with the stamped words “sending you”.
  • My favorite tip for die-cutting small or thin pieces is to add a layer of adhesive using a Xyron Creative Station®* before die-cutting.

Sending Sunshine on a Cloudy Day.

This card was fast and easy to assemble and is sure to brighten up anyone’s day.

Sunflower Thank You Card

Sunflower Thank You Card

There’s something special about receiving a handmade card.

In a world where kindness is “perceived” to be in short supply,

the power of a well-meaning Thank You note goes a long way.

Sunflower Thank You Card-Sue's Creative Workshop www.sueeldred.com 4975

Do you still send greeting cards?

I’ll be honest I don’t send cards like I used to.

I make them; I don’t always send them.  (Sound familiar?)

It’s too easy to wish someone a special greeting on social media or in a text.

Maker's Movement

Disclosure:  This is a sponsored post for The Maker’s Movement.  I have been provided product and compensation in exchange for my creative ideas.  The view and opinions are my own. 

Sunflower Thank You Card

Materials Used:     (*affiliate links)

*Disclosure:  This blog uses ads and affiliate links.  If you choose to make a purchase using one of the links, I receive a small commission (at no additional cost to you) that helps offset the costs of maintaining this blog.  Thanks for your support!

Sunflower Thank You Card

How to…

Sunflower Thank You Card

  • Stamp the small sunflower stamp onto white cardstock using a black permanent ink pad. Color in the image using Tombow ART Markers*.  Die-cut the image using the small square die and the Crossover II Die-Cutting System*.
  • Stamp the word “Thank You” using the midnight blue ink* and die-cut the words using the coordinating die.
  • Add background layers onto a white card base and embellish with a yellow ribbon and adhesive enamel dots.

Shop Tombow

Let’s Eat Cake Birthday Card

Eat Cake Birthday Card

Nothing like getting a sweet 3-tiered layered cake for your Birthday.

Thanks to the Eat Cake Stamp and Die Set from The Maker’s Movement,

you can send everyone a special cake on their birthday.

Maker's Movement

Disclosure:  This is a sponsored post for The Maker’s Movement.  I have been provided product and compensation in exchange for my creative ideas.  The view and opinions are my own. 

Eat Cake Birthday Card

Materials Used: (*affiliate links)

Shop Tombow

*Disclosure:  This blog uses ads and affiliate links.  If you choose to make a purchase using one of the links, I receive a small commission (at no additional cost to you) that helps offset the costs of maintaining this blog.  Thanks for your support!

Eat Cake Birthday Card

Directions:

Eat Cake Birthday Card

  • Stamp portions of the cake on patterned paper from the Rainbow Sprinkles Paper Pad.
  • For extra dimension, place the stamped paper onto white cardstock.
  • Cut the “icing layer” using a fine-detailed scissor and adhere the layer on top of the cut-out cake layer.
  • My secret ingredient for this “fussy cut” 3-tiered cake is my Xyron Create a Sticker Mini*. It makes applying the layers extremely easy.  Just place the paper into the machine and crank the handle, as it runs through the sticker-maker it adds a layer of adhesive onto the back of the paper.

Eat Cake Birthday Card

  • Cut a frame using the Crafty Chica Nested Frame Die Set and white cardstock.
  • Use paper from the Simply Spring Slimline Paper Pad to create a layer for the inside of the frame.

Eat Cake Birthday Card

  • Here’s a closeup of the cake all layered up.  Each layer is slightly thicker than the first.
  • Color the top of the candle using Tombow ART Markers*.
  • Add 3D Foam Mounting Squares* to the back of the cake and place it onto the bottom of the frame.

Eat Cake Birthday Card

  • Cut a small “Happy Birthday” banner from the Rainbow Sprinkles Paper Pad and add to the top of the card.
  • A fun birthday card for any age.

The Maker’s Movement 2022 Design Team

Maker's Movement 2022 Design Team Announcement

The Maker's Movement 2022 Design Team

Meet the New Maker’s Movement 2022 Design Team… 

I am so happy to be able to continue working with The Maker’s Movement* as their New Design Team Coordinator.  They are one of my favorite companies.  And they have so many cute stamps and dies.

So… If you love looking at great papercraft inspiration, be sure to check out these awesome designers on Instagram.  (click on each designer’s name)

The Maker’s Movement 2022 Design Team

Home Sweet Home Shadow Box

Home Sweet Home Shadow Box Frame

The Home Sweet Home Shadow Box was made with Eileen Hull’s

New Shadow Box Dies and Elements from Sizzix.

Home Sweet Home Shadow Box Frame

I used a combination of several of the new dies to make my Home Sweet Home Shadow Box.

The shadow box was die-cut using a thick kraft cardstock. (110 lbs.)

I added double-sided adhesive foam behind the house, grass, flowers, and sign to

make it dimensional. I used toothpicks cut and painted white behind the picket fence

and inserted them into tiny holes poked into the base of the shadow box.

665935 Sizzix Shadow Box Elements by Eileen Hull

665935 Sizzix Shadow Box Elements, 12 pcs. Thinlet Die Set*

This Die set includes four houses along with a range of decorative elements to make your designs pop. The Shadowbox Elements Die set works hand in hand with the Sizzix Thinlits Shadow Box Frames #2 by Eileen Hull to create a beautifully detailed center piece within the Shadowbox.

*Disclosure:  This blog uses ads and affiliate links.  If you choose to make a purchase using one of the links, I receive a small commission (at no additional cost to you) that helps offset the costs of maintaining this blog.  Thanks for your support!

665938 Sizzix Shadow Box Frame #1 by Eileen Hull 665938 Sizzix Shadow Box Frame #1

665938 Sizzix Shadow Box Frames #1, 7 pc. Thinlet Die Set*

665939 Sizzix Shadow Box Frames #2 by Eileen Hull

665939 Sizzix Shadow Box Frames #2, 3 pc. Thinlet Die Set*

Eileen Hull/Sizzix Chapter 2 Release Party

Check out the Designers Links below for even more ideas. 

There is a giveaway too! Comment on each participating designer’s blog and during the live on Tuesday and let us know what you would create with these dies, and you will be entered to win one of the items in the Chapter 2 release!

Eileen Hull Designs

Eileen Hull Educator Logo

“This is a sponsored post.  As a member of the Eileen Hull Educator Team, I have been provided product in exchange for my creative ideas.  The views and opinions are my own.