Joy Shadow Box Tray

joy-shadow-box-tray-8609

A simple Shadow Box that would be cute as Holiday Décor or used as a gift.

The “Happy Holidays” graphic would be cute replaced with a Holiday photo.

This project also uses a simple paint technique for old hardware.


Here’s what I used for my Shadow Box Tray:   

(*including amazon affiliate links)


Tips to make your project easier:

flicking-paint-8566

  • Add Snowy effect by flicking white acrylic paint onto the pine craft stem using an old paintbrush.

hardware-8570

  • Paint the brass hardware with black spray paint.  Once the paint is dry, rub Rose Gold Metallic Lustre over hardware for an aged vintage look.

joy-shadow-box-tray-close-up-sues-creative-workshop

  • For a cohesive look…rub Rose Gold Metallic Lustre onto the chipboard letters and the wood disc on the tree.
  • Cut the back of the bottle brush tree flat so that it fits snuggly into the tray.


This project was sponsored by Canvas Corp Brands and DecoArts.

I am an Amazon Affiliate.  If you choose to make a purchase using an Amazon link, I receive a small commission that helps offset the cost of running this blog.  Thank You!

Christmas Brag Book

Christmas Brag Book

This year make a Christmas Brag Book for all your fun Holiday Memories.

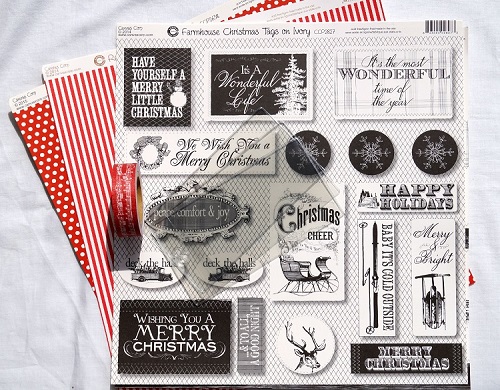
For my brag book I used clear flexible pouches from Deflecto Craft Solutions and paper

from Canvas Corp Brands Farmhouse Christmas Collection for a Quick and Easy project.

A Great Gift Idea for the Grandparents.

Christmas Mini Album Stephanie and Zach 7413

A fun way to share Holiday Silliness and the Sweet Little Moments shared between generations.

Christmas Mini Album Inside Back Cover 7414

The Christmas Brag Book was created for Craft Ideas Magazine’s Holiday Issue

and has my Christmas photo’s from last year.

Craft Ideas Holiday 2015

Craft Ideas is a great magazine for creative inspiration.

Christmas Mini Album Inside Pages 7411

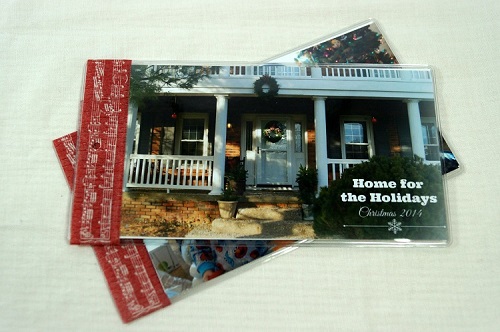
Finished Size: 3 1/4” x 6”

Christmas Mini Album Supplies 7388

Materials:

  • Deflecto 20019CR Flexible Pouch (1 package of 10)
  • Canvas Corp Brands CCP2827 Farmhouse Christmas Tags on Ivory 12 x 12 paper
  • Canvas Corp Brands CCP2826 Farmhouse Christmas Stripe on Ivory 12 x 12 paper
  • Canvas Corp Brands CCP2638 Red & Ivory Mini Dot Reverse 12 x 12 paper
  • Canvas Corp Brands CCP2639 Red & Ivory Ribbon Stripe 12 x 12 paper
  • Canvas Corp Brands Binding Ring-Small Antique Silver
  • Canvas Corp Brands Optical Lens Antique Brass
  • Canvas Corp Brands PaperTape: Christmas Wrap
  • Paper Source 5/8” Ivory/Red Striped Ribbon
  • Red Mini Rick Rack
  • Small Red Button
  • Photos
  • Black Cardstock

Basic Supplies:

  • Paper Cutter
  • 1 11/16” Circle Punch
  • Scissors
  • 1/8” Hole Punch
  • Double Stick Tape Runner
  • Glue Stick
  • Craft Glue
  • Thermo Web Mini Glue Dot

Directions:

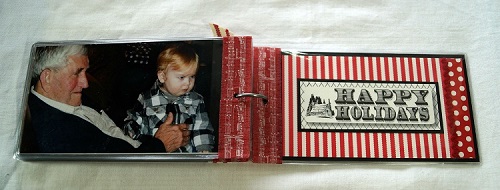
  1. For the Cover: Cut a piece of black cardstock 3” x 5 1/4”. Cut “It’s the most Wonderful Time…” from the Farm House Christmas Tags just slightly smaller than 3” x 5 1/4” and adhere to the black cardstock. Add a 1/2” x 3” strip of Red and Ivory Dots to the left side of the tag. Glue a 3” piece of red mini rick rack onto the right side of the tag.
  2. On the Inside Front Cover: Cut a piece of black cardstock 3” x 5 1/4”. Cut a 3” x 5 1/4” piece of Red & Ivory Ribbon Stripe just slightly smaller than the 3” x 5 1/4” and adhere to the black cardstock. Adhere two strips of 1/2” x 5 1/4” Red and Ivory Dots to the top and bottom of the striped paper. Adhere “I’ll be Home…” from the Farmhouse Christmas Stripe layered on black cardstock onto the center of the striped paper.
  3. Insert Cover and Inside Front Cover into the Flexible Pouch.
  4. Add Paper Tape around the plain end of the Flexible Pouch.
  5. Punch a 1 11/16” Snowflake Circle from the Farmhouse Christmas Tags and glue onto the back of the Optical Lens by adding craft glue along the outside edges of the lens. Glue small red button onto front of the lens in the middle of the snowflake.
  6. Cut a 10” piece of Ivory Red Striped Ribbon. Tie onto front cover adding the Optical Lens.
  7. Choose pictures that can easily be cut down to 3” x 5 1/4”. Add to inside of flexible pouches.
  8. Create Back Cover using the Red & Ivory Mini Dot Paper, Red & Ivory Striped Paper and Farmhouse Christmas Strip.
  9. Add Paper Tape to each of the pouches.
  10. Mark and re-punch the holes using 1/8” hole punch on each of the pouches and gather the mini album together using a small book ring.

Christmas Mini Album Inside front cover 7412

Christmas Mini Album Back Cover 7417

This project was created for Craft Ideas and was sponsored by Deflecto Craft Solutions

and Canvas Corp Brands.

Etched Snowflake Candy Jar

Quick and Easy Holiday Gift Idea

When it comes to the Holidays I love Quick and Easy Gift Ideas.

For the Snowflake Candy Jar…

I used a small canning jar etched with snowflakes and filled with candy.

It’s a project that I was able to put together in under a half hour.

Snowflake Candy Jar Supplies 1274

To make the Snowflake Candy JAR…                 

  1. Punch a strip of Snowflakes using etchmask™ vinyl and a snowflake punch.
  2. Carefully cover the jar with the vinyl.
  3. Make sure to burnish the vinyl to get out air bubbles and to make sure the all edges all down.
  4. Apply a thick coat of Etchall over the snowflake cut out using the squeegee.
  5. Wait 15 minutes.  Scrape excess etching crème from the side of the jar and return extra etching crème back into the bottle. (it’s reusable)
  6. Rinse jar with warm water to clean.
  7. Remove Stencil and dry.
  8. Add adhesive rhinestones to the center of each snowflake.
  9. Wrap craft stem around the neck of the jar and glue on a red button.

Snowflake Candy Jar Covered 1287

  • Cut a small circle from decorative scrapbook paper and adhere to lid of the jar.
  • Embellish jar with greenery stem, jingle and bow.

Snowflake Candy Jar 1472

   This would make a great Teacher, Hostess, Bunco, or Gift Exchange Gift.

This project was created for and sponsored by Etchall®.


Don’t Miss a Thing…Make Sure to Follow me.

Shop Your Fav Brands at Scrapbook.com

Disclaimer:  This blog uses ads and affiliate links.  If you choose to make a purchase using one of the links, I receive a small commission (at no additional cost to you) that helps offset the costs of maintaining this blog.  Thanks for your support!

Try Amazon Prime 30-Day Free Trial