What do you think about when you hear the words “4th of July”?
For me it’s… White picket fences, fireworks and the good old red white and blue.
Or a 4th of July Celebration Centerpiece with Fireworks, Flags, Banners and Pinwheels all
rolled into one. I created this 4th of July centerpiece a couple years ago, since it’s one
of my favorite projects, I thought I’d share it again. Enjoy!
How to make a 4th of July Centerpiece…

Products Used: (*affiliate link)
Directions:
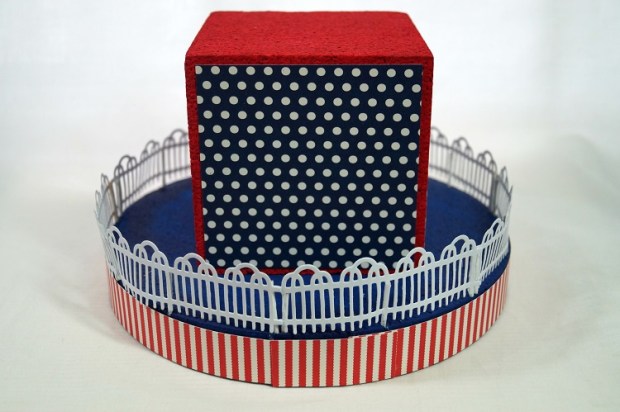
- Paint the round disc with Navy Blue paint.
2. Cut two 1” x 12” strips of the red striped paper and one 1” x 2” piece. Adhere to the side of the disc with double stick tape roller.
3. Die-cut 7 fence sections.
4. Paint 15 round toothpicks white. (set four aside to use later.)

5. Cut 11 toothpicks in half. Glue one toothpick half on each end and middle of the fence with the pointed end facing down.
6. Insert fence sections onto the top edge of the disc.
7. Paint the 4” cube red.
8. Cut five 3 ¾” x 3 ¾” pieces of Navy & Ivory dot paper. Adhere to the sides and top of the cube. Glue cube to center of the disc.
9. Paint two bamboo skewers white. Cut skewers to 5”.
10. Glue small blue beads to top of each skewer.
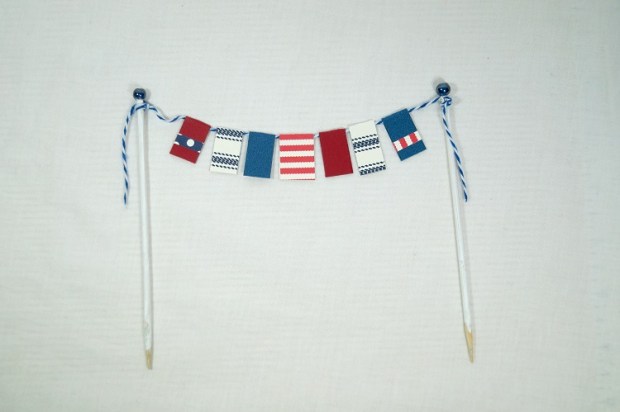
11. Create small ½” flags from scraps of paper and cardstock. Adhere onto a 12” piece of blue and white twine. Tie ends of the twine to top of the skewers to make a flag banner. Insert into disc.

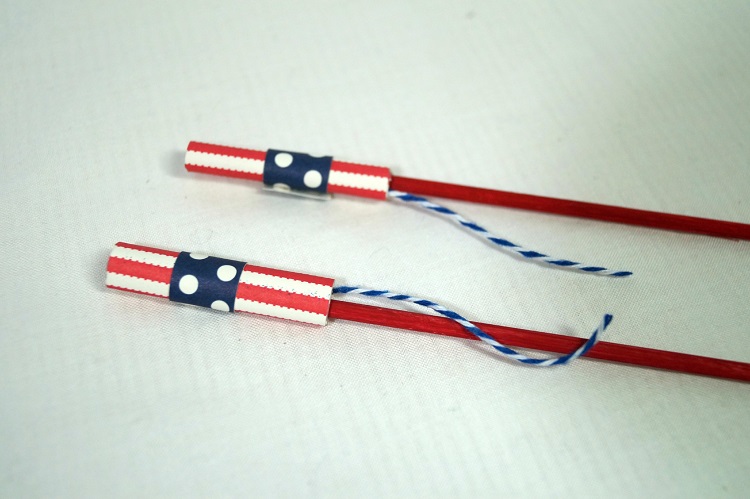
12. To create Bottle Rockets: Paint two bamboo skewers red. Cut two pieces of red striped paper 1 3/4” x two. Wrap around pencil to curve paper. Remove pencil and roll tightly to form a small tube. Wrap a 1/2” strip of navy dot paper around tube. Glue a small piece of twine inside of tube to create the bottle rocket wick. Glue tube onto red bamboo skewer and insert into disc. Create second bottle rocket for other side of the disc.

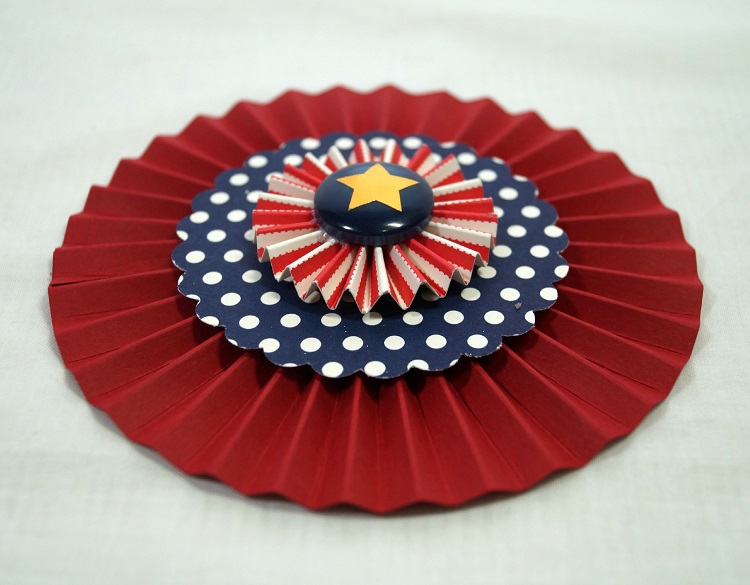
13. Punch two 3” Navy and Ivory Dots scalloped circles.
14. Cut two strips of red card-stock: 1 1/4”” x 12” and 2 1/4” x 6 1/2” . Adhere the two strips together to form one long 2 1/4” x 18” strip of red card-stock.
15. Using scoring board and scoring tool. Score card-stock every 1/4” down the entire length. Fold strip accordion fold. Glue ends together with a strong adhesive to form a cylinder.
16. On a flat surface, gather the bottom of the cylinder tight while spreading and pushing down on the top to create the Rosette.
17. With a strong adhesive, attach one of the scalloped circles to the center of the Rosette. Hold into place until the adhesive starts to hold.
18. Turn the Rosette over and attach the second scalloped circle onto the other side of the rosette.
19. Create a second smaller rosette using a 1” x 12” strip of red striped paper. Score strip every 1/4”. (repeat steps 16 and 17)
20. Glue blue button into center of the rosette to hold in place. Glue onto center of the scalloped circle. Add star sticker to center of button.
21. Paint a bamboo skewer with Navy paint. Cut into a 5” piece. Insert into back of finished Rosette.

22. Insert finished Rosette into top of the 4″ cube.

23. Create small pinwheels by adhering two pieces of 1” x 1” paper together. On each corner, cut diagonally two-thirds of way to square’s center, dividing each corner into two points. Bring every other point to center so that the points overlap. Glue into place.
24. Glue small red button to center of each pinwheel. Glue onto white painted toothpick and insert into base.
25. Create and print computer generated “CELEBRATE” and “4th of July” onto white card-stock. Cut and layer to size and adhere onto picks and skewers and insert onto centerpiece.
This project was created for and sponsored by Smoothfoam and Canvas Corp Brands.
For more summer fun…click on Slimer ad below

Disclaimer: This blog uses ads and affiliate links. If you choose to make a purchase using one of the links, I receive a small commission (at no additional cost to you) that helps offset the costs of maintaining this blog. Thanks for your support!

Join Amazon Kindle Unlimited 30-Day Free Trial