Together… Mini Flip Album

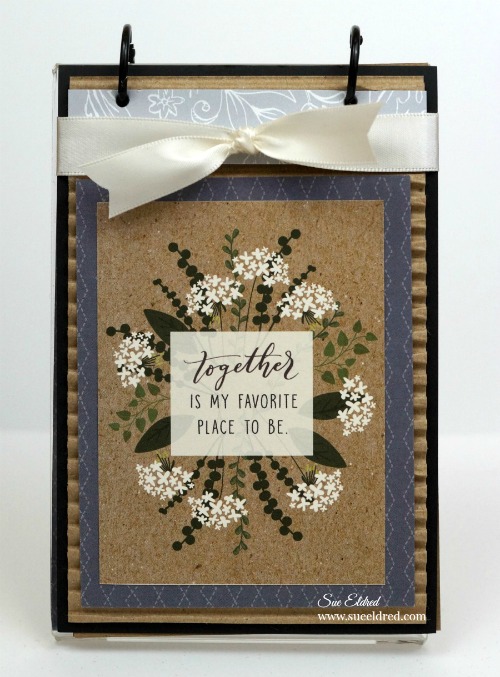
Together is my Favorite Place to Be…

This cute little flip album is one of the “make and take” projects that I taught

in the Deflecto Craft Solutions Booth at Creativation in January.

Shop Your Fav Brands at Scrapbook.com

“Together is my Favorite Place to Be” Supplies Used…          (*affiliate link)

Directions:

  1. Make two marks on the top of the frame approximately 3/4″ in on each side.  The marks need to be approx. 1/2″ down from the top of the frame.  (If the holes go down too far the pages won’t flip correctly.)  Drill two holes in the top of the frame with a 3/16″ drill bit.
  2. For the mini album cover…Adhere a 3/4″ x 4 3/4″ scrapbook paper strip onto the top of the corrugated paper leaving a 1/8″ margin on the top.  Adhere the 3″ x 4″ journaling card (cut from the scrapbook paper) onto a 3 1/2″ x 4 1/2″ piece of blue scrapbook paper layer, add those layers onto the corrugated paper and then onto a 4″ x 6″ black cardstock layer.
  3. Using the drilled holes on the craft frame as a guide, mark the cover and the kraft cardstock pages and punch two holes on the top.
  4. Mark and punch holes into a piece of 4″ x 6″ decorative scrapbook paper and insert into frame.
  5. Attach cover and pages to the craft frame with book rings.
  6. Tie ivory ribbon around cover.

“This is a sponsored post. As a member of the Deflecto Design Team I have been provided product in exchange for my creative ideas, views and opinions.”

*Disclaimer:  This blog uses ads and affiliate links.  If you choose to make a purchase using one of the links, I receive a small commission (at no additional cost to you) that helps offset the costs of maintaining this blog.  Thanks for your support!

Shop Amazon Scrapbooking Supplies*

How to make a Chippy Window for Spring

Happy Spring!

To celebrate the first day of Spring I’m sharing how I made this cute little Chippy Window.

To make the Chippy Window…

I started with a 7gypsies 8×8 Shadowbox Insert that I painted with white acrylic paint


To achieve the look of an aged, worn, old chipped painted window…

I alternated layers of Deco Art Media White Crackle Paint* and

Deco Art Media White Crackle Paste* from DecoArt.

Allow plenty of drying time between each coat.

*Disclosure:  This blog uses ads and affiliate links.  If you choose to make a purchase using one of the links, I receive a small commission (at no additional cost to you) that helps offset the costs of maintaining this blog.  Thanks for your support!

For the background of the window…                                                                          

I cut a piece of 7 3/4″ x 7 3/4″ decorative scrapbook paper and adhered it to a thick piece of

mat-board.  I cut down  a couple of 3″ x 4″ journaling cards from the

“Tealightful” collection from Pebbles Inc. and adhered it to the back of the window

frame before attaching the covered mat-board.  Because the mat board is heavy,

I used a Beacon Adhesive Quick Grip Glue* to attach it to the frame.

I added loop screws onto each side of the window frame approx. 1/2″ in and added a thin chain

to the loop screws for hanging.  Ribbon would also work.

To create the floral swag

I snipped a few sprigs of artificial flowers and attached them together in the center with

a thin floral wire.  I tied a simple bow to cover the wire.

I attached the floral swag and wood embellishments to the front of the frame with

Beacon Adhesive Quick Grip Glue*   

FYI…I found the “Welcome” and “Butterfly” embellishments at Michaels.

I added the Spring Window to the center of a wreath and hung it on the front door.

I found the greenery wreath yesterday at Homegoods.  It was just what I was looking for,

the perfect backdrop for my Chippy Spring Window.

FYI…Having a problem finding a window pane to use or would like one that’s even bigger?

  (*affiliate link)

Hampton Art Jillibean Soup Mix The Media Window Frame-14 X16 White* 

Shop Your Fav Brands at Scrapbook.com


The new guy in my life…

There’s a new guy in my life and I’m in love.

Meet the newest member of our family, my sweet little grandson Emerson.

Emerson is my third grandchild, my third grandson and the littlest brother.

He has already stolen all of our hearts.

I’m so excited to have a new love in my life.

For Emerson’s layout, I used the Lullaby Collection from Pebbles Inc.

    • I created a lacey border for the photo using the Spellbinders Captivating Squares Die Templates* and cutting and piecing six squares together.
    • I wanted some small floral accents for my layouts so I fussy cut small flowers from the floral scrapbook paper.  I used thin 3D foam mounting squares on a few of the flowers.

Disclaimer:  This post uses affiliate links.  If you choose to make a purchase, I will receive a small commission that helps offset the cost of running this blog.  Thanks for your support!

Shop Amazon – Create an Amazon Baby Registry

for little storage needs…

for-little-storage-needs-4892

Sometimes the smallest things take up the most room in your heart.                      (A. A. Milne)

Now that my new grandson has finally arrived in all his adorable sweetness…

It’s hard to believe that someone so small can need so many things.

for-little-storage-needs-sues-creative-workshop-4842

(*Amazon Affiliate Link)

 I created the Bath Time Organizer, for my Daughter in Law, to make bath time a little easier.

For the organizer, (and bath time sign) I used puffy  stickers from the “lullaby” collection

from Pebbles Inc. and Deflecto Tilt Bins*

little-storage-close-up-4851

*Shop Amazon – Create an Amazon Baby Registry

The bins are interlocking and stackable.

Great for little storage needs in the nursery, craft room, garage, kitchen and even the kid’s room.

Wherever you need a little extra storage.


You can purchase these bins by themselves or as a set of four from Amazon*.

Use on table, mount direct to wall or hang using the Deflecto Mounting Bar* (sold separately).

*AD amazon-baby

*Disclaimer:  This post uses ads and affiliate links.  If you choose to make a purchase using one of the links, I receive a small commission (at no additional cost to you) that helps offset the costs of maintaining this blog.  Thanks for your support!

 “This is a sponsored post. As a member of the Deflecto Design Team I have been provided product in exchange for my creative ideas, views and opinions.”

 Adorable Baby Sweaters

Happy Days Card Class Reminder

Happy Day Cards with Pebbles Inc. Collage

It’s not to late to sign up for this fun card class at The Paper Forest…

Happy Days Cards

Enjoy life’s little moments with cards made from this fun collection of papers from the  “Happy Days” Collection from Pebbles Inc.

The Paper Forest in Washington, IL

Saturday, May 30th

10:30-12:30

Cost:  $20.00

Contact The Paper Forest at 309-745-3440 for more information or to sign up.

Supplies Needed:  Scissors, Paper Trimmer, Tape Runner, Foam Mounting Squares

Happy Cards for a Happy Day…

Yesterday was such a lovely Spring day. 

The sun was shining, the birds were singing.

My teenage son wanted to go out with me for dinner!

You know… a “Happy” kind of day.

So a good day deserves some “Happy Day” cards.

Smile 3895

Cards to make you “Smile”. 

Hello Friend 03902

Happy Birthday 3889

Let's make a memory 3906

And… if you like these cards and would like to make a set for yourself, we will be making these cards in my “Happy Day Cards” class that I’ll be teaching in May at The Paper Forest.

Happy Day Cards

Enjoy life’s little moments with cards made from the Happy Days Collection from Pebbles Inc.

Saturday, May 30th

10:30-12:30

Cost:  $20.00

Contact The Paper Forest at 309-745-3440 for more information or to sign up.

Supplies Needed:  Scissors, Paper Trimmer, Tape Runner, Foam Mounting Squares


Mini Desk Calendar

Deflecto Mini Calendar 2976

Today’s project is one of those quick & easy projects that just make me smile.

You can put together this Mini Desk Calendar in just a few minutes.

I started with a 3″ x 4″ clear acrylic frame from Deflecto Craft Solutions

and a Mini Tear Off Calendar from Taylored Expressions.

Along with some left over scrapbook paper from a class I was working on.

And… because the paper is inserted inside the frame you can easily change

it out with the seasons.  You can make the mini desk calendar with the acrylic

frame upright or laying down.  Either one is cute.

Mini Desk Calendar 3029

“This is a sponsored post. As a member of the Deflecto Design Team I have been provided product in exchange for my creative ideas, views and opinions.”

Shop Amazon Scrapbooking Supplies*

*Disclaimer:  This post uses ads and affiliate links.  If you choose to make a purchase using one of the links, I receive a small commission (at no additional cost to you) that helps offset the costs of maintaining this blog.  Thanks for your support!