Upcycling an Old Painted Canvas

Upcycling an Old Painted Canvas

Upcycling an Old Painted Canvas is a satisfying Trash to Treasure Project.

Turn an unused/unwanted canvas into an easy DIY.

Upcycling an Old Painted Canvas

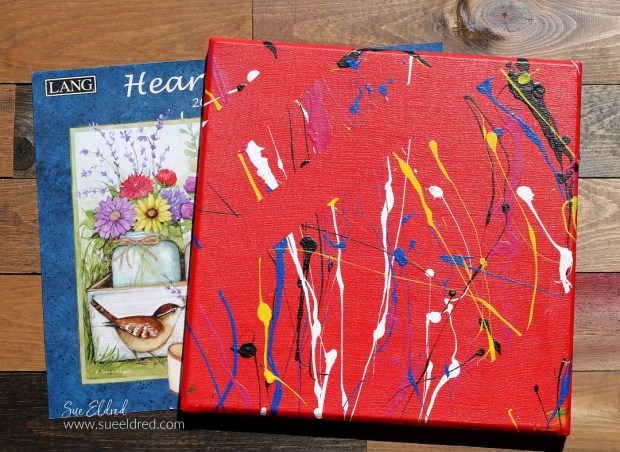
Several years ago, I got the opportunity to try Splatter Painting at a Trade Show.

As fun and exhilarating (and messy) as it was, abstract art is not my style.

While I would never typically do this with a painting,

this just-for-fun painting left me with no guilt.  (splatter painting post here)

I have been using Lang Wall Calendars for years.

And every year, at the end of the year, I have a hard time throwing them away.

I combined the frame under the canvas with the calendar page

for some inexpensive framed art.

Reusing items around the house in new ways is fun for me.

I don’t have to get rid of things I love, and It’s a new way to enjoy them.

And if I change my mind, which I often do, I can always upcycle it again.

It’s super easy to do.

Upcycling an Old Painted Canvas

Here’s what I used:  (*affiliate links)

*Disclosure:  This blog uses ads and affiliate links.  If you choose to make a purchase using one of the links, I receive a small commission (at no additional cost to you) that helps offset the costs of maintaining this blog.  Thanks for your support!

Upcycling an Old Painted Canvas

  • Use a small flat head screwdriver* to remove the staples from the back of the canvas.
  • FYI…Some frames will come with staples in the corner to hold them together instead of glue.
    In that case, you have a decision to make. But because I wasn’t attached to the painting, I had nothing to lose.
  • Give the frame a light sanding with a sanding block*.

Upcycling an Old Painted Canvas

  • Paint or stain the wood to match your decor.
  • Rub the finished frame with a clear wax using a soft, clean rag.

Upcycling an Old Painted Canvas

  • Cut the calendar page a little larger than the inside of the frame.
  • To give the picture more stability and a finished look, I adhered it to a piece of chipboard before gluing it onto the back of the frame.
  • Glue the picture inside the frame using a strong adhesive. I like using Rapid Fuse Adhesive*. It is a quick-setting glue and very strong. It works well with paper.

Upcycling an Old Painted Canvas

I put my “New” framed print on my mantel with a couple of old pots for a fun, fresh Spring look.

Spring Tabletop Kit  New Products at Scrapbook.com!

Paper Crafting Fall Home Décor

Fall Paper Crafted Home Décor

A Simple Fall Paper Crafted Home Décor Project.

It’s so much fun to decorate for Fall with its vibrant and colorful hues.

I’d love Fall even more if it didn’t turn into Winter after it was all over.

For the framed dimensional pumpkin, I decided to use my paper crafting skills

to make a fun and easy Home Décor for Fall.

Maker's Movement

Disclosure:  This is a sponsored post  for The Maker’s Movement.  I have been provided product and compensation in exchange for my creative ideas.  The view and opinions are my own. 

Fall Paper Crafted Home Décor

Materials Used:     (*affiliate links)

*Disclosure:  This blog uses ads and affiliate links.  If you choose to make a purchase using one of the links, I receive a small commission (at no additional cost to you) that helps offset the costs of maintaining this blog.  Thanks for your support!

Fall Paper Crafted Home Décor

Directions:

  • Cut two pieces of Double-Sided Adhesive Foam 5″ x 6″ and 4″ x 5″.
  • Cut two pieces of orange plaid paper from the paper crafting paper the same size as the foam.
  • Remove the protective coating from one side of the foam and place the paper onto the adhesive.
  • Place pumpkin die outlines over the foam and die-cut the shape using the Crossover II Die-Cutting Machine*.  You may need to run the die back and forth a couple of times through the machine to make sure all the layers have been cut.
  • Repeat the process with the die-cutting of the stem and leaves.

Fall Paper Crafted Home Decor

  • For the words used on the front of the pumpkin, run a small strip of striped paper through the Xyron Sticker Maker Mini*.
  • Place the word dies onto the paper and die-cut.  (you may want to put a small piece of tape on the dies to keep them in place)

Fall Paper Crafted Home Décor

  • I have a weakness for old frames and I love to pick them up whenever I see a good deal. (I think this one was a quarter.) It now makes the project an Up-Cycled project which makes it extra special.
  • Remove the glass and the backing from the frame and spray with ivory spray paint.

Fall Paper Crafted Home Decor

  • The frame measures 7 1/4″ x 7 1/4″ with a 6″ x 6″ opening.
  • Replace the 90’s picture with a 6″ x 6″ piece of coordinating scrapbook paper. (I placed the glass behind the scrapbook paper to give the project more stability. Also, I will have it if I want to reuse the frame for another project later.)
  • Remove the adhesive from the back of the pumpkin pieces and place it inside the frame.

Paper Crafting Fall Home Décor

Cute, simple, and easy to make. My favorite kind of projects.

Xyron® is your official site for all your crafting needs