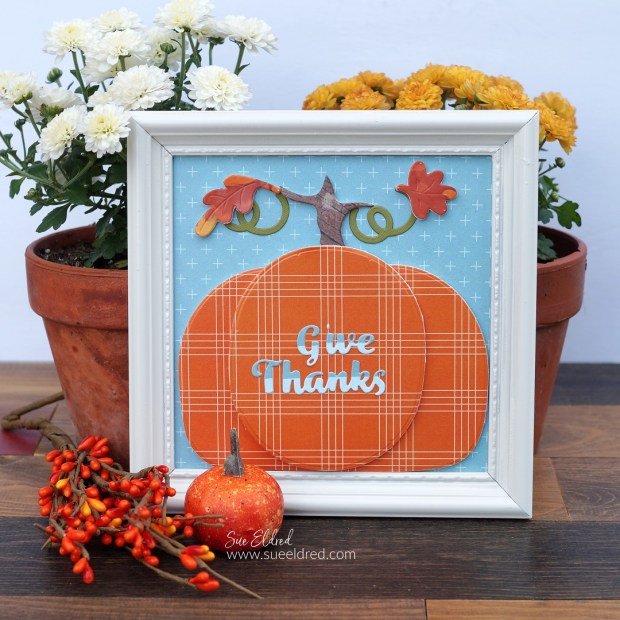
A Simple Fall Paper Crafted Home Décor Project.
It’s so much fun to decorate for Fall with its vibrant and colorful hues.
I’d love Fall even more if it didn’t turn into Winter after it was all over.
For the framed dimensional pumpkin, I decided to use my paper crafting skills
to make a fun and easy Home Décor for Fall.

Disclosure: This is a sponsored post for The Maker’s Movement. I have been provided product and compensation in exchange for my creative ideas. The view and opinions are my own.

Materials Used: (*affiliate links)
- M12654 Pumpkin Card Die Set
- M12715 An Autumn Breeze 6″ x 6″ Paper Pack
- MMT211 Double Sided Adhesive Craft Foam Sheets
- Crossover II Fabric & Paper Cutting System*
- Xyron Sticker Maker Mini*
- 6″ x 6″ Frame*
- Ivory Spray Paint*
- Green Cardstock
*Disclosure: This blog uses ads and affiliate links. If you choose to make a purchase using one of the links, I receive a small commission (at no additional cost to you) that helps offset the costs of maintaining this blog. Thanks for your support!

Directions:
- Cut two pieces of Double-Sided Adhesive Foam 5″ x 6″ and 4″ x 5″.
- Cut two pieces of orange plaid paper from the paper crafting paper the same size as the foam.
- Remove the protective coating from one side of the foam and place the paper onto the adhesive.
- Place pumpkin die outlines over the foam and die-cut the shape using the Crossover II Die-Cutting Machine*. You may need to run the die back and forth a couple of times through the machine to make sure all the layers have been cut.
- Repeat the process with the die-cutting of the stem and leaves.
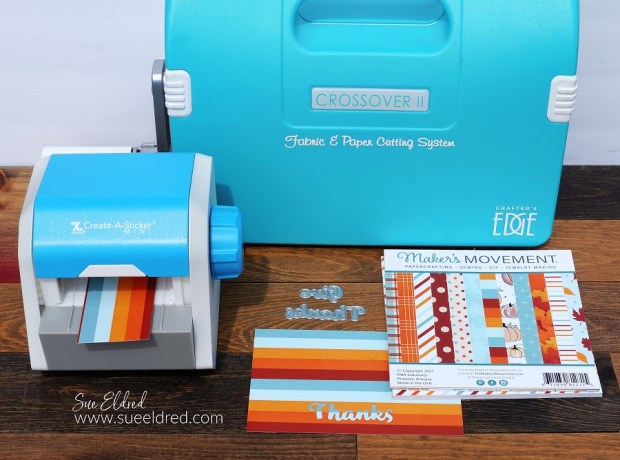
- For the words used on the front of the pumpkin, run a small strip of striped paper through the Xyron Sticker Maker Mini*.
- Place the word dies onto the paper and die-cut. (you may want to put a small piece of tape on the dies to keep them in place)


- I have a weakness for old frames and I love to pick them up whenever I see a good deal. (I think this one was a quarter.) It now makes the project an Up-Cycled project which makes it extra special.
- Remove the glass and the backing from the frame and spray with ivory spray paint.

- The frame measures 7 1/4″ x 7 1/4″ with a 6″ x 6″ opening.
- Replace the 90’s picture with a 6″ x 6″ piece of coordinating scrapbook paper. (I placed the glass behind the scrapbook paper to give the project more stability. Also, I will have it if I want to reuse the frame for another project later.)
- Remove the adhesive from the back of the pumpkin pieces and place it inside the frame.

Cute, simple, and easy to make. My favorite kind of projects.

