How to make a Springtime Delights Resin Magnet

I have to admit, working with Resin intimidated me at first.

With a little practice, I found that it’s really not hard and you can get some amazing results.

Especially when you start small.    (Just make sure to read the package instructions)

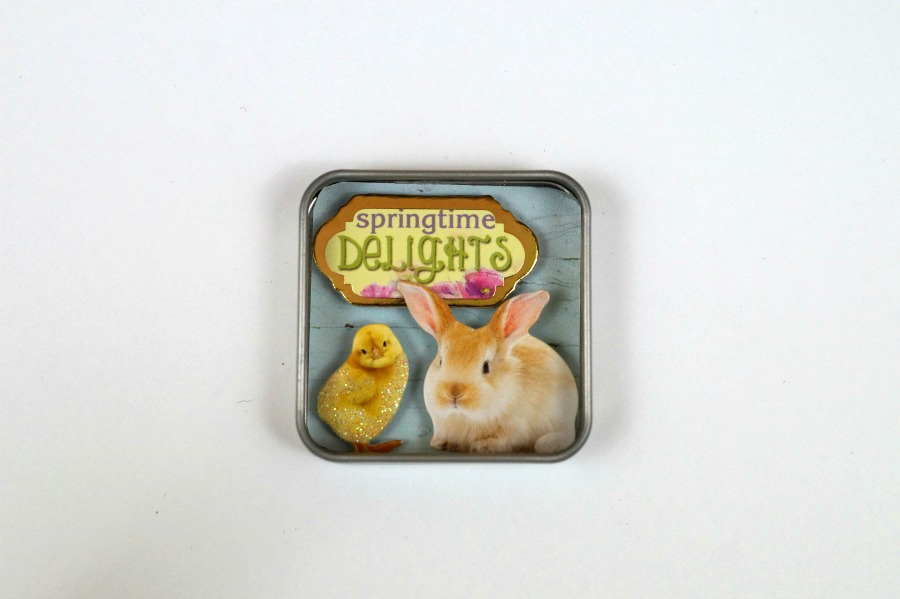
My Springtime Delights magnet measures only 2″ x 2.

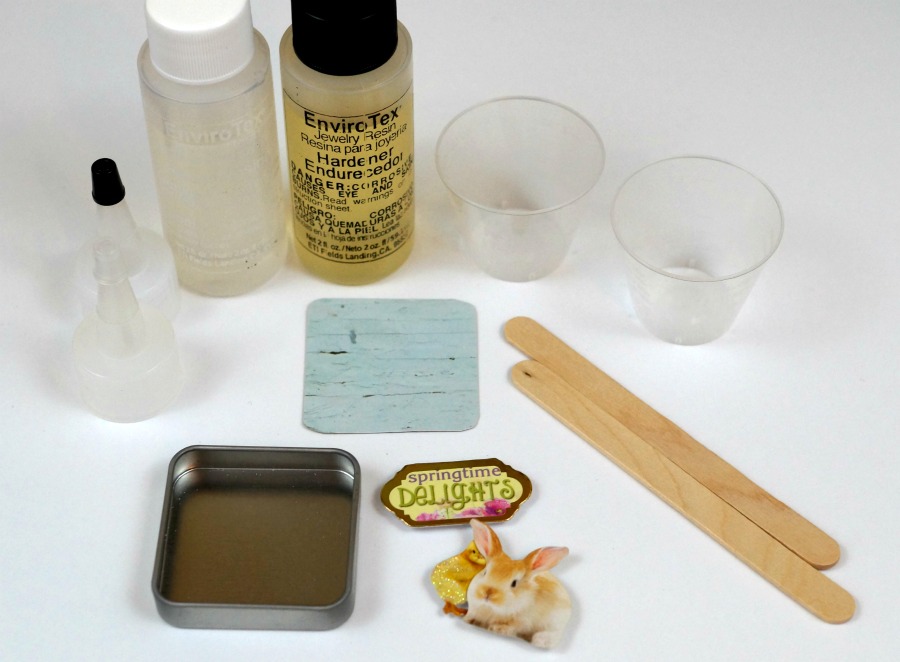
Materials:            (*affiliate link)

Directions:

Cut and glue a small piece of scrapbook paper to fit inside of tin.

Arrange 3D stickers inside of tin.  You may need to add extra glue under each sticker to make sure they stay in place.

Measure, Mix and pour the resin as directed in the product packaging.

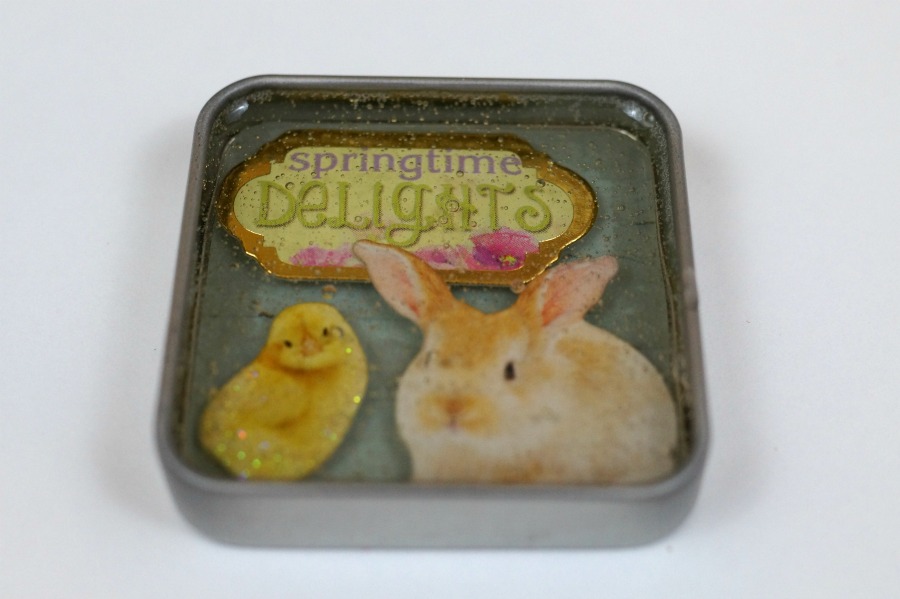
Blow air onto the resin using a thin straw to help remove bubbles.

Allow plenty of drying time for the resin to cure before gluing magnet onto the back of the tin.

CreateForLess.com - Create More, Spend Less

*Disclaimer:  This post uses ads and affiliate links.  If you choose to make a purchase using one of the links, I receive a small commission (at no additional cost to you) that helps offset the costs of maintaining this blog.  Thanks for your support!

How to make a Chippy Window for Spring

Happy Spring!

To celebrate the first day of Spring I’m sharing how I made this cute little Chippy Window.

To make the Chippy Window…

I started with a 7gypsies 8×8 Shadowbox Insert that I painted with white acrylic paint


To achieve the look of an aged, worn, old chipped painted window…

I alternated layers of Deco Art Media White Crackle Paint* and

Deco Art Media White Crackle Paste* from DecoArt.

Allow plenty of drying time between each coat.

*Disclosure:  This blog uses ads and affiliate links.  If you choose to make a purchase using one of the links, I receive a small commission (at no additional cost to you) that helps offset the costs of maintaining this blog.  Thanks for your support!

For the background of the window…                                                                          

I cut a piece of 7 3/4″ x 7 3/4″ decorative scrapbook paper and adhered it to a thick piece of

mat-board.  I cut down  a couple of 3″ x 4″ journaling cards from the

“Tealightful” collection from Pebbles Inc. and adhered it to the back of the window

frame before attaching the covered mat-board.  Because the mat board is heavy,

I used a Beacon Adhesive Quick Grip Glue* to attach it to the frame.

I added loop screws onto each side of the window frame approx. 1/2″ in and added a thin chain

to the loop screws for hanging.  Ribbon would also work.

To create the floral swag

I snipped a few sprigs of artificial flowers and attached them together in the center with

a thin floral wire.  I tied a simple bow to cover the wire.

I attached the floral swag and wood embellishments to the front of the frame with

Beacon Adhesive Quick Grip Glue*   

FYI…I found the “Welcome” and “Butterfly” embellishments at Michaels.

I added the Spring Window to the center of a wreath and hung it on the front door.

I found the greenery wreath yesterday at Homegoods.  It was just what I was looking for,

the perfect backdrop for my Chippy Spring Window.

FYI…Having a problem finding a window pane to use or would like one that’s even bigger?

  (*affiliate link)

Hampton Art Jillibean Soup Mix The Media Window Frame-14 X16 White* 

Shop Your Fav Brands at Scrapbook.com


It Feels Good to Feel Good

There’s nothing like sunshine, blue skies…

and a couple days of antibiotics to get the creative juices flowing again.

Yesterday, I re-worked the mantel and put away the last of my winter decorating.

I washed all the bedding, threw out my toothbrush, opened windows

and used Clorox wipes all over the house.

After being stuck at home for the past several days dealing with Strep Throat,

I finally ventured out.  I went to Goodwill (donated and purchased),

visited the Camera Shop to exchange my tripod for an upgrade

and I went to Michael’s to get supplies for a new Spring project.

It feels good to feel good.

And talking about feeling good.

This past Holiday Season, I got a new tri-pod for my camera.

I researched several new tri-pods online first.

I was looking for a tri-pod with a pivoting arm for table top shots and videos.

Being that a really good tri-pod is somewhat costly…

I wanted to make sure I got the best deal.

I decided to go to the local Camera Shop to check them out in person

before I made my online purchase.  (I know, I know, that’s wrong)

Once there the guy helping me was so nice, that I spent a few more bucks

and bought local.  I did the same thing a few years ago when I was looking

for my new camera.   Great Service is worth something.  Right?

Long story short, I bought the wrong tri-pod.  (technically it wasn’t my fault.)

Flash forward to today. 

I stopped by the Camera Shop to see if  I was doing something wrong.

A couple of the sales-guys and myself were playing with it when a more

knowledgeable salesman informed us that my tri-pod with the rolling ball

action wasn’t made for what I was wanting.  (Oops, someone made a mistake.)

He took me over and showed me the one that would, explained how everything

worked and exchanged my 3 month old tri-pod.   “No problem, I’ll take care of you”.

You don’t get that kind of personal service when you buy online.  (Just sayin!)

Glittered Bunny Egg

Are you ready for Spring?

Warm Weather, Pretty Flowers and Sweet Little Bunnies and Easter Eggs.

My project today is a Sweet Glittery Little Bunny made from a Smoothfoam Egg.

Bunny Parts and Supplies 3178 Glittered Bunny Egg 3224

To Make the Glittered you’ll need:        (*affiliate links)

  1. Cut two bunny ears from the smoothfoam sheet
  2. Lightly sand Smoothfoam egg and bunny ears.
  3. Glue ears onto Smoothfoam egg.
  4. Paint with cream paint.  Paint inside of the bunny ears pink.
  5. Cover the entire bunny with a thin coat of mod podge and sprinkle with glitter.
  6. Insert micro brads for the eyes and heart brad for the nose.
  7. Draw small mouth with fine black marker.

This project was created for and sponsored by Smoothfoam.

Shop Your Fav Brands at Scrapbook.com

*Disclosure:  This blog uses ads and affiliate links.  If you choose to make a purchase using one of the links, I receive a small commission (at no additional cost to you) that helps offset the costs of maintaining this blog.  Thanks for your support!

Spring Bling for your Garden

Spring Bling for your Garden 3640

Add a little Spring Bling to plain boring terra cotta pots.

With Spring Fever setting in, I decided I needed a new flower to perk up the place.

I chose a pretty little African Violet that reminds me of my grandma.

Grandma loved African Violets.

In no time at all, armed with a few simple products, I transformed a boring terra cotta pot into

something sparkly and fun.  Just what I needed.

Spring Bling 3596

 To make my Spring Bling Pot you’ll need:      (*affiliate links)

  1. Start with a 4 1/2″ Terra Cotta Pot painted with black acrylic paint.
  2. Cut Black Damask tissue paper the width of the lower portion of the pot.  Cut the strip into smaller sections.  (my sections were 2 3/4″ x 1 1/2″)
  3. Apply a thin layer of Mod Podge to a small section of the pot, add tissue paper and apply another layer of Mod Podge over tissue.
  4. Continue adding tissue sections until the bottom of the pot is covered.
  5. Apply a thin layer of Mod Podge over the top of the pot to give it a nice shiny finish.
  6. Cut a strip from the Black Crystal Sheet to fit around the rim of the pot.
  7. Glue crystal sheet onto rim of the pot.
  8. Glue vintage button over seam for added sparkle.
  • FYI:  I could have used the Weldbond glue shown in the picture above which is a good permanent glue.  But, because of the weight of the crystals I decided to use my Quick Grip glue instead.

Spring Bling 3606  Spring Bling 3607

My Spring Bling Pot was created for and sponsored by Connie Crystal.

connie crystal logo

Disclosure:  I am an Amazon Affiliate.  If you chose to make a purchase using one of the links, I receive a small commission that helps offset the cost of running this blog.  Thanks for your support!

It’s that time of year again.

It's that time of year again

Mothers Day week-end for me is the start of my gardening season.

My lilacs are blooming and everything smells wonderful! (which makes me very happy)

One of my Mothers Day gifts every year is a day filled with labor.  (kind of fitting don’t you think?)

My guys spent all day on Saturday helping me move bushes, plant shrubs and put in my flowers.

We went to three different places to get everything we needed.  (and I still need more)

I think my youngest is a budding landscape architect.

He worked so hard and was so motivated.  He loves working in the yard and takes great pride in it.

For the past three years, he’s had a wiffle ball field in the yard.  He keeps it extremely manicured.

Spring Collage 2014

On Mothers Day, we usually go to the park, pick up chicken and have a picnic with the whole family.

This year, the weather called for a chance of rain all day.  So, I decided to have it at my house.

Would you believe just a couple sprinkles?  Didn’t even move us inside.

I had a wonderful and productive Mothers Day week-end.