Home is Where the Heart is Stitched Sampler

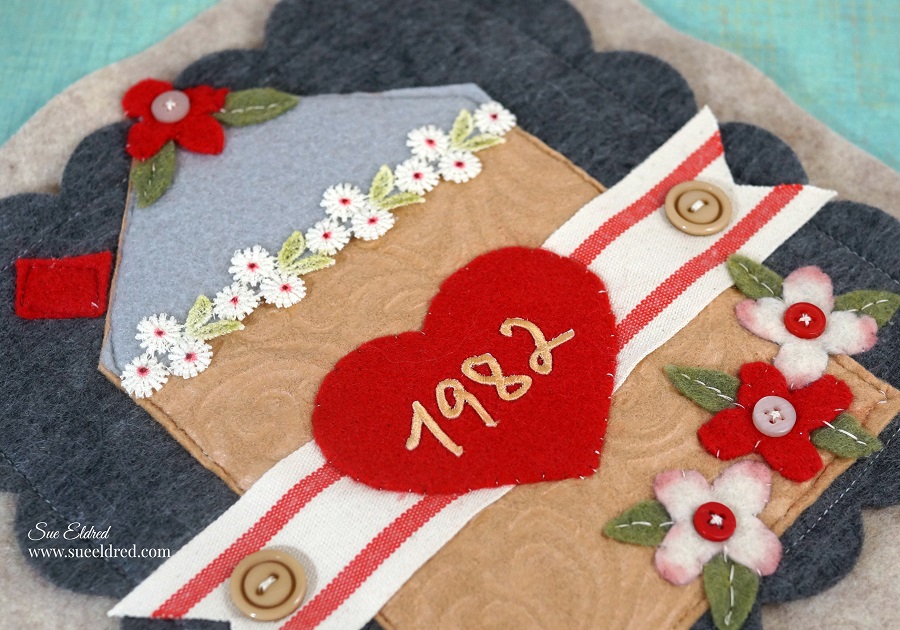
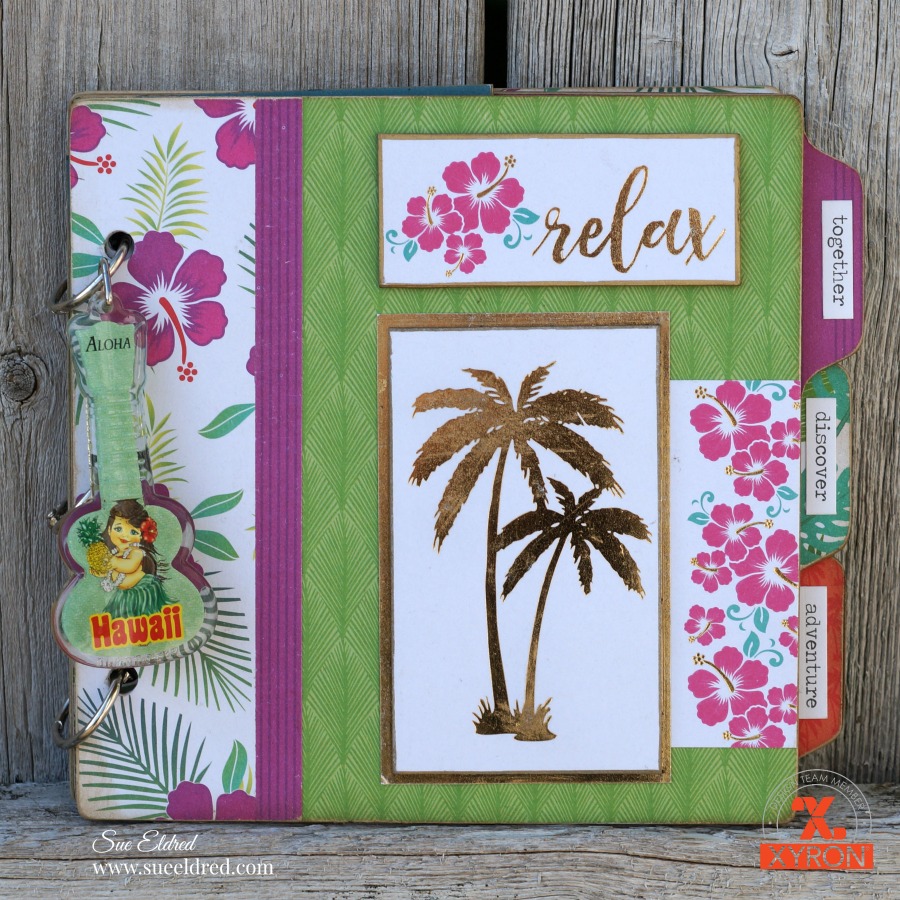
Celebrate special occasions with a personalized stitched sampler.

A great gift idea for a wedding, anniversary or new home.

Home is where the Heart is products used:                      (*affiliate link)

*Disclosure:  This blog uses ads and affiliate links.  If you choose to make a purchase using one of the links, I receive a small commission (at no additional cost to you) that helps offset the costs of maintaining this blog.  Thanks for your support!

Create custom numbers to match the project by spraying numbers with glimmer mist. 

Allow numbers to fully dry before using .

Directions:

  1. Cut a shapes using the picture above.
  2. The flowers were made using a simple hand drawn flower shape and traced onto the felt.
  3. Add red ink to the tips of the cream flowers with a stencil brush.
  4. Machine stitch the gray scalloped square onto the tan square
  5. Machine stitch the roof onto house and machine stitch onto the gray scalloped square.
  6. Iron numbers onto the center of the red heart.
  7. Arrange and adhere smaller pieces onto house using fabri tac glue.
  8. Hand stitch smaller pieces and buttons into place using needle and thread.
  9. Add finish piece into a shadow box frame.

Look for Joy® iron-on embroidered alphabet letter sheets at your local craft store.

“This is a sponsored post. As a member of the Creating with Joy Design Team I have been provided product and compensation in exchange for my creative ideas.  The views and opinions are my own. 


Tropical Vacation Mini Album

Who’s ready for a Tropical Vacation?  

Many, many years ago, I met my sweetie while visiting the island of Oahu.

Twelve years ago we went back.  (I’m thinking we’re long overdue.)

I need a tropical vacation!

This week, the Xyron Design Team teamed up with Die Cuts with a View.

I received the Electric Jungle Paper Pad, a bright and colorful collection.  

For my project, I decided to make a mini album.  I’m not sure if I’ll use the really old, kind of old

or wait until I get new pictures to place inside the album.  (hint, hint!)

Tropical Vacation Mini Album Supplies Used:                     (*affiliate links)

*Disclosure:  This blog uses affiliate links.  If you choose to make a purchase using one of the links, I receive a small commission (at no additional cost to you) that helps offset the costs of maintaining this blog.  Thanks for your support!

  • Cut paper to fit the pages of the chipboard album.
  • Lay decorative scrapbook paper (design side up) on the  *Xyron Creative Station, 9″ crank the handle to run the paper through the machine.  As it moves through the Xyron Creative Station it adds adhesive to the back side of the paper.
  • Easy to use and it doesn’t need any electricity.
  • I like using the Xyron Creative Station* when making mini books because you get complete coverage, no wrinkling, no bubbles!

  • Once the pages are covered with the paper, use a craft knife and cutting mat to trim around the edges of the chipboard.
  • Use the XYRON Adhesive Eraser* to remove any extra adhesive from the edges.
  • Gently sand away rough cut edges on the paper using a extra fine sanding block.
  • Because the chipboard is tan and the core of the paper is white, I inked the edges of the pages with a light tan ink and a ink blending tool.
  • I created thick tags by using a tag cut from the paper pad and adhering it onto a small piece of chipboard.  I used a gold calligraphy paint marker to create a gold border around the edge of the tag.
  • The “Palm Tree” and “Relax” on the front of the mini album both have chipboard underneath to create added dimension.

“This is a sponsored post.  As a member of the Xyron Design Team I have been provided product and compensation in exchange for my creative ideas.  The views and opinions are my own.

Translucent Vinyl Suncatcher

When I received the Translucent Vinyl from Tape Technologies,

I knew it would be perfect for making a Suncatcher.

The translucent vinyl comes in several great colors to choose from.

To make my Suncatcher I used a framed glass sample I rescued from the garbage.

You could also use a small frame and glue the glass into the frame.

To create my shapes I used my Silhouette Cameo*and Jillibean Soup’s Floral Mandala cut file.

*Disclosure:  This blog uses ads and affiliate links.  If you choose to make a purchase using one of the links, I receive a small commission (at no additional cost to you) that helps offset the costs of maintaining this blog.  Thanks for your support!

I used the Vinyl Transfer Tape* to overlay the blue onto the pink.

I then transferred both images onto the glass to create the Suncatcher.

To create a little more sparkle I added adhesive rhinestones onto the glass.

Shop Your Fav Brands at Scrapbook.com

“This is a sponsored post. As a member of the Tape Technologies Design Team I have been provided product in exchange for my creative ideas, views and opinions.”

Ask for Self Adhesive Glitter Vinyl Sheets- by Styletech from Tape Technologies* at your local Scrapbook Store.

How to make a DIY Memo Pad Holder

How to Make a DIY Memo Pad Holder…

I’m a list maker.

I make lists for things to do, groceries to buy, photos to edit, ideas, gardening…

I’m actually using the “Choose Joy” Memo Pad Holder as I sit and write this post.

The Choose Joy Memo Pad Holder with its sweet florals reminds me of everything summer.

And speaking of summer…it’s going to be a busy one.  (which means more lists)

DIY Memo Pad Holder Supplies Used:      (*affiliate link)

How to make a DIY Memo Pad Holder…

  • Cut cardstock to measure 8 ¼” x 10 ½”.
  • Score the cardstock at 5 1/8″ and 5 3/8″

  • Cut a 5″ x 2 ½” piece of decorative scrapbook paper to go around the top of the memo pad.
  • Place the paper, design side up, into the end of the Xyron 3″ Sticker Maker* and pull the paper through.  Rub the protective covering and peel back to expose sticker.
  • I use the XYRON Adhesive Eraser* to remove any extra adhesive from the edges.

  • Align paper on the top of the memo pad band and wrap around to the back of the pad.

Did you know that you can use the Xyron Sticker Maker with ribbon?

  • Run ribbon though the Xyron 1.5-inch Sticker Maker*.
  • Center and adhere onto the middle of the scrapbook paper border.  Wrap extra ribbon around back of the memo pad.

  • Use the Xyron Mega Runner* to adhere the notepad onto the inside cover.
  • On the other side of the inside cover, create a pocket using coordinating paper and embellishments.
  • Add adhesive to three sides of the pocket and adhere inside cover.  Perfect place for receipts and additional lists.

Embellish front cover with an inspirational quote, ribbon and flowers.

(a cute picture of the kids would be nice too)

XYRON MEGA RUNNER GIVEAWAY…

Xyron is giving me a Xyron Mega Runner to give away to one lucky blog reader.

It’s super simple to enter.

Leave a comment on my blog mentioning the Xyron Mega Runner by 5-31-18 to be eligible.

One entry per day.  US and Canada Only (color may vary)

“This is a sponsored post.  As a member of the Xyron Design Team I have been provided product and compensation in exchange for my creative ideas.  The views and opinions are my own.”

*Disclosure:  This blog uses affiliate links.  If you choose to make a purchase using one of the links, I receive a small commission (at no additional cost to you) that helps offset the costs of maintaining this blog.  Thanks for your support!

5 Creative Ideas for Beaded Iron On Trim

5 Creative Ideas for using Beaded Iron On Trim from Expo International.

When I received this selection of beautiful beaded trim from Expo International,

the creative wheels really started to spin.

I couldn’t narrow it down to just one project, so I created five.  (Lucky You!)

But why stop there…

Today, I’m participating with several other designers of Designer Craft Connections

for a fun Blog Hop using the trims from Expo International.

Every designer got something different, so it should be good.  (details below)

#1 Vases…

Turn a simple Dollar Tree* glass cylinder or empty cappuccino bottle in a Elegant Vase.

Spray the top of the Dollar Tree cylinder vase with Gold Glitter Spray Paint* and glue the trim onto the vase with Beacon Zip Dry Glue*.              (*affiliate link)

Try gluing  two or more pieces of beaded trim to the bottom of a empty jar or vase.

#2 Baskets

Embellish the band of a plain basket for a little extra style.

Add a even more personality by gluing iron embroidered letters.

#3 Festival Bracelets

Have fun this summer with easy to make Festival Bracelets.

  • Measure the size of your wrist.
  • Cut a piece of denim or felt approx. 3/4″ longer than your trim.
  • Arrange trim onto fabric so that only one end has the extra fabric.
  • Lay a clean soft cloth over trim and iron on the fabric.
  • Add hook and look tabs* to the end of the fabric.

#4 Jazzed Up Pockets

Jazz up the pockets of jeans, shorts or jacket.

#5 Bridal Pouch

Create a special pouch for the Bride to keep the wedding day jewelry safe while in transport.

Personalize it with Joy Iron On Embroidered letters.

For more inspiration, hop on over the to Designer Craft Connection Blog.   And…while you’re there make sure to leave a comment for your chance to win your own treasure chest of trims.

Thank You Expo International for sponsoring this post.

*Disclosure:  This blog uses ads and affiliate links.  If you choose to make a purchase using one of the links, I receive a small commission (at no additional cost to you) that helps offset the costs of maintaining this blog.  Thanks for your support!

Shop Your Fav Brands at Scrapbook.com

DIY Bloom Planters

“bloom where you are planted”

A little Inspiration for my Summer Flowers…

I’m not sure if it’s a subliminal message or a direct request.  (to my plants that is)

BLOOM!

I picked up these beautiful purple flowers over the week-end and decided to spruce up a couple

of plain pots into something special.

FYI…the name of the plant with Campanula, a partial shade loving perennial.

How to make a DIY Bloom planter…              (*affiliate link)

  1.  Paint terra cotta pot with 2 coats of white paint.
  2. Brush a thin layer of purple paint along top band.  (no need to be perfect)
  3. Lightly sand pot for a distressed look.
  4. Using a cut file and the Silhouette Cameo*, cut the saying out of the purple glitter vinyl.
  5. Apply the saying onto the pot using transfer paper.  Smooth into place and remove transfer paper.

Shop Your Fav Brands at Scrapbook.com

*Disclosure:  This blog uses ads and affiliate links.  If you choose to make a purchase using one of the links, I receive a small commission (at no additional cost to you) that helps offset the costs of maintaining this blog.  Thanks for your support!

The blue ceramic planter was plain and simple until I added stripes using the glitter vinyl,

and applied the light blue glittered vinyl words using a Vinyl Transfer Tape*.

Perfect decorative accent for my summer front porch.  (or a great gift idea)


Don’t Miss a Thing…Make Sure to Follow me


Ask for Self Adhesive Glitter Vinyl Sheets- by Styletech from Tape Technologies* at your local Scrapbook Store.

“This is a sponsored post.  As a member of the StyleTechCraft Design Team I have been provided product and compensation in exchange for my creative ideas.  The views and opinions are my own.


Spring Quilt Card

It’s been a while since I’ve used rubber stamps to make a card… 

and I’ll admit that it felt really good to sit and watercolor a image again.

Interesting fact…In 1996, my creative journey was started with rubber stamps.

This week the Xyron Design Team has partnered up with Deep Red Rubber Stamps.

I choose the Color Me Spring Quilt cling stamp to use in my project.

Spring Quilt Card products used:      (*affiliate links)

I like using art markers ( and dye ink pads) to water color my stamped image.

I scribble using the marker onto a piece of acetate. (or anything non-porous) and pick up

the ink from the marker with the water-brush and paint the image.

When layering the card…

The Xyron Creative Station* is great for adding adhesive to the back of intricate pieces.

For simple layers I use my Xyron Tape Runner*

I also use the XYRON Adhesive Eraser* to remove any extra adhesive that might show.

Embellish the card using self adhesive flower rhinestones and a sheer ribbon bow.

“This is a sponsored post. As a member of the Xyron Design Team I have been provided product and compensation in exchange for my creative ideas.  The views and opinions are my own.”

*Disclosure:  This blog post uses affiliate links.  If you choose to make a purchase using one of the links, I receive a small commission (at no additional cost to you) that helps offset the costs of maintaining this blog.  Thanks for your support!

Grand Canyon Adventure & “Roughin’ It” Shadowbox Frame

In January, after the Creativation Show in Phoenix, we took a little mini vacation.

We had decided earlier to visit Sedona and in a spur of the moment decision

decided to take a day trip to the Grand Canyon.

Neither of us had been and it was on our bucket list.

The day was beautiful and the views were AMAZING!

If you ever get the opportunity to visit the Grand Canyon, I suggest you go.

You won’t be disappointed.

For my Xyron Design Team Project this week, we partnered up with Paper House Productions.

I picked the Paper House Productions Great Outdoors Camping Kit*.        (*affiliate link)

I knew it’d be perfect for my Grand Canyon pictures.

Interesting Fact… I’ve never camped a day in my entire life. (and proud of it)           

Even it you don’t go camping, you’ve got to admit this Great Outdoors Washi Tape Set is cute.

“My idea of roughing it is a bad hotel room!”

This what I tell people whenever they talk about camping.  (it’s not for me)

To make the “ROUGHIN’ IT” shadow box frame…

Products Used:     (*affiliate link)

Directions…

  1. Remove the glass from the shadowbox frame to create a ledge for adding small found treasures.  (removing glass is optional…just a personal preference)
  2. Print the saying “My idea is…”  onto one of the scenic papers from the “Great Outdoors” kit and cut it to 6″ x 6″.  For extra dimension, I used my  Xyron Mega Runner* to adhere the layer onto green mat-board.
  3. Cut a 9″ x 9″ green gingham background from the paper crafting kit and adhere the printed paper to the center of the green gingham background.
  4. Use the 4″ x 4″ “ROUGHIN’ IT” square from the “Great Outdoor Tags” scrapbook paper and adhere it onto mat-board for extra dimension.  Adhere to center of the printed scenic square.
  5. Add the 3D tent sticker over the tent pictured in the “roughin’ it square” .
  6. Add 3D lamp and leaf to embellish.
  7. Insert into shadow box frame.

“This is a sponsored post. As a member of the Xyron Design Team I have been provided product and compensation in exchange for my creative ideas.  The views and opinions are my own.”

*Disclosure:  This blog post uses affiliate links.  If you choose to make a purchase using one of the links, I receive a small commission (at no additional cost to you) that helps offset the costs of maintaining this blog.  Thanks for your support!

A Cup of Attitude

After I finished personalizing my new cup, I proudly ran downstairs to show it to my husband.

“I don’t get it”  was his response.

It’s a cup of Attitude”, I replied.  (I still don’t think he got it.)

I’m generally a very sweet and nice person.  

But sometimes…if you could only hear the snarky comments rolling around in my head,

you just might think otherwise.  I keep it to myself most of the time.  (or at least I try)

The struggle is real.

To personalize my cup…                              (*affiliate links)

  •  I used my Silhouette Cameo* to cut out a cute saying from Jillibean Soup out of translucent

Self Adhesive Glitter Vinyl Sheets- by Styletech from Tape Technologies*

  • I picked up the plain white cup at Dollar Tree* for only $1.00.  (*affiliate link)

Dollar Tree is the perfect place to find inexpensive glassware to personalize with vinyl.

Directions:

  • Clean the cup with warm soapy water to remove any grease or residue.
  • Apply the hot pink glittered  vinyl words onto the cup using a Vinyl Transfer Tape*.
  • Next, add the gray glittered vinyl words.
  • The Vinyl Transfer Tape*  makes it easy to line up the words.
  • Wait 4 days for the adhesive to fully cure before using the cup.
  • It is recommended to hand wash only.  (I have put mine in the dishwasher, just saying.)

If you need to keep your attitude a little more subdued…

the cup also makes a great pen holder.

Shop Your Fav Brands at Scrapbook.com

“This is a sponsored post. As a member of the Tape Technologies Design Team I have been provided product in exchange for my creative ideas, views and opinions.”

*Disclosure:  This blog uses ads and affiliate links.  If you choose to make a purchase using one of the links, I receive a small commission (at no additional cost to you) that helps offset the costs of maintaining this blog.  Thanks for your support!

Shop Amazon Scrapbooking Supplies*

a boy and his cars…

I have this sweet boy in my life that loves cars.

Hotwheels to be exact.  (he’s very brand loyal)

Whenever he walks in my house he puts out his hand to show me the car of the day.

“Grandma, I have a new car to show you, you’re going to love this”…

This one’s Split Vision.  He’s aerodynamic and he goes really fast.”

I imagine he’s going to be a Race Car Driver or something equally cool when he gets older.

This kid always has a car with him wherever he goes.

I watched him at his big brother’s Spring Concert roll his car along the bleachers,

checking to see if it would fit under the boot heel of the guy sitting next to me.

To him… everything’s a potential ramp or tunnel.

For my Deflecto Design Team project this month, I decided to “think like he does” and make

a Deflecto 12″ x 12″ Clear Craft Picture Frame* into a “super cool” ramp for my grandson.

(*Affiliate Link)

I gave the Deflecto Frame* a light sanding with an extra fine sanding block to help the paint

adhere better.  Then, I painted the frame with Rust-Oleum Chalkboard Black Spray Paint*.

I used my Silhouette Cameo* and Glitter Vinyl* from Tape Technologies to create

the words and stripes for “our” new ramp.

Shop Your Fav Brands at Scrapbook.com

And… because you always need more storage for your cars.

I made him a new car box using a Deflecto Stackable Cube Organizer*.

“This is a sponsored post. As a member of the Deflecto Design Team I have been provided product in exchange for my creative ideas, views and opinions.”

*Disclosure:  This blog uses ads and affiliate links.  If you choose to make a purchase using one of the links, I receive a small commission (at no additional cost to you) that helps offset the costs of maintaining this blog.  Thanks for your support!

Shop Amazon Scrapbooking Supplies*