Fun & Easy Felt Projects to make her smile.

Pretty Little Dress Up Purse

Today I’m sharing a couple of Fun & Easy Felt Projects that is sure to make her smile.

Kunin Challenge

I was recently sent a variety of felt from Kunin along with some great glues from

Beacon Adhesives and buttons from Buttons Galore & More

for a Designer Craft Connection September Blog Hop. Pretty little Purse Collage

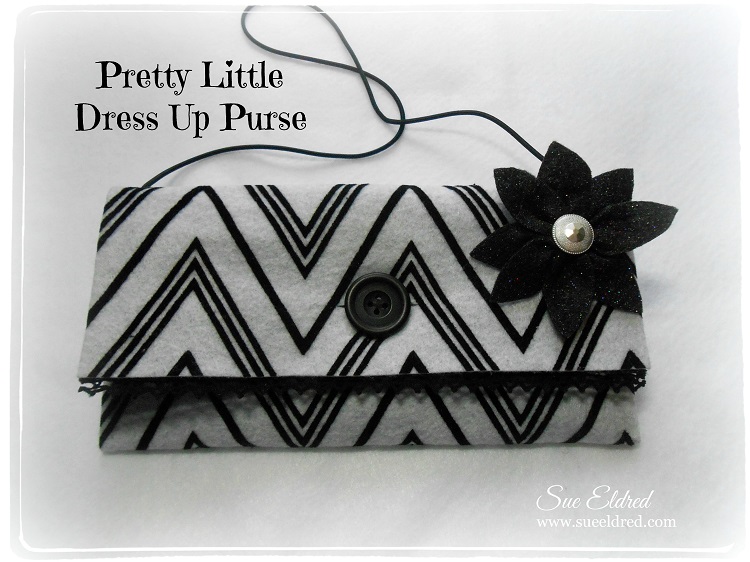
My First Project is a cute little dress up purse made with just three pieces of felt.

Directions:

  1. Glue the edges of two pieces of felt together with Fabri Tac glue from Beacon Adhesives.
  2. Fold over in thirds and glue sides together.  (see above picture)  Binder clips works great to keep everything secure while drying.
  3. Glue a piece of lace to the underneath side of the felt flap.
  4. Cut a button-hole and sew on a big black button.
  5. Cut 8 small petal shapes from Black Glitterfelt™.
  6. Simply quick stitch the petals together. (see above picture)
  7. Gather both ends of the thread together and tie with a knot.
  8. Glue a Fancy Button from Buttons Galore & More into the center to finish off the flower.  My button was originally gold.  I used a silver paint pen on my button to make it silver.
  9. Glue finished flower onto flap of purse.
  10. Punch a couple of holes on each side of the purse with a Crop-a-dile punch and string black cording for the handle.

Felt Heart

Did you know that you can easily die-cut felt?

The love heart pillow was made using White Classicfelt™ and Princess Hearts Fancifelt™ with a large heart die and alphabet dies.  One side of the heart has the white felt, the other has the Princess Hearts felt.  I cut one of the small hearts from the Princess Hearts felt to use as my “o”.  The pink flower on top was made the same as the above black glitter flower except that I used 6 petals instead of 8.

Shop Amazon Scrapbooking Supplies*

*Disclaimer:  This post uses ads and affiliate links.  If you choose to make a purchase using one of the links, I receive a small commission (at no additional cost to you) that helps offset the costs of maintaining this blog.  Thanks for your support!

“Dream Big, the Sky is the Limit” …with Clear Scraps and Imagine Crafts

Clearscrap Stazon Butterfly Tag 2

All this week on the Clear Scraps and Imagine Crafts Blogs we are combining efforts with one Big Creative Blog Hop.

My “Dream Big… the sky is the limit”  tag features a clear acrylic butterfly from Clear Scraps along with a variety of StazOn Inks for a wonderful effect.  I love how the ink works so well with acrylic.  And… that Wedding Dress irrRESISTible colored textured spray, LOVE!!!

Products Used:

  • Butterflies Embellishments  (Clear Scraps)
  • Stazon Inks:  Orange Zest, St. Valentine, Spiced Chai, Jet Black, Blue Hawaii  (Imagine Crafts)
  • Wedding Dress irRESISTible colored textured spray  (Imagine Crafts)
  • GlazOn   (Imagine Crafts)
  • L751 Marbled Background  (Serendipity Stamps)
  • “Hello Sunshine”  6 1/2″ Paper Pad  (Kaisercraft)
  • Alpha & Word Stickers Teal  (My Minds Eye)
  • 2″ circle punch
  • Kraft cardstock tag
  • white acrylic paint and paintbrush
  • ribbon and trim
  • sponge
  • black cardstock
  • adhesive tape runner

Directions:

  1. Dab with a sponge, Orange Zest and St. Valentine’s inks onto the clear butterfly.  (allow to dry)
  2. Ink marble background with jet black ink and stamp directly onto the butterfly.
  3. Paint the center of the kraft cardstock tag with white acrylic paint.
  4. Gently rub with a soft craft sponge Spiced Chai ink around the edges of the tag.
  5. Spray surface of the tag with Wedding Dress irRESISTible colored textured spray.  (allow to dry)
  6. Lay circle onto tag to use as a mask.  Gently sponge Blue Hawaii ink around circle.
  7. Layer and adhere tag onto a piece of black cardstock.
  8. Add strips of scrapbook paper with the edges inked onto bottom of tag.
  9. Glue butterfly onto tag using GlazOn.
  10. Finish embellishing tag with ribbon, trim and word stickers.

Clearscrap Stazon Butterfly Close Up


Day #3 of The Twinery & Serendipity Stamps Blog Hop

The Twinery & Serendipity Stamps Blog Hop Card

Todays is Day #3 of The Twinery & Serendipity Stamps Blog Hop and my chance to join in.

I love Serendipity Stamps and using twine in my card making.  This was a great chance to use both.

“Thanks” Card Directions:

  1. Stamp flower images and leaves onto watercolor paper using black permanent ink.
  2. Water color or color images using markers.
  3. Cut around flowers and leaves.
  4. Paint a thin coat of Diamond Stickles Glue over images for added sparkle.
  5. I started my card by using a 2 1/2″ wide double-sided tape from Kool Tak on a 5″ piece of cardstock.
  6. Closely lay strands of twine onto the super sticky tape to cover the entire piece of paper.
  7. Cut out with a 4″ scalloped square die cut.
  8. Apply die cut square onto cardstock layers.
  9. Glue Flowers and leaves onto front of the card using a fabric glue.  Embellish with adhesive pearls.  Die cut “thanks” from blue cardstock and add to front of card.

Finished Card Size:  5″ x 5″.

Serendipity Stamps Products Used:

The Twinery Colors Used:

  • Peach Stripe, Honeydew Stripe, Denim Stripe, Lilac Stripe, Flax Stripe, Natural.

Today’s Hop:

Don’t forget to leave comments along the way for the chance to win some awesome prizes.

The Twinery & Serendipity Stamps Blog Hop

Twinery Blog Hop Badge - Serendipity Stamps

Are you a Rubber Stamper?  Do you love using Twine on your projects?

Would you like a chance to win some free products?

Serendipity Stamps and The Twinery are joining together in a Blog Hop for the next three days.

Every Day a new group of Designers and New projects.  Start today’s Blog Hop here.

I will be joining them on Day #3 (July 30th)

Here is a few of the Prize Details:

Serendipity Stamps

To win the Serendipity Stamps Prize of $25 to the Serendipity Stamps website leave comments on all Serendipity Stamps posts each day.

To win the Facebook prize of $25 to the Serendipity Stamps website:  like the Serendipity Stamps Facebook page AND leave a comment.