Let’s have a Sedona Adventure…

Last month, after the Creativation show in Phoenix, we took a little extra time and went

to Sedona for a couple days.  I would love to say it was pure relaxation.

But… I think we did more walking (and hiking) than I did all week at the show.

When we went to Sedona last year, we took a Red Rock Jeep Tour.

This year, we did a lot more exploring on our own and after we got tired,

we took a trolley tour up to the Chapel of the Holy Cross.

The chapel and the views did not disappoint.

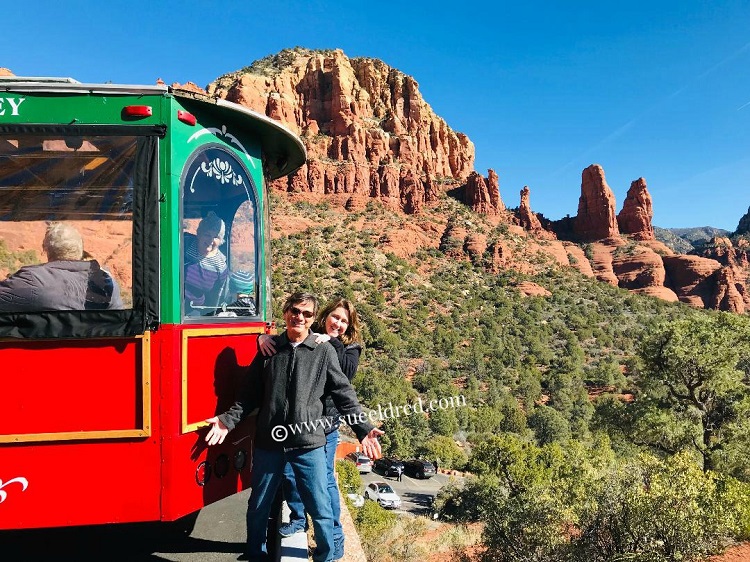
When we were getting ready to leave, I offered to take pictures for a couple of girls from our

trolley tour.  One of the girls took this photo for us in return.

She took our usual “old couple pose” and then said “now, do something else”.

It took us by surprise and this is what we got.  My favorite picture of the trip.

I don’t even mind the photo bomb in the trolley window.

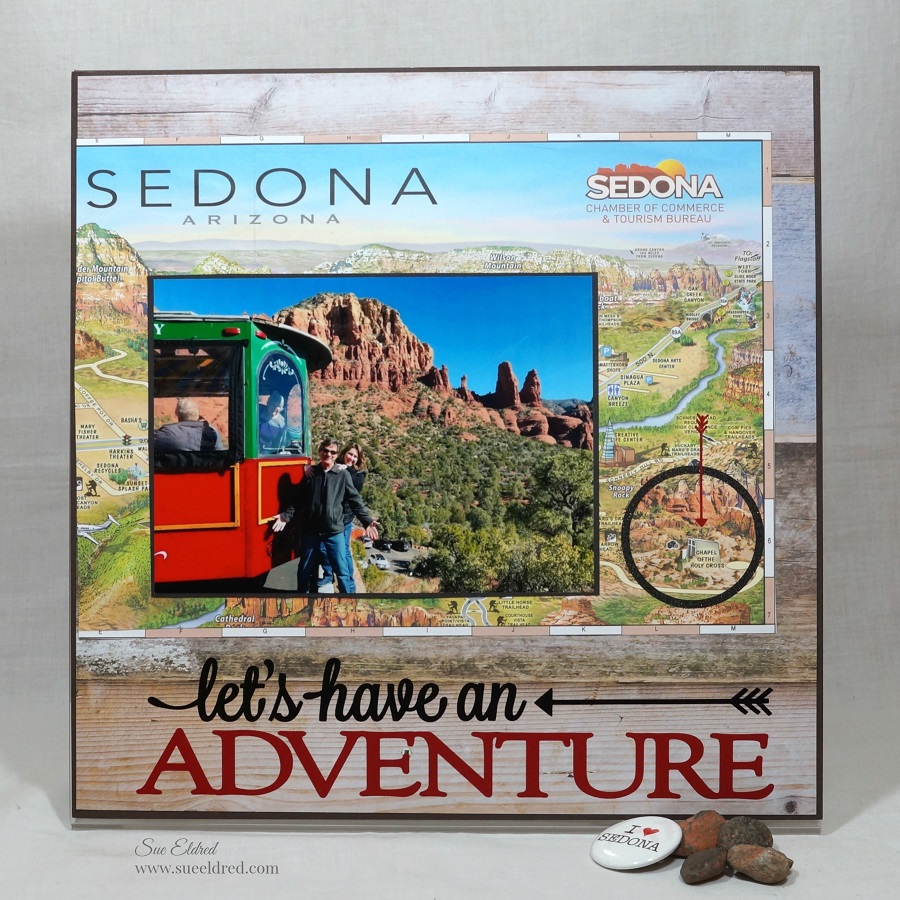
For my Sedona Adventure Layout…

I started with a piece of woodgrain scrapbook paper and a Sedona map I picked up.

I used a SVG file and my Silhouette Cameo Wireless Cutting Machine* to cut the words

“let’s have an Adventure” in Black and Red Glossy Adhesive Vinyl from .

I also cut a circle and a smaller arrow to mark on the map the spot the picture was taken.

It’s an easy way to tell a story.

FYI…Even though StyleTechCraft vinyl is not acid-free, it’s still great for creating titles and accents on your scrapbook pages.  Just make sure not to use it directly on your photo’s.

“This is a sponsored post.  As a member of the StyleTechCraft Design Team I have been provided product and compensation in exchange for my creative ideas.  The views and opinions are my own.

Shop Your Fav Brands at Scrapbook.com

*Disclaimer:  This post uses ads and affiliate links.  If you choose to make a purchase using one of the links, I receive a small commission (at no additional cost to you) that helps offset the costs of maintaining this blog.  Thanks for your support!

Shop Amazon Scrapbooking Supplies*

Love Makes a Family Banner

Create a sweet Home Décor Banner with Rose Appliques and letters.

To make the Love Makes a Family Banner you’ll need:             (*affiliate links)

Directions:
  1. Create a banner by folding the white felt in half lengthways.  Cut diagonally across the bottom from the center fold to a point approx. 3″ from the bottom corner on the outer edges.
  2. Set iron to cotton setting, or follow garment care label.  Position Rose Appliques and letters with shiny side down on felt.
  3. Cover with a fine cloth.  With firm pressure, iron over cloth for 30 seconds.  Turn banner over and iron the back of the letters for 30 seconds.
  4. Cut down 1″ longer than the banner.
  5. Glue or sew the top of the banner over the wood dowel.
  6. Glue gold trim to top of the banner.

You can find Joy® iron-on, embroidered letters, floral appliques at your local craft stores.

“This is a sponsored post.  As a member of the Joy® Design Team I have been provided product and compensation in exchange for my creative ideas.  The views and opinions are my own.

Shop Your Fav Brands at Scrapbook.com

*Disclosure:  This blog uses ads and affiliate links.  If you choose to make a purchase using one of the links, I receive a small commission (at no additional cost to you) that helps offset the costs of maintaining this blog.  Thanks for your support!

Creating a Mini Album with Xyron

Creating a Mini Album using the Xyron Creative Station…

This week the Xyron Design Team was asked to post about our favorite Xyron Product.

With so many wonderful Xyron items to choose from it was a hard decision.  

 When it comes to making Mini Albums, Tags and Altered Home Décor pieces,

the Xyron Creative Station* is hands down my favorite product to use.

When I go to the effort to create, I don’t want my projects falling apart.

With the Xyron Creative Station* you get complete coverage, no gluing, no wrinkling,

no bubbles!  There are so many refill cartridge options available in both the 9″ and 5″ sizes.

*Disclosure:  This blog post uses affiliate links.  If you choose to make a purchase using one of the links, I receive a small commission (at no additional cost to you) that helps offset the costs of maintaining this blog.  Thanks for your support!

To make my Mini Albums…

  • I use chipboard or mat board for the base of my Mini Album and cut it to my preferred size.
  • I cut decorative scrapbook paper to fit onto the base.
  • Put the paper design side up on the  *Xyron Creative Station, 9″ crank the handle to run the paper through the machine.  As it moves through the Xyron Creative Station it adds adhesive to the back side of the paper.  Easy to use and it doesn’t need any electricity.
  • Line up the paper onto the chipboard.

  • Create extra pages for the inside of the Mini Album using cardstock or coordinating scrapbook paper.
  • Bind the album together using a Book Binding Machine*.
  • Embellish the front of the album with frames, flowers, charms, stickers and ribbon.

  • I created a frame for the cover using chipboard and scrapbook paper and cutting it out using a steel rule die.
  • You can run the frame through the Xyron Creative Station* also.
  • The Creative Station makes quick work of putting my Mini Album together.

The paper used on my Mini Album was from Simple Stories Merry & Bright Collection*

 “This is a sponsored post.  As a member of the Xyron Design Team I have been provided product and compensation in exchange for my creative ideas.  The views and opinions are my own.

Shop Your Fav Brands at Scrapbook.com

I Love You a Bushel and a Peck…

A DIY Sign for Valentine’s Day or for everyday..

using Styletech Craft Vinyl and my Silhouette Cameo Electronic Die Cutting Machine*.

My mom loved to sing this song.

She sang it to us when we were kids and then she sang it again to our kids.

This song and sign brings back all the warm fuzzies and good memories.

A Perfect Love Song for Valentine’s Day and everyday.

To make the “I Love you a Bushel and a Peck” sign I used:

Directions:

  1. Using the “Bushel and a Peck” SVG cut file and the Silhouette Cameo re-size the image to fit inside your frame.
  2. To keep it simple, I cut the image out twice using both the black and magenta glitter vinyl.
  3. Remove the excess vinyl (the negative pieces) using a Craft Vinyl Weeding Tool* or pick.
  4. Remove all the hearts and flourishes from the black vinyl.
  5. Remove the words from the magenta vinyl.
  6. Use Vinyl Transfer Tape* to pick up and apply the words directly onto the piece of scrapbook paper.  Gently rub over paper.  Remove transfer tape.
  7. You can re-use the transfer tape to pick up the hearts and flourishes.
  8. Carefully line up the hearts and flourish over the words.  Remove transfer tape.
  9. Add finished sign into frame and enjoy.

Tip:  If you’re good, you can carefully pick up the words from the magenta glitter vinyl and use it on a separate project.  Like the “Hug” cup down below.

From the 1950’s Musical “Guys and Dolls”…Sang by Doris Day

I love you a bushel and a peck
A bushel and a peck and a hug around the neck
A hug around the neck and a barrel and a heap
A barrel and a heap and I’m talkin’ in my sleep

About you, about you
‘Cause I love you a bushel and a peck
You bet your purdy neck I do
A doodle oodle ooh doo
A doodle oodle oodle ooh doo

“This is a sponsored post.  As a member of the StyleTechCraft Design Team I have been provided product and compensation in exchange for my creative ideas.  The views and opinions are my own.

12×12 Glitter Vinyl Sheets from StyleTechCraft available on Amazon*

Shop Your Fav Brands at Scrapbook.com

*Disclaimer:  This post uses ads and affiliate links.  If you choose to make a purchase using one of the links, I receive a small commission (at no additional cost to you) that helps offset the costs of maintaining this blog.  Thanks for your support!

Shop Amazon Scrapbooking Supplies*

Personalize your Christmas Stocking with Joy

Taking a simple stocking from plain to personality is easy with Joy embroidered letters…

I picked up a simple linen stocking at my local craft store.

It was nice enough, but it needed some personality.

I decided to embellish the stocking with Joy iron-on letters, ribbons and trim.

Here’s what I used on my stocking:                (*amazon affiliate link)

Directions:

  • Depending on the fabric and lining content of your stocking, you can either iron on the letters or glue them onto the stocking with craft glue.
  • Make a simple bow by folding the ribbon over and tying the center tight with the twine.
  • Add a jingle bell and a small piece of pine craft stem to the center of the bow and tie again with the twine.
  • Add button to both ends of the twine and tie to the center of the bow.
  • Trim the ends of the bow.
  • I switched out the plain wood button on the center of the button for one that better fits my style.
  • Glue trim and bow onto the front of the stocking with craft glue.
  • Embellish with a Christmas pin.
  • Add presents or greenery and berries to the inside of the stocking.

You could hang that stocking from the mantel or….

Doesn’t it make a great addition in the center of my Christmas Wreath.

You can find Joy® iron-on, embroidered letters and number sheets in a variety of sizes, colors, and fonts at your local craft stores.

“This is a sponsored post.  As a member of the Joy® Design Team I have been provided product and compensation in exchange for my creative ideas.  The views and opinions are my own.

Shop Your Fav Brands at Scrapbook.com

*Disclosure:  This blog uses ads and affiliate links.  If you choose to make a purchase using one of the links, I receive a small commission (at no additional cost to you) that helps offset the costs of maintaining this blog.  Thanks for your support!

Wild Whisper Christmas

Making a Christmas Card from non-Christmas paper.

You don’t always need traditional Christmas paper and embellishments to make

a Christmas card.

One of the perks of being on the Xyron Design Team is receiving product from partnering

companies like Wild Whisper.

I recently received Wild Whisper’s “forever & always” collection…

a soft mix of paper including backgrounds of banners and labels.

I considered making an everyday type project, but, since I’m currently in full blown

“Christmas Crazy”, a Christmas card was in order.

I cut out a few banners and labels from the background paper.

I added letter and number stickers to create my holiday embellishments.

My Xyron Creative Station* made quick work of putting the layers together.

I added a  small wood snowflake, sheer white ribbon and adhesive pearl rhinestones

to finish off the card.  I like the non-traditional soft peach and blue.   (It’s not my usual red.)

“This is a sponsored post.  As a member of the Xyron Design Team I have been provided product and compensation in exchange for my creative ideas.  The views and opinions are my own.

 *Disclosure:  This blog uses affiliate links.  If you choose to make a purchase using one of the links, I receive a small commission (at no additional cost to you) that helps offset the costs of maintaining this blog.  Thanks for your support!

Shop Your Fav Brands at Scrapbook.com

Let it Snow Painted Canvas

A Simple DIY Holiday Canvas

Christmas came early for the Xyron Design Team  and I love a good present.

We all received a wonderful box of paints and supplies from Derwent Academy.

It’s been a while since I’ve painted with acrylics on canvas so I decided to keep it

simple and festive.

I painted my canvas with a mixture of Cerulean Blue, Phthalo Blue, Ultramarine Blue

and Titanium White.  I was going for a “snowy sky”.

I added a few stenciled snowflakes on the corners and then splattered the canvas with

titanium white paint using an old toothbrush.   (I kept it really simple)

I used random chipboard letters and painted them with a mixture of Cobalt Blue and

Purple Violet to make them all match.

After the letters had dried, I stamped them with silver ink.

I used my Xyron 9″Creative Station* to add adhesive to the back of the chipboard letters

before adhering them to my canvas.  I even used it on the large white wood snowflake.

I added the canvas to an antiqued silver frame for a cute Holiday Decoration.

Here’s the Derwent links to the products I used:

“This is a sponsored post.  As a member of the Xyron Design Team I have been provided product and compensation in exchange for my creative ideas.  The views and opinions are my own.

Shop Your Fav Brands at Scrapbook.com

*Disclosure:  This blog uses affiliate links.  If you choose to make a purchase using one of the links, I receive a small commission (at no additional cost to you) that helps offset the costs of maintaining this blog.  Thanks for your support!

Deflecto in the Kitchen

Deflecto in the Kitchen…organizing the dreaded kitchen cabinet.

In an effort to tame the chaos (in my mind) during the holidays,

I like to find small problem areas around the house that I can work on a one at a time.

My kitchen cabinet next to my stove was one of those problems.

This is embarrassing to show.

I’m sure I’m not the only one who has a cabinet like this one.

It’s probably the most used cabinet in the kitchen and it showed.

With the help from my friends at Deflecto.  (design team perks)

I got the kitchen cabinet project started.

I asked Deflecto to send me several of the medium caddy compartments*

from the Stackable Caddy Organizer*  (yes, you can buy just the compartments)

The medium caddy compartments* were the perfect length to fit inside my cabinet.

FYI…there are three sizes of compartments that fit into the stacking caddy organizer.

Shop Your Fav Brands at Scrapbook.com

*Disclosure:  This blog uses ads and affiliate links.  If you choose to make a purchase using one of the links, I receive a small commission (at no additional cost to you) that helps offset the costs of maintaining this blog.  Thanks for your support!

The first thing I did was to completely empty the cabinet and wipe it down.

I tossed all the outdated spices and discarded old medicines.

I put like items together for easy grab and go.

I removed the lids from a couple of the clear compartments to use with taller items.  

I love that the compartments are stackable.   That helps eliminates wasted cabinet space.

These really do come in handy when cooking.

Take it a step further in your organizing by labeling all the bins.

The finished kitchen cabinet all clean and tidy.

It’s been a few weeks since I reorganized the cabinet and thanks to my new organizing

compartments it still looks great.

Here’s a short video I made on the Deflecto Stacking Caddy Organizer*.

You can find the Deflecto Stacking Caddy Organizer* on Amazon or ask for it

at your local craft store.

Want more organizing ideas? 

Check out this post on Organizing the Kids Craft Cabinet.


Don’t Miss a Thing…Make Sure to Follow me

“This is a sponsored post. As a member of the Deflecto Design Team I have been provided product in exchange for my creative ideas, views and opinions.” 


Happy Holidays Chalkboard Sign

How to Create a Happy Holidays Chalkboard Sign with a Simple Button Bow.

I really enjoy working with vinyl and love coming up with simple Holiday DIY projects.

The Happy Holidays Sign was one of the projects we created in last month’s Holiday Workshop.

For my sign, I used Styletech Craft’s Ultra Metallic Glitter Adhesive Vinyl in red, green and

white.  The Ultra Metallic Glitter Vinyl has a white backing which ensures the colors stay bright

and true no matter what surface you apply it too.

To start my project…                                                                                 (*amazon affiliate links)

  • I used a piece of Wood Hardboard*.  (it’s like a hole-less peg board) I cut mine 5 1/2 x 7 1/2″.
  • Drill two small 3/8″ holes in the top of the board to use for hanging the sign.
  • Paint the board using DecoArt Black Chalkboard Paint*.
  • Lightly sand the board using 3M Sandpaper, 220-Grit*.  This smooths the board and allows a little bit of the brown board to show through for a vintage look.
  • Wipe the board with a clean soft cloth.

*Disclosure:  This blog uses ads and affiliate links.  If you choose to make a purchase using one of the links, I receive a small commission (at no additional cost to you) that helps offset the costs of maintaining this blog.  Thanks for your support!

  • I applied the words on the chalkboard using Styletech Clear Vinyl Transfer Tape*.
  • I applied the word “Holidays” first and lined the word “Happy” over top.
  • Cut a small white snowflake using white ultra metallic vinyl and add onto the sign above the word happy.
  • Create a “Button Bow”  for the top of your “Happy Holidays Chalkboard Sign”.
  • Directions for “button bow” below.
  • Add twine to the two top holes for hanging.
  • Glue Button Bow onto the top of the “Happy Holidays Chalkboard Sign” using craft glue*.

“This is a sponsored post.  As a member of the StyleTechCraft Design Team I have been provided product and compensation in exchange for my creative ideas.  The views and opinions are my own.

Shop Your Fav Brands at Scrapbook.com

How to Make a Holiday Button Bow…

  • Fold ribbon in thirds.  (like your getting ready to tie a tie.)
  • Gather and wrap twine around the center of the ribbon a couple of times and tie tightly.
  • Add a jump ring to the jingle bell and add onto one end of the twine and tie.
  • Add button to both ends of the twine and tie to the center of the bow.
  • Trim the ends of the ribbon and twine.

Ask for Styletech Craft vinyl at your local craft store

or online at ATSMCRAFT and limited availability on Amazon.

StyleTechCraft Christmas Colors Bundle on Amazon*


Shop Amazon Scrapbooking Supplies*

Creating Holiday Tees with Personality

Creating fun and funny personalized tees for the Holidays are a snap with the help of

Joy® Embroidered Iron-on Letters.

My grandsons are good sports and will usually let me take their pictures for my projects.

We took this picture the day before Halloween.  They weren’t really into Christmas pictures.

In the picture, Nicholas is giving me his best “grinchy” face.

His mom said his shirt should read “Grandma made me do it”.

Here’s What You’ll Need:

*Disclosure:  This blog uses ads and affiliate links.  If you choose to make a purchase using one of the links, I receive a small commission (at no additional cost to you) that helps offset the costs of maintaining this blog.  Thanks for your support!

Directions:

  1. Wash t-shirt to remove any residue or sizing.
  2. Set iron to cotton setting or follow garment care label.
  3. Remove letters from sheet.
  4. Position letters with shiny side down.
  5. Cover letters with a fine cloth.
  6. With firm pressure iron cloth over the letters for 25 seconds.
  7. Turn t-shirt inside out and iron the back of the letters for 25 seconds.
  8. Allow to cool for one minute before handling.

You can find a wide selection of Joy® embroidered iron-on letters and alphabet sheets in different sizes at your local craft stores.  

“This is a sponsored post.  As a member of the Joy® Design Team I have been provided product and compensation in exchange for my creative ideas.  The views and opinions are my own.

Shop Your Fav Brands at Scrapbook.com

Shop Amazon Scrapbooking Supplies*