How to make an Embossed Metal Envelope Pocket

How to make an Embossed Metal Envelope Pocket with K & S Precision Metals

How to make an Embossed Metal Envelope Pocket with K & S Precision Metals

If you like the look of old embossed tin, the Embossed Metal Envelope Pocket

is a simple project to create.  (easy to follow instructions below)

How to make an Embossed Metal Envelope Pocket

I’m always up for a new crafty challenge,

so, when asked if I wanted to try the colored aluminum foils

from K & S Precision Metals, of course, I said yes.

These thick colored aluminum foils are not like your mother’s aluminum foil.

They are thick enough to bend and manipulate but thin enough to be able to cut with scissors.

And you don’t have to worry about cuts like from thicker metals. (this is fun stuff)

How to make an Embossed Metal Envelope Pocket with K & S Precision Metals    lHow to make an Embossed Metal Envelope Pocket with K & S Precision Metals

Disclosure:  This is a sponsored post for K & S Precision Metals.  I have been provided product in exchange for my creative ideas.  The view and opinions are my own. 

How to make an Embossed Metal Envelope Pocket with K & S Precision Metals

Materials Used:     (*affiliate links)

*Disclosure:  This blog uses ads and affiliate links.  If you choose to make a purchase using one of the links, I receive a small commission (at no additional cost to you) that helps offset the costs of maintaining this blog.  Thanks for your support!

How to make an Embossed Metal Envelope Pocket with K & S Precision Metals

I could have used the metal as it comes, but I wanted it to be slightly thicker, so I double it up with cardstock in the middle.  It also helped it hold the embossed shape.

Directions:  

  • I used an unfolded small white envelope as my pattern.
  • Measure and cut a piece of colored foil slightly larger than the unfolded envelope.
  • To add adhesive on the back of the foil, place the foil colored-side up on the Xyron Creative Station®*Turn the handle of the Creative Station to run the foil through.  As it runs through, it adds complete adhesive covering on the underneath side of the foil.
  • Place the foil onto a piece of white cardstock the same size.

How to make an Embossed Metal Envelope Pocket with K & S Precision Metals

  • If you’re not artistically inclined, you can easily find a swirly scroll pattern to print and use as a pattern.
  • Place the foil with the cardstock side up onto a soft surface.  Tape the swirly scroll pattern onto the back of the cardstock.

How to make an Embossed Metal Envelope Pocket with K & S Precision Metals

  • Using medium to firm pressure, use a small ball stylus* to trace around the design to transfer it to the foil.

How to make an Embossed Metal Envelope Pocket with K & S Precision Metals

  • Remove the pattern from the back of the cardstock.
  • Trace around the opened envelope onto the back of the cardstock.
  • Cut the envelope shape using scissors.
  • Cut a second piece of foil the same size as the first and repeat the adhesive and embossing process, except do not add the foil to the cardstock. Place this piece of foil onto the back of the cardstock and retrim the envelope shape.

How to make an Embossed Metal Envelope Pocket with K & S Precision Metals

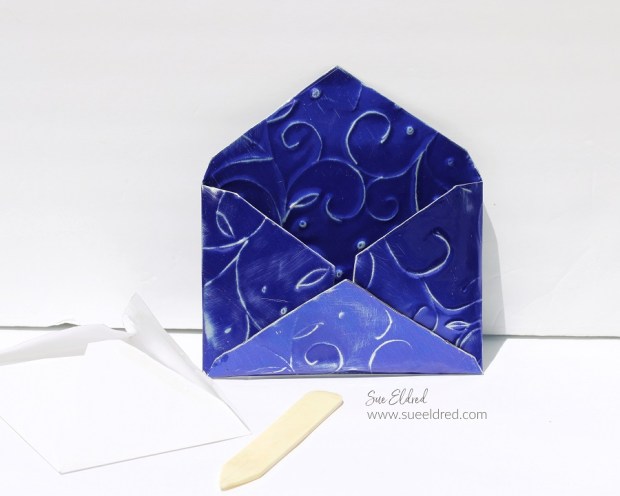
  • Use a ruler and bone folder to mark your envelope fold lines.

How to make an Embossed Metal Envelope Pocket with K & S Precision Metals

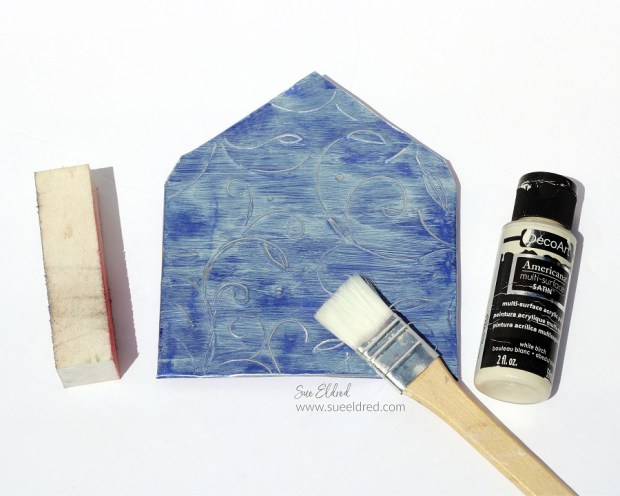
  • Paint over the foil with white multi-surface acrylic paint to give the pocket a brushed denim look.
  • Make sure to paint in one direction only.
  • Once the paint has dried, lightly sand over the embossed areas with a sanding block.
  • The sanding makes the embossed areas stand out.

How to make an Embossed Metal Envelope Pocket with K & S Precision Metals

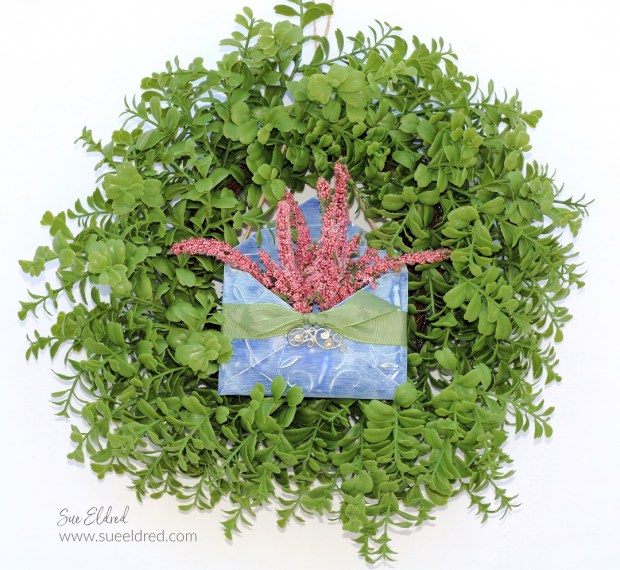
  • Glue the edges of the pocket using rapid fuse all purpose adhesive*.
  • Tie a 1″ piece of ribbon around the envelope pocket.  I added a little bling using a broken silver barrette.
  • Cut a thin slice of floral foam* and place it inside the pocket.  Stick small flower stems into the floral foam.  (Both the floral foam and the flower stems were from Dollar Tree*.)
  • Punch two small holes in the envelope and add a piece of twine for hanging.
  • Add the embossed pocket to the middle of a boxwood wreath for a simple and elegant wreath decoration.

More great designer projects using K & S Precision Metal on the DCC Blog.

Designer Craft Connections Pic

Five Simple Christmas Ornaments made with Kunin Felt

Making Christmas Ornaments with Kunin Felt

How to make Felt Christmas Ornaments…

I’ve found, I’m beginning to love creating handmade stitched ornaments.

It may take a little longer than gluing or sewing, but I find it relaxing.

And… Kunin Felt is the perfect material to use.

A big Thank You to Kunin Felt for sponsoring this month’s Designer Craft Connection Blog Hop.

Making Christmas Ornaments with Kunin Felt-Sue's Creative Workshop www.sueeldred.com 7483

Materials Used:

*Disclosure:  This blog uses ads and affiliate links.  If you choose to make a purchase using one of the links, I receive a small commission (at no additional cost to you) that helps offset the costs of maintaining this blog.  Thanks for your support!

Making Christmas Ornaments with Kunin Felt.

How to make a Felt Poinsettia Ornament:

  • Making a felt flower is simple, and you won’t need any fancy tools. (I learned how to make petal flowers many years ago from Martha Stewart.com.)  
  • Draw a simple petal shape onto a piece of cardstock for a pattern.
  • Trace the petal shape directly onto the felt. (Cut inside the lines when cutting out your petals so that the line doesn’t show.)  You will need 10 petals, eight for the flower and two for the leaves.

Making Christmas Ornaments with Kunin Felt

  • To create a soft delicate-looking poinsettia, I inked the flower petals with red ink and the leaf petals with green ink.

Making Christmas Ornaments with Kunin Felt

  • Thread the needle and thread, leave a long tail after the knot. Using a simple running stitch, thread the petals for the flower.  (I used the black thread for easier viewing.)

Making Christmas Ornaments with Kunin Felt

  • Next, remove the needle and gather the ends of the thread and cinch the petals together. Tie a knot.

Making Christmas Ornaments with Kunin Felt

  • Glue a “fancy” button into the center of the petals.
  • Glue the leaves under each side of the flower.
  • Cut two circles out of the cream felt. (jar lids make great patterns to trace)
  • Stitch around the circles using a blanket stitch. Before you sew it closed, insert a small amount of polyfill and stitch it closed. Glue the flower onto the front of the circle.
  • Using a darning needle, add a gold thread to the top of the ornament for hanging.  
  • Tie a ribbon bow and glue it onto the top of the ornament.

Making Christmas Ornaments with Kunin Felt

Another simple (well kind of simple) ornament to make is the Christmas Tree ornament.

Making Christmas Ornaments with Kunin Felt

How to make a Lacy Cream Christmas Tree Ornament:

  • Create a simple tree pattern using cardstock.  
  • Cut a rectangle, draw lines from the top center of the rectangle to the bottom two corners.
  • Cut the pattern out and trace it onto the felt.  
  • Optional: Cut a small rectangle to use as a tree trunk.
  • Using a variety of laces and trim, stitch it on the front of the “tree” with need and thread. (Stitch the ends inside of the felt.)
  • Align the felt pieces and stitch together using a blanket stitch. Before you sew it closed, insert a small amount of polyfill.
  • Add adhesive pearls onto the front of the Christmas Tree Ornament between the lace strips.
  • Add a piece of gold thread for hanging and a small gold bow.

Making Christmas Ornaments with Kunin Felt

As much as I love the first two ornaments, the red and green ones are my favorite. 

I made the green Christmas Tree ornament bigger than the cream one.  

  • I interwove red and white rick rack to make up the trim. I handstitched the rick rack trim onto the front of the tree shape.  
  • For fun, I stitched red and white Xs in between the trim.  
  • The tree is put together like the others, with a small amount of polyfill in the center.
  • Red and white twine was used for the hanger, with a red and white button on the top of the tree to finish it off.

How to make the Red Poinsettia Embroidery Hoop Ornament:

  • Create a Red Poinsettia using the flower directions above.
  • Open the embroidery hoop and place a piece of fabric over the center ring. (I used an old gray cable knit sweater.)   
  • Place the outside hoop over the sweater and tighten the embroidery hoop. Cut the excess fabric from the back of the embroidery hoop.
  • Glue a cardstock circle onto the back of the embroidery hoop.
  • Measure and glue the pine craft stem around the outside of the embroidery hoop.  
  • Glue the red poinsettia to the front of the embroidery hoop.
  • Add a piece of twine to the top to hang.  Glue a ribbon bow onto the top of the ornament.

Making Christmas Ornaments with Kunin Felt-Sue's Creative Workshop www.sueeldred.com 7669

This soft and pretty Mitten Ornament was made similar to the other felt ornaments.

Except I used a mitten die to cut out the felt pieces.

If you don’t have a mitten die, search online for a mitten outline to size and use as a pattern.  

Making Christmas Ornaments with Kunin Felt

Every year, I make a few new ornaments for my Christmas Tree.

I think these will fit in quite nicely.  (they’d also make a great handmade gift)

Kunin Felt Logo

AND… Did you know?

That Kunin Felt is manufactured right here in the US from recycled plastic bottles.

It takes ten bottles to make a pound of fiber. How cool is that!

DIY Stitched Felt Stocking with Die-Cut Ribbon

DIY Felt Christmas Stocking with Die Cut Ribbon

DIY Felt Holiday Stocking

If you love the warm and cozy feeling of Homespun Holidays and love making your gifts,

this simple felt stocking project is for you.

It makes a sweet stocking to hang on the mantel for Santa to add little gifts.

Or add in some greenery and use it as a Holiday decoration.

Gwen Studios Logo

Disclosure:  This is a sponsored post  for Gwen Studios.  I have been provided product in exchange for my creative ideas.  The views and opinions are my own. 

DIY Felt Christmas Stocking with Die Cut Ribbon

Materials Used:     (*affiliate link)


*Disclosure:  This blog uses ads and affiliate links.  If you choose to make a purchase using one of the links, I receive a small commission (at no additional cost to you) that helps offset the costs of maintaining this blog.  Thanks for your support!

DIY Felt Christmas Stocking with Die Cut Ribbon

Directions:

  • Draw or create a stocking pattern onto cardstock. I used an SVG cut file from the Silhouette Store and a  Silhouette Cameo Electronic Cutting Machine*. I sized the stocking pattern to fit on a 9″ x 12″ piece of felt and cut the stocking pattern using cardstock.
  • Trace the pattern pieces onto the felt and cut them out.

DIY Felt Christmas Stocking with Die Cut Ribbon

  • Cut the word “JOY” out of felt.  Hand stitch the felt pieces onto the stocking.
  • Tack the Snowflake Die-Cut Ribbon onto the front of the stocking using silver thread.

DIY Felt Christmas Stocking with Die Cut Ribbon

  • Iron the star patch onto the front of the stocking using the directions found on the back of the package.
  • Align the front and back of the felt stocking together. Using a “blanket stitch” stitch around the edge of the felt stocking.
  • Stitch a small piece of metallic ribbon as a loop on the corner of the felt stocking for hanging.


Simple DIY’s for Setting a Pretty Table

Simple DIY's for Setting a Pretty Table

Setting a Pretty Table for a Special Occasion with Simple DIYs

Whether for a casual dinner party, wedding, or intimate dinner for two,

a beautiful table can set the mood.

For this dinner, I’m setting it up outside.  I love eating Al Fresco whenever possible.

It lends an air of casualness that promotes better conversations.

Gwen Studios Logo

Disclosure:  This is a sponsored post  for Gwen Studios.  I have been provided product in exchange for my creative ideas.  The views and opinions are my own. 

Simple DIY's for Setting a Pretty Table

Materials Used:     (*affiliate links)

*Disclosure:  This blog uses ads and affiliate links.  If you choose to make a purchase using one of the links, I receive a small commission (at no additional cost to you) that helps offset the costs of maintaining this blog.  Thanks for your support!

Simple DIY's for Setting a Pretty Table

Let me start by saying, first and foremost, I am not a seamstress.

Which makes all of the following projects “sew simple”!

To create the Table Runner:

  • Start with a 2-yard piece of Rugby Tan Satin.  Cut the satin into two 22″ x 46″ pieces.  Sew the two ends together to create one long piece of satin.  
  • For simplicity, I folded, pinned, and ironed 1″ around the whole piece of fabric.
  • Tuck and refold the 1″ seam in half, pin in place.  Sew each side, leaving a 1/2″ seam.
  • Iron the seams.  
  • Sew a strip of lace trim on each end of the table runner.  My table runner is 20″ x 90″.

Simple DIY's for Setting a Pretty Table

  • I created 14″ napkins using the same technique as the table runner.  The lace is only on two sides of the napkin.

Simple DIY's for Setting a Pretty Table

There are several different ways to fold a napkin.  One of the easiest ways is the accordion napkin fold.

  • Begin with a pressed napkin.
  • Lay the napkin flat. Accordion-fold the napkin by folding the bottom edge 1″ to 1 1/2″. Continue folding the entire length of the napkin. Make sure to leave the lace showing on each end.
  • Fold the pleated napkin in half.
  • Wrap a small strip of 1½” satin ribbon around the middle of the folded napkin, overlapping and securing the ends with a glue dot.  
  • Wrap a small strip of satin rhinestone around the 1½ satin ribbon and securing the ends with a glue dot.  
  • Set onto the center of the plate and flare out the folds.
  • For a special touch, place a small flower in the center of the napkin ring.

Simple DIY's for Setting a Pretty Table

To make the Bow:

  • Cut two 24″ pieces of 1½” satin ribbon. 
  • Cut one 6″ piece of 3/8″ ribbon.
  • Fold the ribbon pieces into two loops crisscrossed with the tails on each end.  
  • Lay ribbon bows together with the second one askew. 
  • Tie the bows together with the shorter piece of ribbon.
  • Trim the ends of the ribbon tails with a notch cut.

Simple DIY's for Setting a Pretty Table

  • Cut a 2″ strip of satin rhinestone trim.  
  • Wrap around the center of the bow and attach in the back using a glue dot.

Simple DIY's for Setting a Pretty Table

  • You will need two ribbon bows, one for each end of the table.

Simple DIY's for Setting a Pretty Table

  • Pin the bows onto each end of the table.

Simple DIY's for Setting a Pretty Table

No “pretty table” would be complete without flowers.  

For a casual simple look, use a variety of large vases and vintage jars

to add flowers to your table. 

A simple ribbon tied around the neck is all you need.

Simple DIY's for Setting a Pretty Table

A Simple Vase of Daisies.

As Meg Ryan said in the movie, You’ve Got Mail…

“Don’t you think daisies are the friendliest flowers?”

To dress up a clear glass cylinder vase, wrap a strip of rhinestone trim around

the top of the vase and secure it with a glue dot.  (such a simple trick)

Simple DIY's for Setting a Pretty Table

To Dress the Table:

  • I used the Aqua Voile to create a simple tablecloth. I sewed two ends together to make a 36″ X 90″ tablecloth. Because the fabric is light and airy, I carefully cut the fabric and did not sew any seams around the cloth. It is subtle enough to add a bit of detail without overwhelming the table.
  • Place the table runner centered on the table.
  • Place a natural woven placemat under the plates for a more casual look.
  • I used vintage pink wine glasses for the drinks and two different vintage plates.   I like to mix old with new to create a fun and inviting vibe.
  • Add napkins to the plates and flowers on the table to finish the look.

Simple DIY's for Setting a Pretty Table

Thoughtful touches and simple DIYs make this table perfect for any special occasion.

Playing with i-crafter Dies and Embossing Plates

i-crafter tiny home die and water lily embossing plate

I always love getting the chance to play with something new.

For this month’s Designer Craft Connection Blog Hop, I created a couple of projects using

the I-CRAFTER Tiny Home 3D Die Set* and the I-CRAFTER Water Lily Emboss Folder*.  

i-crafter logo

Disclosure:  This is a sponsored post  for i-crafter.  I have been provided product in exchange for my creative ideas.  The view and opinions are my own. 

i-crafter tiny home die

The Tiny Home Die Set* cuts out the cutest little house.

*Disclosure:  This blog uses ads and affiliate links.  If you choose to make a purchase using one of the links, I receive a small commission (at no additional cost to you) that helps offset the costs of maintaining this blog.  Thanks for your support!

Tiny Home Banner

I used the I-CRAFTER Tiny Home 3D Die Set* to create a little fall banner to hang

on the corner of my favorite family picture.

Water Lily Cards

I used the I-CRAFTER Water Lily Emboss Folder* to create two cards with two different looks.

The first card was embossed using Watercolor Paper*

I used a Waterbrush* and inks to watercolor directly onto the embossed paper.

The second card I embossed onto blue textured cardstock.

I used DecoArt Metallic Champagne Ice Lustre Wax* and rubbed it

over the embossed areas using my fingertip.

Two simple cards using the same embossing folder!

Designer Craft Connections Pic

To see all the i-crafter projects the other designers have made, click here.

DIY Reusable Fox Canvas Gift Bag

Reusable Fox Canvas Gift Bag

How to Make a Reusable Fox Canvas Gift Bag.

I recently received some beautiful suede ribbon and embroidered patches from Gwen Studios

to create with.  After rummaging through a “box of stuff” and finding a piece of canvas material,

I decided to make a reusable canvas gift bag.

Gwen Studios Logo

Gwen Studios Ribbon is Available at Walmart.

Disclosure:  This is a sponsored post  for Gwen Studios.  I have been provided product in exchange for my creative ideas.  The views and opinions are my own. 

Reusable Fox Gift Bag

Materials Used:    

  • 10″ x 14″ Canvas Material
  • Sewing Machine
  • Embroidered Iron On Fox Patch (Gwen Studios)
  • 24″ of 3/8″ Black Double Face Satin Ribbon  (Gwen Studios)
  • 14″ of 5/16″ Black Suede Ribbon with Stars (Gwen Studios)
  • Beacon Fabri-Tac Permanent Adhesive*
  • Twine, Tag and Brass Leaf Embellishment

*Disclosure:  This blog uses ads and affiliate links.  If you choose to make a purchase using one of the links, I receive a small commission (at no additional cost to you) that helps offset the costs of maintaining this blog.  Thanks for your support!

Reusable Fox Gift Bag

Directions:

  • Fold-down the top of the canvas (lengthways) approx. 1″ and sew a seam across the top leave a 3/4″ pocket.
  • Fold the canvas in half and sew the remaining three sides closed.
  • Trim excess canvas and turn the canvas inside out to reveal the bag.
  • Sew or glue the suede ribbon on the bottom of the bag.
  • Iron Fox Embroidered Patch onto the front of the canvas using an iron set on the cotton setting.
  • Cover the embroidery with a damp cloth and iron for 60 seconds.
  • Turn bag over and iron until dry.

Reusable Fox Gift Bag

  • Cut two small slits on the top pocket of the bag on each end.
  • Cut two 24″ pieces of black satin ribbon.
  • Attach a small safety pin to the end of a piece of ribbon.  Thread the ribbon through the top of the bag, remove the safety pin, and knot the ribbon.
  • On the opposite end of the bag, thread the second piece of ribbon through.
  • Pull both ends of the ribbon to gather and close the bag.

Reusable Fox Gift Bag

  • Cut two small layered tags out of burlap and cardstock.
  • Stamp or handwrite a small greeting onto the tag.
  • Tie the tags along with a small brass embellishment onto the top of the bag with twine.

Reusable Fox Gift Bag

The reusable canvas bag is a simple project to make for all seasons.

Try Amazon Prime 30-Day Free Trial

Mini Treat Jars for Fall Parties

Mini Treat Jars for Fall

Impress your guests with this quick and easy table favor.

Create the perfect extra touch for your next Fall party or Get-Together.

I found these adorable mini mason jars at Michaels the other day and fell in love.

If you know me at all, you know I love anything miniature.

I just knew they would be perfect for filling with little treats.

To create the label for the jar…I used a Silhouette Cameo Electronic Die Cutting Machine*

and StyleTechCraft Orange and Bronze Luster Vinyl* to cut out the cute “Hello Fall” SVG file

from Jillibean Soup.   I used my StyleTechCraft weeding tool to remove the background pieces

of my image.  I transferred the “Hello Fall” label using StyleTechCraft Grid Transfer Tape*

*Disclosure… This blog uses ads and affiliate links.  If you choose to make a purchase using one of the links, I receive a small commission (at no additional cost to you) that helps offset the costs of maintaining this blog.  Thanks for your support!

After filling the jar with wrapped caramels…

I wrapped the rim on the jar with twine and tied on a small tag.

I glued a paper marigold (which I found at Hobby Lobby) on the top of the jar.

Cute little party favors to place by each guests plate.

My project is part of the Fall Blog Hop with Designer Craft Connection and StyleTechCraft vinyl.

If you would like to see more Fall projects hop on over to the Designer Crafts Connection Blog

to see the full list of designers.

 Styletech Craft products brought to you by ATSM Craft

“This is a sponsored post.  As a member of the StyleTechCraft Design Team I have been provided product in exchange for my creative ideas.  The views and opinions are my own.

Bunny Table Favor with Rinea Foil

Create a cute little Bunny Treat Box to adorn your table this Easter.

To make the Bunny Table Favor…

I used Rinea Foiled Paper, a paper lined with colorful vibrant metal foil on both sides.

This German inspired paper holds its shape, looks like foil and works like paper. 

The Bunny Table Favor is a fun project to make even the littlest guest feel special.

Products used…                     (*affiliate links)

Shop Your Fav Brands at Scrapbook.com

*Disclosure:  This blog uses ads and affiliate links.  If you choose to make a purchase using one of the links, I receive a small commission (at no additional cost to you) that helps offset the costs of maintaining this blog.  Thanks for your support!

Directions:

  • To add adhesive to the back of the Rinea Foiled Paper lay the paper onto the  Xyron Creative Station* crank the handle to run the paper through the machine.  As it moves through the Xyron Creative Station it adds adhesive to the back side of the paper.  Easy to use and it doesn’t need electricity.

  • Apply Rinea Foiled Paper onto the front and back of pre-cut chipboard pieces.
  • Place the double sided foiled chipboard pieces onto the (discontinued) Easter Elements Die and run through the Sizzix Big Shot Die Cut Machine* to cut out the Bunny Shapes.
  • FYI…the Sizzix Cottontail Die is very similar to the bunny I used.

  • Cut two double-sided blush foiled bunny shapes.
  • Cut two 2 ½” x 1 ½” and two 1 ½” x 1 ½” pieces of double-sided silver foiled chipboard.
  • Cut a 2 ½” x 3 ½” piece of double-sided pastel green foiled chipboard.
  • To cover up the brown core of the chipboard, use the DecoColor Premium Silver Leaf Pen* to go around the edge of each piece of cut chipboard.

  • I used Beacon 3 in 1 Glue* to glue the four silver sides of the box onto the pastel green base.
  • Glue the pink foiled bunnies to both sides of the box.

  • Cut a 2″ x 2 ½” piece of pastel green foil.  Tightly roll foil using a bamboo skewer, add a little glue along the edge of the roll to keep roll from unraveling.
  • Cut small cuts into the top of the foil to create fringe.
  • Create two and glue to the front and back of the box.

  • Punch a couple small pastel purple daisies, curl and form into a petite flower.
  • Glue flower to the front of the box.
  • Cut several thin 6″ strips of pastel green foil.  Wrap foil paper around the bamboo skewer to form little spirals.
  • Use spirals as the filler inside the treat box.  (The foil paper holds its shape well.)

Fill Bunny Table Favor with candy treats and add to your Easter Table.

“This is a sponsored post.”  As part of the Designer Craft Connection Blog Hop I have been provided product in exchange for my creative ideas.  The views and opinions are my own.

My project is part of a Blog Hop put on the Designer Crafts Connection Blog.
For more fun projects using Rinea Foiled Paper and the list of participating blogs click here

Glittered with Mod Podge Ultra

Rainbow Glittered Monogram with Mod Podge Ultra

I have used Mod Podge for years…

So, when Plaid gave me the opportunity to try out Mod Podge Ultra, I thought why not.

I always love trying something new.

What makes Mod Podge Ultra different?

America’s favorite decoupage medium is now available as a spray!  Mod Podge Ultra  is a super strong, non-toxic spray formula that works as all-in-one glue and sealer with a high adhesion level.  Perfect for adding dimensional design embellishments to your projects.  This versatile, water-based formula dries quickly and naturally self-levels, leaving no brush marks.  It cleans up easily with soap and water and is available in both matte or gloss finishes.

For my Framed Rainbow Glitter Monogram I used:                         (*affiliate links)

Directions:

  • Protect your work area with newspaper or drop cloth.
  • Shake Bottle for 15 seconds.
  • Prime the nozzle with a few test pumps.
  • Spray the chipboard letter with Mod Podge Ultra using short even strokes.
  • Add various colors of glitter over the letter.
  • Pour excess glitter off.  Allow project to dry for 30 minutes.
  • Seal letter with 1-2 coats of Mod Podge Ultra.
  • Allow  the letter to fully dry.
  • Accent the outside edge of the letter  using the silver leaf paint pen with a chisel point.
  • Spray or paint the back of the letter with Mod Podge Ultra and add to a piece of black chipboard.
  • Place inside frame for fun and funky framed art.
  • Just like a paint brush, Mod Podge Ultra Spray tops need to be cleaned after every use. If they aren’t they will clog and become unusable.

Shop Your Fav Brands at Scrapbook.com

*Disclosure:  This blog uses ads and affiliate links.  If you choose to make a purchase using one of the links, I receive a small commission (at no additional cost to you) that helps offset the costs of maintaining this blog.  Thanks for your support!

With most glittered projects… if you touch the glittered area you leave a little bit of glitter everywhere you go.  Once I sealed the glittered “S” the glitter does not rub off.  How cool is that.

A special Thank You goes out to Plaid the makers of Mod Podge Ultra*.   

My project is part of a Blog Hop put on the Designer Crafts Connection Blog.

For more fun projects using Mod Podge Ultra and the list of participating blogs click here.

FREE Shipping & FREE Returns Every Day on Fine Art Prints & Wall Murals
with code SHIPFREE at Minted!

Personalized Pool Party Glasses

Keeping Cool and Living the Dream…

Here in the Midwest, summer has turned H-O-T!

And because we have a pool, we get a lot of extra visitors. 

To help us all keep cool…we keep the blender whirling.

This is one of my favorite Summer activities.

Today… I’m participating with several designers of the Designer Craft Connection

in a Designer Challenge using Adhesive Vinyl from Styletech Craft.

For a full list of the participating designer’s projects CLICK HERE.

How to make personalized Pool Party Glasses.                  (*affiliate link)

  • Pick up a couple of inexpensive glasses at Dollar Tree*.   While you’re there…don’t forget to pick up the cute palm tree swizzle sticks.
  • Clean the glasses with warm soapy water to remove any grease or residue.
  • I used my Silhouette Cameo 3* to create and cut the words “just chillin” and “living the good life” out of Self Adhesive Glitter Vinyl Sheets- by Styletech*
  • Remove the background vinyl from the words using a vinyl weeding tool or metal pick.

  • Pick up the words off the backing paper with Vinyl Transfer Tape* and apply directly onto glass.  Rub the words to make sure they’ve stuck before removing the transfer tape.
  • If you can…Wait 4 days for the adhesive to fully cure before using the glass.
  • It is recommended to hand wash only.

Ask for Self Adhesive Glitter Vinyl Sheets- by Styletech from Tape Technologies* at your local Scrapbook Store.

Shop Your Fav Brands at Scrapbook.com

*Disclosure:  This blog uses ads and affiliate links.  If you choose to make a purchase using one of the links, I receive a small commission (at no additional cost to you) that helps offset the costs of maintaining this blog.  Thanks for your support!