A is for Alex

Sue Eldred's Mini Robot made with Smoothfoam July 2014

I recently got the privilege of attending my sweet nephew Alex’s first birthday.

Since the party was a Robot theme…

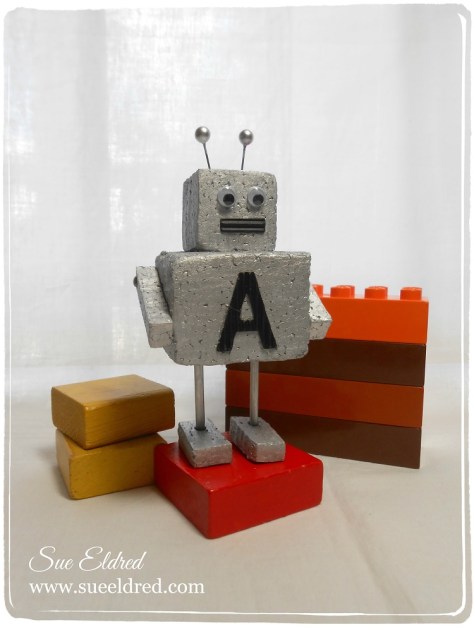
I decided to make a Mini Robot out of Smoothfoam to decorate his present.

Supplies Used for make the robot:          (*affiliate link)

  1. Trim out 6 pieces from the Smoothfoam block with the wire cutter as shown for a body, head, arms and feet. Paint all pieces silver and let dry.
  2. Paint a wood skewer silver and cut into two pieces for the legs. Insert between the body and feet with a few drops of glue to secure.
  3. Glue the head and arms to the body.
  4. Adhere the eyes to the head, and a letter sticker for the child’s first name to the body. Place the letter “I” sideways on the head to create the robot’s mouth.
  5. Push two pearl-head pins into the top of the head for antennae, each secured with a drop of glue.

My little Robot stands approx. 4″ tall.

This project was created for and sponsored by Smoothfoam.

Disclaimer:  This blog uses ads and affiliate links.  If you choose to make a purchase using one of the links, I receive a small commission (at no additional cost to you) that helps offset the costs of maintaining this blog.  Thanks for your support!

Join Amazon Kindle Unlimited 30-Day Free Trial

Make Wedding Place Settings with Smoothfoam

The Bride and Groom Place setting  is a cute way to identify where the bride and groom will sit for dinner!

To make the Bride and Groom Place Settings you’ll need…            (*affiliate link)

4″ Smoothfoam ball
Smoothfoam sheet (any size)
Stick ‘n Carve*
Hot Wire Foam Cutter*
Sandpaper, paint brush
Craft paints – black and white
Mod Podge Gloss Finish*
Stickles Glitter Glue, Diamond*
2 wood dowels
Gold Paint Marker*
“Story of Us” stickers

  1. Draw, trace or print the outlines of a dress and bow tie on to the transfer paper, then stick the paper to a sheet of Smoothfoam.
  2. Cut out the images with the foam cutter, through the transfer paper.
  3. Remove the transfer paper and sand the edges of the foam as needed. Paint the bow tie black and paint the dress white.
  4. Cut the Smoothfoam ball in half then paint one half black and paint the other half white.
  5. After the paint is dry, coat each piece with Mod Podge (gloss finish).
  6. Embellish the surface of the dress and ball with glitter glue for extra sparkle.
  7. Cut each dowel to the appropriate size so the markers are the same height as shown. Paint the dowels with a gold paint pen and insert into the foam, connecting each piece to its base.
  8. Embellish each marker with stickers and bling.

Shop Handmade – The Wedding Store

Disclaimer:  This blog uses ads and affiliate links.  If you choose to make a purchase using one of the links, I receive a small commission (at no additional cost to you) that helps offset the costs of maintaining this blog.  Thanks for your support!