First Day Back to School Signs

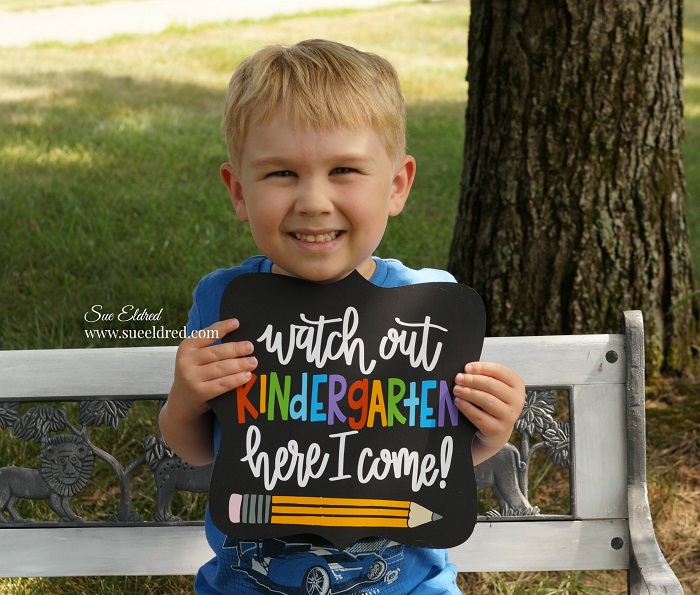
Watch out Kindergarten here I come!

The first day of school is a big deal.  Especially when it’s your first day of Kindergarten.

My grandson is going into Kindergarten this year and will be riding the bus with his big brother.

It’s a really big deal.

So… I decided to make him something  special.

Using my Silhouette Cameo Electronic Die Cutting Machine* and a variety of fun colors of

adhesive gloss craft vinyl from StyleTechCraft…I made a cute two-sided sign for them

(or Mom) to use for those First Day of School pictures.

StyleTechCraft has a large selection of adhesive vinyl colors to choose from.

*Disclosure:  This blog uses affiliate links.  If you choose to make a purchase using one of the links, I receive a small commission (at no additional cost to you) that helps offset the costs of maintaining this blog.  Thanks for your support!

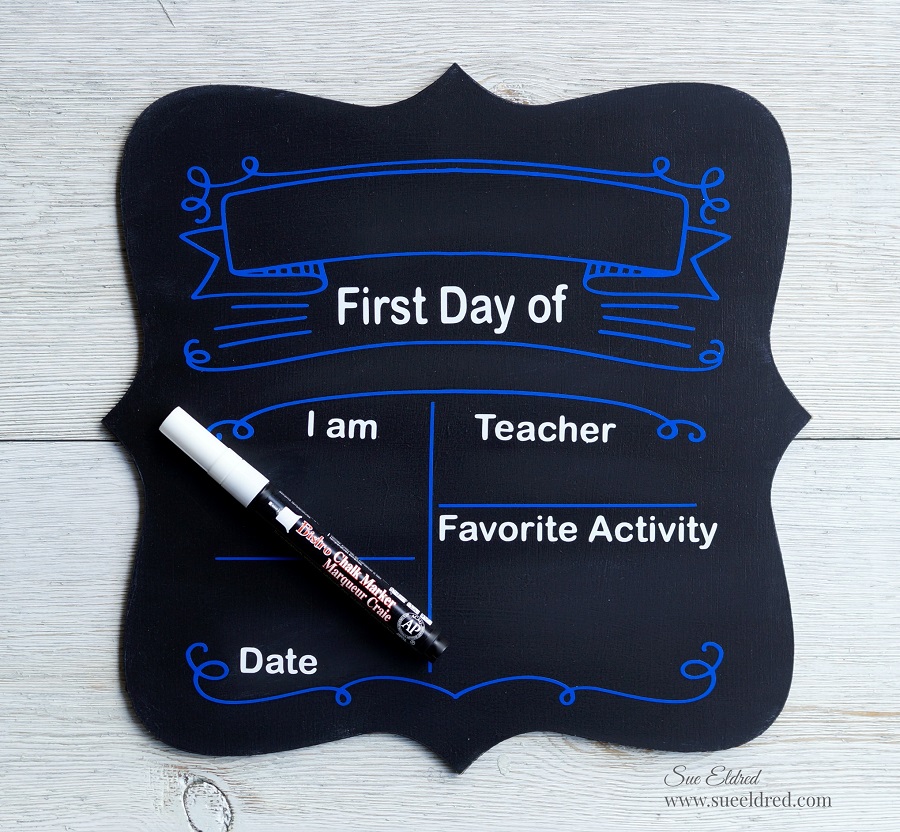
On the second side of the sign I made a few adjustments to my Silhouette Back to School

SVG cut file and added lines instead of dots.  (too many dots for me)

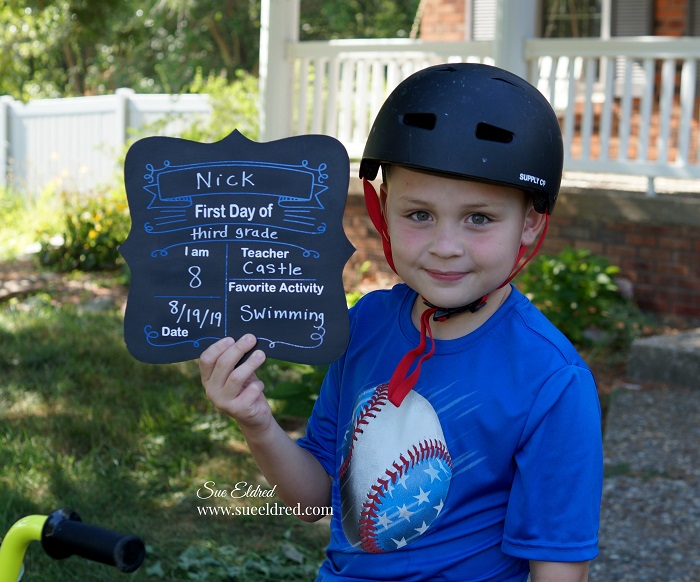
Using a chalk marker or chalk you can reuse the sign for many years to come.

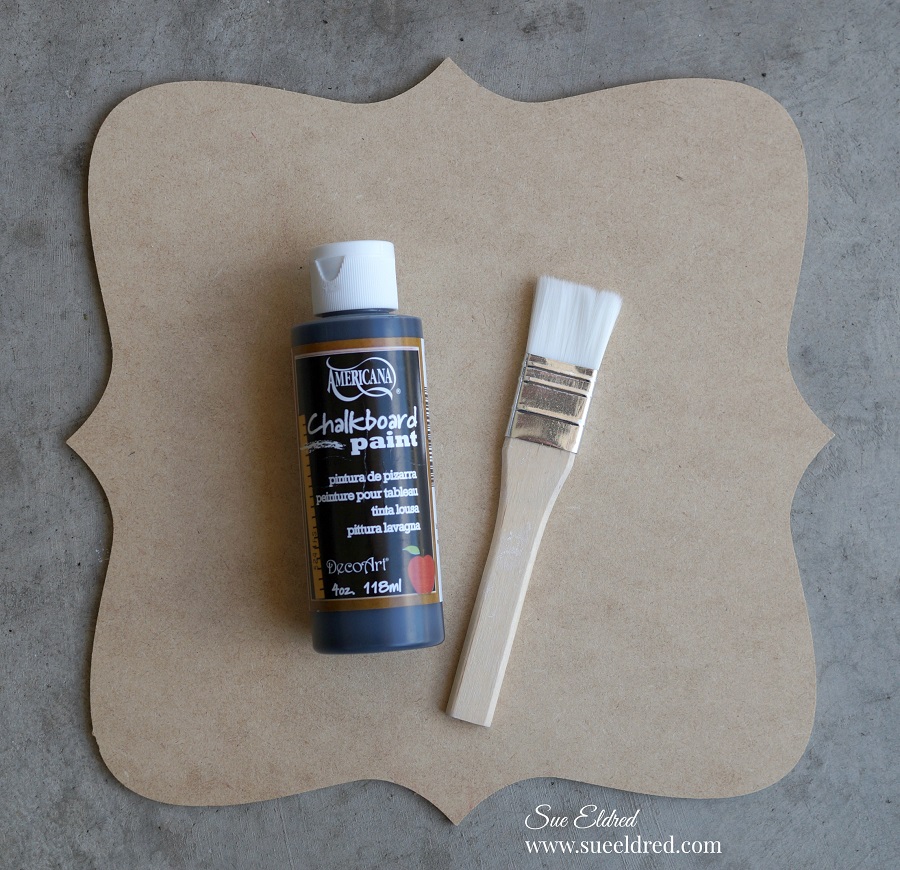
FYI…The base of the sign is a wood cut out from Adornit which I painted using DecoArt Chalkboard Paint*.

“This is a sponsored post.  As a member of the StyleTechCraft Design Team I have been provided product and compensation in exchange for my creative ideas.  The views and opinions are my own.

Shop Your Fav Brands at Scrapbook.com

Dream Create Inspire Wall Decor

Dream Create Inspire Wall Décor

I have been working diligently for the last couple of months on my new craft room.

Moving, purging, organizing and very slowly decorating.  (so much stuff!)

I’m almost ready for a “craft room reveal” but not quite yet.

This past week-end I decided to add a little inspiration to my freshly painted closet doors.

I like the look of inspirational quotes on walls and decided to create one of my own.

With the help of my Silhouette Cameo Wireless Cutting Machine* and

Matte Removable Adhesive Vinyl* from Styletechcraft the project was real easy to create.

(getting a good picture of the final project not so easy)

*Disclosure:  This blog uses ads and affiliate links.  If you choose to make a purchase using one of the links, I receive a small commission (at no additional cost to you) that helps offset the costs of maintaining this blog.  Thanks for your support!

  • I measured the space on the door where I wanted the words to go and decided where the best spacing would be for all three words.
  • I cut the Gridded Vinyl Transfer Tape* to fit inside the space.
  • I used the bottom line of the grid and line on the door inset to line up my words.
  • Once you place your word onto your surface, smooth over word with the vinyl tool.

  • I found it easier to place the words Dream and Inspire first and then center the word Create in between the two.

  • I cut two small flowers using dark red removeable vinyl and placed them in between the words.

Did you know that Matte Removable Vinyl will remove cleanly for up to two years?

This vinyl  film is great for decorating a kid’s room, a classroom or just about anywhere

you just  need a temporary graphic.

“This is a sponsored post.  As a member of the StyleTechCraft Design Team I have been provided product and compensation in exchange for my creative ideas.  The views and opinions are my own.

You can now find the full line of StyletechCraft online at ATSM.

Shop Your Fav Brands at Scrapbook.com

Simple Summer Vase

Create a Simple Summer Vase using Transparent Adhesive Vinyl from StyleTechCraft.

Transparent vinyl is great when you just want to add a subtle touch of color.

It’s great for using on windows, glassware and just about anywhere else you want a unique look.

To create my Simple Vase I used:       (*affiliate links)

Directions:

  1. Cut several flower shapes using the Silhouette Cameo* and the Sky-Blue Transparent Vinyl.  Don’t have a electronic die cutter?  The transparent vinyl can be cut using various metal dies.
  2. Cut leaves out of the teal vinyl.
  3. Using the weeding tool, I carefully removed the negative spaces in and around the flowers and leaves.
  4. Place a piece of Vinyl Transfer Tape* over the flower image.  Apply transfer tape onto the cylinder vase and rub over the vinyl using a vinyl scraper tool to eliminate bubbles.
  5. Remove transfer tape.
  6. Repeat with the leaves.

Allow vinyl to cure for several days.  (Hand washing is recommended.)

I added a piece of white paper inside the vase so you can see the pattern better.

It’s hard to see in this picture the variation between the sky blue and teal vinyl.

“This is a sponsored post.  As a member of the StyleTechCraft Design Team I have been provided product and compensation in exchange for my creative ideas.  The views and opinions are my own.

You can now find the full line of StyletechCraft online at ATSM.

Storing Guy Stuff with Style

Getting to the nuts and bolts of Guy Storage.

Just because it’s in the Garage doesn’t meant it can’t have a little style.

After watching every episode of Tidying Up and a few episodes of Hoarders,

I’ve got the urge to organize everything.

I’ve been going through the house bit by bit (not quite the Marie Kondo way).

It’s going to take some time.

There are so many storage options out there.

When it comes to organizing all the bits and pieces out in the garage,

I’m a fan of Deflecto’s Tilt Bin Storage.

For this project I decided to add a little personalization using StyletechCrafts polished metal

adhesive vinyl and Interlocking Tilt Bins* from Deflecto.

Disclaimer:  This blog uses ads and affiliate links.  If you choose to make a purchase using one of the links, I receive a small commission (at no additional cost to you) that helps offset the costs of maintaining this blog.  Thanks for your support!

For a little masculine style…

I measured and cut the black polished metal vinyl* to add to the top of the bins.

I did the same with silver polished metal vinyl* to the sides of the bins.

Using my Silhouette Cameo Wireless Cutting Machine* and a SVG cut file

I cut the frames, words and background.

Using Vinyl Transfer Tape* I applied the silver frames onto the black background.

(I created the black background by cutting a slightly bigger frame and using the inside.)

The bins are interlocking and stackable.

Great for little storage needs in the garage, craft room, nursery, kitchen and even the kid’s room.

Wherever you need a little extra storage.

The nice thing about the interlocking tilt bins* is that you can use just one or use several.

You can also hang them on the wall or use them with a mounting bar*.

Storing Guy Stuff with Style.

I love adding a little personalization to everyday items.

Storing Guy Stuff with Style-Sue's Creative Workshop www.sueeldred.com 2609

“This is a sponsored post.  As a member of the StyleTechCraft Design Team I have been provided product and compensation in exchange for my creative ideas.  The views and opinions are my own.

You can now find the full line of StyletechCraft online at ATSM.


You can purchase the Deflecto Interlocking Tilt Bins* by themselves or as a set of four from Amazon*.  Use on table, mount direct to wall or hang using the Deflecto Mounting Bar* (sold separately).