Christmas Letter Box and Cup of Christmas Tea

I really love these New Winter Release Dies from Eileen Hull and Sizzix.

The new dies cut the cute little Post Box*, which is perfect for letters to Santa or even a gift card

and the Teacup Box* that you can fill with teabags and other holiday goodies.

You will have fun embellishing and creating holiday treats for everyone on your list!

Letters for Santa…

I created the Christmas Teacup first and thought that it would be my favorite project.

Then I created the Christmas Letter Box*, and IT IS MY FAVORITE.

I think it would make a cute ornament to hang on the tree.

Little kids can write a note and stick it inside for Santa to read.

The Post Box Die* cuts the box in one piece.  Just fold on the score lines and glue.

I like to use Rapid Fuse Adhesive*  to hold my sides together.  (Thirty seconds and it’s ready.)

A Cup of Christmas Tea.

This project was inspired by the book A Cup of Christmas Tea*.


           A Cup of Christmas Tea*

Many, many years ago, I owned a Gift Store.  One of the many items we sold was Teapots and Teacups.  One Christmas, I happened across the story of A Cup of Christmas Tea*.  It’s the story of a young man’s reluctant visit to an elderly aunt at Christmastime, and the unexpected joy it brings.  I loved the story so much I decided to sell it in the store.  Many times, customers would stop and read the book while browsing.  I had more than one customer with tears in their eyes purchase the book.  It’s a sweet book, and it reminds me now more than ever the importance of taking the time with those we love.

A few details on the Christmas Teacup.

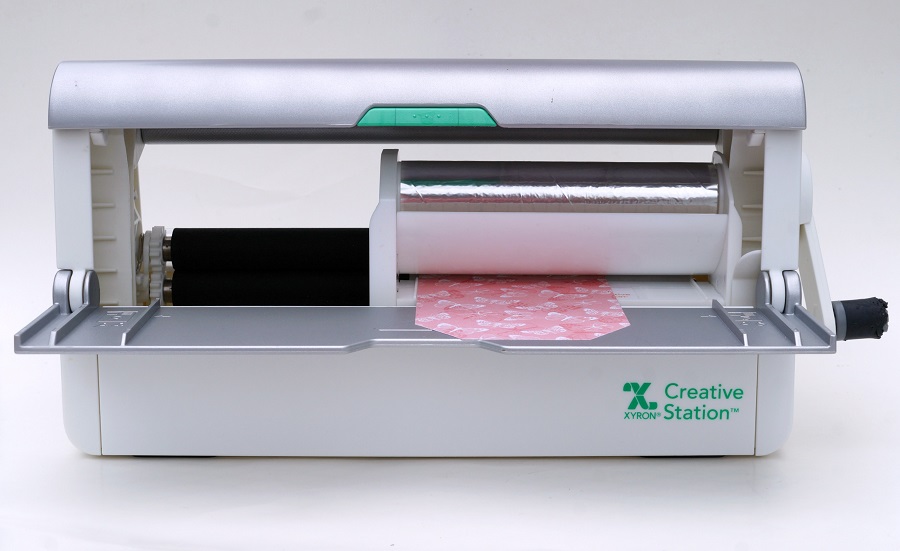
  • Before cutting out the die, I used my Xyron Creative Station*to put adhesive on the back of the Snowflake scrapbook paper.  Just place the paper on the Creative Station design side up and crank the handle to run it through the machine. It adds an even layer of adhesive on the entire piece of paper.
  • I adhered the paper to a piece of white mat board*and ran the covered mat board and die through the Big Shot Die-Cut Machine* to cut.
  • I edged the teacup with a DecoColor Premium Silver Calligraphy Pen*.  I used the pen to paint the mat board spoon also.

*Disclosure:  This blog uses affiliate links.  If you choose to make a purchase using one of the links, I receive a small commission (at no additional cost to you) that helps offset the costs of maintaining this blog.  Thanks for your support!

Materials Used on the Christmas Letter Box and Christmas Teacup:


Authentique Paper “A Magical Christmas Collection” available at Scrapbook.com

For more great projects from the New Winter Release make sure to check out the Blog Hop on Eileen Hull’s Blog.  

Save

Save

Spooky Scary Halloween Card

Open if You Dare!

Here’s a spooky card for all you Halloween Lovers.

If you love a card with dimension, this card has a lot of spooky goodness.

The Spooky Scary Halloween Card was made using the “Spooky Scary” stamp and die set* from

The Maker’s Movement.

Disclosure:  This is a sponsored post.  I have been provided product and compensation in exchange for my creative ideas.  The view and opinions are my own.

Materials Used:            (*affiliate link)

*Disclosure:  This blog uses affiliate links.  If you choose to make a purchase using one of the links, I receive a small commission (at no additional cost to you) that helps offset the costs of maintaining this blog.  Thanks for your support!

My process for making cards sometimes changes as I sit down to create.  I was getting into this

one and decided to forgo all the step-by-step pictures.  Instead, I will give you lots of details.

Here’s one tip I highly suggest.  (Especially with the skeleton die.)

Run the white cardstock through the Xyron Create-A-Sticker Machine* before cutting out the

skeleton die.  The Xyron Create-A-Sticker Machine* puts adhesive on the back of the

cardstock, making the skeleton pieces stickers.  By making stickers, adhering the skeleton

to the coffin was so much easier than using liquid glue.

  • I cut a piece of double-sided adhesive foam large enough to cut the casket shape.  I adhered a piece of gray cardstock to one side of the foam before die-cutting.
  • To cut the casket shape.  Place the casket die on the foam and run it through the Crossover II Die-Cutting Machine.  Because the foam is so thick, you may want to run it back and forth a couple of times to make sure the die cuts entirely through the foam.
  • Another good tip…Use a black chisel tip paint marker* to color the sides of the craft foam.

  • The lid of the casket was made by sticking two pieces of black patterned scrapbook paper together and die-cutting the scrapbook paper with the casket die. (I used the Xyron Sticker Maker)
  • Adhere a piece of scrapbook paper onto a piece of adhesive foam.
  • Using the casket outline die, cut a casket outline from the foam. Stick the casket outline on the inside of the lid.
  • Fold two small pieces of paper to use as the hinges. Glue only the top and bottom of the hinges. Not on the side of the casket.

  • Before sticking the casket onto the layered card base, attach a thin black string onto the back of the casket.
  • If you don’t have black string, put a little black paint between your thumb and index finger and run the string through the paint.  Voila, black string.
  • Tie string around the casket to keep the lid closed.

Save

Save

Toil & Trouble Halloween Shaker Card

Double, Double Toil & Trouble

I’m mixing up a little Halloween fun in the cauldron with this cute little shaker card.

The shaker card uses the “Witch, please” stamp and die set from the Maker’s Movement.

Disclosure:  This is a sponsored post.  I have been provided product and compensation in exchange for my creative ideas.  The view and opinions are my own.

Materials Used:            (*affiliate link)

*Disclosure:  This blog uses affiliate links.  If you choose to make a purchase using one of the links, I receive a small commission (at no additional cost to you) that helps offset the costs of maintaining this blog.  Thanks for your support!

How to Make a Toil and Trouble Halloween Shaker Card….

There are several different ways to make a shaker card.  (This is how I decided to make this one.)

Directions:

  • Cut a piece of double-sided adhesive craft foam approx. 3-1/4″ x 4-3/4″.
  • Using the caldron outline die, die-cut the caldron shape into the craft foam.
  • Cut a piece of scrapbook paper approx. 4″ x 5-1/2″.  Die-cut the cauldron shape into the scrapbook paper.
  • Cut a small piece of acetate to cover the opening of the caldron.
  • Remove protective coating off the acetate.
  • Remove the protective liner off the double-sided adhesive craft foam.
  • Stick the acetate over the opening.

  • Line up and stick the cauldron opening of the scrapbook paper over the cauldron opening of the craft foam and acetate.
  • Trim the excess paper using a cutting mat and craft knife.

  • Turn the craft foam over and fill the cauldron with Spooky Shaker Sprinkles.  Make sure not to overfill, you want to leave enough room for the sprinkles to shake.
  • Cut a second piece of acetate to cover the cauldron opening.
  • Pull back the protective liner on the craft foam and place the acetate over the opening.

  • This is a little pro tip…I used a black calligraphy paint pen marker to color the sides of my craft foam.  The white core would have just made the foam stand out and not in a good way.  I like to use a black marker to cover the edges of my darker colored paper that would have a white or light core.

  • When using small or thin die-cut shapes, I like to run the paper through the Xyron Create-A-Sticker Maker* before cutting out the shapes.  (It makes it so much easier to apply.)
  • Cut a cauldron outline from glossy copper cardstock and stick onto the acetate.
  • Cut the boiling pot shapes out of light green cardstock and stick on the top of the cauldron.

  • Die-cut small bubbles from the die set and mount using thin black adhesive 3D foam squares* over the various circles of the scrapbook paper.
  • Stamp words in black ink onto a small piece of aged parchment card-stock.  Mount onto the front of the card using thin black foam squares.
  • Remove the protective liner from the back of the craft foam and stick onto a glossy card-stock layer.
  • Add the additional layers onto a black card.

Save

Save

Save

Save

Save

Save

Fall Leaves Thank You Card

The Fall Leaves Thank You card…

is an easy to make card, with die-cut embossed leaves that were colorfully distressed with ink.

How to Make the Fall Leaves Thank You Card…

Materials Used:        (*affiliate links)

*Disclosure:  This blog uses affiliate links.  If you choose to make a purchase using one of the links, I receive a small commission (at no additional cost to you) that helps offset the costs of maintaining this blog.  Thanks for your support!

Directions:

  • Place the leaf dies on the cream-colored cardstock and layered on the cutting plates included with the Mini Maker.  Crank the handle of the Mini Maker to run the cutting plates through the machine.  The machine cuts and embosses the leaves as it goes through the Mini Maker.
  • To create a “thanks” word sticker, place a piece of cream card stock through the Xyron Create-A-Sticker Mini*.  The Xyron Create-A-Sticker Mini* puts an even coat of adhesive on the entire backside of the cardstock.  Place the cardstock with the “thanks” die through the Mini Maker to cut out the word.

FYI…The Mini Maker is perfect to use when working with small dies, and space is an issue.

  • Using the Ink Blending Tool, ink the leaves with the various colors of distress inks to create beautiful Fall colors.

  • Layer and overlap the leaves on a piece of fall scrapbook paper.
  • The top layer has a scalloped edge created using a border die from the Borders 1 Die Set from The Maker’s Movement.
  • Apply previously made thanks word sticker on top of the leaves.
  • Tie a piece of twine around the top of the card and add a small acorn embellishment.
  • Add three enamel dots on the bottom right corner of the card.
  • Finished Card Size 5 1/4″ x 6″.

The Fall Leaves Thank You card was created for and sponsored by The Maker’s Movement.  I have been provided product and compensation in exchange for my creative ideas.  The view and opinions are my own.

Palm Springs Junk Journal

How to make a small pocket-sized journal.

Whenever I travel to a new location, I like to keep memorabilia like brochures, maps, and ticket

stubs.  As a scrapbooker, I never know when I’ll want to reference the information for journaling

or even add it to a layout.

The Palm Springs Junk Journal uses a combination of memorabilia and a little bit of recycling.

To Make the Junk Journal I used:                  (*affiliate link)

*Disclosure:  This blog uses affiliate links.  If you choose to make a purchase using one of the links, I receive a small commission (at no additional cost to you) that helps offset the costs of maintaining this blog.  Thanks for your support!

Directions:

  • For the front and inside cover of the journal, cut two 6″ x 8-1/2″ pieces from the brochure.
  • Lay the paper (design side up) on the Xyron Creative Station* crank the handle to run the paper through the machine.  As it moves through the Xyron Creative Station, it adds adhesive to the backside of the paper.  Easy to use and it doesn’t need any electricity.
  • Cut a piece of a thin recycled box the same size.
  • Adhere the decorative paper on each side of the cut box.

I like using the Xyron Creative Station…
when making mini books because you get complete coverage, no wrinkling, no bubbles!

  • I thought I was “so smart” because I cut the map so, the words “Palm Springs Aerial Tramway” would be at the top of the journal.  Being a little too confident, I didn’t measure my placement and “oops” I cut it too short.
  • To “fix” my mistake, I cut out a small picture of the tram with the words and adhered it to the front of my journal.

The inside if the journal.

  • I used an ink applicator and Vintage Photo Distress Ink to age the edges of my Junk Journal.

  • Add a strip of washi tape around the spine of the album for added interest.
  • Cut 5 cardstock pages using the notebook die.
  • Crease the cardstock on the center score lines.

  • Wrap the twine around the inside creases and around the outside of the book cover to secure the pages.
  • I did one page at a time tying the twine in a knot on the outside after each page.

After I had all my pages together, I tied the pieces of twine together in one knot on the spine and added a small metal tag charm that says the word journey.

Album ready to be filled.

In January, after the Creativation Trade Show in Phoenix,

my husband and I took a few days to relax and explore in sunny Palms Springs.

On a whim, we decided to take the Aerial Tramway up the side of the mountain.

It was a lovely warm sunny day.

Of course, we didn’t think about the temperature change at the top of the mountain.

I had on jeans and a light sweater, and my husband had shorts and a light jacket.

(We had just been in the sunny desert a few minutes earlier.)

Upon arriving, I immediately went into the gift shop and bought an oversized hoodie,

while he braved the elements.

The 15-minute ride up the mountain to 8500 feet was stunning,

and the views left us breathless. (literally)

After a nice lunch, and a brisk walk around in the snow, we headed back down to the desert.

Where we warmed our feet at the hotel, around a firepit.

Simple Vintage Garden Tag Album

How to make a Simple Vintage Garden Tag Album.

In keeping with the pretty in pink theme, I created

a sweet little tag album made with the Simple Vintage Garden District Collection

from Simple Stories and several tags dies from The Maker’s Movement.

(To say I love this collection would be an understatement.)

*FTC Disclosure… “This is a sponsored post for The Maker’s Movement.  I have been provided product and compensation in exchange for my creative ideas.  The views and opinions are my own.”

Here’s what I used:                        (*affiliate link)


*Disclosure:  This blog uses ads and affiliate links.  If you choose to make a purchase using one of the links, I receive a small commission (at no additional cost to you) that helps offset the costs of maintaining this blog.  Thanks for your support!

Directions:

  • Cut two large tags out of thin chipboard using the Crossover II Die Cut Machine for the front and back cover of the tag album.
  • You may need to run it through the roller twice before picking it up the tag to make sure it cut all the way through.
  • Cut additional tags using decorative scrapbook paper for the inside pages.

The Crossover II Fabric & Paper Cutting System* has adjustable rollers and pressure settings.  It adjusts for multiple layers and allows you to be able to cut a variety of thicknesses.  It can cut fabric, faux leather, craft foam, chipboard, felt and, several other materials.

  • You will need to use four tags for the front and back of the tag album cover.
  • Place the tag design side up on the Xyron Creative Station* crank the handle to run the tag through the machine.  As it moves through the Xyron Creative Station it adds adhesive to the back of the tag.
  • Remove tag from the protective liners and adhere to the front and back of each chipboard tag.

(FYI…I used the 5″ Permanent Adhesive Refill Cartridge* in the Xyron Creative Station.)

I used a lot of dimensions to create the front cover.

  • Cut a small banner from thin chipboard, cover it with decorative scrapbook paper the same way as the front and back covers.
  • Cover the small metal rimmed tag with circles cut from scrapbook paper.
  • Use twine to tie around the banner and a small teapot charm to hang from the book ring.
  • Create a “bloom” word sticker using the Xyron Creative Station and a small piece of off white scrapbook paper.  Use the bloom word die from the “In Full Bloom” stamp and die set and cut it using the adhesive paper.

  • Decorate and embellish the inside pages using pieces from the ephemera set, and banners.

  • This page was created using the Library Pocket Die Set and the Nested Square Tags Die Set.

Fill your tag album full of fun memories and use it as a sweet gift for someone special.

Save

Sweet Summer Flower Stand Card

Sweet Summer Flower Stand Card

It’s always a good day when I get to buy flowers.  

I stopped by the Garden Center this morning to pick up a few more.  (can you have too many?)

I LOVE FLOWERS!

I was so excited when I got the opportunity to make a sample for Maker’s Movement using

the new Lemonade Stand Stamp and Die Set.  It is so versatile. 

It makes a cute little Lemonade Stand, Flower Stand, and Fall Cider Stand.  

*FTC Disclosure… “This is a sponsored post for The Maker’s Movement.  I have been provided product and compensation in exchange for my creative ideas.  The views and opinions are my own.”

Here’s what I used to make the Sweet Summer Flower Stand:            (*affiliate link)

*Disclosure:  This blog uses ads and affiliate links.  If you choose to make a purchase using one of the links, I receive a small commission (at no additional cost to you) that helps offset the costs of maintaining this blog.  Thanks for your support!

Building the Flower Stand

  • When clearing out my mom’s paper collection, I found this woodgrain cardstock.  I never knew what to use it for until I made this card.  Now I wish I could tell you where to find it.
  • The flower stand die has three sizes of dies to use as the board to build the stand.
  • I adhered two pieces of paper together to create thickness.  Run paper and dies through the Crossover II die-cutting machine to cut the shape.
  • I used basic building construction to make my stand.
  • For the awning, I die-cut two pieces.  (one striped, one blue floral)  Cut two sections from the blue floral and adhere to the striped awning piece.

Super Simple Watercolor Background

  • The key to the background is to use watercolor paper.
  • A simple swish with a wet brush and blue watercolor paint to create the background.

Lots of Dimension and Details

  • What makes this card special is all the little details.
  • I used a lot of foam dots behind the various pieces to create a lot of dimension.
  • I doubled up the foam dots under the awning and sign.

I loved the way the card turned out.   I will be making a Cider Stand for fall soon.

Shop Now!

Patriotic Themed Summer Party

Celebrate the Red, White, and Blue!

No matter if your party is big or small.

It’s easy to throw together a Red, White, and Blue Patriotic Themed Summer Party.

Gather up some hotdogs, burgers, and brats for the perfect Summer BBQ Get-Together.

Here are a few Ideas to make the Summer Holidays fun and special.

Grab and Go Party Ware.

Bring Deflecto to your next party.

I used a Deflecto Stackable Caddy Organizer* to hold my tableware and condiments

for easy grab and go.

Disclosure:  “This is a sponsored post. As a member of the Deflecto Design Team I have been provided product and compensation in exchange for my creative ideas, views and opinions.”

Bold Stripes and Bright Stars

Every party needs a few yummy desserts.

The 3-Tier Dessert Stand* is perfect for displaying cupcakes and other goodies.

It is easy to put together and folds flat for compact storing.

*Disclosure:  This blog uses ads and affiliate links.  If you choose to make a purchase using one of the links, I receive a small commission (at no additional cost to you) that helps offset the costs of maintaining this blog.  Thanks for your support!

A cute little banner for the top of the stand.

How to make the Banner…

  • Cut two bamboo skewers* 6″ each.  Wrap the ends with decorative washi tape*.  The washi tape helps keep the skewers securely in place when inserting in the stand.
  • Die-cut or hand-cut 5 banners out of decorative scrapbook paper.
  • Tie a piece of blue and white twine on each end of the bamboo skewers.
  • Fold banners and adhere to the twine.
  • Apply letter stickers on the front of the banners.
  • I used StyleTechCraft Red Glitter Vinyl* and my silhouette die-cutting machine* to create the words USA to apply to my banners.
  • Stick on each side of the top tier in the holes made to hold cake pops.

StyletechCraft products brought to you by ATSM Craft*

Little details make everything more festive.

Don’t forget to make a few star picks to stick into the cupcakes.

This is a fun project that the kids can help you make.

  • Create the picks by punching or die-cutting several blue and red stars.
  • Add adhesive to the back of the star and place a toothpick in the center.
  • Adhere a second star on the back.
  • For quick and easy work, I used the Xyron Create-A-Sticker* to add adhesive to the stars.
  • Decorative the stars with additional small foil stars.

Add a touch of Vintage Americana with Blue Ball mason jars*. 

They are great for storing straws, and they also make great drinking glasses.

And when the sun starts going down, don’t forget the sparklers and glow in the dark novelties.

Summer Fun Party Decorations Ideas:  (*affilate links)

←PIN ME

Products Used for your convenience…

Save

You are my Sunshine…

You are my Sunshine…I remember this song sung to me and several other little ones

throughout the years.  I’ve sung it myself to all my kids and grandsons.

Did you know you can change the word “sunshine” to almost anything.

My youngest son’s favorite version was you are my airplane?   (try it)

This layout features my youngest “bubble-making” grandson Emerson.

I created the You are my Sunshine Scrapbook Layout using the Hello Sunshine Stamp and Die Set from The Makers Movement.  This set is perfect for Card Makers and Scrapbookers.

Products Used:                (*affiliate link)

*FTC Disclosure… “This is a sponsored post for The Maker’s Movement.  I have been provided product and compensation in exchange for my creative ideas.  The views and opinions are my own.”

  • To mimic the puffy clouds and the scalloped frames.  I created a scallop border for my striped layer using the scallop edge cut from the bottom of the largest Nested Square Tags.  If you place them strategically, you won’t see any seams.
  • Adhere the scallops to the back side of the striped paper.

The Sunshine Die Cut makes the perfect embellishment for my page.

  • I used my Silhouette Electronic Die Cutting Machine and adhesive Craft Vinyl to create the words “You are my, and the name Emerson.
  • For the bubbles, I cut several sizes of small circles using Transparent Glitter Vinyl and the Silhouette.

StyletechCraft products brought to you by ATSM Craft

The Hello Sunshine Stamp and Die Set is great for making handmade cards.

Add a Sweet Little Face for an even Cuter Card.

*Disclosure:  This blog uses ads and affiliate links.  If you choose to make a purchase using one of the links, I receive a small commission (at no additional cost to you) that helps offset the costs of maintaining this blog.  Thanks for your support!

Spring Watercolor Bouquet Card

Spring Watercolor Bouquet

I love the soft look of a handmade water-colored card.

This card was made using the Hello Spring Stamp and Die Set from the Maker’s Movement.

Just for you…I’ve created simple step by step instructions on how to make the card.

How to make a Spring Watercolor Bouquet Card

Materials Used:                (*affiliate link)

*Disclosure:  This blog uses ads and affiliate links.  If you choose to make a purchase using one of the links, I receive a small commission (at no additional cost to you) that helps offset the costs of maintaining this blog.  Thanks for your support!

  • In the Hello Spring Stamp and Die Set, there are several stamps that have a coordinating die that matches the stamp.
  • Stamp a flower using blue ink onto a piece of watercolor paper.

  • Place the mask onto the stamped flower image and stamp a second flower image slightly overlapping the first flower.

  • By using the mask, you create the look of one flower behind the other.

  • Place masks on both of the stamped flower image.  Start adding the background images by stamping small pink flowers, ferns, and leaves.

  • Remove masks and watercolor the stamped flowers using a water-brush*.
  • I like to use dye ink to watercolor.  I apply the ink to a simple grid that I printed onto copy paper and laminated.   Dip the wet tip of the water-brush* into the ink and paint your images.  (You can also use a small paintbrush and water.)

  • After the painted images have dried, stamp the center of the flowers using small stamps from the Hello Spring Stamp and Die Set.

  • Cut frames using the Nested Stitched Rectangles Dies.
  • Adhere water-colored image, frames, and layers onto a 4 ½” x 5 ½” blue dot card.
  • Stamp another flower with blue ink onto watercolor paper.  Watercolor the flower as before.  Cut the flower out using the coordinating die and the Crossover II Fabric & Paper Cutting System*.
  • Mount onto the lower right corner of the card using a thin foam mounting square.
  • Stamp “Hello” onto a small white banner cut from the small banner die found in the Hello Spring set.  Trim banner to size and adhere under the raised flower.
  • Add a simple sheer ribbon to the top of the card to finish.

*FTC Disclosure… “This is a sponsored post for The Maker’s Movement.  I have been provided product and compensation in exchange for my creative ideas.  The views and opinions are my own.”

Save