all things are possible if you believe…

EasterBlogHop

Today, I’m joining the Paper House Design Team for a Easter Blog Hop.

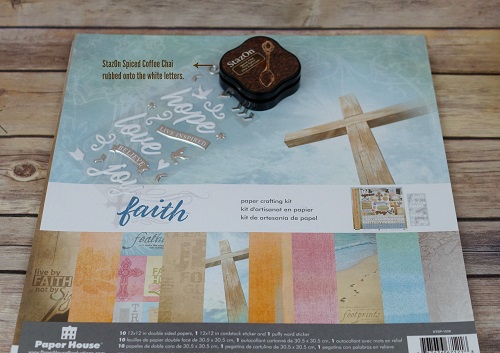
For this hop, we were all given adorable Easter stickers along with the Faith Paper Crafting Kit.

Easter Card materials 5225

I was racking my brain trying to come up with a cute Easter Bunny layout

(ready to steal pictures from my daughter-in-laws Facebook page) when it hit me.

Why not make a card instead.

Easter Card 5237

Easter’s so much more than candy and eggs.

Easter Card Close Up 5243

The Faith kit came with lovely white puffy words that wasn’t quite right for this card.

So…. I used my Tsukineko StazOn Midi Ink Pad, Spiced Chai(which is permanent)

along with an ink applicator and rubbed brown ink onto the white letters.

I used the “HOPE anchors the soul” sticker and stuck it onto a small scalloped

circle.  I mounted the circle onto the corner of the card.

A simple card of encouragement.  (who doesn’t need that?)

PH_25_Gift_Card

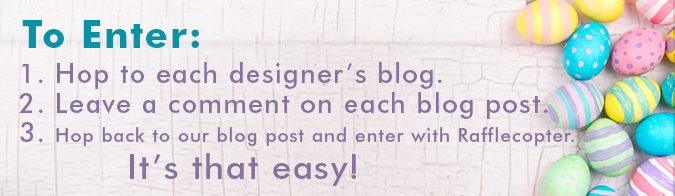
Would you like a chance to win a $25 gift certificate to Paper House?

EasterBlogHopTOENTER2

Good Luck and Happy Hopping!


*This project was created for and sponsored by Paper House Productions.


At the Lake…

At The Lake Title Page

I recently asked my daughter Stephanie to send me some pictures for a family album I was working on.

Stephanie sent me these lovely pictures of her and her husband Zach at the lake.

His parents own a little place by the lake in Conover, Wisconsin that they love to visit.

I love these pictures.  It looks so peaceful there.  (I want to visit.)

Lake Life 4868

I find it hard to believe that she took these beautiful pictures with her phone.

At the Lake 4866

The “At the Lake” layout is my first Design Team project for Paper House Productions.

When it comes to scrapbooking, I consider myself to be fairly simple.  I like layers and clean lines.

I used a variety of Paper House Products from several different collections on this layout.

I love how the Paper House collections work well with each other.

Here’s what I used for my “At the Lake ” layout…

at the lake close up 4919


This project was created for and sponsored by Paper House Productions.

Stitched Sampler

Stitched Sampler

I hate throwing anything away that might possibly be used on a project later.

In an effort to make room and not become a hoarder,

I actually threw these little scraps of fabric away.   (It was hard, I love these prints.)

But…Only minutes later, while I was making a permanent home for my new sewing machine

that I got for Christmas,  (thanks Nick and Bonnie) I got the idea to make a stitched sampler.

What a great use for little pieces of fabric.

Now, bear in mind that this is my first real project on my new machine.

Stitched Sampler Close Up

I misted the iron-on embroidered letters from Joy SA and the white decorative trim with

Tattered Angels Ruby Slipper Chalkboard Mist Paint and stitched to my hearts desire.

I cut a large die-cut square out of premium gray felt using my Accu-cut machine.

I’m pretty please with the way it turned out.

Stitched Sampler 3584

This project was created for and sponsored by Joy SA.

When your Spring Mantel needs a pop of Red…

Spring Mantel

With the beautiful days we had in February…

My Spring Fever has set in big time.

Last week-end, I removed any and all remnants of Winter Decorating and re-did my Mantel for Spring.

little red racer

Inspired by a picture a friend posted online,

I ran upstairs and grabbed my little red racer from my office.

Gumball machine

There’s been a lot of serious jelly bean eating out of this old gumballs machine.

I added a second bag this week.  This could be a problem 🙂

Spring Mantel

Any one who knows me even just a little knows my decorating philosophy…

“Every room needs a pop of red.”

Now, I’m wishing and thinking warm thoughts.

Graphic 45… A Time to Celebrate Frame

Time to Celebrate 4599

I have a hard time resisting the beautiful patterns of Graphic 45 paper and love using

it in my creations whenever possible. The other day, while I was shopping at my local

Scrapbook Store  I picked up a few sheets of the “Time to Celebrate Collection”.

I thought it would be perfect for a Spring Frame I wanted to make.  I couldn’t decide on

which way I wanted to go with the frame so I created two looks for the same frame.

Time to Celebrate Frame 4709

For a slightly more contemporary look….

I used a older black and white picture of my daughter.  (I love the contract.)

Time to Celebrate Frame Close Up 4835

There’s a bit of fussy cutting involved with this frame.

I used the border on the Time to Celebrate paper to create a border around my green frame.

Then, I started cutting out the butterflies and flowers, giving them slight bends with my fingers

before layering them onto the frame with foam mounting squares.

The finished frame is 6″ x 8″ and is made to hold a 4″ x 6″ picture.

Green Craft Frame 2

Here’s what I used:

Deflecto Craft Frame, Green Border, 4x 6 Inches (69574CR)

I used two sheets of paper from Graphic 45’s “Time to Celebrate” collection.


Graphic 45 Time To Celebrate Paper Pad, 12 by 12-Inch(available on Amazon*)


“This is a sponsored post. As a member of the Deflecto Design Team I have been
provided product in exchange for my creative ideas, views and opinions.”

*This post uses Amazon Affiliate links.  I am an Amazon Affiliate


How to Make a Mini Rose Topiary

How to Make a Mini Rose Topiary 04034

Maybe it has something to do with my short stature, but, I have always had a thing for

miniatures.  My momma always told me “Good things come in small packages”.

(which I whole-heartily believed)

The Mini Rose Topiary is a project that can be easily adapted to make larger topiaries.

I just happen to like mine mini.

How to make a Mini Rose Topiary

How to make a Mini Rose Topiary

Here’s what I used:                                                                    (*affiliate link)


Directions:

  1. Spray Roses and small wood heart with the Mistable Paint.   Allow plenty of time to dry.
  2. Paint the 2″ Smoothfoam Ball  and the wood dowel with the green acrylic paint.
  3. Poke hole into the end of the 2″ ball.  Squirt a little glue in the hole and insert the painted dowel.
  4. Starting at the top of the ball.  Glue roses, one by one, onto the ball with a fast drying glue until covered.  After the rose ball is formed, you may want to go back and re-mist the flowers for additional coverage.
  5. Cover the wood spool with the ticking material and glue the end in place.  Tie a small piece of crinkle ribbon around the ticking and glue the wood heart on top.
  6. Insert rose topiary into the small wood spool.

TIP:  Try making a topiary using larger Smoothfoam balls and silk flowers inserted into a pail, vase or containers.

The Mini Rose Topiary was created for and sponsored by Smoothfoam™ The Crafter’s Foam.

"Painting

*Disclaimer:  This post uses ads and affiliate links.  If you choose to make a purchase using one of the links, I receive a small commission (at no additional cost to you) that helps offset the costs of maintaining this blog.  Thanks for your support!


How to Create a Wedding Memories Card Box

I am honored to have had my Wedding Memories Card Box featured as a special project in

DIY Wedding Magazine’s Holiday Issue.

Wedding Memories Keepsake Cards Box 1

The Wedding Memories Cards Box is a dual-purpose box to hold cards at the Reception

and then to be used later to store the Wedding Memories to be cherished for years to come.

Wedding Memories Card Box 8032

I started with a plain wood box from Walnut Hollow and Chalky Finish Paint from Deco Art to create a soft timeless finish.

Supplies Used:    (*amazon affiliate links)

Finished Size: 9” x 12” x 3 1/2”

Wedding Memories Card Box Collage

Directions:

  1. Paint the top portion of the cornice box with “Vintage” Chalky Finish paint and the bottom portion of the box with “Timeless” Chalky Finish paint. (Inside and out)
  2. Lightly sand the box to smooth out the finish.
  3. Position “Mod Quatrefoil” stencil over the top of the box. Secure the stencil in place with the painter’s tape to prevent slipping. Use stipple brush to apply “Whisper” Chalky Finish paint inside open stencil areas.
  4. Remove stencil.
  5. Position and stencil “Mod Quatrefoil” pattern onto the sides of box.
  6. Allow paint to dry for a few hours and lightly sand over the stenciled area to give a slightly worn look.
  7. Apply clear crème wax onto the inside and outside of the box.
  8. Wait one hour and buff box using a soft, clean rag.
  9. Measure and apply decorative paper onto the inside of the box.
  10. Tie a long length of Antique White Satin ribbon around the top of the box, tying a bow on the top.
  11. Cut cream cardstock into five 2 1/4” x 3 1/2” pieces.
  12. Stencil the letters to spell “CARDS” onto cream cardstock using the 3” Simple Script Alphabet.
  13. On the inside of the box: Clip the letters onto the ribbon using the mini clothespins.

Wedding Memories Card Box closed

This project was sponsored by Deco Arts and Walnut Hollow. 

Shop Handmade – The Wedding Store

Disclaimer:  This blog uses ads and affiliate links.  If you choose to make a purchase using one of the links, I receive a small commission (at no additional cost to you) that helps offset the costs of maintaining this blog.  Thanks for your support!

Pretty Pink Birthday Party Sign

Pink Birthday Party Frame 4299

A quick share today of a Pretty Pink Birthday Party Sign…

I made the sign using the Deflecto Craft Frame, Pink Border, 8.5 x 11 Inches (69771CR)

from Deflecto Craft Solutions and the new Flamingo ColorWay paper and stickers from

Paper House Productions.  I love the way they look like they were made for each other.

After the Party is over, add a couple cute photo’s of the birthday girl for a fun memory.

Happy Monday Everybody! 


“This is a sponsored post. As a member of the Deflecto Design Team I have been
provided product in exchange for my creative ideas, views and opinions.”

This post uses Amazon Affiliate links.  I am an Amazon Affiliate

add a little LOVE in the bathroom

Add a little love in the bathroom 3442

When I was little, my Grandma B loved to sing the song “Let me Call You Sweetheart” to us kids.

It’s a sweet song endeared to my heart.

So… while decorating the house for Valentine’s Day, I thought I’d show my family a little love

by adding a cute embellished hand towel in the powder room.

A perfect way to let them how much they’re loved.

Let me call you sweetheart towel supplies

It’s easy! Use mini Joy embroidered letters to iron-on your message and then sew on a simple lace trim.


This project was created for and Sponsored by Joy S.A. Inc.

DIY Etching on a Mirror

Etched Mirror 4197

It all started with an inexpensive gold mirror that my daughter didn’t want anymore.

I had spray painted it red and left it like that for a couple of years.  (it was o.k.)

I took it off the shelf, while cleaning the other day, and decided it needed an immediate update.

Of course, I had to stop cleaning.  (when inspiration strikes)

Etched Mirror Collage

This is how I etched my mirror…                                                                       (*affiliate links)

  • I removed the mirror from the frame.  I gave the red frame a light sanding and then painted it with Tattered Angels Decor and DIY Paint, Ebony*.
  • I cut an oval mask using etchall etchmask*  vinyl and centered it on the mirror.  Make sure to burnish the vinyl to get out air bubbles and to make sure the all edges all down.
  • Apply a thick coat of etchall Etching Crème* over the sides of the mirror using the squeegee.  It’s important to get an even coat of etching crème to achieve a consistent even etch.  (remember more is better)
  • Wait 15 minutes.  Scrape excess etching crème from the mirror and return the extra etching crème back into the bottle. (it’s reusable)
  • Rinse mirror with warm water to clean.
  • Remove mask and dry.
  • Return the mirror back into the frame.  Apply the gold “love” rub-on onto the mirror.

Frosted Mirror Close UP 3711

New to Etching?  You might want to check out the video on the Etchall getting started page.

The Etched Mirror project was created for and sponsored by Etchall®.

*Disclosure:  This blog uses ads and affiliate links.  If you choose to make a purchase using one of the links, I receive a small commission (at no additional cost to you) that helps offset the costs of maintaining this blog.  Thanks for your support!

Shop Your Fav Brands at Scrapbook.com