Every Card Makers Dilemma and a Crazy, Embarrassing Give-Away

You’ve been making cards for how long?  You have how many cards?

Card Makers Dilemma 2

If you’re a Card Maker then you know what I’m talking about…

Because we’re addicted to paper, stickers, dies and stamps…

pretty patterns, inks and embellishments.

We make cards.  We make lots of cards.

We just love making them.   (we do, we really do)

Saving the ones we made in class because…“they’re just too pretty to give away”

or “I’m keeping them for future inspiration”.  (you know I’m right)

What was I thinking

But then after so many years of card making…

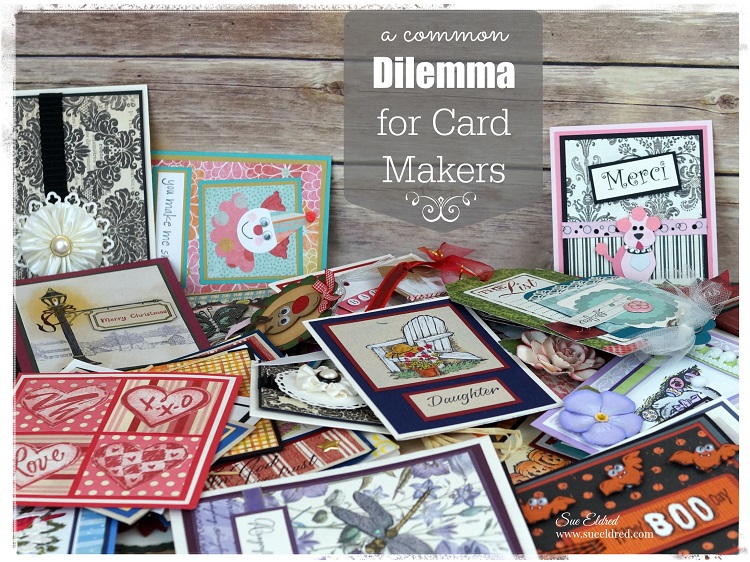
What to do with all these cards.

I have been making cards for years.  A lot of years.

Almost 20 years to be exact and I’ve designed for various manufacturers for the last 14.

Truth is… like a lot of Card Makers, I do sometimes give them out.  (Most of the time, I keep them.)

I’ve kept a lot. 

Amazing

Here’s the deal…

As I work on Spring Cleaning and purging in my office, I decided to give some away.

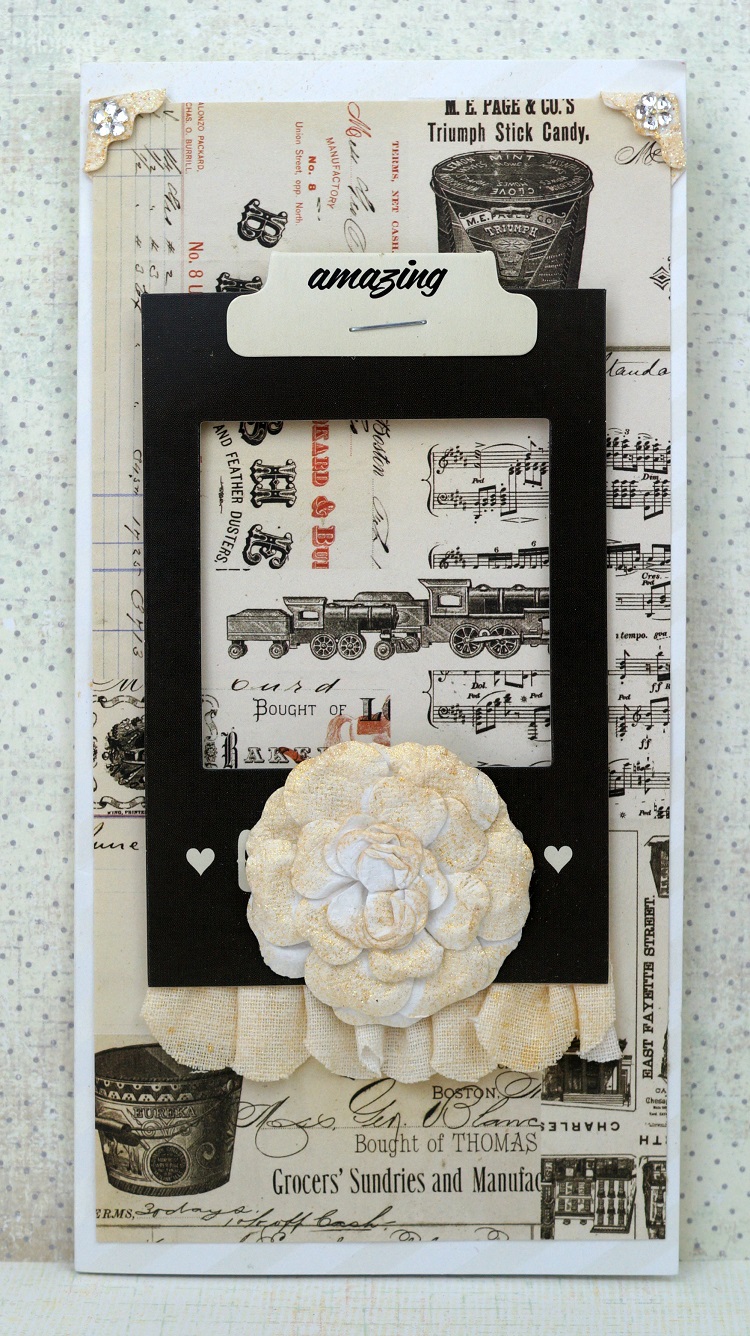
Some are old, really old, others are card fronts or tags.

It’s kind of embarrassing…

cards

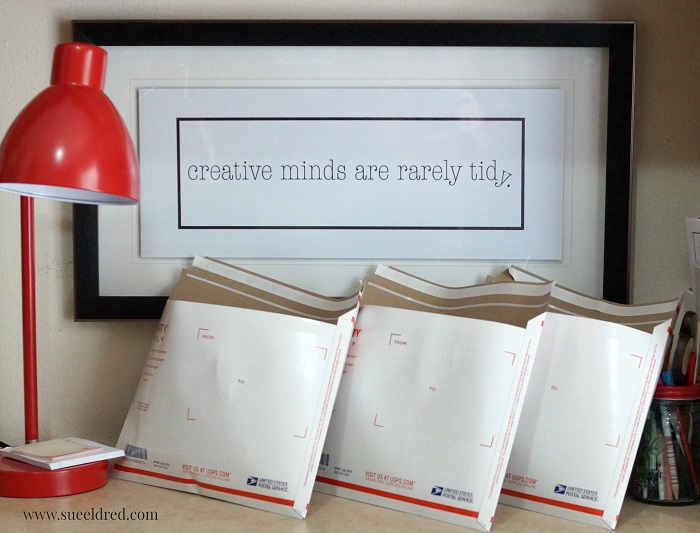
I will stuff Three Priority Mail envelopes full and send them to three lucky recipients.

That is if anyone wants them.  (geez, this could be really embarrassing)

Just leave me a comment on this post by Monday, April 25th

and I’ll pick a three winners to send out the cards.


Snicker, Laugh, Give them away or “Keep them for Inspiration”.  The choice is up to you. 

Just promise not to post them or submit them to as your own.  (that would be wrong)

Your turn… leave a comment.  (please!!!)

Vintage French Inspired Keepsake Box

Vintage French Inspired Keepsake Box

I am a guest blogger on the Walnut Hollow Blog sharing my Vintage French Inspired Keepsake Box.  Make to stop by their blog to check out the full tutorial here.

Supplies Used on the Vintage French Inspired Keepsake Box…           (affiliate link)

*The Vintage French Inspired Keepsake Box was created for and sponsored by Walnut Hollow and DecoArts.

Shop Amazon Scrapbooking Supplies*

Disclaimer:  This blog uses ads and affiliate links.  If you choose to make a purchase using one of the links, I receive a small commission (at no additional cost to you) that helps offset the costs of maintaining this blog.  Thanks for your support!

Buy the Planner Value Kit

Climbing on the “Really Big Rocks” with Warren

Climbing on the really big rocks with Warren 6062

On a warm afternoon in March, I got the chance to play with Warren outside all by himself.

We played basketball for a little while and then he was off to climb on the “really big rocks”. 

Under the tree, in our front yard we have a grouping of big rocks.

When your a two year old little boy it’s the perfect place to climb.

It was such a beautiful day, we played outside for over an hour.

Warren Climbing on the Rocks 6076

I mixed a variety of Paper House Collections to create this fun layout.

From the Faith Collection to Sports and Travel.  They all work well with each other.

Climbing on the rocks close up 6082

I cut a tree silhouette out of brown cardstock and rubbed Tim Holtz Distress Ink in Vintage photo

and outlined the tree with a black marker to give it some dimension.

I printed the rocks clip art onto grey cardstock and cut out.

Climbing on the rocks 06083

Here’s what I used for my layout:

Clever Storage Ideas

Creative Storage Collage 2

I’m not one that’s easily impressed…

I’ve been told I’m a hard sell.

Let me tell you, these new storage containers from Deflecto has really impressed me.

So much that I made a quick 2 minute video to show the benefits and features.

Well thought out and versatile.  My new go to caddy to take to classes.

Ask for them at your local craft store.  Also available on Amazon*.

Deflecto Caddy Organizer, Three Compartments, White (29003CR)

Deflecto Stacking Organizer, 3″ x 3.89″ x 3″, 1 Compartment (20101CR)


“This is a sponsored post. As a member of the Deflecto Design Team I have been
provided product in exchange for my creative ideas, views and opinions.”

*This post uses Amazon Affiliate links.  I am an Amazon Affiliate

DIY Seashell Lamp

DIY Seashell Lamp 5998

Oh…to be by the ocean listening to the waves and picking up shells.

Lately, I’ve been dreaming of summer vacation and relaxing on the beach.  (it’s my happy place!)

Like most people, I love to walk the beach and collect shells.

During the summer, I like to display my shells in a large clear vase on the mantle.

It reminds me of fun summer family vacations.

Last month, when I received the Lighten Up Kit from Etchall®, I thought…

“wouldn’t it make a cute Seashell Lamp to put on the patio to use on those

warm summer nights?”

I used shells collected during our trips to South Carolina.  (some even from the Isle of Palms)

Lamp Close Up 5992

Here’s what I used to make the DIY Seashell Lamp:        (*affiliate link)

Seashell Lamp Collage 2

The shade measures 4″ x 7″.

Directions:

  1. Clean mason the jar to remove all dirt, fingerprints and oil.  Dry with a coffee filter, paper towel, or lint-free cloth.
  2. Mask off a 1″ area around the mason jar with removable painters tape.
  3. Apply a heavy coat of etchall® etching crème to the masked area using the etchall® squeegee.  Leave etching crème on for 15 minutes.  After etching time has elapsed, use the squeegee to return the crème back into the original container for later re-use.
  4. Rinse etched surface with hot water to remove any remaining crème.  Remember to keep crème away from porcelain or ceramic tiles.
  5. Dry mason jar and apply the “relax” peel and stick stencil onto the middle of the first side.  Mask the sides of the stencil with removable painter’s tape.
  6. Using a stencil brush and the multi surface paint, fill in the open areas of the stencil.
  7. Carefully remove stencil and clean before stenciling on the other three sides of the jar.
  8. Fill Jar with sand and shells.
  9. Using the plastic sleeve template, trace onto a piece of burlap. Cut the burlap leaving a 1/2″ allowance around traced template.  Craft Confession:  I tried using a “stick it adhesive sheet” on the burlap first before cutting it out.  It didn’t work.  (see next step)
  10. Use spray adhesive to coat the back of the burlap.  Apply onto the lampshade and trim.
  11. Glue twine around edge of lampshade.

Optional:  The top of the shade is removable so I spray painted it black.

DIY Seashell Lamp 05959

The Lighten Up Kit is pretty easy to customize.  Lots of possibilities.

It comes with a self-illuminating lampshade with LED lights, template and instructions guide.

It uses 3 AA batteries so it’s portable and can be used almost anywhere.

The DIY Seashell Lamp was created for and sponsored by Etchall®.

Shop Your Fav Brands at Scrapbook.com

*Disclosure  This blog uses ads and affiliate links.  If you choose to make a purchase using one of the links, I receive a small commission (at no additional cost to you) that helps offset the costs of maintaining this blog.  Thanks for your support!

Making a place for Dad’s coffee

Making a place for Dad's Coffee 5605

Dad comes over every Monday, Wednesday and Thursday evenings for dinner.

It’s our weekly ritual.

He arrives at 5:30, sits in the leather chair closest to the television, in time for the evening news.

While he watches the news, I make dinner.  That’s the routine.

Dad sits in that particular chair so he can read the closed captioning.

Unfortunately, that’s the one chair that doesn’t have an end table.

Occasionally… he’ll give me a hard time telling me I need a table so he can put his coffee

cup down.  Problem is there’s no room to put one there.

old stool 5552

Problem Solved…

I noticed this old stool down in the basement, paint splattered and water stained.  (a little ugly)

A make-over was in order and I knew exactly what I wanted to do.

I wish you could of saw the smile when I told him why I did this.  (I had to sneak the first picture)

He thought it was perfect.

Easily put away when not in use.

*Disclosure:  This blog uses ads and affiliate links.  If you choose to make a purchase using one of the links, I receive a small commission (at no additional cost to you) that helps offset the costs of maintaining this blog.  Thanks for your support!

Finished Stool with coffee cup 5592

Old Stool Make-0ver Products Used:                                                   (*affiliate link)

*FTC Disclosure… “This is a sponsored post.  I have been provided product in exchange for my creative ideas.  The views and opinions are my own.”

Old Stool Make Over Steps

Directions:

  1. I gave the top of the table a quick sanding with my palm sander to smooth out the paint splatters.  (I could of sanded the legs but I was lazy.)
  2. I used Tattered Angels Decor and DIY, Ebony*, I love that you don’t need to do any sanding or priming.  I love the smooth matte finish that it gives.  I gave the table 2 coats of paint and some touch ups.
  3. Allow the paint to fully dry and cure before starting the stenciling.
  4. I custom mixed Americana Décor Chalky Finish paint relic and everlasting for a light contrast to the ebony black finish.
  5. Center the stencil onto the middle of the stool and tape down the edges with removable painter’s tape to keep the stencil from moving.
  6. Use stipple brush to apply Chalky Finish paint inside open stencil areas.
  7. Remove Stencil.
  8. For the time being, I’ve decided to leave the stool as is.  You may want to apply a finishing wax to help protect the paint.


Don’t Miss a Thing…Make Sure to Follow me

Shop Amazon Scrapbooking Supplies*

The Beautiful Monochromatic Colors of Colorways

If you love beautiful monochromatic colors and patterns…

then you’ll love the new paper collections from Paper House Productions called ColorWays.

Colorways Atlantis 5409

Today I’m sharing a couple of cards I made using the ColorWays collection for the Paper House

Productions Design Team.  My “beautiful Memories” patchwork card was made using the “Atlantis”

collection of lovely turquoise and blues.

Beautiful Memories Card:

Paper House Pink Birthday Card 4312

This next card is a birthday card I made for my niece using the “Flamingo” collection.

A fun loving pink collection.  It’s so easy to make cards with these perfectly coordinated patterns.

Tori’s Birthday Card:

Tori's Birthday Card 4337                                                                                                               (inside of Tori’s card ↑)

“This is a sponsored post.  As a member of the Paper House Productions Design Team, I have been provided product in exchange for my creative ideas.  The views and opinions are my own.

Nick’s Garden Caddy (for Easter)

Nick's Garden Caddy 5510

As soon I walked into Target, a few weeks ago, I was stopped in my tracks by their adorable gardening

supplies for kids.  (in the one spot area)  I am a sucker for cute little things.

Sweet little metal tools and polka dot gardening gloves (oh my) and when I found the plain wood

caddy…  I knew exactly what I wanted to use for Nicholas’ Easter basket.

Nicholas, as you may know, is my gardening buddy.

Wood Caddy 5459 2

Instead of leaving the caddy plain (what fun would that be), I decided to paint and personalize the

caddy with a chalkboard on one side and his name on the other.

(I used Deco Art Urban Ink Stencil, 6″ by 9″, Sea Dogto stencil on his name.)

Back of Nick's Garden Caddy 5538

I went back to Target last week to see if I could find another wood caddy but sadly they were all out.

If you happen to spy one at your Target make sure to grab one, they make wonderful paint caddies.

Wood Caddy with Paint 5462

Along with the Gardening supplies, I added tie-dye chalk (for the chalkboard), jelly bellys, a light up

ball and of course marshmallow peeps.

Nick's Garden Caddy Haul 5493

And… I didn’t forget little brother Warren.  (I picked up all these goodies at Target)

Warren's Easter Bucket 5545

In case your wondering… No this isn’t a sponsored post for Target.  (but I wish it was)


*This post uses Amazon Affiliate links.  I am a Amazon affiliate.

Speckled Eggs for Spring

Speckled Eggs for Spring 4927

Now that I only have a teen-ager at home, we don’t do the dyed eggs anymore.  (he’s no fun)

But… I still needed some soft pastel hued Speckled Eggs for Spring.

Putting my eggs in one basket 4847

So… I grabbed a few of my Smoothfoam Eggs.

I gave the eggs a light sanding to remove the ridge and painted them with a soft chalky finish.

Like the name suggests, these eggs have a smooth finish making them perfect for painting.

The best way to paint an egg 4895

The best way to paint an egg…

Use a small glass or candle votive to hold the egg.  Paint one half of the egg at a time.

Speckled Eggs Close Up 4943

I especially like the look of speckled eggs, so I grabbed an old toothbrush for speckling.

  • Speckled the eggs by lightly rubbing the old toothbrush into brown paint and gently flicking the paint onto the eggs.
  • Make sure to wear an apron to protect your clothing.  Flicking can be quite messy.

This project was created for and sponsored by Smoothfoam™, The Crafters Foam.

Paper Sculpting made easy…

Another Fun Blog Hop!

As a Deflecto Design Team member, I am super excited this week to play with our friends over at Stampendous.  With two amazing teams joining in the fun you will want to check in everyday of the hop.  There will be some fabulous projects and we’re going to be showing them off all week long.

Make sure to scroll all the way to the bottom for a chance to win some awesome prizes.

Deflecto Stampendous Blog Hop Logo 2

 Paper Sculpting made easy…

Deflecto Stampendous Blog Hop 5022 1

Years ago, when I still had my store, we had a Paper Sculpting Card Class

using of all things a sunflower stamp.  (oh, my…cutting all those petals!!!)

While the end look was beautiful, I thought the ladies were going to revolt.

They held that card over my head for years.  (it was not for the faint of heart)

Matter of fact, I was reminded of that card not that long ago.


Do you love the look of paper sculpting but hate all that fussy cutting?

With this stamp and die set from Stampendous, there is minimal cutting and the flower assembly

goes together very quickly.

The Cling Rose Bouquet Rubber Stamp Set from Stampendous comes with various sizes

of flowers each meant to be used separately or layered together to create one large dimensional flower.

When used with the matching die set, you get amazing results.

Flower Close Up 5015

Here’s what I used on my frame:

Paper Sculpting made easy

Directions:

  1. Stamp the flowers and leaves onto the patterned paper.  (see above image)
  2. Die-cut the shapes using the thin dies and big shot die-cutting machine.
  3. Cut the leaves off the rosebud and the bottom portion of the second stamped rose image.
  4. Use a gray marker to go around the outside edge of each image to hide the white core of the patterned paper.
  5. Using a foam mat or mouse pad and a large ball stylus, turn the shapes over onto the mat and gently rub the shapes with medium pressure on the back of the shapes.  This will give the shapes added dimension.
  6. Using thin foam mounting squares, adhere the flower sections together in this order: large rose, medium rose, rosebud and bottom section of medium rose to create one large rose.
  7. Cut out the 4″ x 6″ What a Wonderful World section and adhere onto a 5″ x 7″ polka dot paper layer.
  8. Add layers inside the clear acrylic beveled frame from Deflecto.
  9. Mount dimensional flowers and leaves onto the front of the frame using thin foam mounting squares.

You’ll want to get your commenting fingers ready!  Each comment on a post this week will enter you to win a fabulous prize package! (one comment per post, per person)  Contest open to USA residents only.  We have three prizes, and each will have a 3 Tiered Cake Stand from Deflecto AND the Stamp and Die Sets from Stampendous.

Cupcake StandCRS5087_DCS5087_SSH57

Now click on the links below and get to hoppin’!  Remember to comment on each blog and then return to the Deflecto Blog and leave a comment there for your chance to win.

Are you social? We are too! Please check us out at the following locations…


This is a sponsored post. As a member of the Deflecto Design Team I have been
provided product in exchange for my creative ideas, views and opinions.”

*This post uses Amazon Affiliate links.  I am an Amazon Affiliate