Together is my Favorite Place to be…

Together is my Favorite Place to be

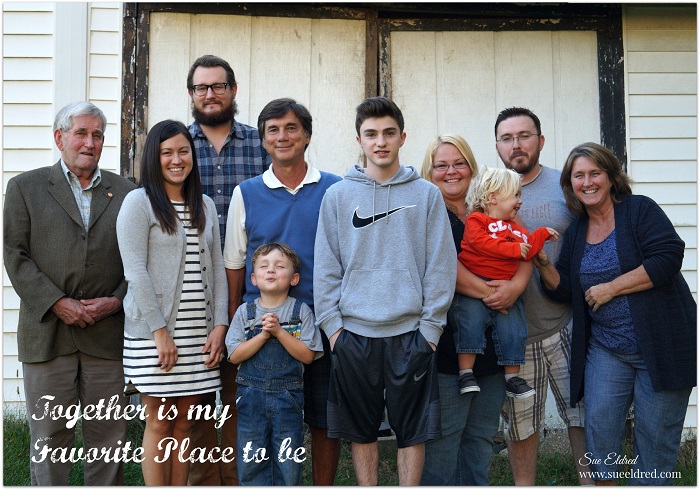
We took this photo a couple of months ago, the last time we were all together.

I always make them do a group picture.  (it’s what I do)

My youngest son had the idea to take the picture in front of the old barn.

So we set up the tri-pod and self timer and I got this fun shot.

I am so Thankful for my Family.

After we got this picture, the real run began.

The boys started kicking the soccer ball around.

There were foot races, push ups and a lot of good family fun.

Echo Park Family Album

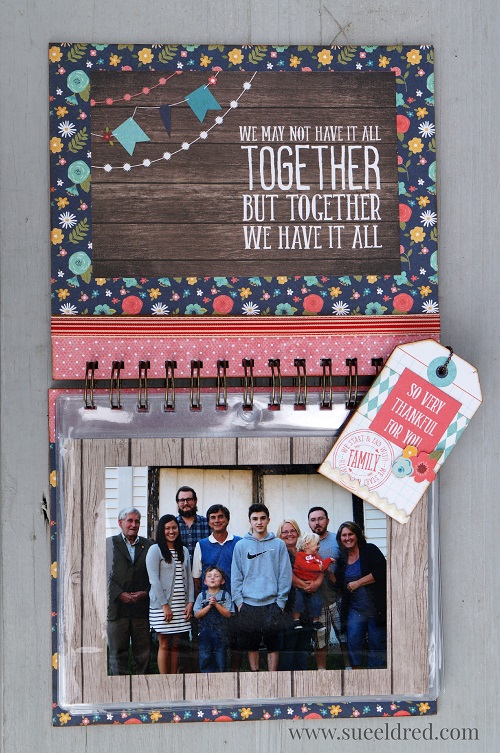
I found The Story of Family Collection by Echo Park and knew it was perfect for these pictures.

Echo Park Family Album Inside

Happy Thanksgiving.


Warren’s Masterpiece

Warren's Masterpiece

I love watching little kids as they create.

At almost two, Warren doesn’t always get to use markers.

He just quietly worked on his Masterpiece for at least 10 minutes or more.

Just happy creating.

I wish I had that freedom.  (my head gets in the way)

My Masterpiece

For Warren’s frame I decorated a clear flat acrylic frame from Deflecto Craft Solutions by adding a

couple strips of Washi Tape along with some Lime Green Iron-on Letters from Joy SA Inc.

I glued the letters onto the frame (since I couldn’t iron them) and added a couple magnet strips

to the back.

My Masterpiece 9759

Warren was so proud of his Masterpiece. 


*This project was created for Joy SA Inc. and sponsored by Joy SA Inc. and Deflecto Craft Solutions.

Etched Snowflake Candy Jar

Quick and Easy Holiday Gift Idea

When it comes to the Holidays I love Quick and Easy Gift Ideas.

For the Snowflake Candy Jar…

I used a small canning jar etched with snowflakes and filled with candy.

It’s a project that I was able to put together in under a half hour.

Snowflake Candy Jar Supplies 1274

To make the Snowflake Candy JAR…                 

  1. Punch a strip of Snowflakes using etchmask™ vinyl and a snowflake punch.
  2. Carefully cover the jar with the vinyl.
  3. Make sure to burnish the vinyl to get out air bubbles and to make sure the all edges all down.
  4. Apply a thick coat of Etchall over the snowflake cut out using the squeegee.
  5. Wait 15 minutes.  Scrape excess etching crème from the side of the jar and return extra etching crème back into the bottle. (it’s reusable)
  6. Rinse jar with warm water to clean.
  7. Remove Stencil and dry.
  8. Add adhesive rhinestones to the center of each snowflake.
  9. Wrap craft stem around the neck of the jar and glue on a red button.

Snowflake Candy Jar Covered 1287

  • Cut a small circle from decorative scrapbook paper and adhere to lid of the jar.
  • Embellish jar with greenery stem, jingle and bow.

Snowflake Candy Jar 1472

   This would make a great Teacher, Hostess, Bunco, or Gift Exchange Gift.

This project was created for and sponsored by Etchall®.


Don’t Miss a Thing…Make Sure to Follow me.

Shop Your Fav Brands at Scrapbook.com

Disclaimer:  This blog uses ads and affiliate links.  If you choose to make a purchase using one of the links, I receive a small commission (at no additional cost to you) that helps offset the costs of maintaining this blog.  Thanks for your support!

Try Amazon Prime 30-Day Free Trial

Home Sweet Home Recipe Book Class

Graphic Home Sweet Home Recipe Book 215

♥ “Home Sweet Home” Recipe Book

at The Paper Forest in Washington, IL

Tuesday, December 8th from 5:30-7:30 p.m.

Cost:  $35

Create a spiral bound recipe book using Graphic 45’s “Home Sweet Home” scrapbook paper and stickers.  Inside the album is several heavy duty pouches from Deflecto just waiting for your own special recipes.  Perfect Gift Idea!

Contact The Paper Forest www.thepaperforest.com or 1-309-745-3440 to sign up.

Graphic 45 Home Sweet Home Cookbook with Deflecto Pouches 4744 Sue Eldred's Graphic 45's Home Sweet Home Cookbook with Deflecto Pouches 4737

French Country Fall Stenciled Burlap Table Runner

French Country Fall Stenciled Burlap Table Runner 681 2

French Country Inspired Stenciled Burlap Table Runner for Fall.

This table runner is a Quick & Easy DIY project with no sewing involved.

Supplies 223

To make the table runner you’ll need:                                     *(affiliate links)

*Disclaimer:  This post uses ads and affiliate links.  If you choose to make a purchase using one of the links, I receive a small commission (at no additional cost to you) that helps offset the costs of maintaining this blog.  Thanks for your support!

Stenciling 269

Stenciled 380

Directions:

  1. Make sure to lay paper down before stenciling on burlap.
  2. Tape around stencil with removable painter’s tape so that the stencil won’t move.
  3. Using a stencil brush, dip just the tip of your brush into the paint.  Tap off excess paint.
  4. Stenciling is a “dry” brush technique.
  5. Apply paint with stencil brush in a straight up and down motion called stippling.
  6. Clean Stencil between each image.
  7. Glue lace trim onto each edge of the runner using Fabri Tac glue.
  • Burlap is a rough fabric.  You may want to add a layer of fabric or felt underneath the runner to protect the finish of your table.

Close UP 0666

Fall Display

Because I really liked how the table runner turned out…

I decided to create a pillow for the comfy chair in my dining room

I used muslin as a lining for the burlap and on the reverse side of the pillow.

(The pillow, of course, consisted of some sewing.)

Shop Amazon Scrapbooking Supplies*

How to make a Holly Jolly Flip Album…

Holly Jolly Flip Book

I wanted to share with you today one of my favorite projects from my Holiday Workshop

last Saturday.  It is the “Holly Jolly Flip Album” using paper from Canvas Corp Brands

Farmhouse Christmas Collection and a 5″ x 7″ Black Acrylic Frame from Deflecto Craft Solutions.

It’s a fairly simple project and the ladies were able to complete the album in just a couple of hours.

Farmhouse Christmas Flip Book Front Cover7638  Farmhouse Flip Book Supplies 07392

Holly Jolly Flip Album

Here’s the complete supply list:

Directions:

  1. Mark and measure hole placement on black acrylic frame.
  2. Drill 3/8” holes into frame.
  3. Cut a 7” x 9” piece of Red & Kraft Ribbon Stripe paper and insert into frame.
  4. Album Cover: Cut the “Holly Jolly Christmas” section from the Better Not Pout Tags on Kraft. Layer it onto black cardstock, kraft corrugated paper and then another back cardstock layer.
  5. Cut a 4 3/4” x 6 3/4” piece of Red & Black Stitched Diamonds and adhere it onto a piece of 5” x 7” Red Cardstock layer. Add a 3/4” x 4 3/4” strip of Red & Kraft Ribbon Stripe. Adhere “Holly Jolly” layers onto the Red & Black Stitched Diamonds.
  6. Punch a 1 11/16” circle from the Better Not Pout Tags and glue onto the back of the Optical lens by adding craft glue along the outside edges of the lens. Add jump ring to Optical Lens.
  7. Mark and measure holes to line up with black acrylic frame on the Album Cover and punch holes. Add eyelets to holes with the Crop-a-dile.
  8. Tie a piece of gold ribbon around the front of the album cover.
  9. Cut several pieces of black 5” x 7” cardstock layers to use as the pages of the album. Decorate album pages using additional scrapbook paper layers, strips, flips, pockets, trim, cords, tickets and mini bags.
  10. Align, measure and punch holes in the top of the album pages.
  11. Add album cover and pages to the black acrylic frame using medium book rings. Add Optical lens to ring.
  12. Embellish the stand by adding gold decorative trim with Fabri-Tac glue.

Pg. #4 Farmhouse Christmas Flip Book Special Delivery Side view 07658    Pg #1 Farmhouse Christmas Flip Book Made with Love Pocket Page 7646


“This is a sponsored post.  As a member of the Deflecto Design Team I have been provided product in exchange for my creative ideas, views and opinions.”

Thank You… I had a really good time

Sue's Holiday Workshop 2015

We have officially started Holiday Crafting. 

This past Saturday I had the privilege of creating with these lovely ladies at my 7th annual Holiday

Workshop.  We made a Holly Jolly Flip Album, 2016 Mini Desk Calendar, a Mini Ribbon Wreath

Christmas Ornament, Cards, Tags and a Holiday Planner.

So…Bring on the Holidays.  We’re ready!  (well maybe)

Holiday Jello SquaresChristmas Cookies


We joked, We laughed, We ate, We crafted and We had a really good time.

everyone working hard

Everyone hard at work.

I host Sue’s Holiday Workshop in my church’s Family Life Center.  It is a big, beautiful, well lit space.

Look at all the space we have to work with.  Lots of room to spread out and no one was cramped.

A Special Thank You to everyone who attended.  I had a really good time.

I ain’t afraid of no Ghost…

Ghostbusters 0731

My daughter in law brought the boys over today to show me their Halloween costumes…

(and a little early Trick or Treating.)

I just had to share the pictures with you.

She made Warren’s “Stay Puft” costume and even crocheted his hat.

Ghostbuster Nick 0729

Who you going to call?  Ghostbusters!

Warren 727

Isn’t he just the cutest Stay Puft Marshmallow guy?

Nick 0728 Warren 741

Have a Safe and Happy Halloween.

How to make a Frosted Pinecone Wreath

Frosted Pinecone Wreath

Autumn has come to the Midwest bringing with it crisp air and colorful leaves. 

I’ve even given up my flip flops for socks and shoes…

I like Autumn.

Really I do.  (If only it’d turn right back into Summer.)

Now that I’ve given up on Summer, I thought I’d better start with my Fall Decorations.

I like making projects that serve more than one purpose.

Like this Pinecone wreath.   After I’m done with my Fall Decorations…

I plan on adding red berries and re-making it into a Christmas Wreath.

How to Make a Frosted Pine Cone Wreath…

You’ll need:

  • 14″ Smoothfoam Wreath
  • Assortment of Pinecones
  • White Spray Paint
  • Craft Moss
  • Craft Glue
  • Hot Melt Gun and Glue
  • Ribbon and Raffia
  • Thin Wire

Directions:

  1. Gather an assortment of various sizes of pinecones.
  2. Spray one side of the pinecones with white spray paint.
  3. Glue Moss onto Smoothfoam Wreath.   (leave the outside of the wreath bare)
  4. Hot Glue and wire larger pinecones onto the wreath first.
  5. Fill in the Wreath with the smaller pinecones.
  6. Tie Ribbon around the outside of the wreath.
  7. Add raffia bow.

*Disclaimer:  This post uses ads and affiliate links.  If you choose to make a purchase using one of the links, I receive a small commission (at no additional cost to you) that helps offset the costs of maintaining this blog.  Thanks for your support!

This project was created for and sponsored by Smoothfoam.

Try Amazon Prime 30-Day Free Trial