Although I don’t always send a ton of handmade Christmas cards out, I do enjoy making them.
The Christmas Tree card was made using paper and stickers from Paper House Productions.
I love how the playful plaids blend perfectly together to form a Traditional Christmas feel
in this layered card. Enjoy! (makes me feel like singing “O’ Christmas Tree…”)
To make the card you’ll need: (*affiliate links)
- Merry Christmas 3D Sticker
- Red Flannel 12″ Double Sided Scrapbook Paper
- Deck the Halls 12″ Double Sided Scrapbook Paper
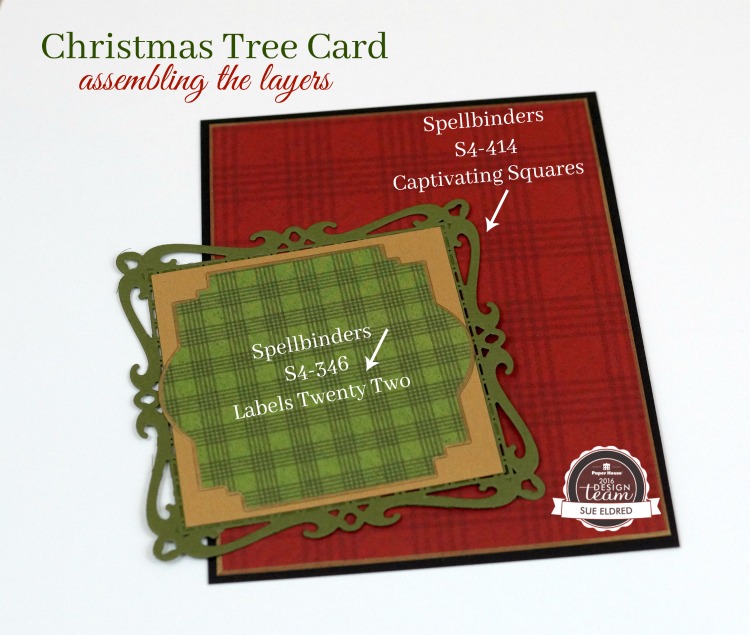
- Spellbinders S4-414 Nestabilities Captivating Squares Die Templates *
- Spellbinders Twenty-Two Labels *
- Cardstock: Metallic Gold, Green and Black
- 1/4″ Red Double Faced Satin Ribbon
- Pine Craft Stems
- Calligraphy Paint Marker, Gold *
- Red Adhesive Rhinestones
- Double Stick Tape Runner
- Red Adhesive Rhinestones
- Craft Glue
- Die Cut Machine
- Paper Trimmer
Directions:
- Cut a 4 1/2″ x 6″ piece of “red flannel” paper. Hold the edge of the paper against the nib of the gold calligraphy marker to add a thin gold border on the edge of the paper. Adhere the red flannel layer onto a 4 3/4″ x 6 1/4″ piece of black cardstock.
- Adhere the red flannel and black layers onto a 5″ x 6 1/2″ green card base.
- Cut the “deck the halls” paper (green plaid) using the “labels twenty two” die. Add a thin gold border around the edge of the label like in step #1. Adhere the green plaid label onto a 3 1/4″ x 3 1/4″ gold metallic cardstock layer.
- Cut a decorative square using the “captivating square” die and a piece of green cardstock. Adhere the green plaid label and gold metallic square onto the top of the decorative square.
- Adhere the green and gold layers onto the bottom portion on the red flannel layer, leaving even spacing on the bottom three sides.
- Assemble the pine swag using the 3D stickers and glue onto the top of the card. (picture below)
- Finish embellishing the front of the card with the 3D Christmas Tree sticker and a couple of red adhesive rhinestones.

This card was created for and sponsored by Paper House Productions.
*I am an Amazon Affiliate. If you choose to make a purchase from Amazon using these links, I receive a small commission that helps offset the cost of running this blog. Thank You!