
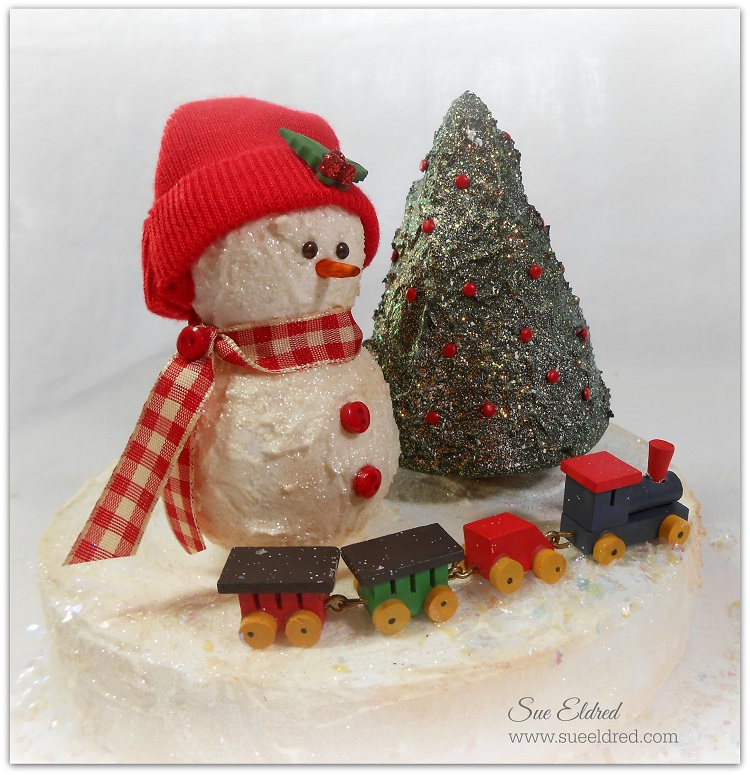
Create your own Frosty Winter Wonderland using Smoothfoam’s Snowman and Tree Shapes and a 6″ Smoothfoam Disc.
Supplies Used:
- Snowman Body
- 2″ x 3 1/2″ Tree
- 6″ x 1″ Disc
- Textured Embossing Paste
- Acrylic Paints: White, Green and Brown
- Paintbrush
- Stickles Glitter Glues: Frosted Lace, Diamond
- Micro Brads: Black, Red
- Bamboo Skewer
- Orange Marker
- Brown Ink-pad
- Ribbon, Buttons and Christmas Embellishments
- Small Red Doll Sock
- Craft Glue
- Old Toothbrush
Directions:
- Cover the Snowman, Tree and Disc with the textured embossing paste using your finger. Allow to thoroughly dry.
- Gently dust the Snowman and Disc with brown ink using the paintbrush to accent the texture of the paste.
- Paint the Snowman with Frosted Lace Glitter Glue.
- Paint the Tree with Green Acrylic Paint, speckle white paint onto tree using an old toothbrush.
- Paint the Tree and Disc with Diamond Glitter Glue.
- Decorate the Snowman with Small Micro Brads for the eyes, the tip of a bamboo skewer colored orange for the nose, small red doll sock with the tip tied with twine for his hat, teeny tiny red buttons and a red and cream gingham bow.
- Insert Red Micro Brads into the tree for the Christmas Lights.
- Assemble onto 6″ base and glue into place.

hello! i love the flannel hat you made for your snowman, but i’m not sure from your instructions how you made such a nice looking one. is there a tutorial or more detailed instructions? thanks and happy holidays!
I used a little red doll sock which I tied the tip with a piece of string to make it look like a little beanie. You can also use a small piece of felt. See my post on “How to make a Wood Slice Snowman” for instructions on how to make a hat that way. Thanks and Happy Holidays.