Tropical Vacation Mini Album

Who’s ready for a Tropical Vacation?  

Many, many years ago, I met my sweetie while visiting the island of Oahu.

Twelve years ago we went back.  (I’m thinking we’re long overdue.)

I need a tropical vacation!

This week, the Xyron Design Team teamed up with Die Cuts with a View.

I received the Electric Jungle Paper Pad, a bright and colorful collection.  

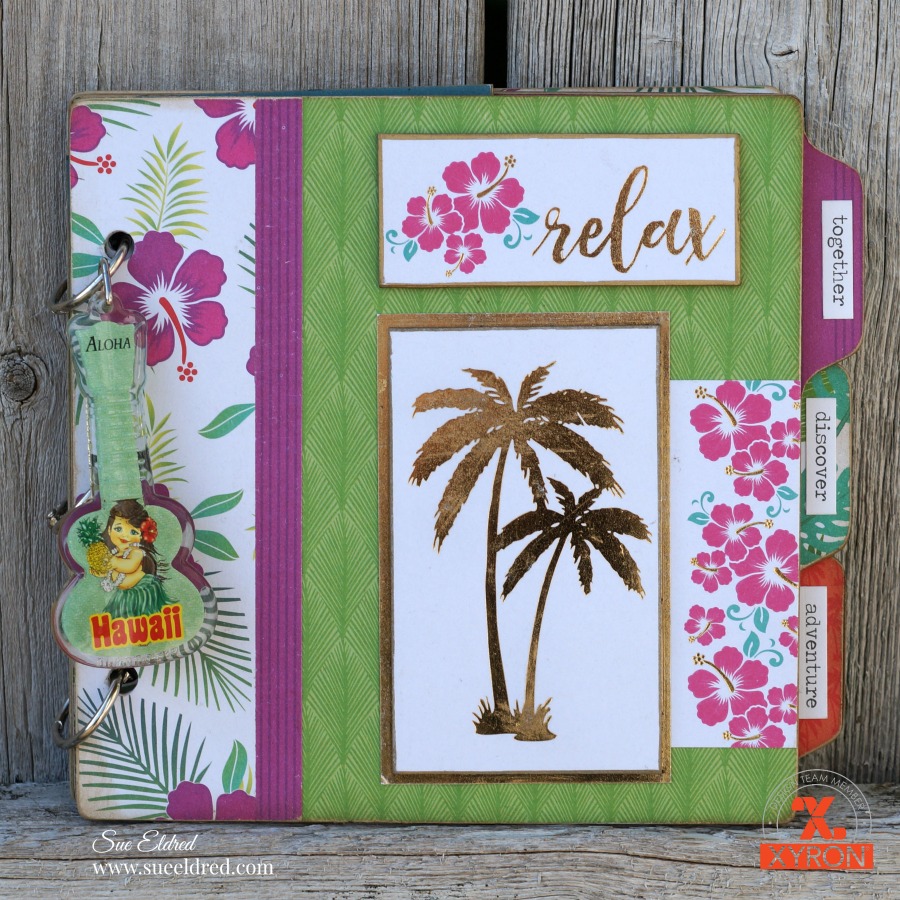
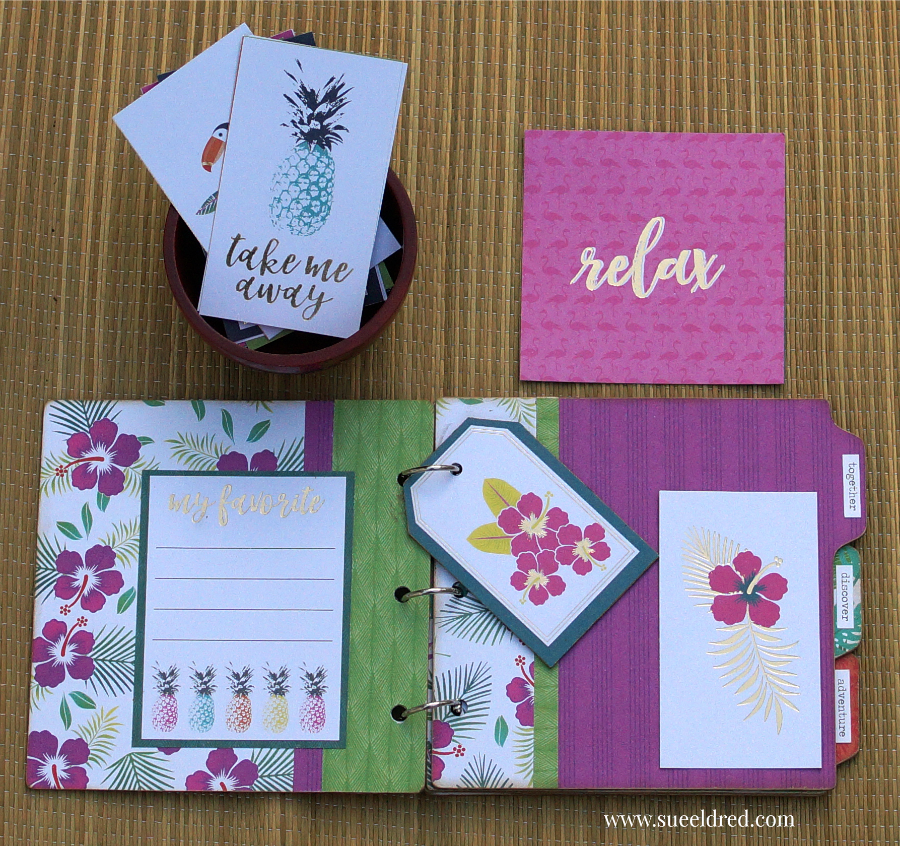
For my project, I decided to make a mini album.  I’m not sure if I’ll use the really old, kind of old

or wait until I get new pictures to place inside the album.  (hint, hint!)

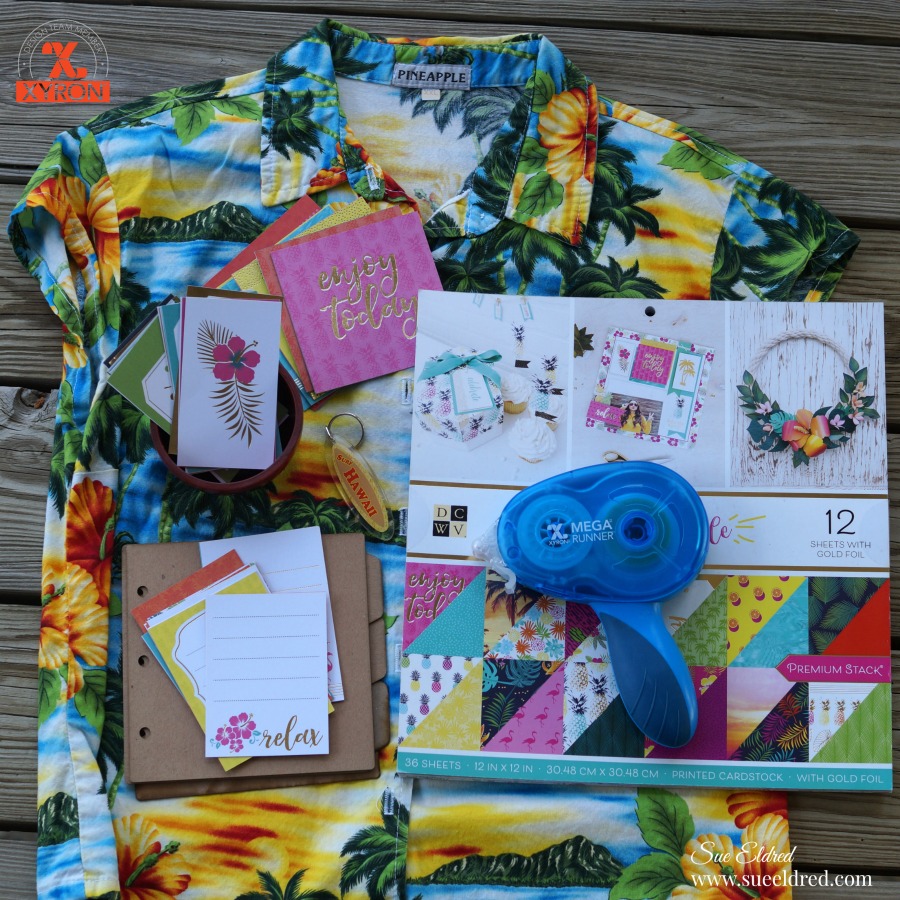
Tropical Vacation Mini Album Supplies Used:                     (*affiliate links)

*Disclosure:  This blog uses affiliate links.  If you choose to make a purchase using one of the links, I receive a small commission (at no additional cost to you) that helps offset the costs of maintaining this blog.  Thanks for your support!

  • Cut paper to fit the pages of the chipboard album.
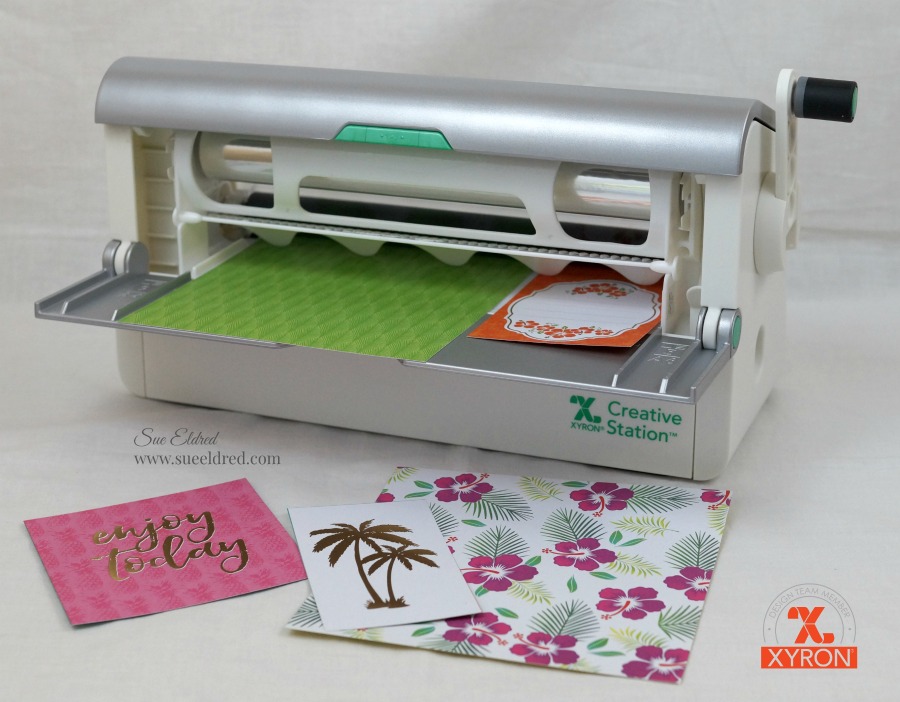
  • Lay decorative scrapbook paper (design side up) on the  *Xyron Creative Station, 9″ crank the handle to run the paper through the machine.  As it moves through the Xyron Creative Station it adds adhesive to the back side of the paper.
  • Easy to use and it doesn’t need any electricity.
  • I like using the Xyron Creative Station* when making mini books because you get complete coverage, no wrinkling, no bubbles!

  • Once the pages are covered with the paper, use a craft knife and cutting mat to trim around the edges of the chipboard.
  • Use the XYRON Adhesive Eraser* to remove any extra adhesive from the edges.
  • Gently sand away rough cut edges on the paper using a extra fine sanding block.
  • Because the chipboard is tan and the core of the paper is white, I inked the edges of the pages with a light tan ink and a ink blending tool.
  • I created thick tags by using a tag cut from the paper pad and adhering it onto a small piece of chipboard.  I used a gold calligraphy paint marker to create a gold border around the edge of the tag.
  • The “Palm Tree” and “Relax” on the front of the mini album both have chipboard underneath to create added dimension.

“This is a sponsored post.  As a member of the Xyron Design Team I have been provided product and compensation in exchange for my creative ideas.  The views and opinions are my own.

DIY…Christmas Chalkboard

DIY…Christmas Chalkboard

Christmas in July…

Last week it was so hot that when I went out at 9:00 in the evening to water my flowers it

was hard to breath.  It was so hot that our unheated pool felt like bath water.

Summer’s in full swing and vacation (for me) is fast approaching.

And with all the things I could or should be doing, I felt like making a Christmas Chalkboard.

It’s not too early?  Is it?

The Christmas Chalkboard is really easy to make…

and would be a wonderful gift for those of you thinking ahead.

And if you’d like…you could make it a two sided chalkboard and really get creative.


Here’s how I made the Christmas Chalkboard…  

Disclaimer:  This blog uses ads and affiliate links.  If you choose to make a purchase using one of the links, I receive a small commission (at no additional cost to you) that helps offset the costs of maintaining this blog.  Thanks for your support!

Vintage Home Sweet Home Layout

Home Sweet Home 3088 Lately, I’ve been noticing more and more people using embossing paste on their scrapbook layouts.

Hmmm…. I haven’t used embossing paste in years.

Matter of fact… my jars of embossing paste are over 10 years old.  (and still good)

So, I thought I’d give it a try with a simple layout and this old house picture.

Quick, Simple and adds a subtle punch to this layout.  I think I like it.

Embossing Paste Border 3092

Using embossing paste is easy: 

  • Lay stencil onto cardstock, fix in place with removable masking tape.
  • Apply a thin layer of embossing paste over the stencil using a palette knife.
  • Remove stencil and allow time to fully dry.
  • Make sure to clean embossing paste off stencil right away.
  • It’s as easy as icing a cake.

Products Used:

Click on the pictures above for more information through Amazon*

Disclosure:  This project was created for and sponsored by Clear Scraps.

I am an Amazon Affiliate.

Little Black Dress Mixable Medley Album

Clear Scraps LBD new album

When it comes to scrapbooking, I have a lot of stuff.

I have so much stuff… I should never buy another sheet of scrapbook paper.  (but I will )

I love paper.  I love pretty patterns.  I love mini albums.  (so much to love)

Lately, I’ve been on a quest to use more of the stuff I have on hand.

So, when it came to making this Mixable Medley Album for Clear Scraps, I pulled

from one of my favorite collections, the “Little Black Dress” collection from Basic Grey.

The album also uses Clear Scraps New Oval Fancy Mirror Frame.

To make the mirror stand out and give the album a vintage feel, I sponged “Spiced Chai”

Stazon Ink onto the back of the acrylic cover leaving the center of the mirror clear.

LBD Album 2457   LBD Album 2458

This project was created for and sponsored by Clear Scraps.

Home Sweet Home

House Mixable 1580

A quick share today to show you the Mini Album I made using Clear Scraps New Mixable Home Album.

My “Home Sweet Home” album is a 8″ x 9″ Acrylic & Chipboard mixed Album.

I used chipboard stickers from My Mind’s Eye “Sweetest Thing” collection and various scrapbook papers

to decorate my album.

House Mixable Close Up 1582

My favorite part of the album is the fence.

I love the look of a white picket fence so I sprayed the clear acrylic with white spray

paint.  Now I have a white picket fence.

(This project was created for and sponsored by Clear Scraps.)

Shabby Vintage Clipboard

Shabby Clipboard 2509

More new products today from Clear Scraps.

This was a fun project.

When I first got this new acrylic clipboard I wasn’t sure how I was going to use it.

Once I got a clearer vision on how I wanted it to look, inspiration soon followed.

Now, I can’t wait to make another one.

Here’s the link to all of the NEW PRODUCTS from Clear Scraps.

Shabby Vintage Clipboard

Supplies Used:

  1. Spray the back of the clipboard with the IrRESISTible Texture Spray to give it a soft lacey look and dab the edges with White Picket Fence paint.  (Both paints work great on acrylic.)
  2. Adhere collage papers and vintage photo into place or allow the clip to hold them.
  3. Adhere mirror embellishment to corner of clipboard
  4. Embellish Clipboard with Vintage Trim and Lace.
  5. Add small adhesive rhinestones and a vintage style button to the clip and tie a crinkle ribbon bow.

DSCN2510

This project was created for and sponsored by Clear Scraps.

Grandkids are Blessings

Grandkids are Blessings Layout with Truck

I have two adorable grandsons who are just the sweetest little guys.

I just love being around these two.  So many smiles, hugs and lots and lots of love.

Being a grandma is Wonderful.  (Although I’m sure I don’t look old enough to be a grandma)

My Grandkids are definitely a Blessing.

The “Grandkids are Blessings” Layout was made with:          (*affiliate link)

Tip:  I sprayed the Irresistible Texture sprays fairly thick on the front of the word “blessings” and allowed a couple of hours to dry before adhering to my page with Glaz On.

This project was created for and sponsored by Clear Scraps.

Shop Amazon Scrapbooking Supplies*

Disclaimer:  This blog uses ads and affiliate links.  If you choose to make a purchase using one of the links, I receive a small commission (at no additional cost to you) that helps offset the costs of maintaining this blog.  Thanks for your support!

Wedding Day Brag Book

Our Wedding Day Brag Book

Overwhelmed by all the Wedding Pages you need to scrap?

The Wedding Brag book is a perfect way to show off a few of your favorite Wedding photos until you get that larger book finished.

The Wedding Brag Book would also make a perfect gift for your favorite Mother or Mother-in-law.

For my Wedding Brag Book I used the 6″ x 6″ Chipboard 3 Tabbed Album  from Clear Scraps and

The “Story of Us” Collection from Simple Stories.

Wedding Album inside

I love these sturdy chipboard books.  When I use these books, I can easily trim around the edges with a craft knife and smooth any rough paper edges with a sanding block.

To spice up boring silver book rings, I painted each ring with a gold metallic paint pen.

Every Love Story...

Tip:  Being a frugal scrapper, I used the 1/2″ strip at the bottom of most scrapbook paper to cover the tab.  Start with that edge and cut your paper 6″ x 6 1/2″ and include that strip for the perfect tab.

Have a Creative Day!

Make sure to check all the 5 days of the DIY Wedding Projects.

Shop Handmade – The Wedding Store

Disclaimer:  This blog uses ads and affiliate links.  If you choose to make a purchase using one of the links, I receive a small commission (at no additional cost to you) that helps offset the costs of maintaining this blog.  Thanks for your support!

Embossing Clear Scraps Clear Shapes for Layouts and Cards

Vintage Sisters Layout for Clear Scrap by Sue Eldred using Clear Shape Flowers

Did you know that you can emboss Clear Scraps Clear Shapes?   (I didn’t until recently.)

Smile Card for Clear Scraps Sue Eldred July 2014

For my “Vintage Sisters” layout and “Smile” card, I started with a Clear Shape Flower.

To make the Flower:

  • I used my Big Shot and a Swiss Dot Embossing Plate to emboss my flower.
  • I dabbed Antique Linen Distress Paint on the front of the flower  (raised dot)  and Victorian Velvet Distress Paint on the back side of my flower.

This project was created for and sponsored by Clear Scraps.

Simple Decorated Linen Bag and Burlap Utensil Holder


Burlap Pouches

I recently got the opportunity to play along with a group of Designers using some fun burlap products.

I really love working with burlap.  So many ideas, too little time.  Here’s a few of the many things you can make using burlap.

Decorated Muslin Bag w vase

My first project is a simple and elegant idea for decorating a plain muslin bag.

muslin pouch and stencil tools

  1. Start with a plain muslin bag.
  2. Lay diamond stencil over the bag and secure in place with removable tape.
  3. Stipple over the stencil with white acrylic paint.
  4. Adhere a 1 1/2″ strip of burlap around center of bag.
  5. Glue a thin piece of white lace around the bottom of the burlap strip.
  6. For the heart:  Paint a small piece of red burlap with several coats of white acrylic paint, creating the nice soft pink color.
  7. Cut burlap with heart die.
  8. Adhere sheer pink rosette ribbon onto pink heart and glue onto front of muslin bag.
  9. Cut and Decorate a small tag.

Burlap Utensil Holder 2

The Burlap Utensil Holder uses the 3 1/2″ navy striped burlap ribbon.

  1. Cut a 12″ strip of burlap ribbon.
  2. Fold over one end of the ribbon approx. 1/2 end and glue using a good Fabri Tac glue.  I used small metal binder clips to secure the ribbon in place while drying.
  3. Create a 4″ pouch by folding and gluing ribbon.  (love those binder clips)Glue a piece of 1 1/2″ burlap ribbon around pouch.
  4. Glue lace over burlap ribbon and tie with a piece of cream crinkle ribbon.
  5. Embellish with a flower and stick pin.
  6. Add a napkin and utensil and your ready to go.