Santa’s Letter Box

Santa's Letter Box using Sizzix Slotted Box die

Create a Holiday Mailbox for letters to Santa using the Sizzix Slotted Treat Box Die by Eileen Hull*.

A fun project to make for Christmas!

Santa's Letter Box using Sizzix Slotted Box die by Eileen Hull.

To say I have a lot of Holiday Scrapbook paper would be a understatement!

Paper crafters have a tendency to “save” their special scrapbook paper

for just the right project.

We also have a tendency to hoard said special paper.

Santa's Letter Box using Sizzix Slotted Box die by Eileen Hull.

Sometimes its fun to use what you have on hand.

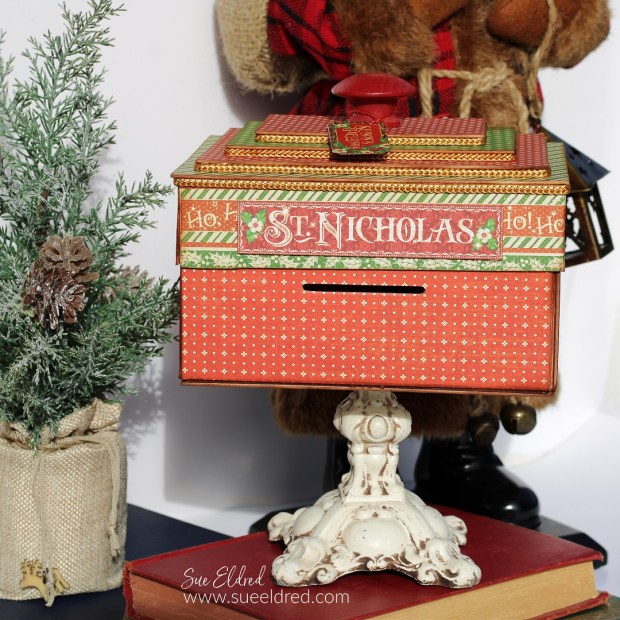
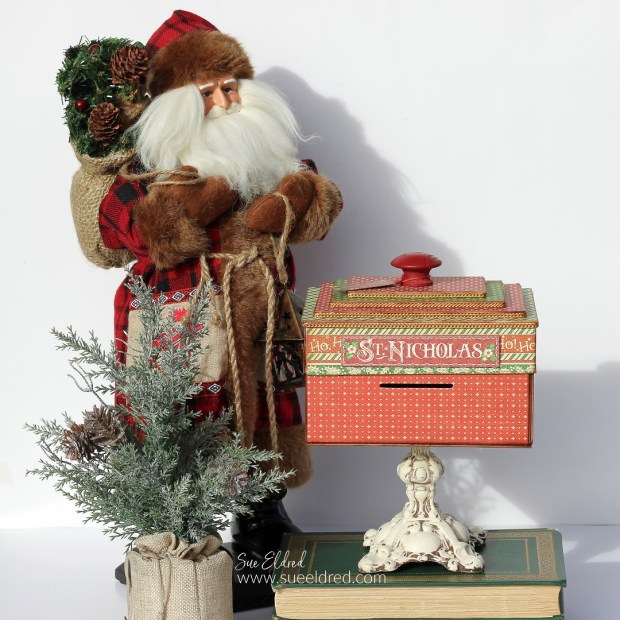
I dug deep into my hoarded Graphic 45 Christmas Scrapbook paper

to make the Santa Letter Box.

One of my favorite tips…

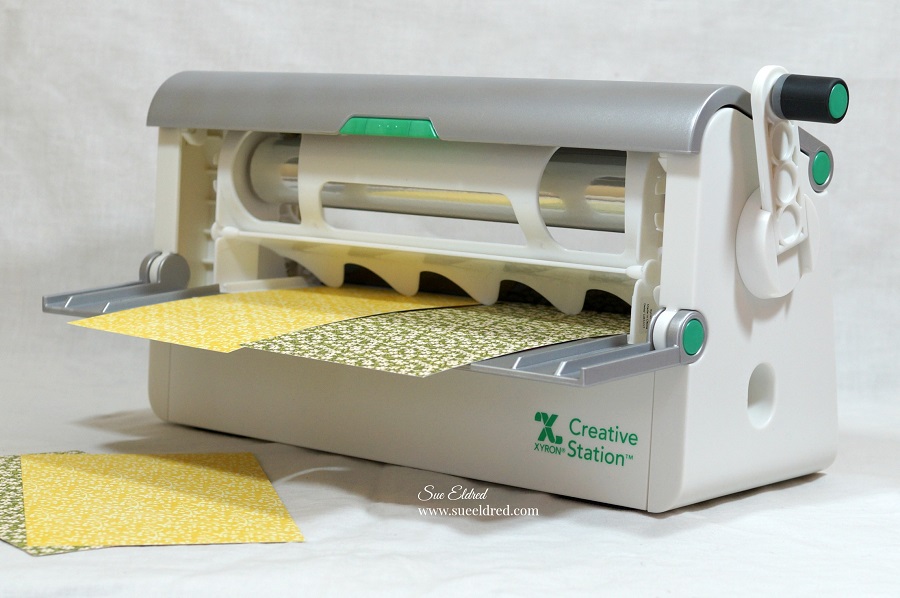
  • Before I die-cut the mat board, I like to use the Xyron Creative Station* to add adhesive to the back of the paper.  It gives the paper a complete layer of adhesive with no bubbles.  It really is easy to use.

*Disclosure:  This blog uses ads and affiliate links.  If you choose to make a purchase using one of the links, I receive a small commission (at no additional cost to you) that helps offset the costs of maintaining this blog.  Thanks for your support!

Santa's Letter Box

When making the Santa Letter Box…

  • I adapted the box by adding 1″ strips of matboard* around the existing box lid. The extra strips allowed the box to have a lip that fits over the edge of the box.

Santa's Letter Box

  • I added three additional layers of graduated sized matboard to the lid for dimension using foam tape.
  • I glued thrifted gold cording around each layer to cover the Foam Tape*.
  • A wood knob painted red completes the lid.

Santa's Letter Box

For the base of the letter box, I used an old metal lamp base. 

(At least, that’s what I think it is.)

We found it in my Dad’s garage while cleaning it out a few years ago.

It’s fun to use old things in unusual ways.

Santa's Letter Box

The Santa Letter Box adds a little Christmas Magic to your Holiday Decorating.  

Materials Used:  (*affiliate links)

Eileen Hull Educator Logo

Disclosure:  This is a sponsored post.  As a member of the Eileen Hull Educator Team, I have been provided product in exchange for my creative ideas.  The view and opinions are my own. 

Annie’s Sweet Dreams Bedroom

Annie’s Sweet Dream Bedroom

I love working with miniatures and creating little rooms.

I guess…I’m creating the doll house I always imagined as a kid.

For this room, I wanted to create a “mini makeover” for Annie’s Bedroom.

This little room won me third place in the 2019 Fave Crafts Best Blogger Contest.

And now, I can finally share it all with you.

“This is a sponsored post.  I have been provided product and compensation in exchange for my creative ideas.  The views and opinions are my own.”

Annie’s Sweet Dreams Bedroom Products Used:                 (*Affiliate Links)

*Disclosure:  This blog uses affiliate links.  If you choose to make a purchase using one of the links, I receive a small commission (at no additional cost to you) that helps offset the costs of maintaining this blog.  Thanks for your support!

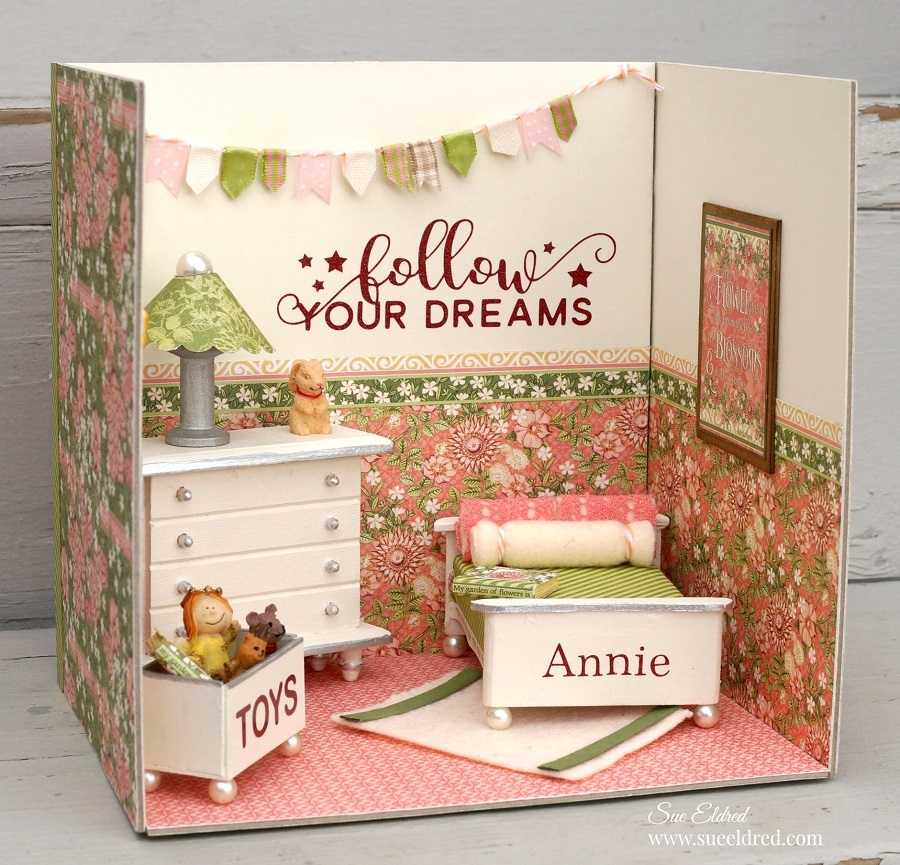
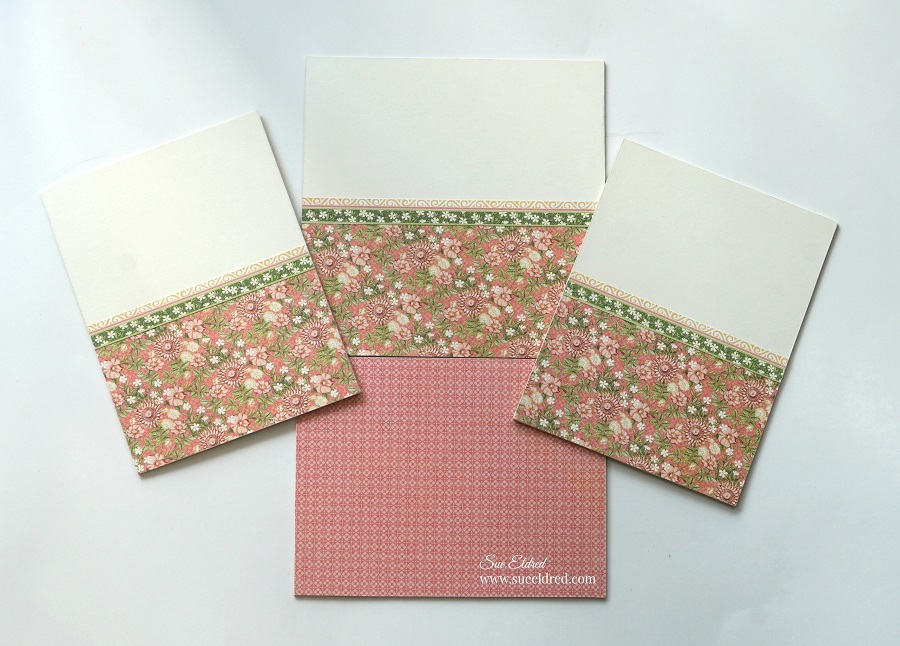
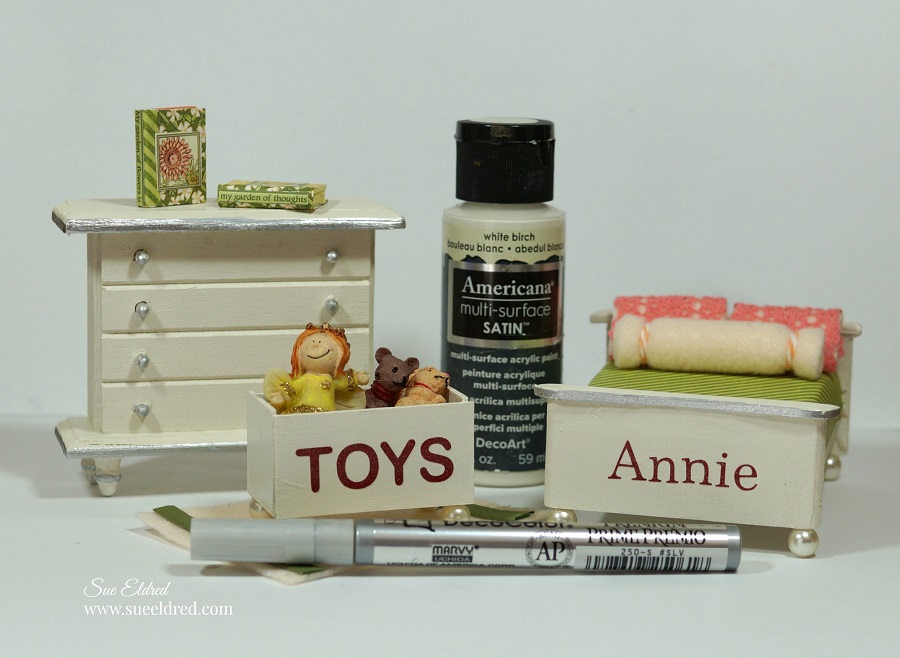
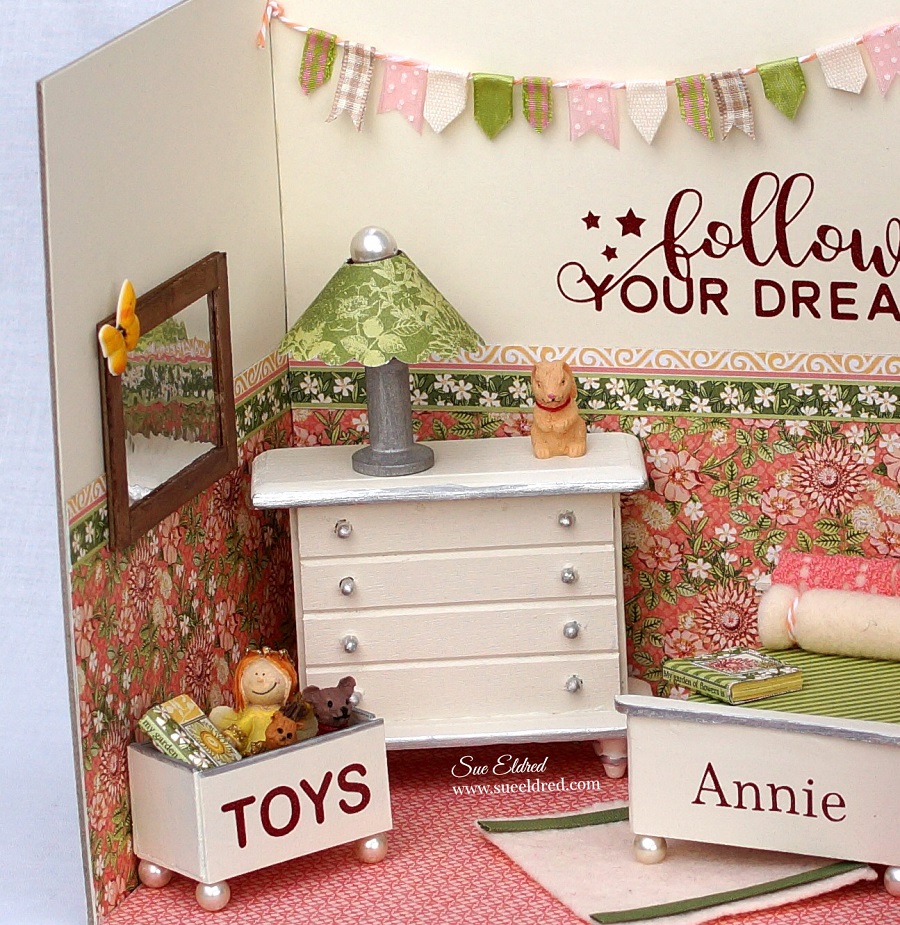
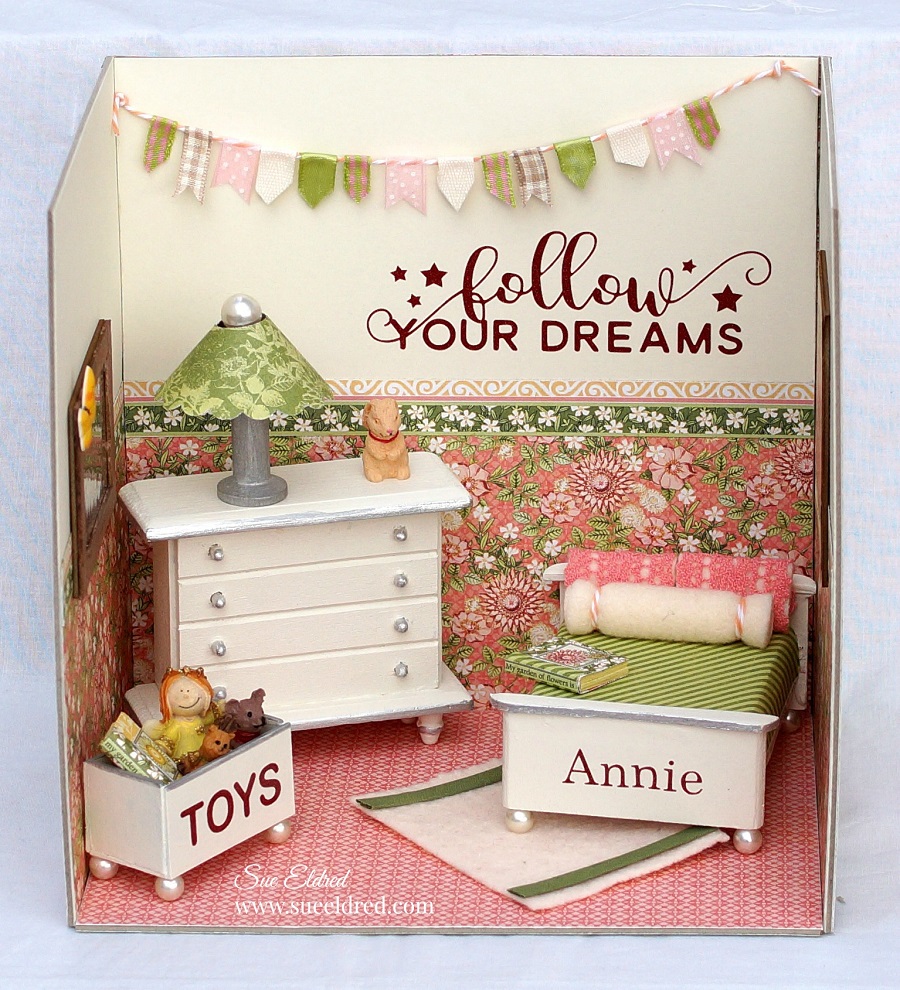
How to make Annie’s Sweet Dreams Bedroom…

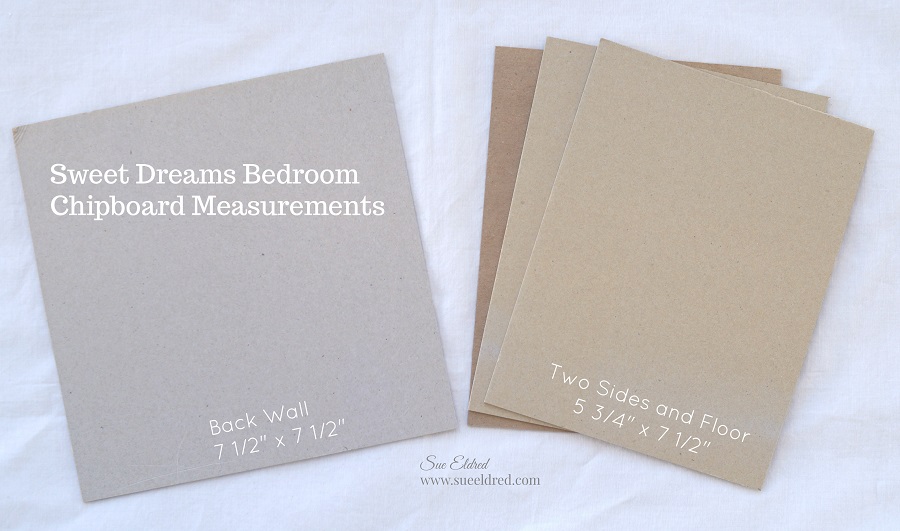
The Bedroom measures 7 1/2″ wide, 7 1/2″ tall and 5 1/2″ deep. 

  • Cut 3 pieces of chipboard 5 3/4″ x 7 1/2″.
  • Cut 1 piece of chipboard 7 1/2″ x 7 1/2″ to use as the back wall.

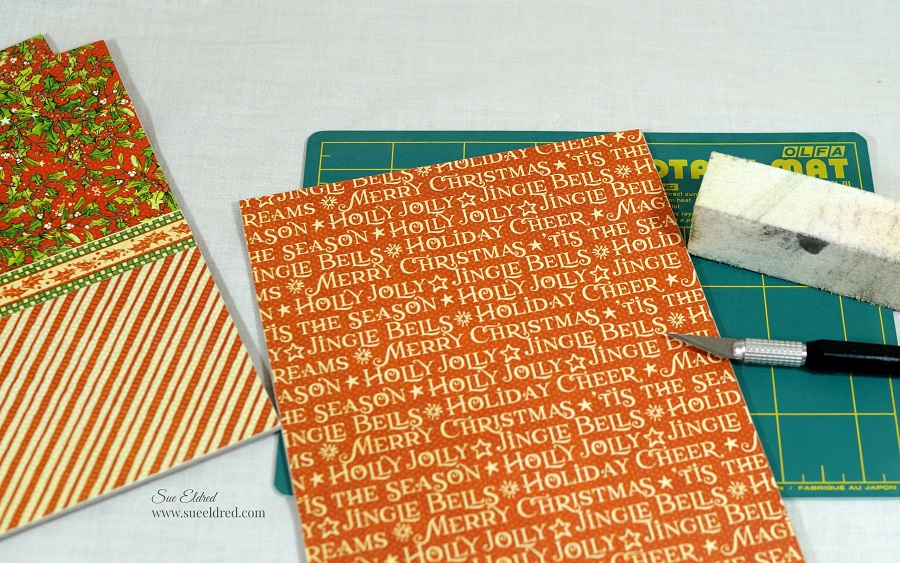
  • Cut decorative scrapbook paper from the Graphic 45 Garden Goddess 8×8 Paper Pad* to use on the floor, walls and outside walls of the room.  I like to cut my paper slightly wider than I need so I can trim the edges with a craft knife.
  • I used both cardstock and scrapbook paper to cover my walls.  For my walls…cut both papers into 3 3/4″ strips.
  • I cut a small strip of paper from the paper pad for a decorative border.
  • I ran each of my strips through the Xyron Creative Station*.
  • Adhere paper to the chipboard.
  • Cover back of the chipboard with coordinating scrapbook paper.

The Xyron Creative Station* is perfect for projects like this.  I wanted complete adhesive coverage on every corner and edge of the paper.  (No wrinkles, no bubbles, easy to use.)

Finished Inside Walls

For the Mural on the Wall…

  • I used an SVG file and my Silhouette Cameo Wireless Cutting Machine* to cut and create the words “follow your dreams” using StyleTechCraft Dark Red Ultra Metallic Glitter Vinyl.
  • Using the weeding tool, I carefully removed the negative spaces in and around the letters.
  • Place a piece of Vinyl Transfer Tape* over the letters.
  • Apply words onto the back wall.
  • Remove transfer tape.

  • Glue the walls together using a good craft glue. I like to use Beacon 3 in 1 Glue*.  I used wood boxes to hold my wall up while the glue dried.

  •  I added small strips of paper on the back corners for added support.

  • To make a mini lamp shade…punch a 3″ scallop circle.
  • Trace around a button in the center of the circle.
  • Cut out the small circle as shown in the above picture.
  • Glue ends of the circle together to form shade.
  • Glue shade onto a small painted wood spool.

  • Cut small pieces of ribbon and glue them onto a piece of twine to create a small ribbon banner to hang onto the wall.
  • Glue Banner onto back wall.
  • The Deflecto Ribbon Dispenser* is great for organizing my ribbon spools.

  • The mirror was made using a small piece of StyleTechCraft Chrome Metallic Vinyl* I placed onto a small piece of chipboard.
  • Cut 1/4″ strips of chipboard and paint brown.
  • To create a wood look, ink to the edges of the chipboard with vintage photo distress ink. 
  • Glue strip onto the front of the Chrome Metallic Vinyl* to create the frame.
  • I used small Christmas ornaments for the toys.

Creating Annie’s Sweet Dreams Bedroom was a labor of love.

With a little imagination and some basic construction, it’s really not hard to do.

Help…I’m a Finalist!

My Sweet Dream Bedroom was selected as a Finalist

in FaveCrafts 2019 Top Blogger Contest.

At Creativation, in January,  I attended the FaveCrafts Blogger Event.

For attending the event we were eligible to enter a contest using products from the sponsors.

My project is one of 20 finalists.

For the next 10 days you can vote on your favorite project.

This is where I need your help… I need all the votes I can get!

You can also see the complete instructions on how I created my project.

Please  go to the Fave Craft Blogger Contest Link and Vote.

You can vote everyday (for the next 10 days if you want) on all your devices.

THANKS for Your Support!!!

Shine from Within Mini Tag Album

Shine from within Mini Tag Album…

I love the sweet pastels of Graphic 45’s Garden Goddess Collection*, it just screams Spring.

So…after using the Garden Goddess paper pad on a special project (coming soon),

I decided to make a Mini Tag Album with the remaining paper.

When it comes to making Mini Albums I like using the Xyron Creative Station* 

because you get complete coverage, no wrinkling, no bubbles!

And…your album stays together!!!

Products Used on the Shine Within Mini Tag Album:         (*Amazon Affiliate Link)

Shop Your Fav Brands at Scrapbook.com

*Disclosure:  This blog uses ads and affiliate links.  If you choose to make a purchase using one of the links, I receive a small commission (at no additional cost to you) that helps offset the costs of maintaining this blog.  Thanks for your support!

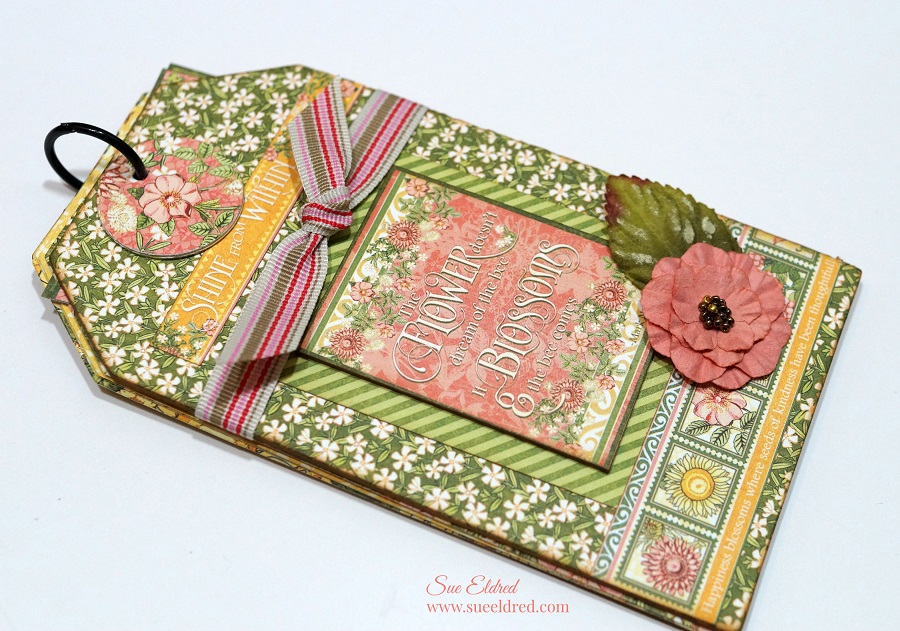
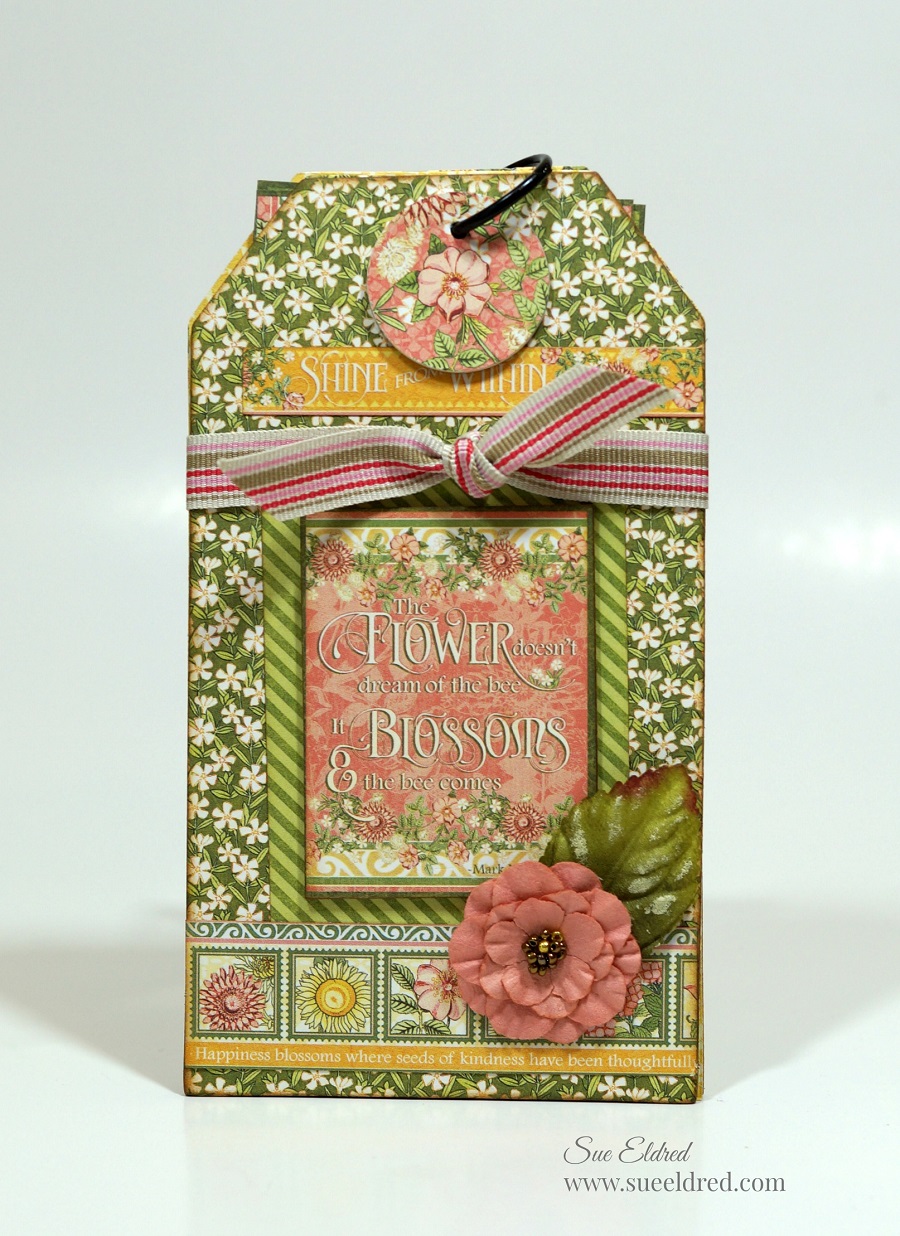
How to make the Mini Tag Album                                 (*amazon affiliate link)

  • Lay decorative scrapbook paper (design side up) on the  *Xyron Creative Station* crank the handle to run the paper through the machine.  As it moves through the Xyron Creative Station it adds adhesive to the back side of the paper.  Easy to use and it doesn’t need electricity.
  •  Cut two pieces of chipboard to use as the front and back of the mini album.  Cover the front and back of both pieces of chipboard with the decorative scrapbook paper.
  • Cut covered chipboard using a Tag die-cut or cut into a simple rectangle tag shape.
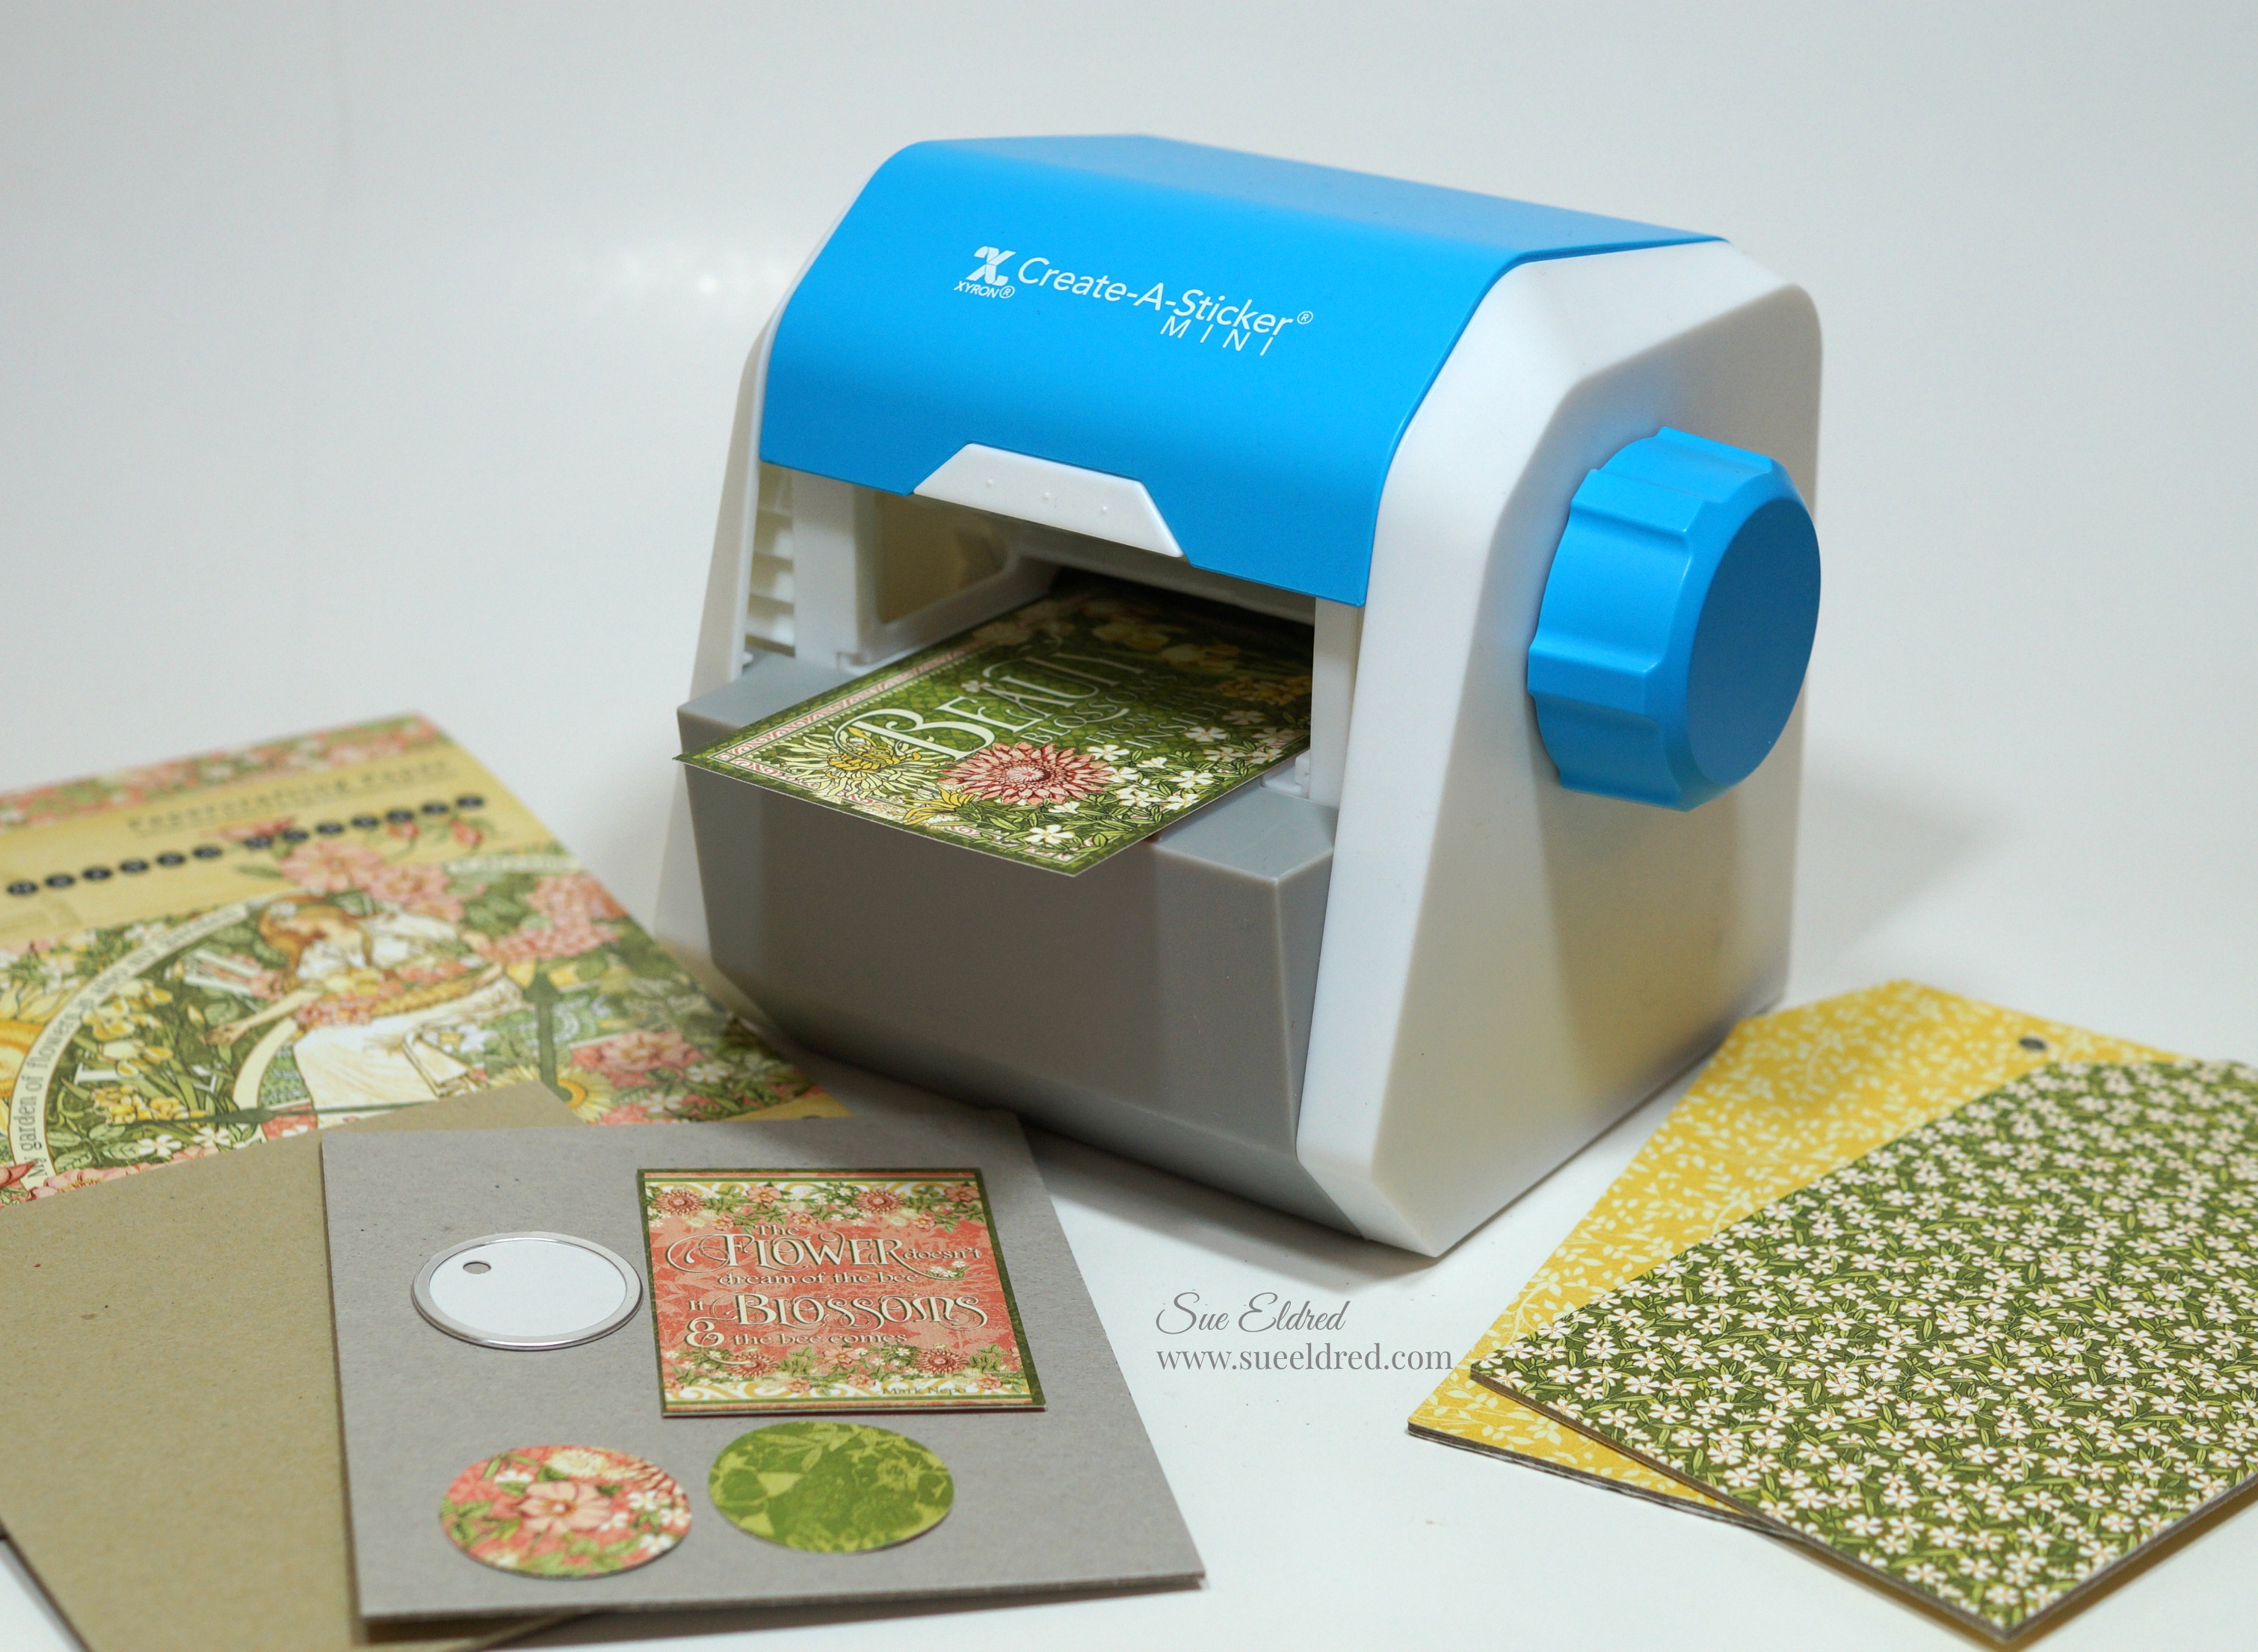
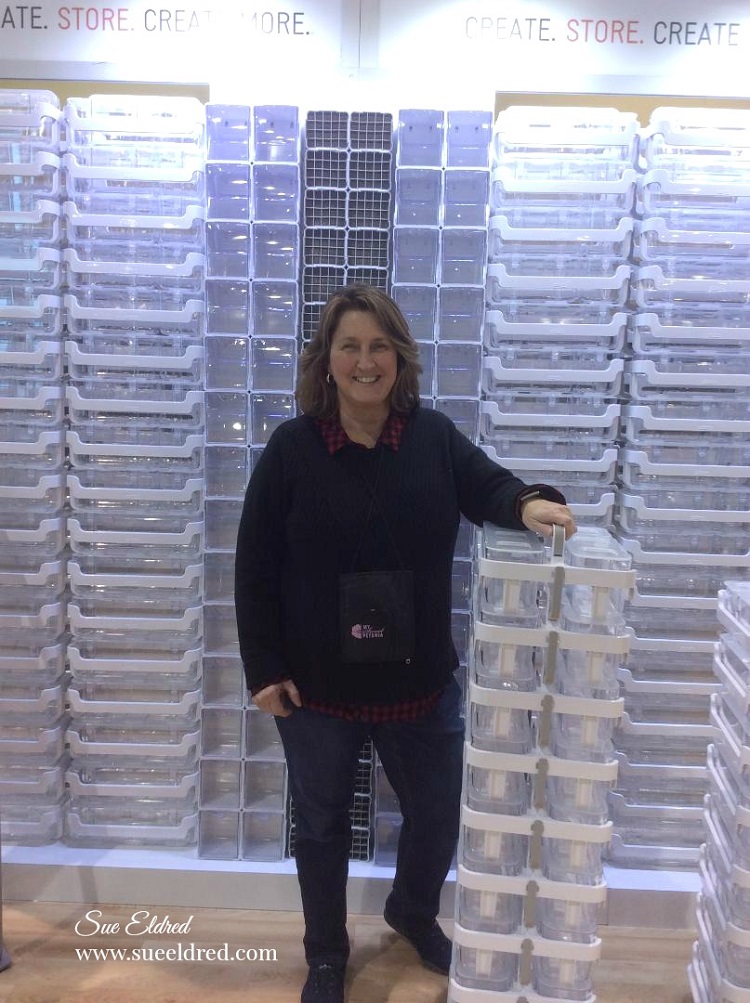
  • Because the chipboard is tan and the core of the paper is white, I inked the edges of the pages with  Vintage Photo Distress Ink*and a ink blending tool*.  

  • Adhere the smaller graphic in the center of the tag front to a piece of chipboard for added dimension.
  • Cut two small circles and adhere to the metal rim tag.  Cut a new hole on the top of the tag.
  • Embellish the front of the tag album using bits and pieces from the Garden Goddess Paper Pad.
  • Glue flower embellishment to front of mini tag album cover using craft glue.

  • Cut extra tag pages and small tags for the inside of the mini tag album.
  • Assemble the mini tag album using a small book ring.

“This is a sponsored post.  As a member of the Xyron Makers Program I have been provided product in exchange for my creative ideas.  The views and opinions are my own.

Creativation 2019

These are the moments that remind me how lucky I am to work in the Creative Industry.

Opening Day…waiting for the show to open

Last month, I got the opportunity to fly to Phoenix to work and attend the Creativation Show.

For those of you that don’t know what Creativation is, it is the annual trade show for everyone

involved in the Hobby and Creative Industry.

Manufacturers, Distributors, Retailers, Designers, Bloggers.

For me, as a designer, it’s also the opportunity to reconnect face to face with friends

that I only get to see once a year.  (you know…”my tribe”)

Oh… and the chance to see what’s new and the latest and greatest in the industry.

Make and Takes in the Deflecto Booth

I always have great intentions of taking tons of pictures and possibly a video or two.

But in Reality…I also have to work.  (or play)

Each day, I taught a different “make and take” in the Deflecto Booth.

Deflecto is one of the great companies I have the honor of working with.

Deflecto is known for their awesome craft storage.

The Great Wall of Deflecto Stack ‘N Go Caddy Wheel Base, Craft Organizers*

At Creativation we like to have a little fun.

Each day in the Deflecto Booth they host a Stack ‘N Go Caddy Challenge,

attendees compete to see who can fill and stack the caddies with the fastest time.

(The one with the best time each day wins a American Express Gift Card.)

It’s a big hit and can get quite competitive at times.  At the end of the show, if you’ve got

your special postcard stamped, they give away all caddies used to build the great wall.

It’s a fun booth to work in.

Another company I have the privilege of working with is StyleTechCraft.

They have the best adhesive vinyl to work with.  (and they treat me like a queen)

As you can see…I had a three hour demo on Saturday.

Graphic 45 Booth

I love all their new paper collections.

The Graphic 45 booth is always one of my favorites because their samples are always

so beautiful and inspiring.

Bloom where you are planted…(I need this collection)

Another one of my favorite booths is the Jillibean Soup booth.

Besides being know for their fun paper collections they also have a wonderful line called

Mixed the Media.  I love everything about this collection.

I NEED these windows.  (just saying)

I also took a little “me time” and did a make and take in the Jillibean booth.  

This is from their Embroidery Hoop Art collection.

Simple Stories Booth

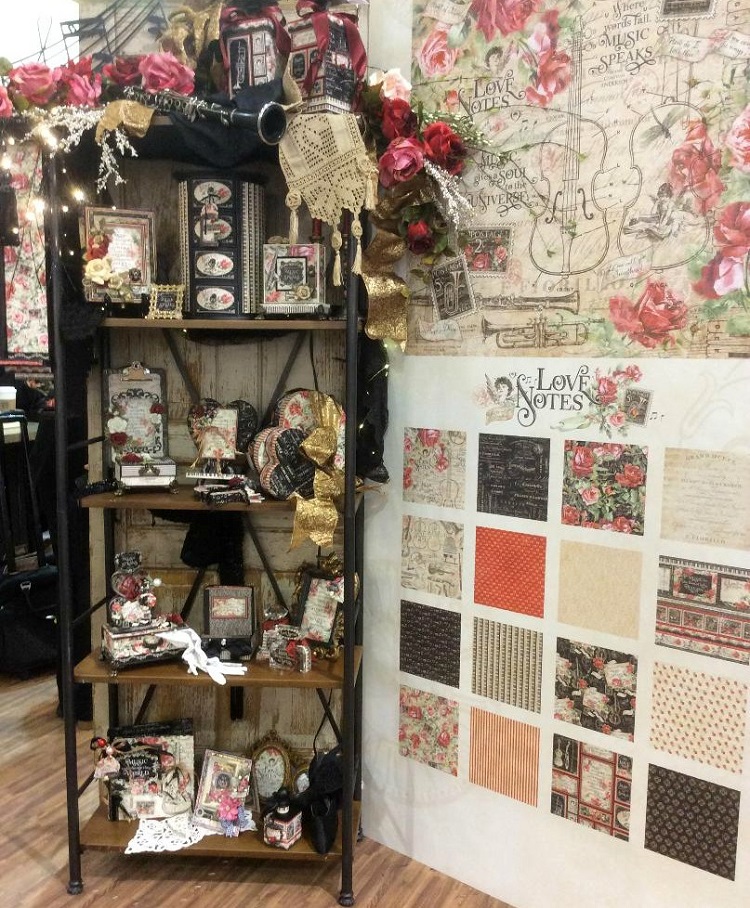
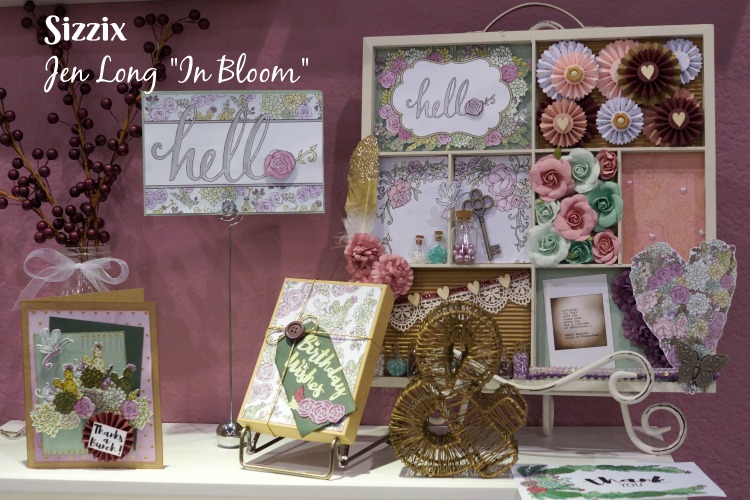
This is embarrassing.  As much as I LOVE Simple Stories, this is is the only picture I took.

Sometimes…I get to talking too much (and drooling) to take pictures.

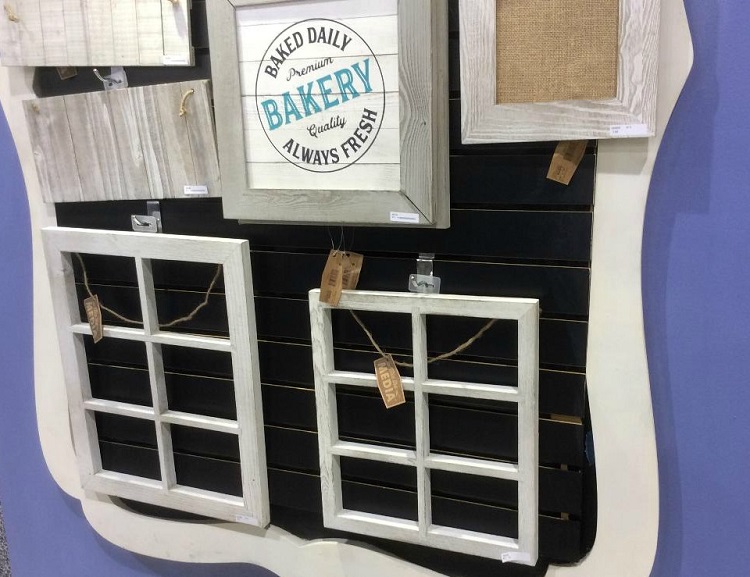
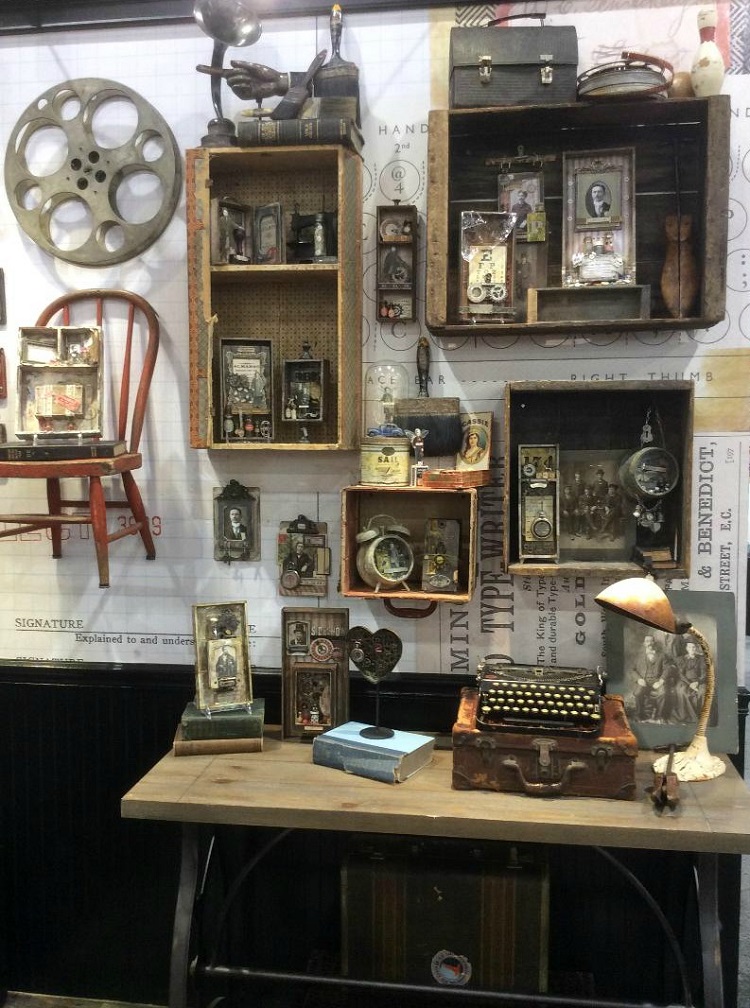
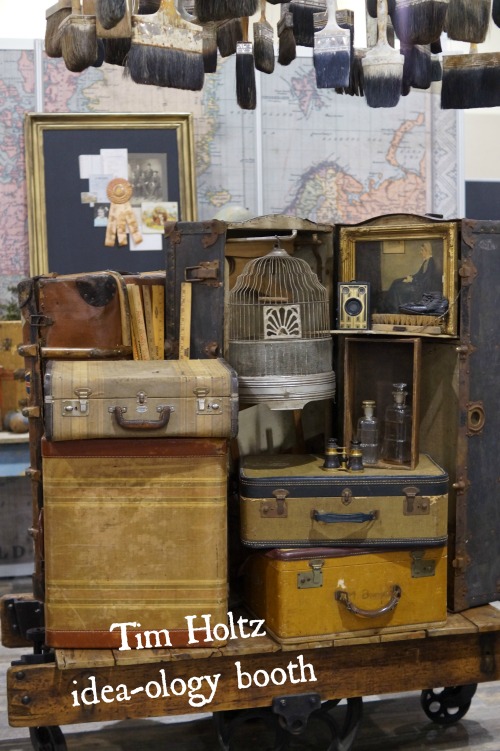
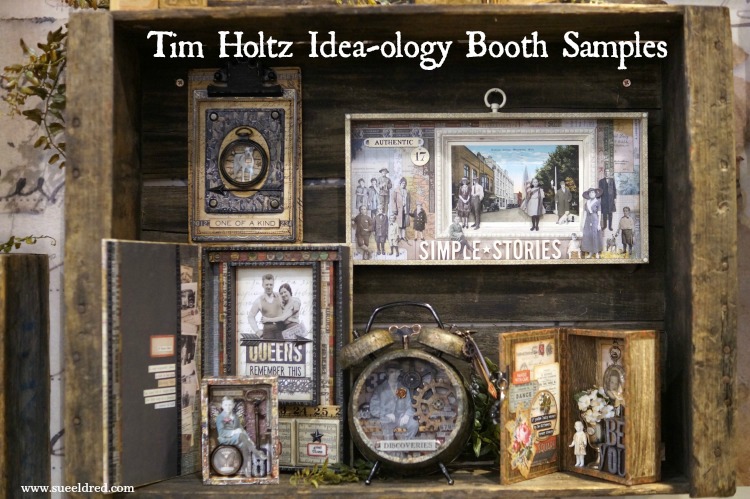
Tim Holtz ideal-olgy Booth

As a “vintage lover” this booth always stops me in my tracks.

Shop Your Fav Brands at Scrapbook.com

*Disclaimer:  This post uses ads and affiliate links.  If you choose to make a purchase using one of the links, I receive a small commission (at no additional cost to you) that helps offset the costs of maintaining this blog.  Thanks for your support!

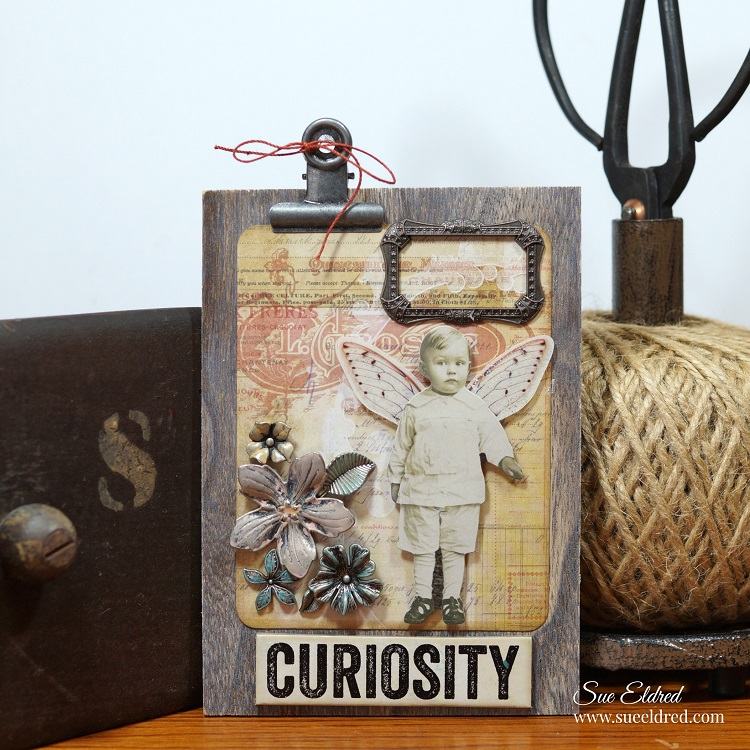
Idea-ology Booth Make and Take

Look what I made.  Isn’t he cute?

 At Creativation there is a large variety of classes that attendees can take.  

Business classes, workshops.  This is from the Waffleflower class I took.

I got to use their new “Water Media Mat” that will be available next month.

I always wish I would have taken more pictures. 

My pictures are only a super small sample of all the wonderful and creative things

to see and do at the Creativation Show.

If you’d like to see more…

Check out the Creativation Round Up on the Designer Craft Connection Blog.


Don’t Miss a Thing…Make Sure and Follow me

Shop Amazon Scrapbooking Supplies*

Christmas Magic Mini Tag Album

How to Create a Christmas Magic Mini Tag Album…

I decided to create a mini tag album using the left over paper and stickers from my

Creating A Miniature “Christmas Magic” Room with Graphic 45 and Xyron  project.

It’s a cute way to show off a few of your favorite holiday photos.  (It  also makes a nice gift.)

How to make a Christmas Magic Mini Tag Album                                 (*amazon affiliate link)

  • Create a chipboard tag by running two pieces of  Graphic 45 Christmas Magic* paper through the Xyron Creative Station*.  Cover both sides of the chipboard with the paper.
  • Cut Chipboard using a Tag die-cut to use as the front and back cover of the album.
  • Accent the edges of the covers using a Gold DecoColor Paint Pen*.
  • Create small tags by placing a sticker on a small piece of chipboard.  Add a coordinating piece of paper onto the back of the small tag.  Trim around tags.
  • Cut extra tag pages using the die-cut and Christmas Magic paper.

  • Embellish the cover with stickers, ribbon, wood snowflake, jingle bell and additional tags.
  • Add a medium sized book ring to hold the album together.

 Graphic 45 Christmas Magic 12×12 Collection Pack*

If you haven’t seen my Christmas Magic Mini Room you can see the full tutorial here.

Products Used:

XYRON 9″ Creative Station*                Graphic 45 Christmas Magic Collection Pack*

Shop Your Fav Brands at Scrapbook.com

*Disclosure:  This blog uses ads and affiliate links.  If you choose to make a purchase using one of the links, I receive a small commission (at no additional cost to you) that helps offset the costs of maintaining this blog.  Thanks for your support!

Shop Amazon Scrapbooking Supplies*

Creating A Miniature “Christmas Magic” Room with Graphic 45 and Xyron

How to Create A Miniature Christmas Room…

Graphic 45 Christmas Magic…Decorating the tree.

I knew as soon as I started working with Xyron that one day I would make a miniature room.

When I got the opportunity to work with Graphic 45’s “Christmas Magic” Collection,

I knew the time had come.  (Graphic 45 and Xyron are the perfect combination.)

Here’s What I used to make my Miniature Christmas Magic Room:            (*affiliate link)

*Disclosure:  This blog uses affiliate links.  If you choose to make a purchase using one of the links, I receive a small commission (at no additional cost to you) that helps offset the costs of maintaining this blog.  Thanks for your support!

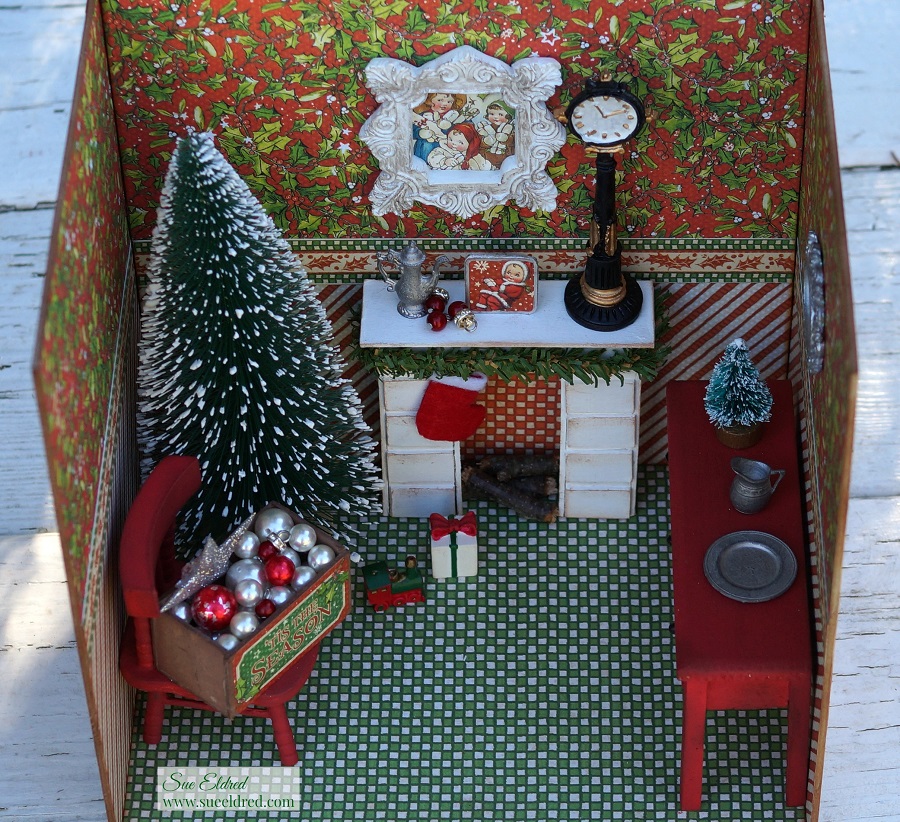
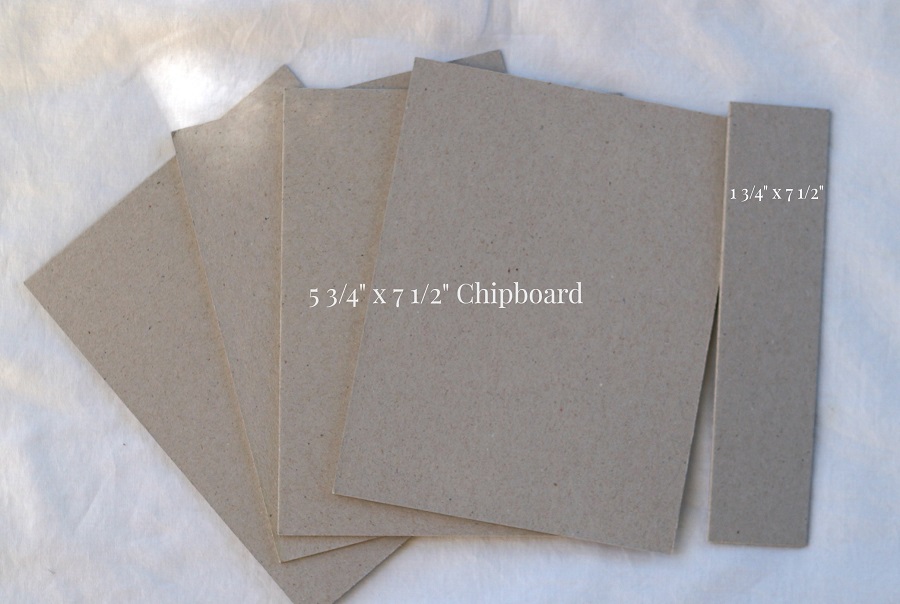
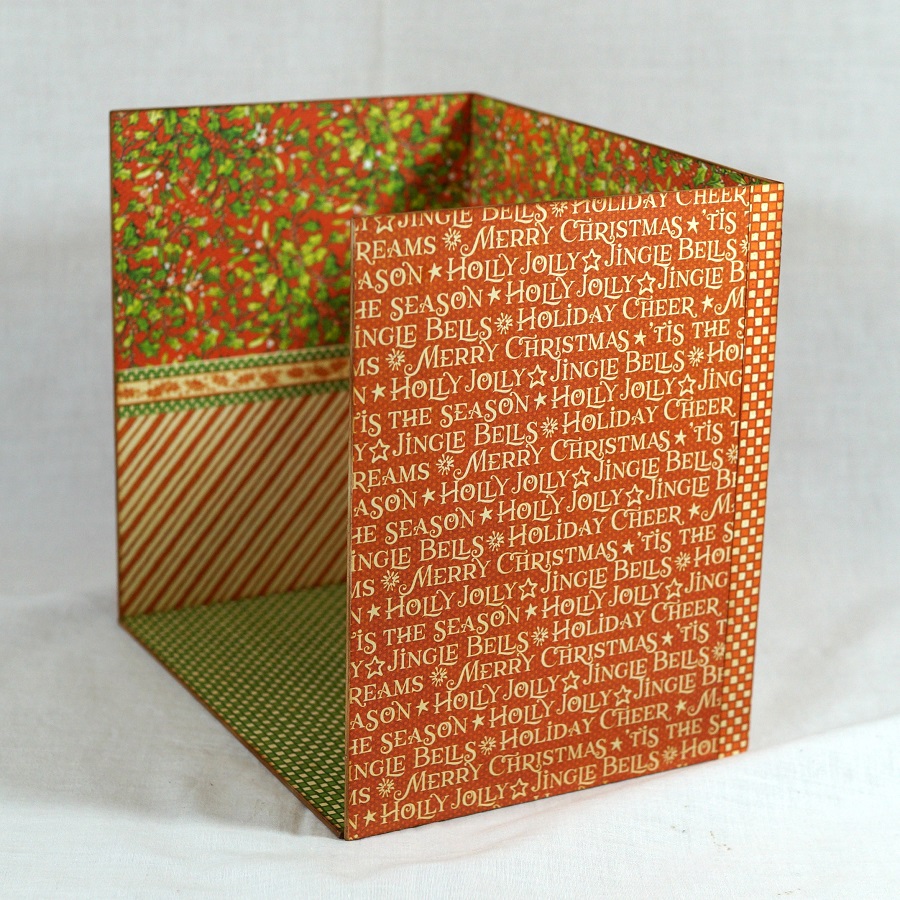
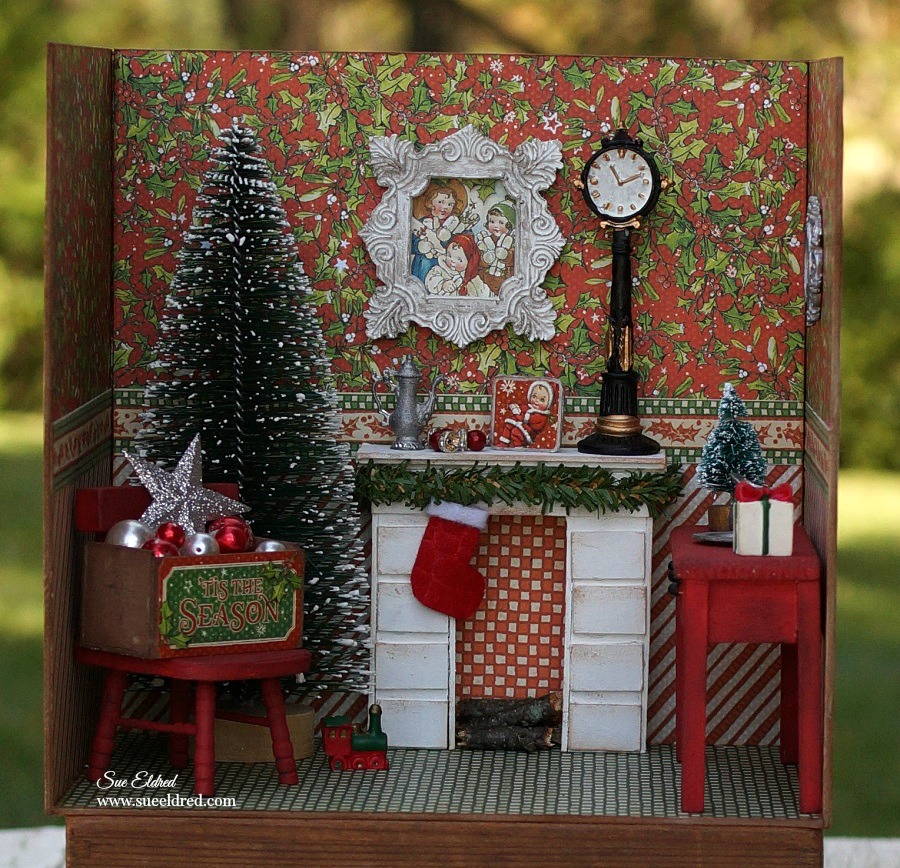
How to make a miniature Christmas Magic Room…

  • My Christmas Room is 7 1/2″ wide, 7 1/2″ tall and 5 1/2″ deep.  I used 5 3/4″ x 7 1/2″ chipboard pieces.  (that’s what I had on hand)  You could use a 7 1/2″ x 7 1/2″ piece of chipboard for the back wall instead of piecing it together like I did.

  • I cut paper for my walls into 3 3/4″ strips.
  • I cut a small strip of paper for my decorative border.
  • I ran each of my strips through the Xyron Creative Station*.
  • Adhere paper to the chipboard.

The Creative Station is perfect for projects like this.  I wanted complete adhesive coverage on every corner and edge of the paper.  (No wrinkles, no bubbles, easy to use.)

  • I cut my paper slightly wider than I need so I can trim the edges with a craft knife.
  • Gently sand edges with a extra fine sanding block for the perfect edge.

  • Glue the walls together using a good craft glue.  I used wood boxes to hold my wall up while the glue dried.  (If you have a better idea I’d love to hear it.)

  • I covered the back of my room with coordinating paper and added small strips of paper on the back corners for added support.

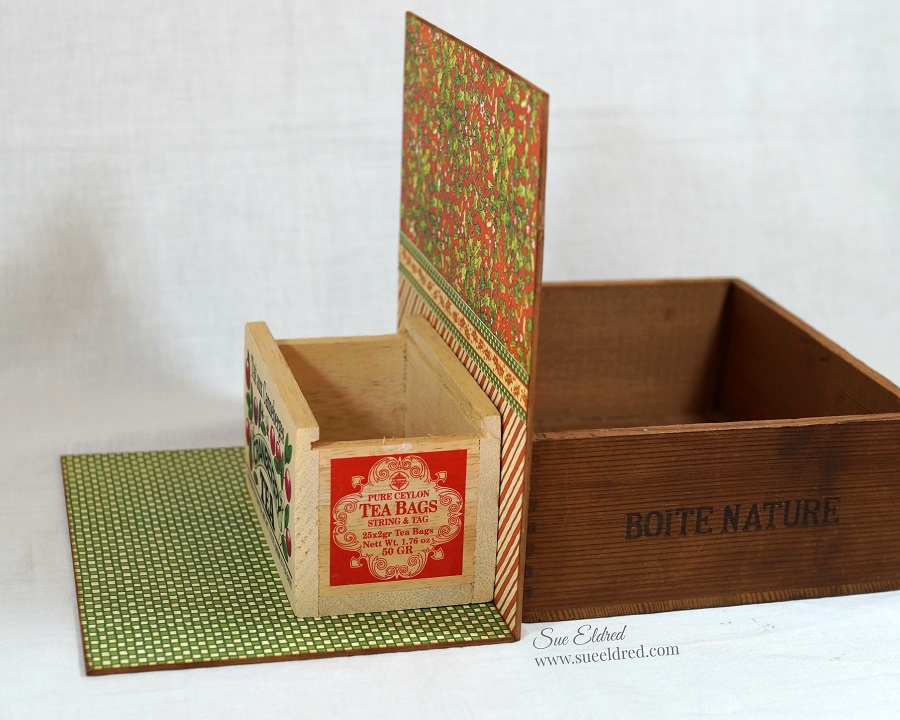
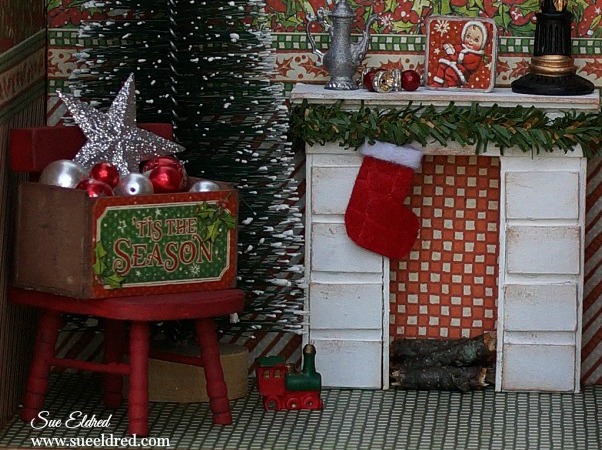
  • I made a small fireplace out of chipboard.  (I needed a place to hang my stocking)
  • Paint the fireplace with white paint.  Give it a vintage feel by rubbing a little ink on the edges.

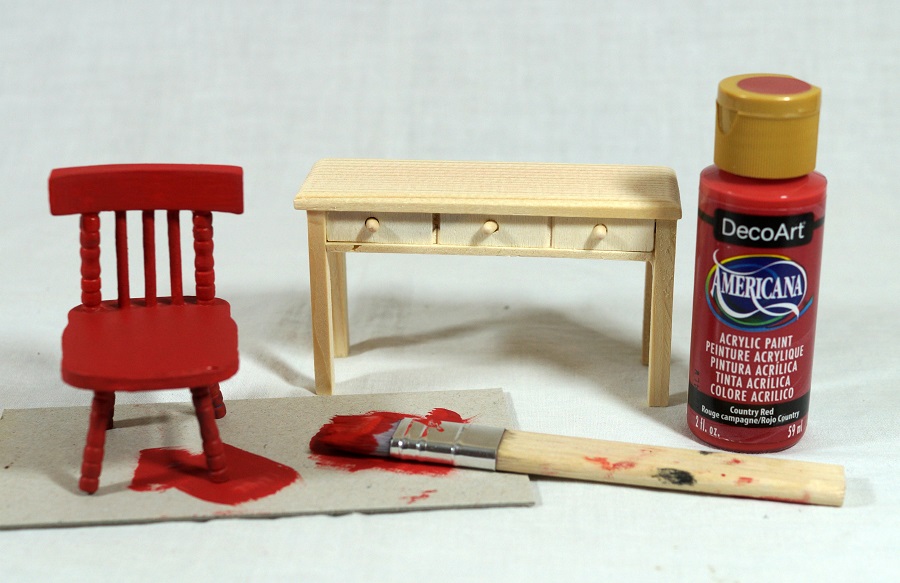
  • I purchased inexpensive unfinished doll furniture at the Dollar Tree* and painted it red.
  • For a vintage look add ink to the edges of the furniture.

  • I used stickers from the collection kit to make little framed art.

  • I made a small little crate to hold my “ornaments” out of chipboard and painted it brown.  I added a small “tis the season” sticker on the front.

  • I created a small picture using a sticker and chipboard and a small felt stocking to add to the mantel.

I have spent way to much time rearranging the furniture and playing with it.

It was a real labor of love.  (and I loved every minute of it)

“This is a sponsored post.  As a member of the Xyron Design Team I have been provided product and compensation in exchange for my creative ideas.  The views and opinions are my own.

My Creativation Adventure 2017

my-adventure-to-creativation-2017-sues-creative-workshop

It’s been a few weeks since the Creativation Trade Show in Phoenix…

and I’m finally getting around to sharing.

You might want to sit back and grab a cup of coffee.  (it’s a long one)

The Creativation Show was a fast, busy few days.

Getting the opportunity to see old friends, meeting in person online friends you’ve known for years.

creativation-friends

And the best part making new friends. 

Creativation, for me, is more than seeing the latest and greatest in the Creative Industry

(although that’s great too)

it’s about the opportunity to meet and network with people from all over the world.

When you’re at a show like this, you sit by a stranger on the convention bus and talk the whole way.

You go to lunch by yourself and instead of looking for a empty table, you sit with a group or

a table of one and the conversations flow.  That’s where we share ideas and inspiration.

We ask… “what did you see that excited you?”

During one of those conversations I heard someone say this is where our “tribe” is.

cactus-3984

(The cactus in front of my hotel.)

This was my first trip to Phoenix and the first time this Midwest gal saw cactus this large.

Can you tell I was impressed?

I wish I would of been able to see more of Phoenix, it poured the first evening I was there

and the sun didn’t come out until the last day.  Most of the time, it really didn’t matter as it was

dark outside when I left and it was dark when I got back to the hotel.

I didn’t even notice the mountains out my hotel window until the second day.

sue-working-the-deflecto-booth

I left the hotel before 7:00 on Saturday morning to take a class before working all day

in the Deflecto booth.  We made mini desk calendars using Deflecto’s 3″ x 4″ clear acrylic

frames, paper from Paper House Productions “One Big Happy Family” collection and cute

little calendars from Taylored Expressions.

Also in the booth was the “Caddy Challenge”.   ↓

deflecto-caddy-challenge-3970

Each challenger was given two empty caddies and a variety of craft supplies.

Every caddy container had to have at least one craft item and put back into the caddy,

each layer had to be locked and put on the base.

The whole thing was timed and the timer stopped when the caddy was lifted.

It was so much fun watching how competitive it became.  (there were Visa gift cards at stake)

Co-worker against co-worker, friend against friend, husband against wife.

deflecto-caddy-landing-page-cha-2017-02

SO…What’s NEW at Deflecto?

An interlocking wheel base for the craft caddy and the Interlocking Marker Organizer.

deflecto-caddy-landing-page-cha-2017-03

Right next to the Deflecto Booth were my good friends at

Canvas Corp Brands, 7Gypsies and Tattered Angels.

canvas-corp-brands-7gypsies

So many new things there.  They introduced their new line called “Architextures”.

I can’t wait to get my hands on all that vintage inspired goodness.

7-gypsies-new-architextures-books-ledgers-sues-creative-workshop

Coming Soon from Canvas Corp Brands… Relics and Artifacts.

A lot of mixed media potential.

canvas-corp-brands-relics-and-artifacts-sues-creative-workshop

On Sunday afternoon, I got to hang out in the Paper House booth where I helped attendees make

the Discover USA travel mini book project.  I’m so lucky to work in such a fun industry.

For full Discover USA project instructions click here.

paper-house-miti-at-creativation

Monday was the last day of the show and a half day for me.

After working in the booths all day on Saturday and Sunday,

I decided I needed to take some time to do something fun.

splatter-painting-4001

DecoArt, 3M and Pinspiration had a clear acrylic booth set up called the “Splatter Room”.

Dressed in a hazmat suit and goggles…

I went to town choosing paint and splattering onto a 12″ x 12″ canvas.

Oh, what a glorious mess.  It was the highlight of my day.

After painting and splattering…

I walked the show floor, taking pictures and making connections.

I always wish that I would have taken more pictures and maybe even a video or two.

Time at these shows go fast and I needed to make the most of that time.

Below are a few of the booths that I remembered to take pictures of.  (Enjoy!)

tim-holtz-suitcase-display-sues-creative-workshop

Probably one of the most photographed booths is the Tim Holtz Idea-ology booth.

For Vintage lovers this is serious eye-candy.

tim-holtz-idea-ology-booth-samples-sues-creative-workshop-3959

tim-holtz-idea-ology-booth-samples-sues-creative-workshop

tim-holtz-ideaolgy-booth-samples-sues-creative-workshop-3962

rebekah-meier-designs

Lovely Mixed Media from Rebekah Meier Designs.

sizzix-jen-long-in-bloom-creativation-2017-sues-creative-workshop

Somehow my camera setting got changed and I didn’t get a lot of sharable pictures of the Sizzix booth.

sizzix-david-tutera-creativation-2017-sues-creative-workshop

And the always impressive Graphic 45 Booth.  ↓

graphic-45-booth-samples-4037

graphic-45-booth-samples-4035

graphic-45-booth-samples-4030

graphic-45-booth-samples-4036

graphic-45-album-4049

graphic-45-booth-samples-4046

Of all the wonderful things I saw, do you want to know what impressed me the most?

Let me start by saying, I’ve been a stamper for 20 years and it takes a lot to impress me…

the clear animated stamps from Uchis Design did just that.  (it’s the simple things)

Below is the business card they gave me.

I hoped you enjoyed my adventure to Creativation.

I just want to say…

I am very thankful that I have the opportunity to work with all the wonderful and talented people

and companies in the Creative Industry.  I am one lucky girl.

Graphic 45…”A Place in Time” Valentine Frame

graphic-45-valentines-frame-sues-creative-workshop-4157

A little throw back Thursday…

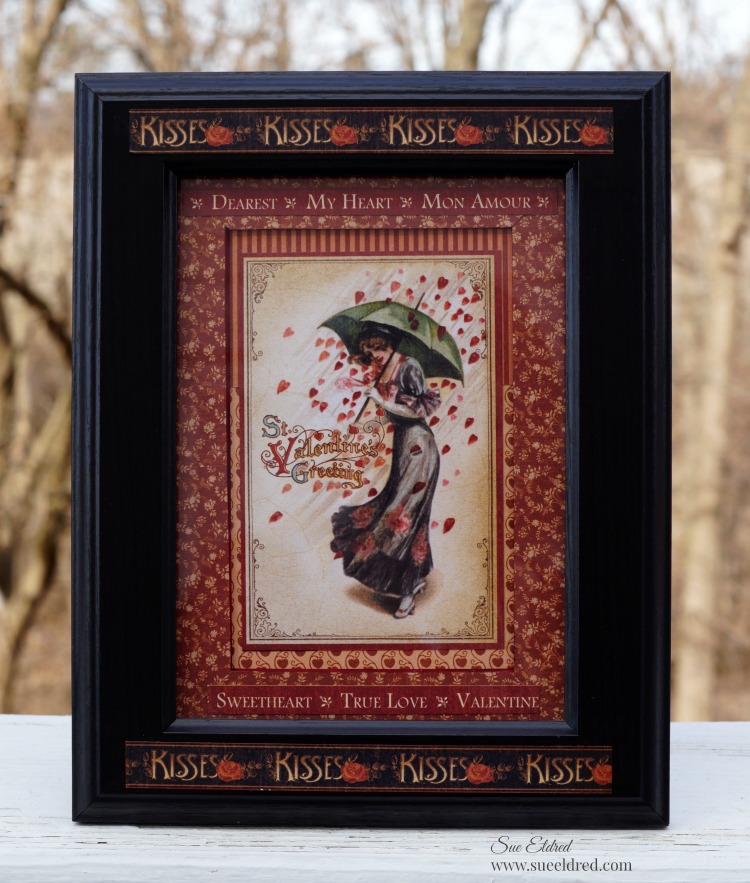
to one of my favorite Valentine projects.  (made 4 years ago)

On the frame, I used Graphic 45’s “Place in Time” collection and a little cut and paste .

Which is now available as a Deluxe Collector Edition. 

(*affiliate link)
Graphic 45 4501470 Deluxe Collectors Edition Place In Time
*I am an Amazon Affiliate.  If you choose to purchase from Amazon using the above link, I receive a small commission that helps offset the cost of running this blog.

Reindeer Star Card

reindeer-star-card-sues-creative-workshop

Impress your friends and family this Holiday…

with a gatefold card that looks a lot harder than it really is.

This may not be a beginner card for some, but, I promise it really is not hard.

A few layers and a few simple steps and you’ll be done in no time.

The supply list may seem long…

but you can easily adapt the card with supplies you have on hand.


This is what I Used to make the Reindeer Star Card:                                           (*affiliate link)

Directions:

  1. Cut a piece of cream cardstock 7 1/2″ x 5″.  Score and fold on the 2 1/2″ mark to create a 5″ x 5″ card base with flap.
  2. Cut a piece of red patterned paper 2 1/4″ x 4 3/4″ and adhere to the front of the flap.
  3. Cut a 2 1/4″ x 2 1/4″ piece of light green patterned paper and adhere onto the bottom of the red patterned paper.  Repeat for the inside flap.
  4. Cut a piece of dark green patterned paper 4 3/4″ x 4 3/4″.  Adhere to the inside of the card.
  5. Cut a piece of red plaid paper 2 1/4″ x 4 3/4″ and adhere onto the bottom of the dark green patterned paper.
  6. Add a strip of thin washi tape to the seam of the patterned papers.
  7. Apply White and Gold Foil washi tape to a piece of white cardstock.reindeer-star-card-creating-a-washi-tape-background-sues-creative-workshop
  8. Cut two medium washi tape stars using the star die and Big Shot Cutting/Embossing Machine*.reindeer-star-card-cutting-the-star-dies-sues-creative-workshop
  9. Cut two larger stars from the gold metallic cardstock.reindeer-star-card-opened-sues-creative-workshop
  10. Adhere the first star halfway onto the flap (with the other half hanging over)  Adhere second star directly onto the back of the first star.
  11. Adhere medium washi tape stars onto the middle of the large gold stars.
  12. Cut one small gold cardstock and mount it to the middle of the front washi tape star with thin 3D foam mounting squares.reindeer-star-card-close-up-sues-creative-workshop
  13. Add small “white stag” dimensional sticker to center of the smallest star.  Add a small red adhesive rhinestone to the tip of the stags nose.
  14. Adhere a piece of gold cardstock onto the Stick It Adhesive Sheets*.  Die cut the words “Merry Christmas” using the Christmas Phrases die and stick onto card.
  15. Tie a thin gold ribbon around the flap with a small gold jingle bells and you’re done.

Finished Size:  5” x 5”  (may take additional postage to mail)


This project was sponsored by Little B LLC.

I am an Amazon Affiliate.  If you choose to purchase from Amazon using one of the above links, I will get a small commission that helps offset the costs of running this blog.  Thank You!

Try Amazon Prime 30-Day Free Trial*