Super Mario Bros. Inspired Bedroom

Super Mario Bros. Inspired Bedroom

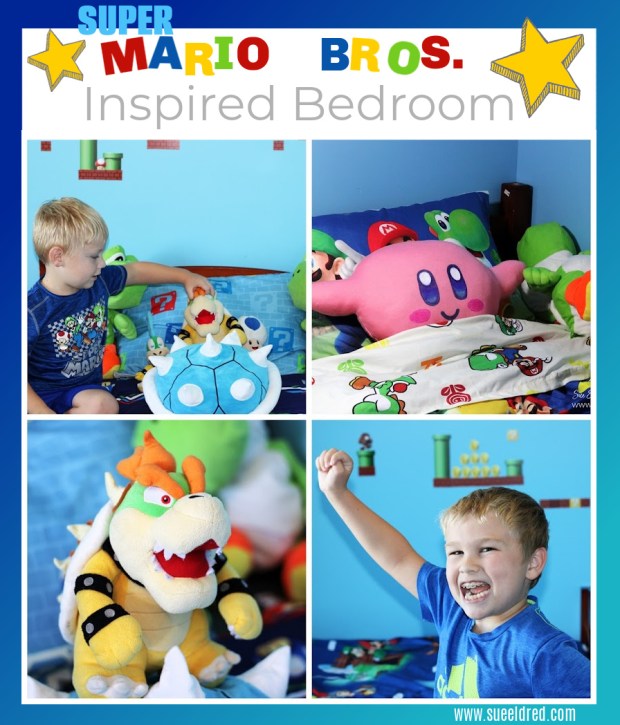
A bedroom makeover for a couple of boys obsessed with all things Super Mario Bros.

Super Mario Bros. Inspired Bedroom

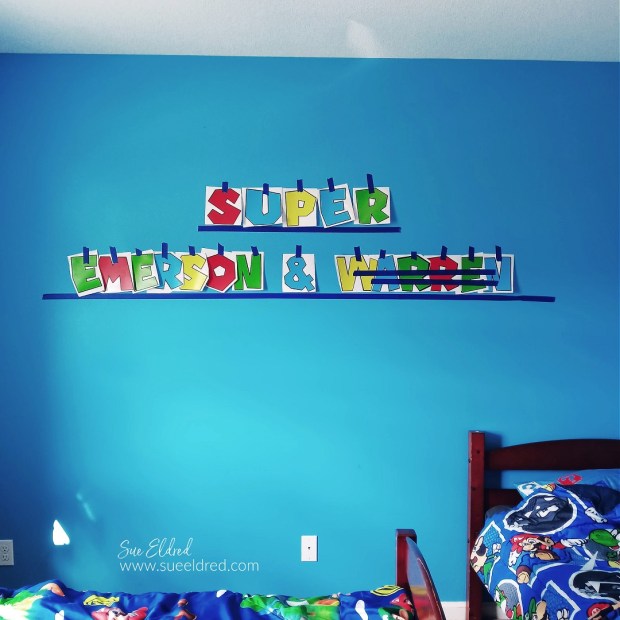
Bedroom Makeover-Before

My daughter-in-law has been hard at work transitioning her oldest son into his new tween room

and the younger boys into a new bedroom together.

Since the boys are obsessed with all things Super Mario Bros.,

she decided to create a Super Mario Bros. Inspired Bedroom.

She had everything planned out but only needed help with one thing.

She wanted super large letters for the wall.  (She figured I was the person to ask.)

Super Mario Bros. Inspired Bedroom

To make the Super Mario Bros. inspired letters…

Super Mario Bros. Inspired Bedroom

Products used to make the letters:

StyletechCraft products brought to you by ATSM Craft*

*Disclosure:  This blog uses ads and affiliate links.  If you choose to make a purchase using one of the links, I receive a small commission (at no additional cost to you) that helps offset the costs of maintaining this blog.  Thanks for your support!

Super Mario Bros. Inspired Bedroom

  • Place the cut vinyl letters onto the slightly larger black letters using the Vinyl Transfer Tape*.

Super Mario Bros. Inspired Bedroom

  • The room was painted “Big Sky Country” with Dutch Boy’s Duraclean Paint, in eggshell.
  • Use a strip of removable blue painter’s tape* as a guide to place the letters.
  • Leave the paper backing on the back of the black letters.  Cut around the letters and place them on the wall with the blue painter’s tape*.

Super Mario Bros. Inspired Bedroom

  • Gently rub over the letters with the vinyl scraper tool to ensure the letters have stuck to the vinyl transfer tape.
  • Carefully peel up the transfer tape, keeping the transfer tape in place, and remove the paper backing from the letter.
  • Rub over the letter to help it stick to the wall.

Super Mario Bros. Inspired Bedroom

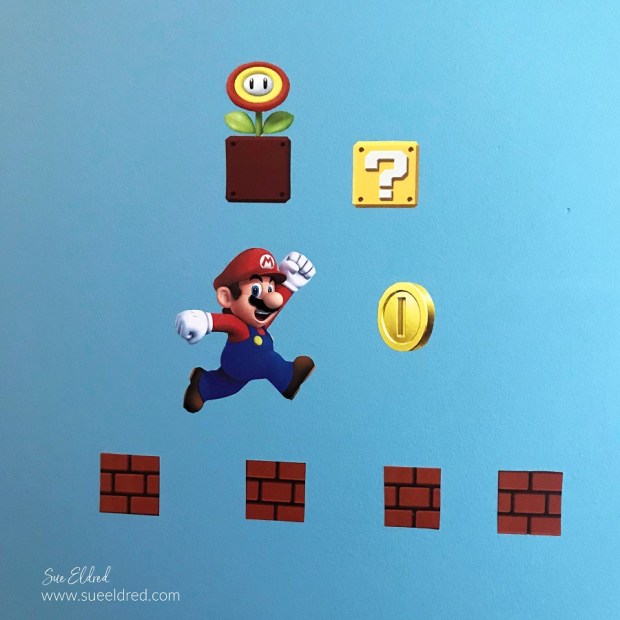
For even more Super Mario Bros. Fun…

  • My daughter-in-law used decals and Super Mario Bros. characters hand cut from the wallpaper to create the decorations around the room.
  • She trimmed the white outline off the decals and cut out by hand the characters from the wallpaper.
Super Mario Bros. Inspired Bedroom

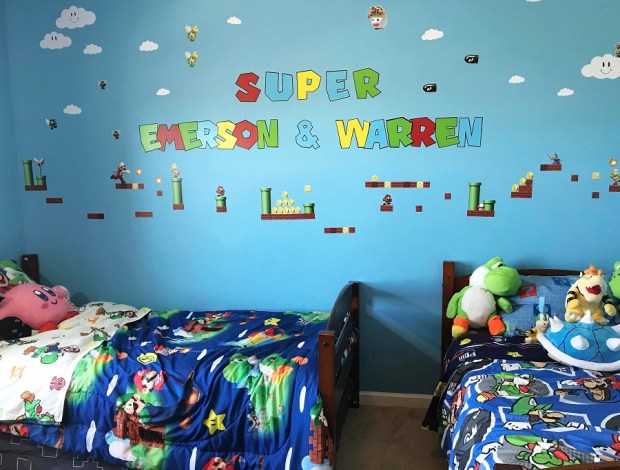
Super Mario Bros. Bedroom-After

Super Mario Bros. Bedroom

  • The room wouldn’t be complete without Super Mario Bros. Comforters*, Pillows, and of course their favorite “stuffies”.  (Unbelievably, I know quite a few of their names.)

Super Mario Bros. Bedroom

I was there when the boys saw the finished room for the first time.

One of them exclaimed “it’s like a whole level of Super Mario World”.

They were a little excited!  (Good Job, Mom!)

Click on pictures below for the products used to create the Super Mario Bros. Inspired Bedroom.


Yoshi Pillow Buddy

Crafty IKEA Cabinet Makeover

Crafty IKEA Cabinet Makeover

Give a basic IKEA storage cabinet a little personality with a crafty makeover.

I’m a little bit of a neat freak.  I geek out when I find a good storage piece.

I found this IKEA Moppe Mini Storage Chest* on a recent IKEA trek.

The mini cabinet was the perfect solution to replace an old decrepit plastic one.

“This is a sponsored post.  As a member of the StyleTechCraft Design Team I have been provided product and compensation in exchange for my creative ideas.  The views and opinions are my own.

Crafty IKEA Cabinet Makeover

If you don’t have an IKEA store close, you can get the IKEA Moppe Cabinet*

on Amazon for a bit more.

The IKEA MOPPE mini chest with drawers is a true classic with its many drawers

and timeless style.  It’s made of untreated wood that you can paint and

decorate as you like, over and over again.

Crafty IKEA Cabinet Makeover

Here’s what I used Used:   (*affiliate links)

*Disclosure:  This blog uses ads and affiliate links.  If you choose to make a purchase using one of the links, I receive a small commission (at no additional cost to you) that helps offset the costs of maintaining this blog.  Thanks for your support!

Crafty IKEA Cabinet Makeover

Directions:

  • Lightly sand the surface of the cabinet with a Sanding Block* to smooth away any rough spots.
  • Paint the cabinet and drawers with Classic Black Deco Art Americana Decor® Satin Enamels*.
  • You may need to give it a second coat. (I didn’t paint the inside of the cabinet or drawers.)
  • Lightly sand over the paint to smooth the grain of the cabinet.
  • Wipe the cabinet with a clean, soft rag to remove any dust.

Crafty IKEA Cabinet Makeover

Crafty IKEA Cabinet Makeover

Crafty IKEA Cabinet Makeover

  • I used Red Gingham Paper* to cover the front of my cabinet. The red gingham matches the decor in my craft room and is a simple pattern to match. (This is important if you want to line up your design.)
  • Brush a coat of Mod Podge Satin Decoupage Glue* over the drawer front. Make sure to get the Mod Podge to the edges of the drawer.
  • Lay the paper onto the drawer and smooth. Allow the Mod Podge to dry.

Crafty IKEA Cabinet Makeover

  • Place the drawer onto a cutting mat and cut away the excess paper using a craft knife.

Crafty IKEA Cabinet Makeover

  • Sand away any rough-cut edges using a sanding block on the edge of the drawers.

Crafty IKEA Cabinet Makeover

  • A small nail file is great for getting into small to reach places.

Crafty IKEA Cabinet Makeover

Place the labels onto the drawer fronts and fill them with all your goodies.

Crafty IKEA Cabinet Makeover

Don’t judge me for my weird categories.

Crafters have a lot of random stuff to store, and this cabinet holds a lot of stuff.

Crafty IKEA Cabinet Makeover

You could use wallpaper, stencils, metal hardware to customize this into the perfect organized cabinet.


Don’t Miss a Thing…Make Sure to Follow me

Vintage School Desk Make-Over Before and After-Sue's Creative Workshop


A Kid Sized Makeover

Mini Park Bench before

Mini Park Bench Makeover

Tucked away beside my porch, next to my hydrangeas, was a wobbly, forgotten little park bench.

It had been left out all winter and hadn’t weathered very well.

I picked up the little bench a few years ago at a yard sale when it was still in good shape.

The bench has nice metal frame and a cute jungle theme inset. 

I knew with a little tender loving care the bench could be almost as good as new.

I carefully took the bench apart and gave it a light sanding to get rid of the rust and grim.

I painted the frame with Rust-Oleum Dark Gray Paint and Primer*.

*Disclosure:  “This is a sponsored post.  I have been provided product in exchange for my creative ideas.  The views and opinions are my own.”  This blog uses ads and affiliate links.  If you choose to make a purchase using one of the links, I receive a small commission (at no additional cost to you) that helps offset the costs of maintaining this blog.  Thanks for your support!

Learn More

DecoArt Color Stain

I had a difficult time choosing which color I wanted to use so I created a color sample board.

In the end I went with white.    (bird poop doesn’t show up as much on white)

The wood slats were painted with DecoArt White Americana Decor Color Stain*.

DecoArt Color Stain has a semi-transparent, satin sheen for enhancing wood, concrete, terra cotta, and other surfaces that can be displayed indoors or out. Once cured, there is no reason to add an additional polyurethane or other sealant on top. The water-based formula makes cleanup simple while still offering a durable finish.

And because little details count…I also painted the screws.

Do you like how I used a long reach hole punch to make holes in my box for the screws to sit?

Finished Park Bench  (well almost)

The white color stain paint* allows the wood grain to show through giving my bench

a “worn look” with out being worn out.   (It’s hard to see by the pictures.)

When my husband got home and looked at the bench he thought the animals looked a little flat.

So…I rubbed DecoArt Champagne Ice Metallic Lustre™ Wax* on the metal to make them stand

out.  I added a little metallic lustre™ wax* on the bench frame as well.

DecoArt generally recommends using a Multi-Purpose Spray Sealer* if you plan to keep a piece

with Metallic Lustre outside.

Shop Your Fav Brands at Scrapbook.com

He was right, it really makes a difference.

I placed the bench in the shade under the maple tree in the front yard.

All I need is a couple pint sized buddies to come over and enjoy it with me.

For your Convenience these are Products Used on my Kid Sized Make-over…

Click on picture links for purchasing options through Amazon.


Don’t Miss a Thing…Make Sure to Follow me

If you liked this post you might like to read  A Trash to Treasure Love Story

Shop Your Fav Brands at Scrapbook.com

Dollar Store Pumpkin Makeover

I love the look of heirloom pumpkins and those cute little white pumpkins called “baby boo”.

But…I always have a hard time finding them.

This year, I decided to make my own.

I found these cute little 4″ metallic pumpkins* at my local Dollar Tree*.

At $1.00 each, I couldn’t pass them up.

I painted the pumpkins with Americana Multi-Surface Satin Acrylic Paint in White Birch*.

It took 4-5 coats.  In hindsight, I wish I would have left a little green showing through.

I used Americana Multi-Surface Satin Acrylics Paint in Coffee Bean* to paint the stem and

accent the grooves of the pumpkin.  To make it look more realistic, I used a baby wipe to

strategically wipe off some of the extra brown paint.

I really please with the way they turned out.

Best part is… they won’t spoil and I can reuse them year after year.

Shop Your Fav Brands at Scrapbook.com

*Disclaimer:  This post uses ads and affiliate links.  If you choose to make a purchase using one of the links, I receive a small commission (at no additional cost to you) that helps offset the costs of maintaining this blog.  Thanks for your support!

Save