Christmas Mason Jar Shaker Tags

Christmas Mason Jar Shaker Tags

I’m shaking up the Holidays with some cute Christmas Mason Jar Shaker Tags.

These little Mason Jar Dies from The Maker’s Movement make the cutest

Mason Jar Shaker Tags.

And…If you’re a paper crafter like me,

you probably have a lot of special Christmas Paper scraps.

(You know, the ones you can’t throw away.)

The Mason Jar Shaker Tag is a great project to use up those bits and pieces

from “Christmas Paper Past”.  That’s what I did!

Christmas Mason Jar Shaker Tags

Materials Used for the Christmas Mason Jar Shaker Tags:  (*affiliate link)

  • M13583 Nested Shaker Jars Die Set
  • Mini Maker Die Cutting Machine*
  • Clear Acetate
  • Double Sided Adhesive Craft Foam
  • Shaker Sprinkles
  • Scrapbook Paper
  • Xyron Create a Sticker Mini*
  • Twine
  • Christmas Embellishments

*Disclosure:  This blog uses ads and affiliate links.  If you choose to make a purchase using one of the links, I receive a small commission (at no additional cost to you) that helps offset the costs of maintaining this blog.  Thanks for your support!

How to make a Halloween Shaker Tag

These Mason Jar Shaker Tags aren’t just for Christmas.

Click here for my Halloween Tags.
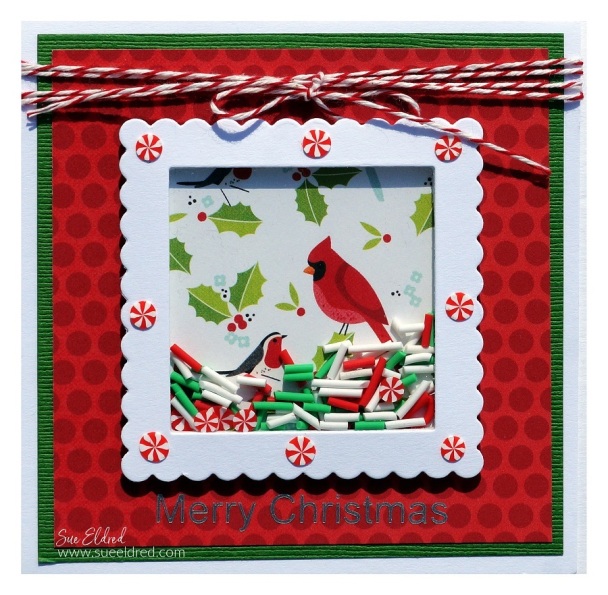
Cardinal Shaker Card

Shaker Sprinkles are great for making Shaker Cards.

Here’s a bonus…The Cardinal Shaker Card is a project from last year’s Holiday Workshop that I never shared.

Maker's Movement

Disclosure:  This is a sponsored post for The Maker’s Movement*.  I have been provided product and compensation in exchange for my creative ideas.  The view and opinions are my own.

Simple Country Christmas Vase

Simple Country Christmas Vase

Create a sweet Country Christmas Vase with a little help using Joy Iron On Embroidered Letters.

Supplies Used:

Shop Your Fav Brands at Scrapbook.com

*Disclosure… This blog uses ads and affiliate links.  If you choose to make a purchase using one of the links, I receive a small commission (at no additional cost to you) that helps offset the costs of maintaining this blog.  Thanks for your support!

Directions:

  1.  Spray the mason jar with a couple coats of ivory colored spray paint.

2.  After the paint has dried, lightly sand the jar to remove the paint off the letters.

3.   Drill a hole on the top of a small wood slice and paint the center with red acrylic paint.
4.  Glue the embroidered letters and wood star onto the wood slice with craft glue.
5.  Tie ribbon around the neck of the jar and add embellished wood slice.

You can find a wide selection of Joy® embroidered iron-on letters and alphabet sheets in different sizes at your local craft stores. 

“This is a sponsored post.  As a member of the Joy® Design Team I have been provided product and compensation in exchange for my creative ideas.  The views and opinions are my own.

Give the Gift of Amazon Prime*

DIY Seashell Lamp

DIY Seashell Lamp 5998

Oh…to be by the ocean listening to the waves and picking up shells.

Lately, I’ve been dreaming of summer vacation and relaxing on the beach.  (it’s my happy place!)

Like most people, I love to walk the beach and collect shells.

During the summer, I like to display my shells in a large clear vase on the mantle.

It reminds me of fun summer family vacations.

Last month, when I received the Lighten Up Kit from Etchall®, I thought…

“wouldn’t it make a cute Seashell Lamp to put on the patio to use on those

warm summer nights?”

I used shells collected during our trips to South Carolina.  (some even from the Isle of Palms)

Lamp Close Up 5992

Here’s what I used to make the DIY Seashell Lamp:        (*affiliate link)

Seashell Lamp Collage 2

The shade measures 4″ x 7″.

Directions:

  1. Clean mason the jar to remove all dirt, fingerprints and oil.  Dry with a coffee filter, paper towel, or lint-free cloth.
  2. Mask off a 1″ area around the mason jar with removable painters tape.
  3. Apply a heavy coat of etchall® etching crème to the masked area using the etchall® squeegee.  Leave etching crème on for 15 minutes.  After etching time has elapsed, use the squeegee to return the crème back into the original container for later re-use.
  4. Rinse etched surface with hot water to remove any remaining crème.  Remember to keep crème away from porcelain or ceramic tiles.
  5. Dry mason jar and apply the “relax” peel and stick stencil onto the middle of the first side.  Mask the sides of the stencil with removable painter’s tape.
  6. Using a stencil brush and the multi surface paint, fill in the open areas of the stencil.
  7. Carefully remove stencil and clean before stenciling on the other three sides of the jar.
  8. Fill Jar with sand and shells.
  9. Using the plastic sleeve template, trace onto a piece of burlap. Cut the burlap leaving a 1/2″ allowance around traced template.  Craft Confession:  I tried using a “stick it adhesive sheet” on the burlap first before cutting it out.  It didn’t work.  (see next step)
  10. Use spray adhesive to coat the back of the burlap.  Apply onto the lampshade and trim.
  11. Glue twine around edge of lampshade.

Optional:  The top of the shade is removable so I spray painted it black.

DIY Seashell Lamp 05959

The Lighten Up Kit is pretty easy to customize.  Lots of possibilities.

It comes with a self-illuminating lampshade with LED lights, template and instructions guide.

It uses 3 AA batteries so it’s portable and can be used almost anywhere.

The DIY Seashell Lamp was created for and sponsored by Etchall®.

Shop Your Fav Brands at Scrapbook.com

*Disclosure  This blog uses ads and affiliate links.  If you choose to make a purchase using one of the links, I receive a small commission (at no additional cost to you) that helps offset the costs of maintaining this blog.  Thanks for your support!