We are all a Work in Progress

We are all a Work in Progress-How to Upcycle a promotional water bottle

How to Upcycle a promotional water bottle.

A few months ago, I joined a gym.

I did it for a couple of reasons.

The first was for my physical self.

And the second for my mental health.

What I didn’t expect was the community I would find

and the friends I would make.

And while I haven’t seen huge improvements in my waistline,

I have seen improvement in my ability to do more than I thought I could.

I’m still a work in Progress. 

We are all a Work in Progress-How to Upcycle a promotional water bottle.

Wanting to be like the “cool kids” and help save the planet from plastic water bottles,

I told my husband I needed a metal water bottle to take to the gym.

“I have one at work you can have,” he said.  (he knows I’m cheap)

His company had given them metal water bottles that included the company’s core values.

While the values are good and everything, I wanted something different.

I wanted something more inspirational, more personal.

Being a creative person, I brought out my favorite StyleTechCraft adhesive vinyl.

“This is a sponsored post.  As a member of the StyleTechCraft Design Team I have been provided product and compensation in exchange for my creative ideas.  The views and opinions are my own.

We are all a Work in Progress-How to Upcycle a promotional water bottle

Here’s what I Used:  (*affiliate links)

StyletechCraft products brought to you by ATSM Craft*

*Disclosure:  This blog uses ads and affiliate links.  If you choose to make a purchase using one of the links, I receive a small commission (at no additional cost to you) that helps offset the costs of maintaining this blog.  Thanks for your support!

We are all a Work in Progress-How to Upcycle a promotional water bottle

Directions:

We are all a Work in Progress-How to Upcycle a promotional water bottle

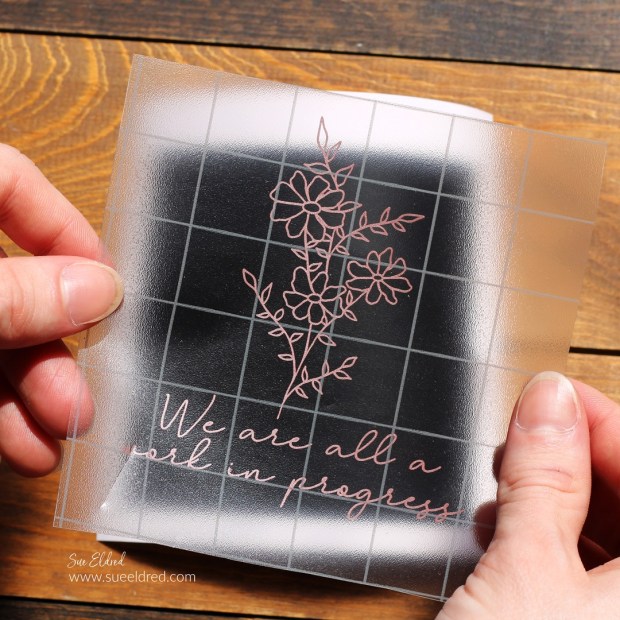
  • Remove the vinyl design from the white liner and center the image onto the black square.
  • Gently rub over the Vinyl Transfer Tape* to make sure the image has transferred.
  • Slowly and carefully, place the design and black square onto the water bottle.  Rub over the design to remove any air bubbles.  Remove the transfer tape.
  • Allow the vinyl to cure on the bottle for a few days before use. (Hand Wash Only)

We are all a Work in Progress-How to Upcycle a promotional water bottle

For those of you who are considering joining a gym,

I suggest starting slow and giving it a try.

You might be able to do more than you think.

WE ARE ALL A WORK IN PROGRESS!

Upcycled Brass Christmas Ornament

Simple Christmas Ornament Makeover

A Simple Christmas Ornament Make Over.

I ran across a couple of brass Christmas Ornaments from several years ago.

I was cleaning out my excess Christmas decorations when I found them.

I first threw them away before retrieving them from the trash.

They’re not especially valuable.

Simple Christmas Ornament Makeover

They were a 1982 Norman Rockwell promotional ornament from McDonald’s.

Because 1982 was a significant year (for me) I couldn’t throw them away.

So, I decided to try painting them.  (I had nothing to lose.)

Spring Baking Cups

*Disclosure:  This blog uses ads and affiliate links.  If you choose to make a purchase using one of the links, I receive a small commission (at no additional cost to you) that helps offset the costs of maintaining this blog.  Thanks for your support!

Simple Christmas Ornament Makeover

Here’s what I did to update the ornament:

  • Lightly sand the ornament with an extra fine sanding block* to remove dirt and grim.
  • The sanding smoothed the ornament and removed the brassy gold finish. Sanding also made the ornament silver, which I liked better.
  • Paint the ornament with a multi-Media paint* that will adhere to the metal.
  • I used Deco Art’s Multi-Media Paint in Birch.
  • Once the paint dries, lightly sand the ornament to expose the details.
  • While sanding, I made sure not to remove all the white paint from the face of the ornament. I like the “snowy look” of the white.
  • It’s also probably a good idea to spray the ornament with a matte spray sealer*.

Now the ornament looks great and compliments the other decorations on my Christmas Tree.

Buy Your Crafting Supplies Now at Dollar Tree starting at $1.25!

Upcycling an Old Painted Canvas

Upcycling an Old Painted Canvas

Upcycling an Old Painted Canvas is a satisfying Trash to Treasure Project.

Turn an unused/unwanted canvas into an easy DIY.

Upcycling an Old Painted Canvas

Several years ago, I got the opportunity to try Splatter Painting at a Trade Show.

As fun and exhilarating (and messy) as it was, abstract art is not my style.

While I would never typically do this with a painting,

this just-for-fun painting left me with no guilt.  (splatter painting post here)

I have been using Lang Wall Calendars for years.

And every year, at the end of the year, I have a hard time throwing them away.

I combined the frame under the canvas with the calendar page

for some inexpensive framed art.

Reusing items around the house in new ways is fun for me.

I don’t have to get rid of things I love, and It’s a new way to enjoy them.

And if I change my mind, which I often do, I can always upcycle it again.

It’s super easy to do.

Upcycling an Old Painted Canvas

Here’s what I used:  (*affiliate links)

*Disclosure:  This blog uses ads and affiliate links.  If you choose to make a purchase using one of the links, I receive a small commission (at no additional cost to you) that helps offset the costs of maintaining this blog.  Thanks for your support!

Upcycling an Old Painted Canvas

  • Use a small flat head screwdriver* to remove the staples from the back of the canvas.
  • FYI…Some frames will come with staples in the corner to hold them together instead of glue.
    In that case, you have a decision to make. But because I wasn’t attached to the painting, I had nothing to lose.
  • Give the frame a light sanding with a sanding block*.

Upcycling an Old Painted Canvas

  • Paint or stain the wood to match your decor.
  • Rub the finished frame with a clear wax using a soft, clean rag.

Upcycling an Old Painted Canvas

  • Cut the calendar page a little larger than the inside of the frame.
  • To give the picture more stability and a finished look, I adhered it to a piece of chipboard before gluing it onto the back of the frame.
  • Glue the picture inside the frame using a strong adhesive. I like using Rapid Fuse Adhesive*. It is a quick-setting glue and very strong. It works well with paper.

Upcycling an Old Painted Canvas

I put my “New” framed print on my mantel with a couple of old pots for a fun, fresh Spring look.

Spring Tabletop Kit  New Products at Scrapbook.com!

How to make a Mini Gift Bag out of an Envelope

The Quick and Easy way to make a Mini Gift Bag from an Envelope.

The Envelope Gift Bag is a great way use large envelopes and recycle old ones.

The gift bag was decorated using the Farmhouse Market Collection from Carta Bella.

Supplies Used:          (*affiliate link)

*Disclosure:  This blog uses affiliate links.  If you choose to make a purchase using one of the links, I receive a small commission (at no additional cost to you) that helps offset the costs of maintaining this blog.  Thanks for your support!

Directions:

  • Seal the envelope closed.
  • Cut the end off one side of the envelope.

  • Score the envelope 3/4″ on the remaining three sides of the envelope.  You will need to use medium to firm pressure when scoring to crease through all the layers.  Score on both sides of the envelope.
  • Fold the envelope on each score line.  Use the scoring tool to go over each line to make sure you have a good sharp crease.

  • Put your hand inside of the envelope and gently start opening it up.  Refold the lines as you open it up.   Create gusset folds on the sides of the bag.
  • Once the bag is fully open you will have two pointed flaps sticking out on each end.  Add adhesive to the flaps and adhere to the bottom of the bag.  (you can also add a piece of decorative washi to the bottom of the bag to hold the flaps in place.)

  • Start decorating the bag.
  • Add a decorative strip of washi tape around the bottom of the bag.
  • Add stickers to the front of the bag.  Stickers are a great way to cover up a name when re-using an envelope.

  • Fill the bag with your gift.
  • Fold the top of the bag over and crease.
  • Punch two holes in the top of the bag and add ribbon.

Remember the next time you get a card to carefully open the envelope on the side so

that you can recycle it into a cute little gift bag.

Holiday DIY with Old Kitchen Hardware

old-jar-of-hardware-sues-creative-workshop-3257

I have this old jar of assorted hardware on my shelf in my workshop.

I keep it just in case.  (Why you ask?)

Because I’m a “you never know” type of crafter.

old-hardware-before-sues-creative-workshop-3261

I had picked up a bag of old kitchen hardware at a garage sale a couple years ago

for fifty cents and used it on a few projects and even made a couple of ornaments.

(you can see them here)


While it may be too late for you to make this year…

it’s an idea that you can put away on the shelf, so to speak, for next year.

old-kitchen-hardware-spray-painted-cream-sues-creative-workshop-3263

Here’s how I made my ornament…

After disassembling the hardware, I spray painted the base plate cream.

What a difference spray paint makes.

go-around-edge-of-the-hardware-with-silver-leaf-paint-pen-sues-creative-workshop-3266

I added silver around the edge using a  Chisel Point Calligraphy Paint Marker, Silver*    (*affiliate link)

embellish-the-top-of-the-ornament-with-pine-stem-and-glitter-berry-sues-creative-workshop-3267

I used the small hole at the top of the hardware plate to string red and white twine.

I embellished it with a glitter berry cut from a glitter berry sprig (see previous picture)

wrapped around a small craft pine stem to form a small swag.

I glued the pine swag and small red and white bow to the hardware with

Beacon Adhesives Zip Dry.*

painted-snowflake-sues-creative-workshop-3271   let-it-snow-christmas-ornament-made-from-old-kitchen-hardware-close-up-sues-creative-workshop

I painted a small wood snowflake, found at the craft store, with silver acrylic paint and added

the “let it snow” sticker from Small Talk Stickers by Tim Holtz Idea-ology*.

I added a small red pearl to cover the bottom hole in the hardware and glued the

snowflake on top.

let-it-snow-ornament-made-from-old-kitchen-hardware-sues-creative-workshop-3290

A quick and easy upcycled ornament for the Christmas Tree.

Join Amazon Kindle Unlimited 30-Day Free Trial

Disclaimer:  This blog uses ads and affiliate links.  If you choose to make a purchase using one of the links, I receive a small commission (at no additional cost to you) that helps offset the costs of maintaining this blog.  Thanks for your support!

Making a Winterberry Table from a $2 treasure.


winterberry-table-2-2562

Making a Winterberry Table from a $2 Garage Sale treasure.

I almost missed the small cardboard sign leaning up against the mailbox…

I wasn’t completely sure it was even a sale.  So I backed the car up and parked.

You never know what you might find when your out “treasure hunting”.

2-table-from-a-garage-sale-1723

While chatting with the fun older couple, I found out that they had just recently married and moved

into their new home.  They were downsizing and combining both households.

The couple had a lot of good stuff, most of which I didn’t need.

It was on my second look around when I spotted the table and it’s $2 price tag.  (no need to haggle)

deco-art-americana-decor-satin-enamels-deep-ruby

She told me… “I always meant to refinish it.  I put a doily and a basket on it instead.”

I didn’t have the heart to tell her I was planning on painting it.

painting-the-winterberry-table

(this post uses affiliate links)

I had just recently received some new paint from DecoArts and thought I’d give it a try.

I gave the table a couple coats of Americana Decor Satin Enamels Deep Ruby*.

I was seriously impressed with how smooth the paint went on and dried.

I didn’t even need to sand between coats.

stenciling-the-winterberry-table-sues-creative-workshop

I decided to stencil the top of the table using my new DecoArt Stencil 6 x 18 in. Winterberries*.

I secured the stencil in place using removable painters tape.

Using a stipple brush…

I applied DecoArt Americana Multi-Surface Satin Acrylic Paint, White Birch*

inside the open stencil areas.

winterberry-table-2509

The Winterberry stencil comes with two 6″ x 18″ stencils which are slightly different.

I used the second stencil to add another berry branch to my table top.

I’m in love with my “new” table.  

For now, the table will be used with my holiday decorating and then after the Holidays it’ll find a

permanent home in the guest room.


The Winterberry Table was sponsored by DecoArts and uses Amazon Affliliate links.

If you choose to purchase an item from Amazon using one of the links, I will receive a small commission which helps offsets the cost of running this blog.  Thank You.

DIY Up-cycled Jar…a little trash to treasure

Ikea Toothbrush Holder

I was about to throw away this inexpensive toothbrush holder

(from IKEA) while cleaning my bathroom, when I got the idea.  I’m always looking for items

to use as a base on repurposed projects and thought this was perfect for a quick project.

Inspiration and ideas can be found anytime, anywhere…

even while cleaning your bathroom.
Upcycled Jar and Toothbrush Holder 3964Upcycled Jar and Toothbrush Holder 3988
Great Storage or Gift Idea.  So many ways to customize using items destined for the trash.

How to make an Up-Cycled Jar…

Materials Used:                                            (affiliate links)

Upcycled Jar Collage

Directions:
  1. Disassemble toothbrush holder.  Set aside the top portion of the holder for future projects.
  2. Paint the bottom of the holder, the lid of the jar and the cabinet knob with black semi-gloss spray paint.
  3. Glue the bottom of the jar to the painted base.
  4. Cut a circle from the decorative paper and adhere it to the top of the lid.
  5. Glue knob onto the center of the lid.
  6. Add chalkboard label to front of the jar.

craft-ideas-garden-2016

The DIY Up-cycled Jar was featured in  2016 Craft Ideas Garden Issue. (page 72)

This project was created for and sponsored by Craft Ideas Magazine.

Check out Craft Ideas Magazine for Craft Ideas for Every Occasion, Every Skill Level.

Join Amazon Kindle Unlimited 30-Day Free Trial*

Disclaimer:  This blog uses ads and affiliate links.  If you choose to make a purchase using one of the links, I receive a small commission (at no additional cost to you) that helps offset the costs of maintaining this blog.  Thanks for your support!

Making a place for Dad’s coffee

Making a place for Dad's Coffee 5605

Dad comes over every Monday, Wednesday and Thursday evenings for dinner.

It’s our weekly ritual.

He arrives at 5:30, sits in the leather chair closest to the television, in time for the evening news.

While he watches the news, I make dinner.  That’s the routine.

Dad sits in that particular chair so he can read the closed captioning.

Unfortunately, that’s the one chair that doesn’t have an end table.

Occasionally… he’ll give me a hard time telling me I need a table so he can put his coffee

cup down.  Problem is there’s no room to put one there.

old stool 5552

Problem Solved…

I noticed this old stool down in the basement, paint splattered and water stained.  (a little ugly)

A make-over was in order and I knew exactly what I wanted to do.

I wish you could of saw the smile when I told him why I did this.  (I had to sneak the first picture)

He thought it was perfect.

Easily put away when not in use.

*Disclosure:  This blog uses ads and affiliate links.  If you choose to make a purchase using one of the links, I receive a small commission (at no additional cost to you) that helps offset the costs of maintaining this blog.  Thanks for your support!

Finished Stool with coffee cup 5592

Old Stool Make-0ver Products Used:                                                   (*affiliate link)

*FTC Disclosure… “This is a sponsored post.  I have been provided product in exchange for my creative ideas.  The views and opinions are my own.”

Old Stool Make Over Steps

Directions:

  1. I gave the top of the table a quick sanding with my palm sander to smooth out the paint splatters.  (I could of sanded the legs but I was lazy.)
  2. I used Tattered Angels Decor and DIY, Ebony*, I love that you don’t need to do any sanding or priming.  I love the smooth matte finish that it gives.  I gave the table 2 coats of paint and some touch ups.
  3. Allow the paint to fully dry and cure before starting the stenciling.
  4. I custom mixed Americana Décor Chalky Finish paint relic and everlasting for a light contrast to the ebony black finish.
  5. Center the stencil onto the middle of the stool and tape down the edges with removable painter’s tape to keep the stencil from moving.
  6. Use stipple brush to apply Chalky Finish paint inside open stencil areas.
  7. Remove Stencil.
  8. For the time being, I’ve decided to leave the stool as is.  You may want to apply a finishing wax to help protect the paint.


Don’t Miss a Thing…Make Sure to Follow me

Shop Amazon Scrapbooking Supplies*