A Plate Full of Thanks

This month I started working with a company called Tape Technologies, the maker of

Styletch Vinyl, as their New Design Team Coordinator.

Being that it’s November…

I decided my first project should be something that I could use for Thanksgiving.

I perused my new collection of 12″ x 12″ adhesive vinyl and decided on the Sunflower

Transparent Glitter Vinyl sheet.  (fyi…Styletech has a great selection of vinyl to work with.)

You can find a 10 assorted pack of 12×12 Glitter Self Adhesive Vinyl Sheets* on Amazon.

Some of you may gasp…

when I tell you that I still don’t have one of those fancy electronic die cutting machines.

(although it may be on this year’s Christmas list)

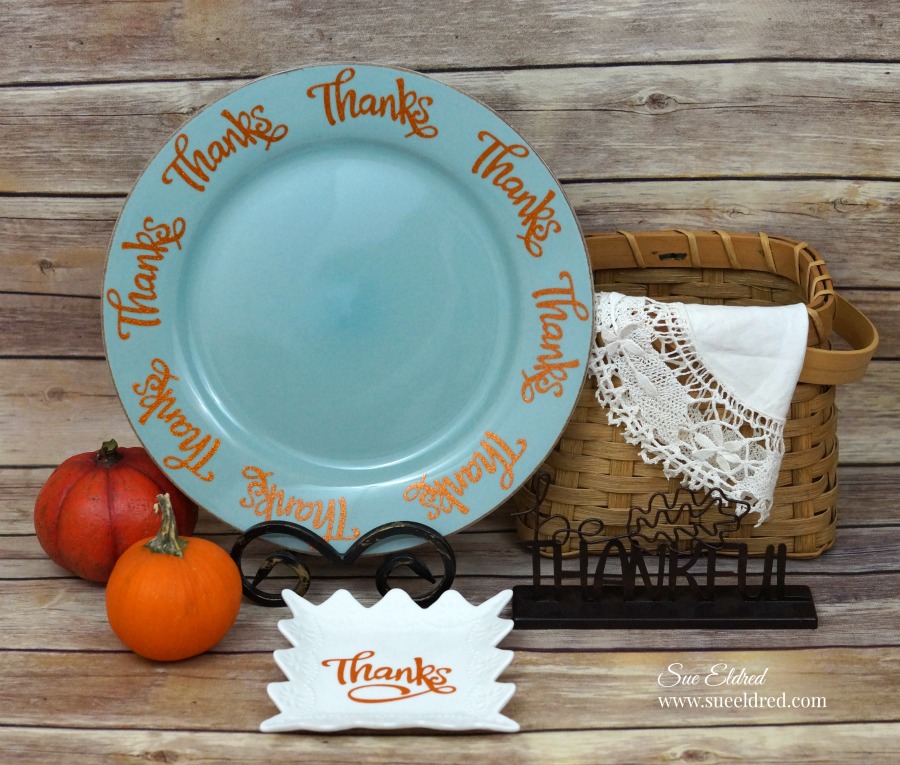
To begin this simple project…  I cut the word “Thanks” using a thin steel die and my

Sizzix Big Shot Die-Cutting/Embossing Machine*.  I cut out 8 for my large plate and

one for my small plate.  Because I only wanted the “thanks” around the edge of the plate

I cut the flourish off the bottom of the “k”.

After figuring out my plate placement, I placed my die-cut “thanks” onto a flat surface and

picked up the die-cut with my Vinyl Transfer Tape*.

Once on the transfer paper I peeled back the protective layer and secured it in place on my

plate.  I burnished the transferred die and removed the transfer paper.

Because I couldn’t help myself I added another die cut “Thanks” with the flourish in tack onto

a cute little thrift store find.

FYI…While I would not place the plates in the dishwasher, I did try to see how it would hold up to hand-washing.   It did fine.

Shop Amazon Scrapbooking Supplies*

*Disclaimer:  This post is sponsored by Tape Technologies and uses ads and affiliate links.  If you choose to make a purchase using one of the links, I receive a small commission (at no additional cost to you) that helps offset the costs of maintaining this blog.  Thanks for your support!

Stamping in White Embossing Powder


Good Old Embossing Powder…                             

When I was introduced to stamping in 1996, do you know what hooked me?

It was the Gold Embossing Powder.

The first time I watched them melt that gold embossing powder.  WOW!

At the time, I had a gift store and was looking for something new.

I can’t tell you how many people I hooked with that gold embossing powder.

Here’s a little throwback to where I started.

Back to embossing powder.  (this time with a twist)

For this project, I started with a oval that was cut from chipboard.

I rubbed Colorbox White Embossing Pad*  onto the surface of the oval.

Next, I poured White Embossing Powder* over the entire oval.

After pouring the excess powder off, heat the oval with a

Multi-Purpose Embossing Heat Tool*.

Make sure all the embossing powder is melted.

Repeat that step 3 or 4 times, building up a thick layer of embossing powder.

After it was thick enough, I added a little red ink to the edge of the oval and

inked up the “Windmill” stamp.

I heated up the oval again, making sure the powder was really hot and melted.

I pressed the inked stamp into the hot, melted powder.  Success!

I love the way it looks like red toile.  (which is something I collect)

*Disclaimer:  This post uses ads and affiliate links.  If you choose to make a purchase using one of the links, I receive a small commission (at no additional cost to you) that helps offset the costs of maintaining this blog.  Thanks for your support!

Christmas Cards with Serendipity Stamps

Now that the weather is cooler and the calendar has turned to November,

many of you card makers are thinking about Christmas cards.

(I know, some of you have yours done already)

I wanted to share with you today a couple of cards I made using a few of

Serendipity Stamps   New Holiday Stamps.

Both of my cards were water colored using my tombow markers and a waterbrush.

Serendipity Stamps Poinsettia Border

This card uses:

Serendipity Stamps Sledding Snowman

I love this fun snowman card.

This card uses:


Day #3 of The Twinery & Serendipity Stamps Blog Hop

The Twinery & Serendipity Stamps Blog Hop Card

Todays is Day #3 of The Twinery & Serendipity Stamps Blog Hop and my chance to join in.

I love Serendipity Stamps and using twine in my card making.  This was a great chance to use both.

“Thanks” Card Directions:

  1. Stamp flower images and leaves onto watercolor paper using black permanent ink.
  2. Water color or color images using markers.
  3. Cut around flowers and leaves.
  4. Paint a thin coat of Diamond Stickles Glue over images for added sparkle.
  5. I started my card by using a 2 1/2″ wide double-sided tape from Kool Tak on a 5″ piece of cardstock.
  6. Closely lay strands of twine onto the super sticky tape to cover the entire piece of paper.
  7. Cut out with a 4″ scalloped square die cut.
  8. Apply die cut square onto cardstock layers.
  9. Glue Flowers and leaves onto front of the card using a fabric glue.  Embellish with adhesive pearls.  Die cut “thanks” from blue cardstock and add to front of card.

Finished Card Size:  5″ x 5″.

Serendipity Stamps Products Used:

The Twinery Colors Used:

  • Peach Stripe, Honeydew Stripe, Denim Stripe, Lilac Stripe, Flax Stripe, Natural.

Today’s Hop:

Don’t forget to leave comments along the way for the chance to win some awesome prizes.

The Twinery & Serendipity Stamps Blog Hop

Twinery Blog Hop Badge - Serendipity Stamps

Are you a Rubber Stamper?  Do you love using Twine on your projects?

Would you like a chance to win some free products?

Serendipity Stamps and The Twinery are joining together in a Blog Hop for the next three days.

Every Day a new group of Designers and New projects.  Start today’s Blog Hop here.

I will be joining them on Day #3 (July 30th)

Here is a few of the Prize Details:

Serendipity Stamps

To win the Serendipity Stamps Prize of $25 to the Serendipity Stamps website leave comments on all Serendipity Stamps posts each day.

To win the Facebook prize of $25 to the Serendipity Stamps website:  like the Serendipity Stamps Facebook page AND leave a comment.

TBT: Serendipity Stamps Heart Scroll Card

Heart Scroll Card

This morning I was going through my Pinterest Made by Me Board and changing the

web address on several of my old pins.

The Heart Scroll Card was one of my first pins from a few years ago and I thought I’d share again.

The card uses the Heart Scroll Stamp from Serendipity Stamps.

The heart image was embossed with white embossing powder and shaded after embossed

with pink ink.  Simple and Elegant.

Serendipity Stamps also has a thin metal die that matches the heart stamp.

If you’re a stamper and you’ve never checked out their stamps and dies you really should.

A great company to work with.  www.serendipitystamps.com.

And the Winner is…

And the winner is...

Congratulations goes out to Pat S. she is the winner of the Cupcake Cling Stamps

from Serendipity Stamps.

Thanks to everyone who participated.  I loved hearing from you all.

It’s nice to know your out there.

Hmmm…  I think I should have another Give Away sometime later this month.

Make sure to keep stopping by.  (and keep those comments coming)

FYI:  Did you know that Sue’s Creative Workshop is being seen all over the world?

Last month I had visitors from 24 countries.  (Kind of exciting, don’t you think.)


It’s Give Away Time!!!

Would you like to win something?

I think it’s time to give something away to Celebrate my “New Month, New Challenge”.

Cupcake Stamps Giveaway

I will be giving away four new cling stamps from Serendipity Stamps.

Cupcake, Candle, Happy Birthday and Small Cupcake  (Retail Value $14.95)

I’ll even throw in the Cupcake Card Sample.

TO ENTER:  Leave a “Comment” on any post by Sunday, June 1, 2014.

(Winner will be announced on Monday, June 2nd.)

Good Luck!!!

Let the fun begin…

It’s Memorial Day, the official start of summer.

The cover has come off the pool and we’re ready to put Winter far behind us.

Time for Baseball, Relaxing and Fun in the Pool.

Serendipity Stamps Sprinkler Card

This stamp image from Serendipity Stamps has always reminded me of my grandson Nicholas.

The long-awaited new sod has finally been laid at Nick’s new house.

Nicholas got in trouble the other day because he couldn’t stay out of the sprinkler.

He’s three, I’m sure it was calling his name.

Let the fun begin…

Happy Memorial Day!