My Lucky Mug

My Lucky Mug

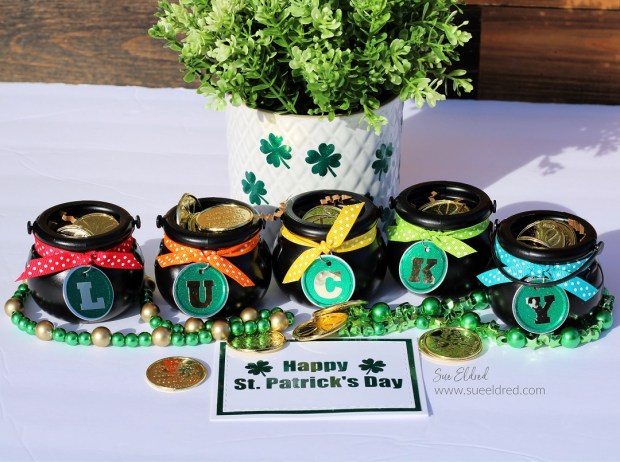
Everyone’s Irish on St. Patrick’s Day.

Whether you’re toasting with green beer or a minty green shake,

Make St. Patrick’s Day a little more special with StyleTechCraft vinyl.

My Lucky Mug made with StyleTechCraft Vinyl.

I love ♥ adding vinyl to everyday items.

I found these clear mason jar mugs at Dollar Tree* and decided to pick up a

few to create a little St. Patrick’s Day fun.

Did you know, Dollar Tree* is the perfect place for finding

inexpensive glassware to make any occasion special?

Buy Your Crafting Supplies Now at The Dollar Tree!

My Lucky Mug made with StyleTechCraft Vinyl.

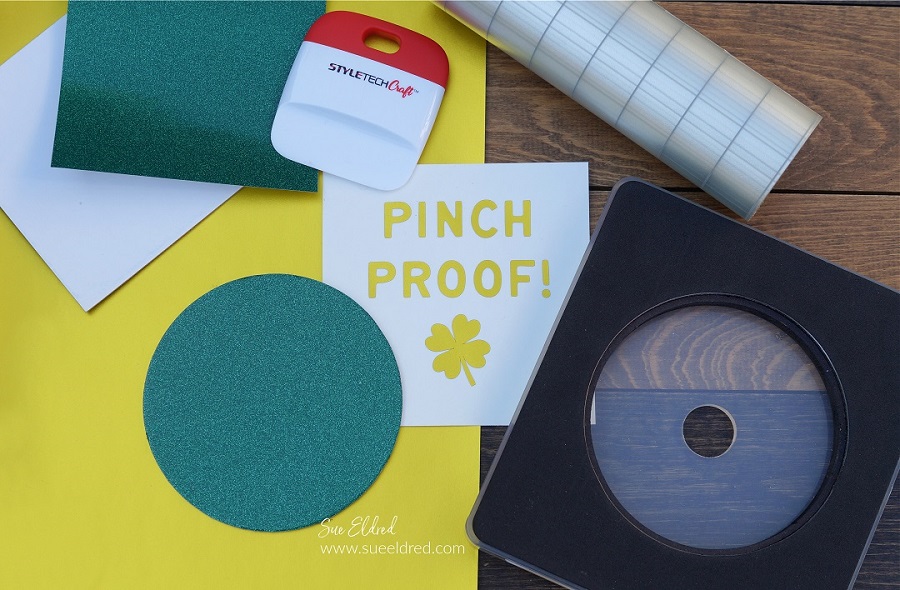
Materials Used:     (*affiliate links)

*Disclosure:  This blog uses ads and affiliate links.  If you choose to make a purchase using one of the links, I receive a small commission (at no additional cost to you) that helps offset the costs of maintaining this blog.  Thanks for your support!

To create my Lucky Mug…

I used a cute “Lucky Rainbow” image from the Silhouette Store

and a variety of StyleTechCraft vinyl and cut it using my

Silhouette Cameo Electronic Die Cutting Machine*.My Lucky Mug made with StyleTechCraft Vinyl.

Happy St. Patrick’s Day!

Pot of Gold Party Favors

Pot of Gold Party Favors

Celebrate St. Patrick’s Day with these cute pots of gold party favors.

A quick and simple little party favor for your guests.

Fill with all kinds of goodies and chocolate coins.

Gwen Studios Logo

Disclosure:  This is a sponsored post for Gwen Studios.  I have been provided product in exchange for my creative ideas.  The views and opinions are my own.

Pot of Gold Party Favors

Materials Used:

I found the little Black Cauldrons* at Dollar Tree with their St. Patrick’s Day display.  I knew they would look cute as little pots of gold under rainbows of ribbon.  (And don’t forget to get a few extra to save for next Halloween.)

*Disclosure:  This blog uses ads and affiliate links.  If you choose to make a purchase using one of the links, I receive a small commission (at no additional cost to you) that helps offset the costs of maintaining this blog.  Thanks for your support!

Pot of Gold Party Favors

To personalize the Pots of Gold…

Solid and Polka Dot Grosgrain Ribbon Pack, 24 Bright Colors, 3/8" x 48 Yards by Gwen Studios

If you love ribbon, you can find the variety pack of Polka Dot Grosgrain Ribbon Pack by Gwen Studios* at Walmart or Walmart.com.

Pinch Proof for St. Patrick’s Day

Doing A little Pinch Proof Preparedness for St. Patrick’s Day.

GREEN is the color of the day on St. Patrick’s Day…

and, I’ll be the first to admit that I look horrible in green. (It’s just not my color.)

So what do you do when green is not your color and you still want to celebrate?

You get creative and make a simple “Pinch Proof” button so you can wear a little green

and keep those pinches at bay. (It’s kind of like cootie protection when you were a kid.)

To make my Pinch Proof Button I used:     (*affiliate link)

*Disclosure:  This blog uses affiliate links.  If you choose to make a purchase using one of the links, I receive a small commission (at no additional cost to you) that helps offset the costs of maintaining this blog.  Thanks for your support!

Directions:

  • Gently rub over the vinyl transfer tape using the squeegee tool to make sure all the image has transferred.   Remove the transfer tape.

Now you’re Pinch Proof and ready to Celebrate.

“This is a sponsored post.  As a member of the StyleTechCraft Design Team I have been provided product and compensation in exchange for my creative ideas.  The views and opinions are my own.

March Calendar Girl Card

The March Calendar Girl card was made by using one the pages from my

Calendar Girls Mini Coloring Book* by Adornit.

The card was water colored using dye ik pads and a Waterbrush*

I apply the ink directly onto a piece of acetate and pick up the ink with my water-brush.

MATERIAL LIST:                            (*affiliate links)

Shop Your Fav Brands at Scrapbook.com

March Calendar Card Directions:

  1. Form a 5 x 6 ¾ inch card from cream cardstock.
  2. Cut green chevron patterned paper to 4 ¼ x 6 inches. Adhere to gold cardstock and trim a small border. Adhere layers onto 4 ½ x 6 ¼ olive green layer and then onto the cream card base.
  3. Cut Calendar Girl coloring page to 3 ¼ x 4 ¾ inches.
  4. Apply light watercolor wash to coloring page using waterbrush and ink from light blue dye ink pad.
  5. Color on acetate sheet with the salmon marker; pick up color with waterbrush and color girls face on coloring page.
  6. Dab ink onto the acetate sheet with ink pads. Pick up color with waterbrush and paint the rest of the calendar image.
  7. Add gold accents to the glasses, center of flower, skirt, socks and lettering using the gold gel pen.
  8. Add diamond stickles to the girl’s hair and vest.
  9. Adhere calendar girl to a thin gold cardstock border and onto the front of the card base.
  10. Add green enamel dots to the bottom corner of the card.
  11. Tie a sheer ivory ribbon to left side of card.

Finished card size: 5” x 6 ¾.”

March Calendar Girl was sponsored by ADORNit.

*Disclaimer:  This blog uses ads and affiliate links.  If you choose to make a purchase using one of the links, I receive a small commission (at no additional cost to you) that helps offset the costs of maintaining this blog.  Thanks for your support!

Make a Lucky Hat for St. Patrick’s Day

Feeling a little Irish? 

Need a Lucky Hat for St. Paddy’s Day?

Using only a few Smoothfoam shapes you can make yourself a Lucky Hat centerpiece

in no time.  A fun centerpiece for all your “GREEN” celebrations.

Here’s what you’ll need:                                                                                    (*affiliate link)

Directions:

  1. Paint 8″ Half Ball and 10″ Disc with English Ivy paint.
  2. Repaint Disc and Half Ball with Kelly Green paint, allowing some of the darker paint to show through.
  3. Paint sides of 8″ Disc with Black paint.
  4. Glue 8″ Disc onto the 8″ Half Ball.
  5. Center and glue onto the  10″ Disc.
  6. For a shiny finish, paint the entire piece with Mod Podge.
  7. To create gold letters, paint the chipboard letters with a gold paint pen.

Have a great day and may the “Luck of the Irish” be with you!

 
Click on the pictures for product ordering through Amazon*.

Disclosure:  This post uses affiliate links.  If you choose to make a purchase using one of the links, I receive a small commission that helps offset the cost of maintain this site.  Thanks for your Support!

This project was created for and sponsored by Smoothfoam.

Shop Amazon Scrapbooking Supplies*