“Celebrate” with a Banner made from old blue jeans

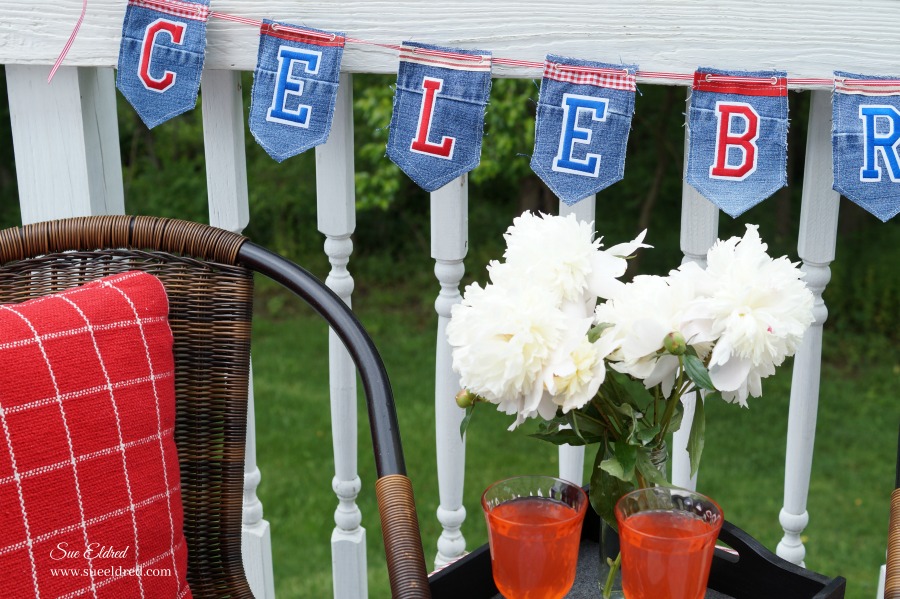
Create a banner using Joy Embroidered Iron On Letters and old blue jeans.

When inspiration hits in the middle of the night, it usually ends of being one of my favorite

kind of projects.  (This one  was fun.)  

Got any old worn blue jeans ready to be thrown out?

I started with my old blue jeans and 3″ Iron-on Embroidered Varsity Letters from Joy

in red and blue.

I created a 3 1/2″ x 5 1/2″ banner pattern using grid paper and traced it onto the jeans.

To add a little interest…I incorporated the seams from the sides of the jeans to use for the

front of the banner.  For the word “C-E-L-E-B-R-A-T-E”  I cut 9 banners for the front with

seams and 9 plain ones to use to line the back of the banner.

The Iron-on Embroidered Varsity letters are sticky backed so I went ahead and placed

them onto the front of my banners before sewing.

Next came my jar of red ribbon scraps.  (I love red so much, I have a jar just for “red”)

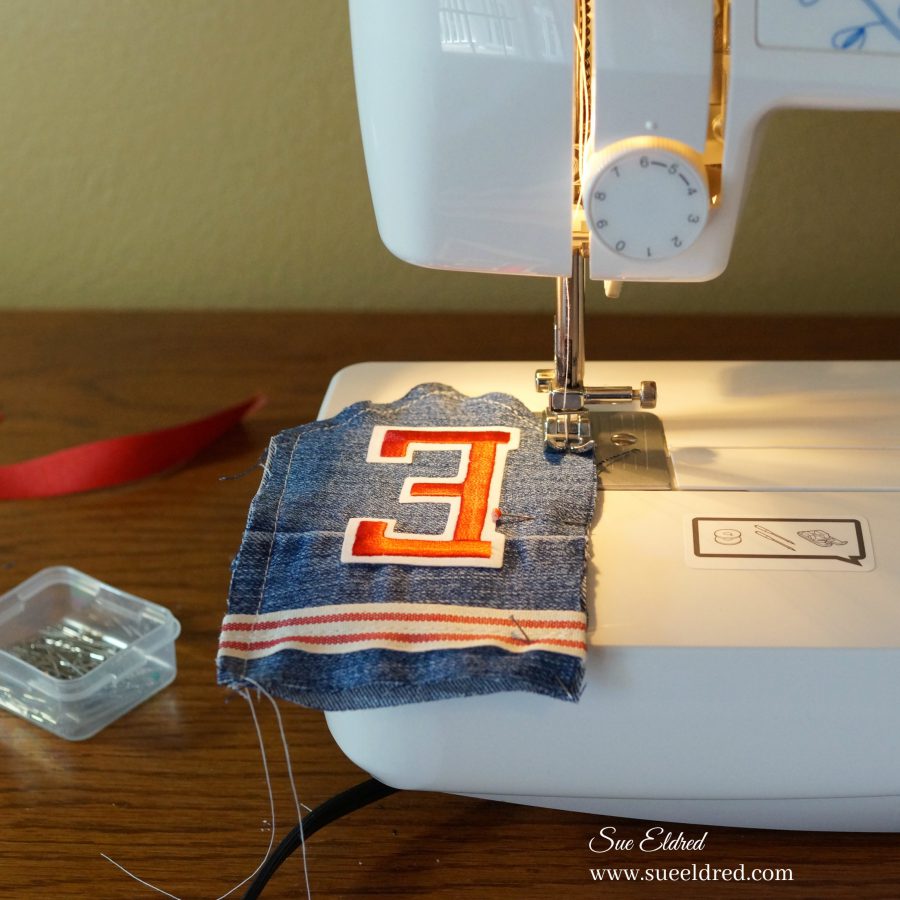
I sewed the ribbon scraps onto the tops of each banner.

I then sandwiched the front with a plain back and simply sewed around each banner with

my sewing machine.  After the third banner, I finally got smart and started using straight pins.

As you can tell, I was going for a casual simple look.  (that’s my story and I’m sticking to it)

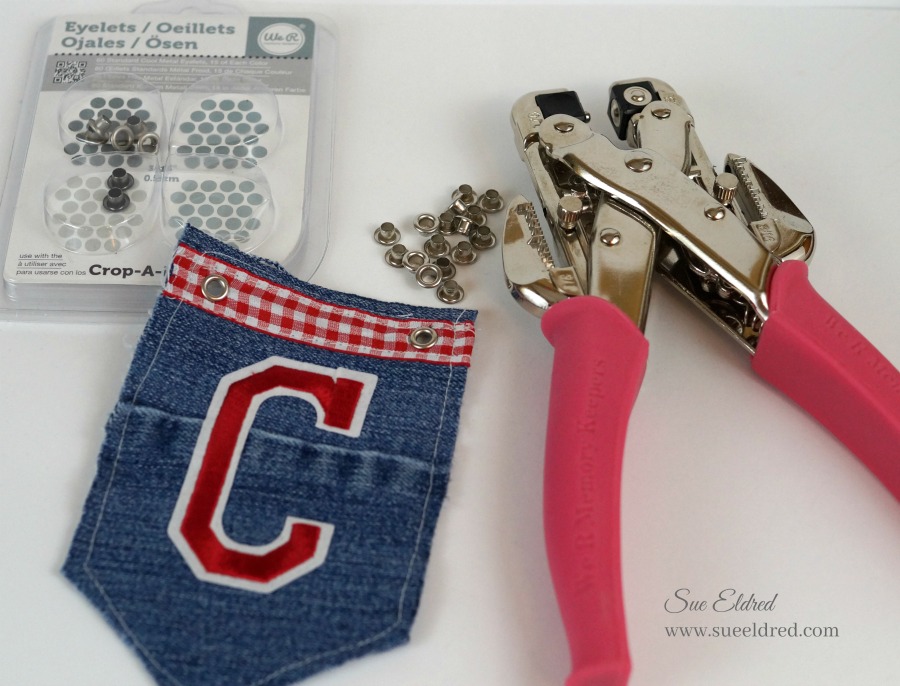
After I was finished sewing all my banners, I used my We R Memory Keepers Crop-A-Dile*

to punch two holes.  (I used the 3/16″ sized hole.)

I used We R Memory Keepers Eyelets Cool Metal* (affiliate link) for my eyelets.

Did you know that the  Crop-A-Dile* easily goes through both layers of jeans.

Join Amazon Kindle Unlimited 30-Day Free Trial

Disclaimer:  This blog uses ads and affiliate links.  If you choose to make a purchase using one of the links, I receive a small commission (at no additional cost to you) that helps offset the costs of maintaining this blog.  Thanks for your support!


The “Celebrate” banner was created for and sponsored by Joy.

Jazz Up your Flip Flops with Patent Leather Paint

Old or New…Jazz Up your flip flops with Patent Leather Paint from Deco Arts.

While attending the Creativation show in Phoenix earlier this year, I received a bottle

of “new” Garnet patent leather paint to play with.  You could say, I was smitten.

This paint was so fun and easy to work with.

 A quick and easy way to jazz up old or new flip flops.  (also pumps and purses)

To jazz up your flip flops you’ll need…              (*amazon affiliate link)

Directions:

  1. If using old flip flops… Make sure to wipe flip flops well with damp towel to remove any dirt or dust.
  2. Apply patent leather paint evenly with a soft-bristled brush.  The paint will have a slight tacky feel as it is drying.
  3. Apply 2-3 coats of paint to get the desired coverage.  Allow paint to dry between coats.
  4. Cut the shank off the back of the button with Wire Cutter*.
  5. Adhere the button onto the front of the flip flops using Quick Grip Adhesive*.
  6. Allow paint to cure 24-48 hours before using.

Next… Get a pedicure and ENJOY!

The Jazzed Up Flip Flops were created for Craft Ideas Magazine’s Summer 2017 issue.

Shop Your Fav Brands at Scrapbook.com

Shop Amazon Scrapbooking Supplies*

Disclaimer:  This blog uses ads and affiliate links.  If you choose to make a purchase using one of the links, I receive a small commission (at no additional cost to you) that helps offset the costs of maintaining this blog.  Thanks for your support!

Create a Beach Votive with a few Dollar Store Treasures.

Create a Beachy Votive with a few Dollar Store treasures.

A cheap and easy beachy decoration.

A great way to display those small shells collected on vacation.

I purchased the Parmesan Cheese Shaker* and a Flameless Candle Votive*

To make the Beachy Votive here’s what I used:                             (*affiliate link)
Disclaimer:  This blog uses ads and affiliate links.  If you choose to make a purchase using one of the links, I receive a small commission (at no additional cost to you) that helps offset the costs of maintaining this blog.  Thanks for your support!

Directions:

  • Wrap wire around a pencil for a spiral handle.

  • Using the needle nose pliers, make a small loop on each end of the wire.

  • Find two small shells with natural holes on the end.  Tie them together with a small piece of string.

  • Thread burlap ribbon through both looped ends of the wire and tie around the top of the parmesan shaker.  Add shells on string as you knot the ribbon.
  • Glue top of broken shell onto the knot of the burlap ribbon with Beacon Fabri-Tac Permanent Adhesive*.
  • Add approx. 1″ of sand into the parmesan shaker.  Add small votive and shells.

The Beachy Votive looks good with or without the lid.

I love my Calendar Girls

I love, I love, I love my calendar girl.

You ever get a song stuck in your head?  (over and over again)

When I finished up with these samples last night, I couldn’t get that song out of my head.

For those of you not old enough to remember the song Calendar Girl by Neil Sedaka,

I suggest you “google” it.  Then you’ll have it rolling around your head just like me.

(*amazon affiliate link)

It all started with the Calendar Girls Mini Coloring Book* from ADORNit.

I simply water colored the image using a variety of inks from ink pads and a waterbrush.

(It makes me feel like an artist)

The mini coloring books are now available on Amazon*.

And… if you use the code MINIBOOK (all caps) you will be able to buy 2 and get 1 free!  

Try Amazon Prime 30-Day Free Trial

Disclaimer:  This blog uses ads and affiliate links.  If you choose to make a purchase using one of the links, I receive a small commission (at no additional cost to you) that helps offset the costs of maintaining this blog.  Thanks for your support!

DIY a Colorful Garden Chair for your Gnome

diy-a-colorful-garden-chair-for-your-gnome-2

A Colorful Chair for Colorful Little Gnome…

Every year around this time, my Grandson and I start making our mini gardens.

It’s our special annual tradition.

Last year, we added a Gnome named Mr. Elfsnail.

This year, I decided to create a chair for him to sit on while working in the garden.

We take our gardening seriously.   Read about Mr. Elfsnail’s garden.

For Mr. Elfsnails chair…

I found this cute little wooden chair in the toy area of Dollar Tree and knew it’d be a cute

mini garden chair for my gnome.

How to make a Colorful Gnome Chair

Supplies Used:
  • Miniature Wood Doll Chair
  • DecoArt Americana Paint:  Watermelon Slice, Marigold, Olive Green
  • DecoArt Multi-Surface Satin Acrylic Paint:  Night Sky, Cotton Ball
  • Paint Brush
  • Sand Paper
  1. Lightly sand any rough spots off the chair.
  2. Paint the chair in a variety of colors.
  3. Create small flowers on the top of the chair by dipping the end of the paintbrush in paint and adding small dots as the petals.

Chair measures 3″ tall.

I might have even left it here (glued to the tree) if I didn’t think it’d drive the boys crazy.

A little fun and whimsy. 

For a dollar and some paint, it might be fun to let the boys paint a chair of their own.

For more summer fun… click on ad below ↓

Slimer

Disclaimer:  This blog uses ads and affiliate links.  If you choose to make a purchase using one of the links, I receive a small commission (at no additional cost to you) that helps offset the costs of maintaining this blog.  Thanks for your support!

Join Amazon Kindle Unlimited 30-Day Free Trial

Preserving Summer Memories

Summer Layout 9108

I’m holding on to Summer as long as I can.

This summer Nicholas learned how to swim the entire length of the pool without the aid

of a floatie and he learned how to float on his back.

Warren learned how to jump off the side of the pool.

Pretty impressive when you consider they’re only 4 and 1 1/2.

Nicholas loves the water, we call him a polar bear because it doesn’t matter how

cold the water is.

Yesterday… we had our last pool party of the season.  Thanks to a little 95º heat wave.

I’m going to miss summer.

My Summer Layout uses:

  • Simple Stories Collections: Summer Vibes and Freedom
  • Bo Bunny’s Boardwalk

Join Amazon Kindle Unlimited 30-Day Free Trial

Disclaimer:  This blog uses ads and affiliate links.  If you choose to make a purchase using one of the links, I receive a small commission (at no additional cost to you) that helps offset the costs of maintaining this blog.  Thanks for your support!

Busy Summer Meal Planning

I was recently thumbing through a magazine and noticed a week of dinner plans.

Each meal was designed to be ready and on the table in 45 minutes or less.

While I like the idea, I looked at the menu and said to myself.

“My family would never go for that.”

Black Bean Burgers with Srirachi Aioli and Greek Cucumber Salad?

Seriously, I wouldn’t even know where to start.

At the risk of sounding horrible…  (Healthy Moms close your eyes)

Here’s what my Busy Summer Menu looked like for the week:

Mon:  Ham Steak, Cheesy Potatoes, Green Beans

Tues:  Fiend for Yourself Night  (Baseball Practice, Dad out-of-town) aka leftovers

Wed:  Crockpot Italian Beef, Baked Mac and Cheese and because we had three extra teen-age boys show up I added a Wal-Mart Pizza for good measure.  (total of 9 for dinner)

Thurs:  BLT’s and Chips.  (Baseball Practice, Dad out-of-town)  Of course, Dad/Grandpa stops by and offers to take me to Cracker Barrel.  Who am I to refuse?  BLT’s another night.

Fri:  Pizza Night  (of course!)

Now if this isn’t your idea of good meal planning, please don’t throw me under the bus just yet.

Once school starts, I’ll do much better.  (I hope)

Until then, you can enjoy your Grilled Steak Panzanella with Pickled Vegetables and Bourbon Peach Limeade without me.


Summer Distractions

Summer Collage 2014

Summer always goes so fast for me.

It’s always around this time in the Summer that I start wondering what I’ve done.

That’s why I’m glad I take a lot of pictures, so I can look back and remember.

No, we didn’t take a big family vacation.  But, we’ve been busy just the same.

33 games of baseball, picnics in the park, swimming whenever the weather

was warm enough, a couple of out of state week-ends trips, unexpected home repairs

and general laziness.

I guess that’s what summer’s really all about.   Enjoying life as it happens.

Nick and Grandma’s Mini Garden

A few weeks ago, Nick and I talked about making a special project.

I decided we should make a miniature garden for him to help me take care of.

Saturday, my little buddy came over to help me work on it.

Garden Tools

We had previously collected moss, sticks, bark and rocks for our project.

I added some mini plants (for fairy gardens), potting soil, a small park bench, tiny garden fence,

green spray bottle and a set of teeny tiny tools.

While cleaning out the garage a couple of weeks ago, I almost threw out this rusty broken

wagon.  I’m so glad I decided to keep it.   It was perfect for our mini garden.

Nick with Tools

All I needed was one excited 3 1/2 year old to help me.

Nick working in the garden

I added a piece of paper towel over the holes in the bottom of the wagon and we filled it

with potting soil.  I added the small fence, large flat rock and bench.  I let Nick finish the rest.

Nick loved digging in the dirt and adding the plants.

Garden Close Up

We put rocks around the little fence and even added a chicken to our garden.

Nick watering the tulips

Occasionally, Nick had to stop and water other things.  Like my tulips.

Grandma and Nick's Special Garden w watermark

I don’t know who was more excited about the garden, him or me.

picnic lunch

Since, grandpa had brought the little white picnic table up from the barn.

Nick decided we needed to have a picnic lunch.  All in all, a day very well spent.

Shop Your Fav Brands at Scrapbook.com

Disclosure:  This blog uses ads and affiliate links.  If you choose to make a purchase using one of the links, I receive a small commission (at no additional cost to you) that helps offset the costs of maintaining this blog.  Thanks for your support!

Join Amazon Kindle Unlimited 30-Day Free Trial