Holiday Centerpiece or Party Serving Stand

holiday-centerpiece-sues-creative-workshop-2839

Tis the season for Holiday Parties and decorating…

around my house, it’s starting to kick in full steam.

Instead of stressing out, I try to create items with more than one purpose.

My Holiday Centerpiece also works wonderful as a Party Serving Stand.

holiday-stand-before-sues-creative-workshop-2810

I started with a Deflecto 3 Tier Dessert Stand* (affiliate link),

wrapping paper, glue stick and cutting mat.

holiday-centerpiece-cutting-the-circles-sues-creative-workshop-2812

  • I traced around all three of my circles onto the back of the wrapping paper.
  • Apply the glue stick generously around and inside the circle.  Lay circle onto wrapping paper and smooth out any air bubbles.  (The nice thing about using wrapping paper and a glue stick is that you can easily remove the paper and glue by soaking stand in warm water.)
  • Trim around circle and inside channels using a craft knife and cutting mat.

holiday-stand-close-up-sues-creative-workshop-2822

  • Glue lace around the outside of each circle and assemble stand.

holiday-adjustable-3-tier-stand-sues-creative-workshop-2826

Add ribbon and holly berries and you’re ready for a party.

holiday-centerpiece-sues-creative-workshop2841

Or add small ornaments and decorations for a fun Holiday Centerpiece.

“This is a sponsored post. As a member of the Deflecto Design Team I have been provided product in exchange for my creative ideas, views and opinions.”

Disclaimer:  This blog uses ads and affiliate links.  If you choose to make a purchase using one of the links, I receive a small commission (at no additional cost to you) that helps offset the costs of maintaining this blog.  Thanks for your support!

Try Amazon Prime 30-Day Free Trial

Making a Winterberry Table from a $2 treasure.


winterberry-table-2-2562

Making a Winterberry Table from a $2 Garage Sale treasure.

I almost missed the small cardboard sign leaning up against the mailbox…

I wasn’t completely sure it was even a sale.  So I backed the car up and parked.

You never know what you might find when your out “treasure hunting”.

2-table-from-a-garage-sale-1723

While chatting with the fun older couple, I found out that they had just recently married and moved

into their new home.  They were downsizing and combining both households.

The couple had a lot of good stuff, most of which I didn’t need.

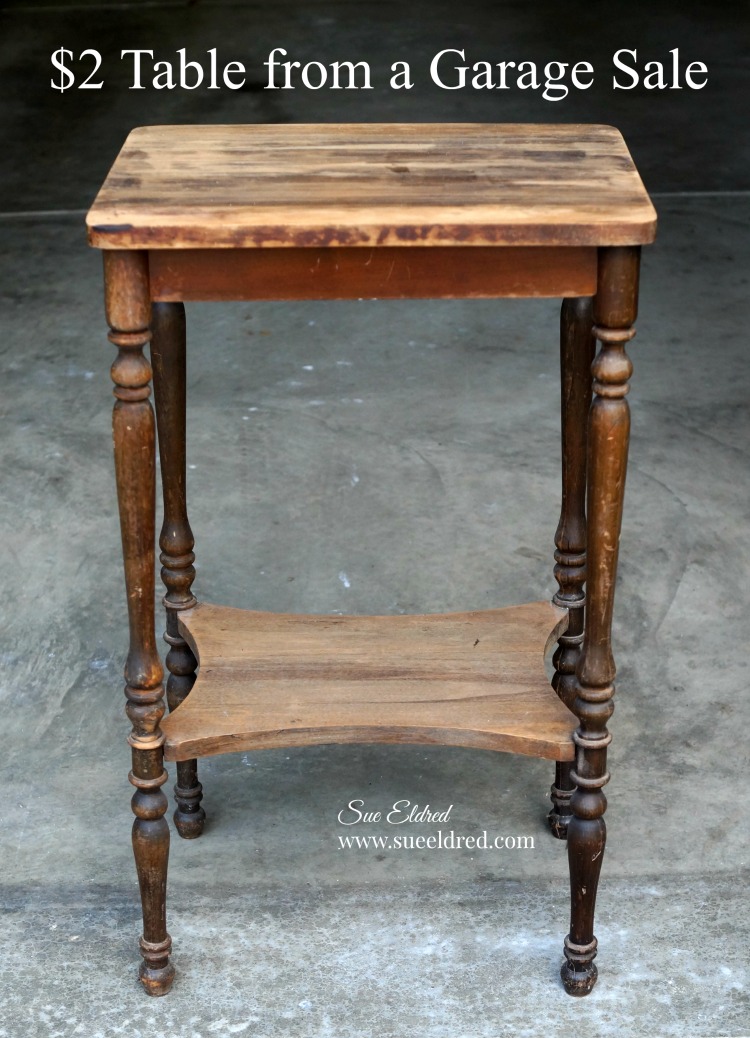
It was on my second look around when I spotted the table and it’s $2 price tag.  (no need to haggle)

deco-art-americana-decor-satin-enamels-deep-ruby

She told me… “I always meant to refinish it.  I put a doily and a basket on it instead.”

I didn’t have the heart to tell her I was planning on painting it.

painting-the-winterberry-table

(this post uses affiliate links)

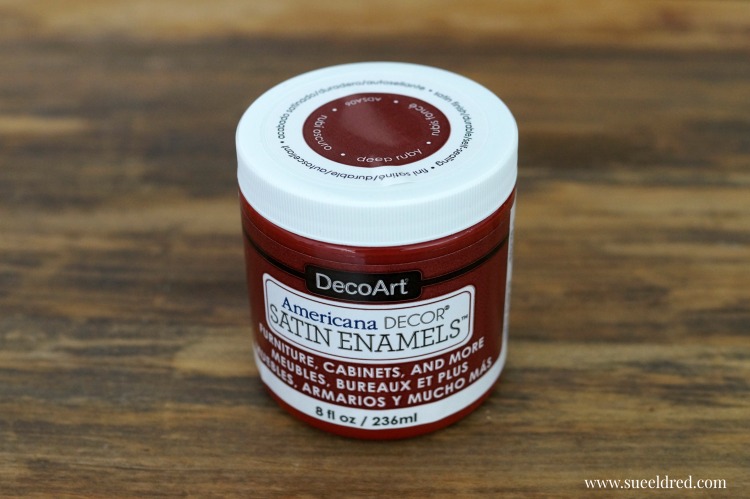
I had just recently received some new paint from DecoArts and thought I’d give it a try.

I gave the table a couple coats of Americana Decor Satin Enamels Deep Ruby*.

I was seriously impressed with how smooth the paint went on and dried.

I didn’t even need to sand between coats.

stenciling-the-winterberry-table-sues-creative-workshop

I decided to stencil the top of the table using my new DecoArt Stencil 6 x 18 in. Winterberries*.

I secured the stencil in place using removable painters tape.

Using a stipple brush…

I applied DecoArt Americana Multi-Surface Satin Acrylic Paint, White Birch*

inside the open stencil areas.

winterberry-table-2509

The Winterberry stencil comes with two 6″ x 18″ stencils which are slightly different.

I used the second stencil to add another berry branch to my table top.

I’m in love with my “new” table.  

For now, the table will be used with my holiday decorating and then after the Holidays it’ll find a

permanent home in the guest room.


The Winterberry Table was sponsored by DecoArts and uses Amazon Affliliate links.

If you choose to purchase an item from Amazon using one of the links, I will receive a small commission which helps offsets the cost of running this blog.  Thank You.

Christmas Cards using Paper House’s “Home for Christmas” Collection

christmas-cards-using-paper-house-productions-home-for-christmas-collection-sues-creative-workshop

Planning on making Christmas Cards this year?

I thought I’d share a couple of the quick and easy layered cards that we made in my Holiday Workshop.

joy-to-the-world-2577

The Joy to the World card uses:

joy-to-the-world-inside-sues-creative-workshop

I used the Merry Christmas Tag from the Glitter sheet on the inside of the card.

peace-card-sues-creative-workshop

For the Peace Card I used:

peace-card-inside

On the inside of the card I used:

  • Winter Snowflakes Washi Tape from Little B LLC
  • the Snowman from the Home for Christmas Cardstock Stickers


*I am an Amazon Affiliate.  If you choose to make a purchase from Amazon, I will receive a small commission that helps offset the cost of running this blog.

Festive 3-Tier Serving Stand

festive-3-tier-stand-sues-creative-workshop-8638

Create an elegant Holiday serving stand…

using random thrift store dishes and a Dollar Store candlestick.

Imagine this filled with yummy deserts and treats.

getting-started-sues-creative-workshop

*Disclaimer This post uses ads and affiliate links.  If you choose to make a purchase using one of the links, I receive a small commission (at no additional cost to you) that helps offset the costs of maintaining this blog.  Thanks for your support!

Here’s what you’ll need to get started:             (*affiliate link)

Directions:

  • Clean and dry dishes.  Wipe areas where adhesive will be applied with rubbing alcohol to remove any oil left on glass from handling.

gluing-the-candlestick-sues-creative-workshop

  • Run a thin line of adhesive on the top of the glass candlestick and adhere to the bottom of the medium plate.  Let dry.

fill-with-jingle-bells-sues-creative-workshop

  • Place jingle bells into glass cordial. Run thin line of adhesive on top of glass cordial.  Adhere to bottom of the smallest plate.  Let dry.

Shop Your Fav Brands at Scrapbook.com

festive-3-tier-stand-separate-pieces-sues-creative-workshop

  • Adhere bottom of glass cordial to center of the medium plate.
  • Adhere bottom of glass candlestick to top center of largest plate.

plain-stand-sues-creative-workshop

TIP… Use as three separate pieces or adhere together to create one elegant serving stand.

Try Amazon Prime 30-Day Free Trial

Sue’s Family Flip Album Video

As soon as I received this new flip book from Paper House I fell in love.

This interactive album has plenty of room for photos, and lots of places to write

down memories, plus it has special pockets for keepsakes.

Since mere pictures wouldn’t show you how fun this album is…

I decided to make a short video.

I actually spent more time editing and uploading the pictures to be printed than it took me to put this

album together.  I decided to keep my album simple with just a few stickers.

I’ll go back later and add some journaling.

But…with the extra large spine, you’ll be able to get carried away embellishing. (if you’d like)


The album I used in the video is…

Paper House Productions FB-0004E Flipbook Interactive Album, Wedding Day*

Since the pages of the album are neutral they worked perfect for my family pictures.

To embellish my album I used the Wedding Day 12″ Cardstock stickers.


*This project was created for and sponsored by Paper House Productions.

This post uses Amazon Affiliate links.  If you would choose to purchase an item from Amazon

using this link I will receive a small commission that helps offsets the costs of running this blog.


Ring Toss Anyone?

For Nick’s Carnival themed birthday party, earlier this month…

I was given the task to create the Ring Toss Game.

 After washing and spray-painting all the bottles, I needed a cute sign for the game.

Joy letters to the rescue – I just adhered them to scrapbook paper I added to the outside

of the plastic bin that holds the bottles.

I used lightweight Smoothfoam rings painted with acrylic paint for the kids to toss.

ring-toss-game-sues-creative-workshop

Besides the Ring Toss Game there was a Hit the Can, Frisbee Toss, Fishing Game, Shoot Em Up, Tattoo Parlor, Fortune Teller.

fishing-game

Warren especially love the Fishing Game.

So much, he stuck his head in the tub.  (it was unseasonably HOT that day)

nicks-6th-birthday-party

There was Ice Cream Cone Cupcakes, Corn Dogs, Popcorn, Nacho’s and a ton of prizes.

The kids and adults had a really good time at the party.

This post was sponsored by Joy Sa and DecoArt.

Disclosure:  This blog uses ads and affiliate links.  If you choose to make a purchase using one of the links, I receive a small commission (at no additional cost to you) that helps offset the costs of maintaining this blog.  Thanks for your support!

Join Amazon Kindle Unlimited 30-Day Free Trial

Sue and Nick’s First Video together on 3D Shimmerz from Paper House Productions

I asked my grandson, Nick to help me make a video.

If you’ve followed my blog any at all you’ve most likely seen a picture or two of my grandsons.

To be totally honest…some of my most popular posts are projects that I did with my grandson Nick.

So…when I decided to make a video showing how fun the new 3D Shimmerz from Paper House

Productions are I thought who better than Nick to help me.  He’s a natural and really did a great job.

He probably didn’t even need me.  Prepare yourself for extreme cuteness.

(oh…and please excuse the crickets in the background)

Nick asked me tonight when we’re going to make another video.  You just never know.


*This video was sponsored by Paper House Productions.

The last time I cooked, hardly anyone got sick.

For some people, cooking defines them.

I AM NOT that person.

Ask me to bring chips and soda to a potluck and I’m totally fine with that.

But… don’t let the apron fool you.

It’s not that I can’t cook.  I just don’t like too.

If I had a personal chef, I’d be one happy girl.

So… If I’ve got to do it, I might as well have a little fun.  (and keep the expectations low)

This apron should do the job.

Red Ticking Apron

Want an apron like mine?

A while back, I asked the good folks at Canvas Corp Brands if they made an

apron with Red Ticking (they only had blue) and they made this apron special just for me.

Last Time I Cooked 9942

The lovely lettering is Iron-on Embroidered Letters from Joy SA.

Look for them at your local Hobby Lobby and Michaels craft stores.

“This is a sponsored post.  As a member of the Joy® Design Team I have been provided product and compensation in exchange for my creative ideas.  The views and opinions are my own.

Shop Your Fav Brands at Scrapbook.com

*Disclosure:  This blog uses ads and affiliate links.  If you choose to make a purchase using one of the links, I receive a small commission (at no additional cost to you) that helps offset the costs of maintaining this blog.  Thanks for your support!

Autumn Woods Pop-Up card and Fall Collage

Autumn Woods Pop Up Card 096

One of the best things about being on a design team is the opportunity to work with awesome

products.  When I got my last box of goodies from Paper House Productions I instantly fell

in love with the Autumn Woods Collection.

Autumn Woods Pop Up Card 083

The sweet water colored woodland animals are cute without being to cutesy.

I knew as soon as I saw them that they needed to be made into a pop-up card.

Autumn Woods Pop Up Card 084

Tips…

  • I apply baby powder on the back of my stickers with a small paintbrush to remove the tackiness.  That way I can use my stickers like die-cuts.
  • On the front of the card:  I love adding dimension… so under the “Autumn is in the Air” and the “bunnies” I used 3-D foam mounting squares.
  • Add even more dimension to the inside of your pop up card by adding thin foam mounting squares to the stickers “tree” and  “autumn woods” and strategically placing them on the background.
  • I created a couple of pop-up steps for my forest friends.

Autumn Woods Collage 115

While cleaning up the Autumn Woods scraps laying on my desk, I decided to make a Fall

Collage using a rummage sale frame I picked up last month for next to nothing.

Autumn Woods Pop Up Card 0099

All in all… I would have to say that the Autumn Woods Collection has to be my favorite

Paper House Productions collection so far.  (at least for the time being)

Here’s the list of the Paper House Products I used:

These projects were created for and sponsored by Paper House Productions.

Disclaimer:  This blog uses ads and affiliate links.  If you choose to make a purchase using one of the links, I receive a small commission (at no additional cost to you) that helps offset the costs of maintaining this blog.  Thanks for your support!

Shop Amazon Scrapbooking Supplies*

Gel Press and the Colors of Autumn

the-colors-of-autumn-print-using-gel-press

The first time I watched a video of someone using a Gel Press I was completely intrigued.

The project they were making was artsy, colorful, very cool and it looked like so much fun.

When I got the chance to participate in the Designer Craft Connection monthly design challenge

and receive a Gel Press plate for “free”… I was more than excited.

gel-press-supplies-sues-creative-workshop

Never heard of a Gel Press?    (Well…It’s just about the coolest thing.)

The Gel Press is a reusable Gel Printing Plate.

Gelatin printing is a form of mono-printing in which a gelatin slab is used as a printing plate to create a variety of images and backgrounds using acrylic paint.  Simple to use.  Ready for Printing.

the-colors-of-autumn

Here’s how I created “The Colors of Autumn Print”…

Supplies Needed:

Directions:

making-a-gel-press-background

  • Remove clear protective film from your gel press.  Apply paint to the exposed Gel Plate.
  • Roll paint on as a thin layer with brayer.
  • Create design by pressing textured item into wet paint.
  • Lay paper onto painted surface.
  • Gently rub paper with hands to create a transfer image onto the paper.
  • I traced guidelines around the paper onto my scratch paper to make it easier to line up the second printing.
  • Pull paper away from printing plate to reveal your background.

creating-the-leaf-background-on-the-gel-press-sues-creative-workshop

  • I created a second background just like the first by using fall colors.
  • I placed 3 leaves into the paint.
  • I place a second piece of white paper over the gel press and pressed.  This removes most of the paint from the background.  Leaving the paint underneath the leaves.
  • Remove leaves from the gel press.  I masked the corners with a couple of additional leaves.
  • Lay the first blue background paper over the press.  Lining the paper up with the guidelines.
  • Gently rub paper with hands to create a transfer image onto the paper.
  • Pull paper away from printing plate to reveal your leaf prints.

autumn-background

  • Mat print and embellish with “the colors of autumn” chit chat sticker.

the-colors-of-autumn-sneak-peek-815

The “Colors of Autumn Print” was created for and sponsored by Gel Press.

gel-press-logo

Make sure to check out the video on the Gel Press site.


*This post uses Amazon Affiliate links.  I am a Amazon Affiliate.  If you choose to purchase an item from Amazon by clinking on the product link, I will receive a small commission that helps offset the cost of running this blog.