How to make a Frosted Pinecone Wreath

Frosted Pinecone Wreath

Autumn has come to the Midwest bringing with it crisp air and colorful leaves. 

I’ve even given up my flip flops for socks and shoes…

I like Autumn.

Really I do.  (If only it’d turn right back into Summer.)

Now that I’ve given up on Summer, I thought I’d better start with my Fall Decorations.

I like making projects that serve more than one purpose.

Like this Pinecone wreath.   After I’m done with my Fall Decorations…

I plan on adding red berries and re-making it into a Christmas Wreath.

How to Make a Frosted Pine Cone Wreath…

You’ll need:

  • 14″ Smoothfoam Wreath
  • Assortment of Pinecones
  • White Spray Paint
  • Craft Moss
  • Craft Glue
  • Hot Melt Gun and Glue
  • Ribbon and Raffia
  • Thin Wire

Directions:

  1. Gather an assortment of various sizes of pinecones.
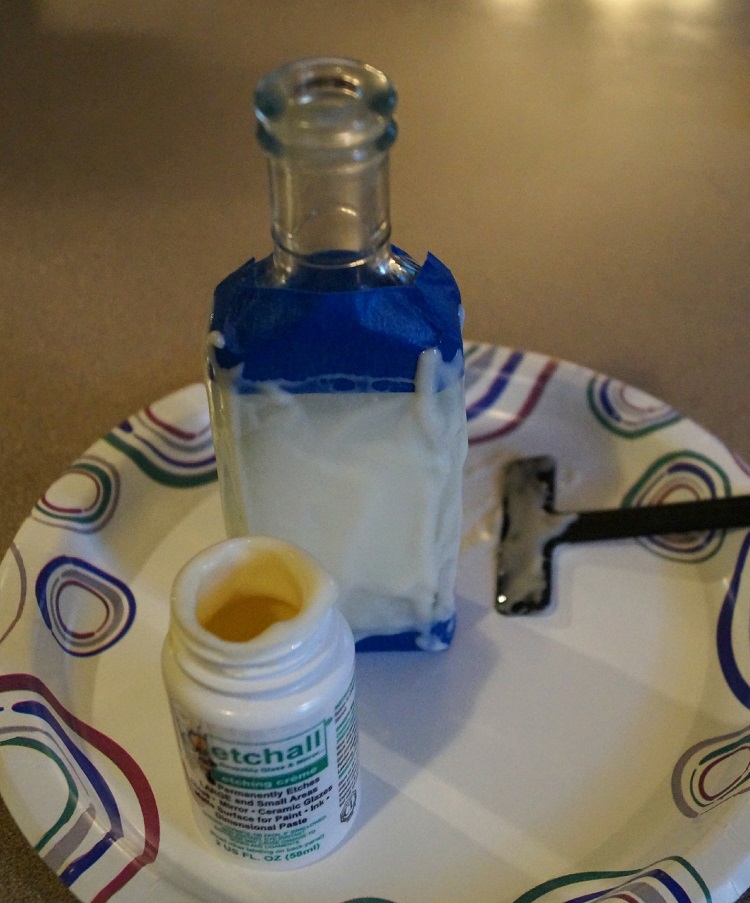
  2. Spray one side of the pinecones with white spray paint.
  3. Glue Moss onto Smoothfoam Wreath.   (leave the outside of the wreath bare)
  4. Hot Glue and wire larger pinecones onto the wreath first.
  5. Fill in the Wreath with the smaller pinecones.
  6. Tie Ribbon around the outside of the wreath.
  7. Add raffia bow.

*Disclaimer:  This post uses ads and affiliate links.  If you choose to make a purchase using one of the links, I receive a small commission (at no additional cost to you) that helps offset the costs of maintaining this blog.  Thanks for your support!

This project was created for and sponsored by Smoothfoam.

Try Amazon Prime 30-Day Free Trial

Candy Corn Halloween Treat Bags

Personalized Halloween Bags 9602

Give the kids an extra special treat this year with their very own personalized Trick or Treat Bag.

Halloween Greeting in black iron-on letters and their names on the back using orange

iron-on letters from Joy.

No more fighting over whose bag is whose.

These cute Candy Corn Bags came from Canvas Corps Brands.

Just iron on your Joy letters to each bag and send the kids out there to fill ’em up!

back of bags 9623


Etching for Fall

I picked up this very old bottle at a yard sale…

The story with this bottle is that the guy bought a collection of old medicine bottles from the

early 1900’s that came from the old Bartonville State Mental Hospital.

If your not from around here, rumor is, the old State Hospital is haunted.

I believe the show “Ghost Hunters” did an episode there.

So… that and the fact that it was only $2.00 had me intrigued.

The old bottle was in rough shape.

When I tried removing the cork, it pretty much disintegrated on the spot.

tape bottle and etchall creme 9950 Etched Bottle 9970

To breath new life into the old bottle… 

I masked the top and the bottom of the bottle with removable painters tape and added

a thick coat of etchall Etching Creme*.  (*affiliate link)

After waiting 15 minutes, I removed the excess etching crème and put the excess back

in the container.  I rinsed the bottle with warm water and let dry.

(make sure to read the instructions on the bottle of etching crème.)

To give the bottle a little Fall color…

I used a StazOn Ink Pad, Orange Zest* and rubbed the ink over the bottle.

The ink only adheres to the etched area.

To finish the look, I added a rub-on decoration to the front of the bottle with

a little raffia and key around the neck.

A new look for a very old bottle.

This project was created for and sponsored by Etchall®.

Disclaimer:  This blog uses ads and affiliate links.  If you choose to make a purchase using one of the links, I receive a small commission (at no additional cost to you) that helps offset the costs of maintaining this blog.  Thanks for your support!

Join Amazon Kindle Unlimited 30-Day Free Trial

Welcome Trick or Treaters

Welcome Trick or Treaters 9833

When it comes to Halloween Decorating, I’m not one to go all out.

Usually a couple of jack-o-lanterns and that’s it.  (I’m pretty low-key)

How do you Welcome Trick or Treaters?

I remember the year my oldest decided that he was too old for trick or treating…

He dressed up in costume… sat in the chair on the porch with a big bowl of candy to pass out.

He sat very, very still.

All the kids thought he was a decoration.

When they’d start to reach and grab the candy he’d scare them.

As I was walking down our street from taking my daughter Trick or Treating that night,

we were warned about the house on the end of the street.

I think that might of been his favorite Halloween.

black craft frame

Deflecto Craft Frame, Black Border, 8.5 x 11 Inches (69775CR)

My “Welcome Trick or Treaters” sign was made using a large frame from Deflecto Craft Solutions

and computer graphics.

The bat and pumpkin chipboard was old K & Company embellishments.

deflecto logo

"This is a sponsored post. As a member of the Deflecto Design Team I have been 
provided product in exchange for my creative ideas, views and opinions."

My Friend the Ghost

Happy Halloween Mr. Boo 9065

Meet Mr. Boo, my newest Halloween Decoration.

I had all Mr. Boo’s parts finished when my Grandson showed up the other day.

I thought I’d let him help me decide what face Mr. Boo should end up with.

(he likes stuff like that)

To him it was like a game of Mr. Potato Head.  (actually… we all had fun with it)

The Many Faces of Mr. Boo 2

Angry?  Surprised?  Confused?  Happy?

So many looks for one little ghost.

And… before you say it, yes, he does look a little like a Pac Man Ghost.

Smoothfoam Ghost Parts 9045

To Make your own Mr. Boo you’ll need:          (*affiliate link)

Directions:

  1. Trace and cut a ghost shape on the Smoothfoam Sheet using the Hot Wire Foam Cutter*or cutting knife.
  2. Cut the 2″ ball in half to use for the eyeballs.
  3. Paint the ghost shape and the eyeballs with white acrylic paint.
  4. Mix the black and white paint together to create a light grey paint.  Paint around the ghost shape to create a shadow.
  5. Glue buttons on the top of the eyeballs.
  6. Glue eyeballs onto ghost.
  7. Paint eyebrows and mouth using black acrylic paint or cut pieces out of black cardstock and glue onto ghost.
  8. I added magnet to the back of my ghost so it will stick to my metal front door.

The Many Faces of Mr. Boo

The Many Faces of Mr. Boo

This project was created for and sponsored by Smoothfoam.

Disclaimer:  This blog uses ads and affiliate links.  If you choose to make a purchase using one of the links, I receive a small commission (at no additional cost to you) that helps offset the costs of maintaining this blog.  Thanks for your support!

Join Amazon Kindle Unlimited 30-Day Free Trial

Making a Playhouse Banner with oly*fun

Making a Playhouse Banner with Oly Fun 9634
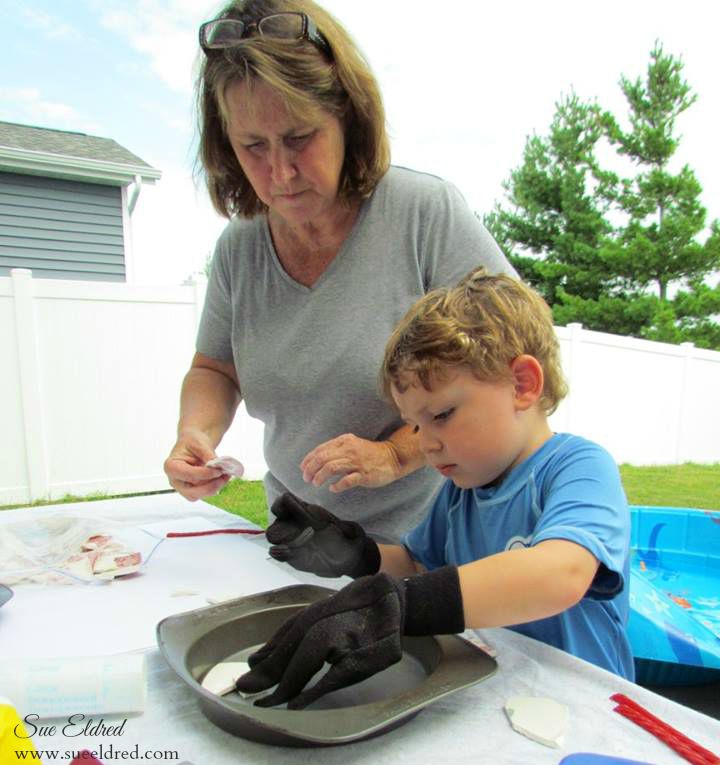
My grandson Nicholas is celebrating his 5th birthday in just a few days.  (but who’s counting?)

He’s having two parties this Saturday.  One for the kids and the other for family.

Such a lucky little guy.  (Born on his Daddy’s birthday.)

Since the family party is at his house, I had an idea to make a bright colorful banner to decorate

the new playhouse.

I had recently received a selection of oly*fun to work with and thought it would be perfect to use.

It was super easy to put together.

Playhouse 9651

What exactly IS oly*fun? 

oly*fun is a specially engineered material that features some of the best things about fabrics AND

papers.  Easy to cut or die-cut and it will not fray.  It is great for outdoors

Supplies 9625

 Here’s what I used:

Supplies 9631

Directions:

  1. Stencil the check pattern using the black acrylic paint on the orange oly*fun.
  2. Create a banner pattern on cardstock.
  3. Cut out the banner pattern and trace onto the stenciled oly*fun.
  4. Trace and cut several banners out of the black and green oly*fun.
  5. Cut strips and circles to decorate the banners.  Glue onto banner with Fabri Tac Glue.
  6. Fold top of the banner and staple onto the piece of twine.
  7. Tie the banner onto the top of the playhouse and watch the kids play.

Playhouse 9644

A Special Thanks to Fairfield World for generously providing the oly*fun for this project.


Creating a Garden Stepping Stone

Creating a Garden Stepping Stone 08274

Every one in my family thinks of me when they see Red Toile dishes.

It’s my thing.  (one can never have too many right?)

So… when my daughter saw a set of Red Toile dishes on clearance for $25 at her local thrift store

she immediately called me to see if I wanted them.   (um, yes!)

While packing the car for their visit home, my son in law picked up the box to rearrange the car

and the bottom fell out.  Most of the dishes survived.  Five of the large plates did not.

Broken China 08190

Deciding to turn lemons into Lemonade…

I kept the broken plates to make a few garden stones.

Nick and I making Garden Stones 2

I enlisted the help of my little buddy.  He was eager to lend a hand.  (with gloves of course)

Laying out the pieces in the pan 8187

Creating a Garden Stepping Stone:

  • Cover the sides and bottom of an old cake pan with Petroleum Jelly for easy removal.
  • Arrange the pieces of the broke china pattern side down in the bottom of the pan.  Make sure to use the flattest pieces.
  • Add glass stones in between the pieces for added color and interest.

Smoothing out the cement 8199

  • Mix a quick setting cement according to the directions on the package.
  • Fill pan with cement approx. an 1″ thick.
  • Shake pan a little to fill in the gaps and smooth.
  • Allow a couple hours for the stones to set.
  • Remove stepping stones from the pans and clean excess cement from the top of the stones with a stiff wire brush and water.
  • Allow a few days for the cement to cure before sitting outside in your garden.

close up of stone 8267

*Disclaimer:  This blog uses ads and affiliate links.  If you choose to make a purchase using one of the links, I receive a small commission (at no additional cost to you) that helps offset the costs of maintaining this blog.  Thanks for your support.

my flowers 8329

Any content on this website is created for inspiration purposed only.  Creating with my suggested methods, products used, and tools is under your own risk.


Try Amazon Prime 30-Day Free Trial

Etched Family Frame

Etched Family Frame 09191

Whenever I get a chance…

Whenever they’re all home together…

I try to get a family picture.

It only seems to happen a few times per year.

When we’re all together, there’s so much excitement, talking and laughter that I  forget.

Like this summer, after swimming and naps….

I set up the tri-pod, gathered the kids and set up the self timer.

(it’s always good for a few laughs)  All 18 eyes were open,

all those who were running away were captured and everyone was looking.

Phew… not an easy task.  But always worth it in the end.

It was starting to get dark, so the picture’s not as clear as I’d like it.

I decided to print it in black and white and put it in a simple black frame.

Family close up 09196

To capture the sentiment of the picture I etched the word “family” on the glass.

Etched Frame Supplies 08943

Etched Family Frame Products Used:               (*affiliate links)

Directions:

  1. Remove glass from frame.  Clean glass to remove all dirt, fingerprints and oil.  Dry with a coffee filter, paper towel, or lint-free cloth.
  2. Apply “Family” stencil to glass.  Burnish the edges of the stencil.  You want to make sure no edges are coming up.
  3. Mask around the stencil with removable painters tape for extra surface protection.
  4. Apply a heavy coat of etchall® etching crème to the masked area of the stencil.
  5. Leave etching crème on design for 15 minutes.  After etching time has elapsed, use the squeegee to return the crème back into the original container for later re-use.
  6. Rinse etched surface with hot water to remove any remaining crème. Remember to keep crème away from porcelain sinks or ceramic tiles.
  7. To make the etched letters stand out more, apply picket fence distress paint over the letters.  Wipe surrounding area of the glass clean.

Poof and he's gone

and for your viewing pleasure…

Shop Your Fav Brands at Scrapbook.com

*Disclaimer:  This post uses ads and affiliate links.  If you choose to make a purchase using one of the links, I receive a small commission (at no additional cost to you) that helps offset the costs of maintaining this blog.  Thanks for your support!

Try Amazon Prime 30-Day Free Trial

Preserving Summer Memories

Summer Layout 9108

I’m holding on to Summer as long as I can.

This summer Nicholas learned how to swim the entire length of the pool without the aid

of a floatie and he learned how to float on his back.

Warren learned how to jump off the side of the pool.

Pretty impressive when you consider they’re only 4 and 1 1/2.

Nicholas loves the water, we call him a polar bear because it doesn’t matter how

cold the water is.

Yesterday… we had our last pool party of the season.  Thanks to a little 95º heat wave.

I’m going to miss summer.

My Summer Layout uses:

  • Simple Stories Collections: Summer Vibes and Freedom
  • Bo Bunny’s Boardwalk

Join Amazon Kindle Unlimited 30-Day Free Trial

Disclaimer:  This blog uses ads and affiliate links.  If you choose to make a purchase using one of the links, I receive a small commission (at no additional cost to you) that helps offset the costs of maintaining this blog.  Thanks for your support!

How to Etch a Mason Jar…

I love the look of daisies in old blue canning jars.  It just says summertime.

It’s simple, beautiful and it makes me happy.

I recently got the opportunity to work with a new product, etching crème from Etchall®.

While looking around for something to etch, I noticed the daisies sitting on the table.

Hmmm…Wouldn’t that look great with a etched flower and a greeting?

It’s a super simple project.  (just how I like it)

Here’s what you’ll need:                                   (*affiliate link)

Shop Your Fav Brands at Scrapbook.com

Directions:

  1. Clean jar to remove all dirt, fingerprints and oil.  Dry with a coffee filter, paper towel, or lint-free cloth.
  2. Apply Stencils to jar.  Burnish the edges of the stencil.  You’ll want to make sure no edges are coming up.
  3. Mask around the stencil with removable painters tape for extra surface protection.
  4. Apply a heavy coat of etchall® etching crème to the masked area of the stencil.
  5. Leave etching crème on design for 15 minutes.  After etching time has elapsed, use the squeegee to return the crème back into the original container for later re-use.
  6. Rinse etched surface with hot water to remove any remaining crème. Remember to keep crème away from porcelain sinks or ceramic tiles.

Mason Jar with Stencils 8839Mason Jar with Stencils and Masks 08841Mason Jar with Etching Creme 8842

             Step #2                                        Step #3                                      Step #4

The etched flower looks subtle against the water in the blue jar.   

“This is a sponsored post.  As a member of the Etchall Design Team I have been provided product and compensation in exchange for my creative ideas.  The views and opinions are my own.”

Join Amazon Kindle Unlimited 30-Day Free Trial

Disclosure:  This blog uses ads and affiliate links.  If you choose to make a purchase using one of the links, I receive a small commission (at no additional cost to you) that helps offset the costs of maintaining this blog.  Thanks for your support!


Don’t Miss a Thing…Make Sure to Follow me.