Cardmaking with Vinyl

Happy World Cardmaking Day!

To celebrate World Cardmaking Day I thought I’d share a few cards made with

StyleTechCraft adhesive vinyl.

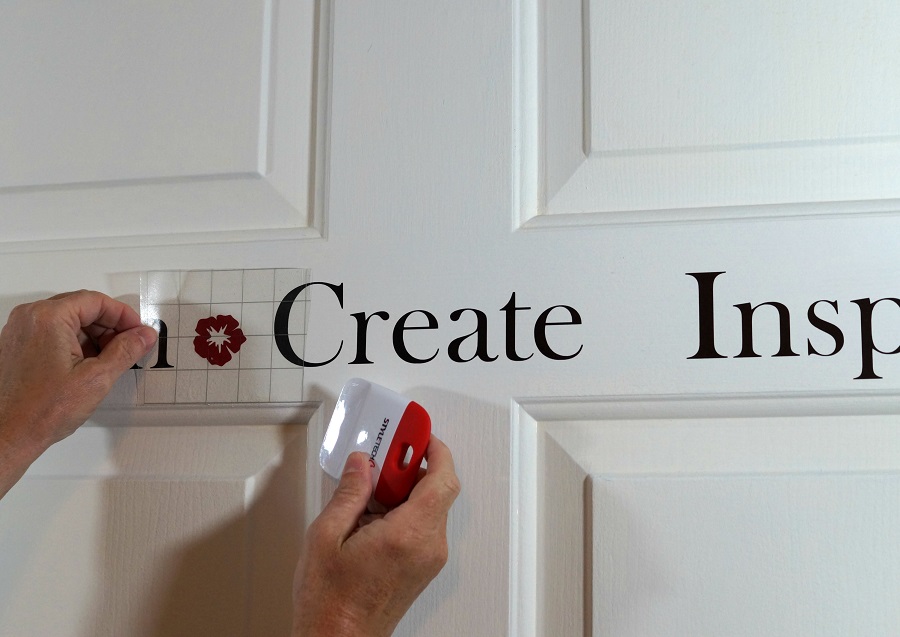
I created this card for my Grandson Nick’s 9th birthday last weekend.

He was very impressed.  (it could have just been the money included in the card)

Using StyleTechCrafts Ultra Metallic Vinyl* and a Silhouette Cameo Electronic Die Cutting

Machine* it was easy to create a card using basic fonts included with the machine.

*Disclosure:  This blog uses affiliate links.  If you choose to make a purchase using one of the links, I receive a small commission (at no additional cost to you) that helps offset the costs of maintaining this blog.  Thanks for your support!

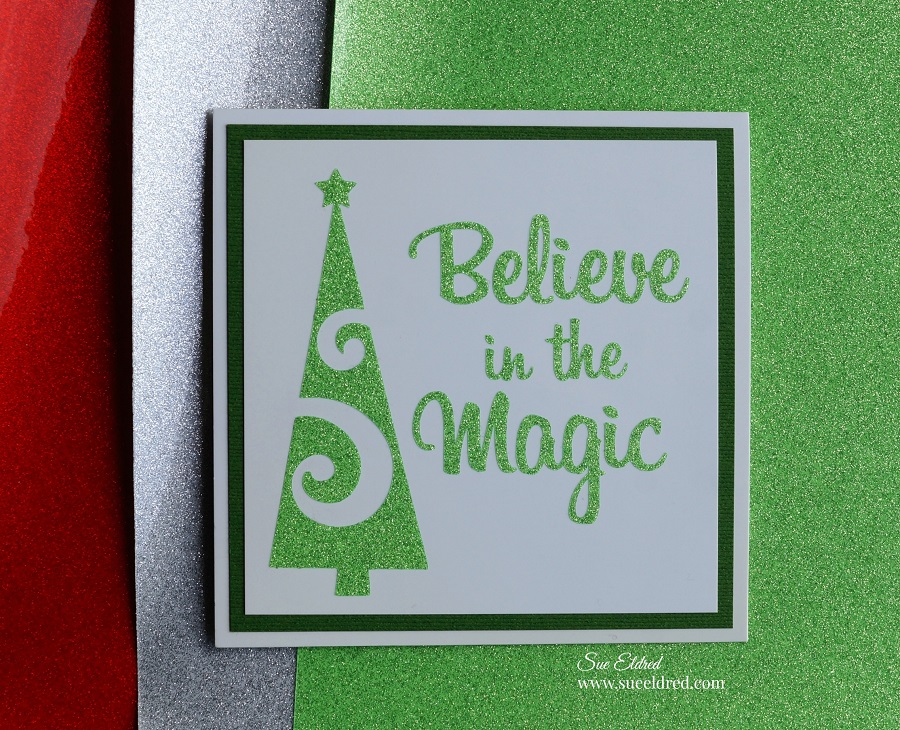
And…if you like the look of a Glittery Card at Christmas but hate the mess it leaves.

You can create simple Holiday cards using StyleTechCrafts Transparent Glitter Vinyl* 

and you won’t have glitter hanging around your studio for months and months.

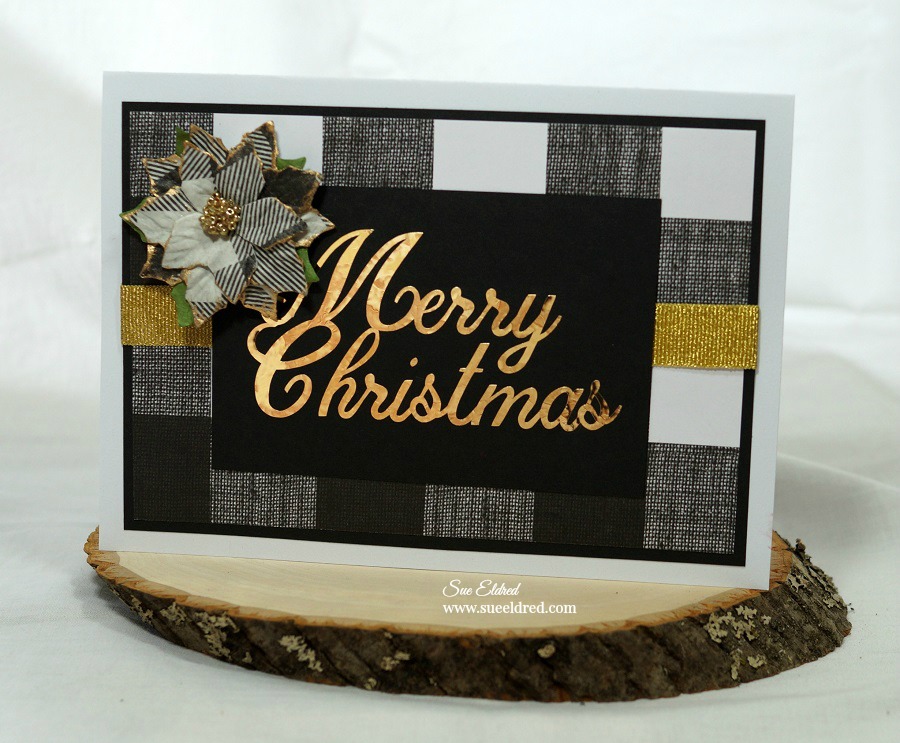
I love the look of the Chrome Vinyl on this simple Christmas Card.  

It looks likes it’s embossed.  (but it’s not!)

This month the StyleTechCraft Design Team was asked to post about their favorite vinyl.

That’s kind of like asking us to pick our favorite child.

It all depends on what you’re doing and which one you need.  (kids and vinyl)

 Styletech Craft products brought to you by ATSM Craft

“This is a sponsored post.  As a member of the StyleTechCraft Design Team I have been provided compensation and product in exchange for my creative ideas.  The views and opinions are my own.

Faux Barn Wood Pumpkin

Add a little Joy to your Fall Home Décor with this quick and easy Fall Centerpiece.

I wanted to make something new to decorate my mantel for fall this year.

So…I made a quick (or not so quick) trip to my local Hobby Lobby.

While there, I found this unfinished wood pumpkin and a fall floral pick (among other things).

It went together really quick.   I had it painted and put together in no time.

To be honest, the project didn’t turn out exactly how I envisioned in my head,

I think it turned out better.  (my original thought was to paint it in soft muted fall colors)

The best part of the whole process was…

this simple wood painted pumpkin inspired my son to spend the next few hours arranging

and rearranging my mantels until he got them just perfect.  (and that makes me happy!)

Faux Barn Wood Pumpkin Supplies Needed:

Shop Your Fav Brands at Scrapbook.com

*Disclosure… This blog uses ads and affiliate links.  If you choose to make a purchase using one of the links, I receive a small commission (at no additional cost to you) that helps offset the costs of maintaining this blog.  Thanks for your support!

Create the look of old barn wood using a wood pumpkin cut-out and acyrlic paint.

Directions:

  • Paint the wood pumpkin with brown acrylic paint.  Make sure to get down into the grooves.
  • After the brown paint has dried paint the sections of the pumpkin with alternating colors.
  • Sand the pumpkin with a fine grit sandpaper* to distress and smooth the wood.

Glue the embroidered letters and floral pick onto the wood pumpkin with Beacon 3 in 1 Glue*.

Faux Barn Wood Pumpkin

  • Create a bow with sheer ribbon tied in the center with twine and glue onto the top of the pumpkin for the finishing touch.

A quick and easy Fall Centerpiece for my mantel.  

You can find a wide selection of Joy® embroidered iron-on letters 

and alphabet sheets in different sizes at your local craft stores.  

“This is a sponsored post.  As a member of the Joy® Design Team I have been provided product and compensation in exchange for my creative ideas.  The views and opinions are my own.

Pin Me

Barn Art

If you had a newly remodeled little red barn…

would you make Barn Art for its newly painted walls?

Our newly remodeled little red barn is finally done and it’s looking really good. 

(maybe even cute)

So…I decided to make it some art using my Silhouette Cameo Electronic Die Cutting

Machine* and luster vinyl from StyleTechCraft.  A simple little project and fun sign that’ll

adorn the barn walls along with the old personalized license plates that I found.

*Disclosure:  This blog uses affiliate links.  If you choose to make a purchase using one of the links, I receive a small commission (at no additional cost to you) that helps offset the costs of maintaining this blog.  Thanks for your support!

I will be posting the complete barn remodel in the next week or two.

Here’s a sneak peek until I do.

Don’t you just love this old weathervane?

It had been sitting in the barn for years just waiting to be polished up good as new.

“This is a sponsored post.  As a member of the StyleTechCraft Design Team I have been provided product and compensation in exchange for my creative ideas.  The views and opinions are my own.

Shop Your Fav Brands at Scrapbook.com

Happy National S’mores Day

Did you know today was National S’mores Day?

This is the last week-end before school starts, sounds like a perfect way to spend a week-end.

So grab your S’mores caddy and enjoy.

You can find Deflecto’s Caddy Organizer* on Amazon.

*Disclosure… “This is a sponsored post.  As a member of the Deflecto Design Team I have been provided product in exchange for my creative ideas.  The views and opinions are my own.”

This blog uses affiliate links.  If you choose to make a purchase using one of the links, I receive a small commission (at no additional cost to you) that helps offset the costs of maintaining this blog.  Thanks for your support!

First Day Back to School Signs

Watch out Kindergarten here I come!

The first day of school is a big deal.  Especially when it’s your first day of Kindergarten.

My grandson is going into Kindergarten this year and will be riding the bus with his big brother.

It’s a really big deal.

So… I decided to make him something  special.

Using my Silhouette Cameo Electronic Die Cutting Machine* and a variety of fun colors of

adhesive gloss craft vinyl from StyleTechCraft…I made a cute two-sided sign for them

(or Mom) to use for those First Day of School pictures.

StyleTechCraft has a large selection of adhesive vinyl colors to choose from.

*Disclosure:  This blog uses affiliate links.  If you choose to make a purchase using one of the links, I receive a small commission (at no additional cost to you) that helps offset the costs of maintaining this blog.  Thanks for your support!

On the second side of the sign I made a few adjustments to my Silhouette Back to School

SVG cut file and added lines instead of dots.  (too many dots for me)

Using a chalk marker or chalk you can reuse the sign for many years to come.

FYI…The base of the sign is a wood cut out from Adornit which I painted using DecoArt Chalkboard Paint*.

“This is a sponsored post.  As a member of the StyleTechCraft Design Team I have been provided product and compensation in exchange for my creative ideas.  The views and opinions are my own.

Shop Your Fav Brands at Scrapbook.com

Nick’s New Swim Team Jacket

Nick joined the swim team this summer and I couldn’t be more proud of him.

I got to watch him at a few of the swim meets and was so impressed on his abilities.

He’s always loved being in water and has really become quite the swimmer.

I’m not sure I’d make it across the width of the pool let alone the length.

He even swims the 100 meter race.  (4 lengths of the pool for us non-swimmers)

Not bad for an 8 year old.

He’s so proud of his swim gear.  (Isn’t he handsome?)

But…his new Super Cool Swim Team Jacket didn’t come with the option for personalization.

Joy® Embroidered Iron-On Monogram letters to the rescue.

For his Swim Team Jacket we used:

  • One Super Cool New Swim Team Jacket

  • Joy® Baby Monogram Iron On Embroidered Letters

  • Iron and pressing cloth

Directions:

  1. Check Garment care label before choosing which setting to set your iron.

  2. Remove letters from sheet.  Position letters with shiny side down on jacket.

  3. Cover letters with fine cloth.  With firm pressure iron cloth over the letters for 25 seconds.

  4. Turn jacket inside out and iron the back of the letters for 25 seconds.

  5. Allow to cool for 1 minute before handling.

Joy® iron-on embroidered letters and appliqués can be found at your local craft stores!

“This is a sponsored post.  As a member of the Joy® Design Team I have been provided product and compensation in exchange for my creative ideas.  The views and opinions are my own.

Shop Your Fav Brands at Scrapbook.com

*Disclosure:  This blog uses ads and affiliate links.  If you choose to make a purchase using one of the links, I receive a small commission (at no additional cost to you) that helps offset the costs of maintaining this blog.  Thanks for your support!

Crafting with Kids…all about bugs

BUZZIN’ BUGS

The summer crafting adventures continue with Nick and Warren and the July Orange Art Box.

This month’s box is all about Bugs and I do believe it was Warren’s favorite box.

The kit came with supplies to make a bug jar, cute little felt bugs, bug stencils, stickers,

paper to make a bug book, plastic bugs, markers and several other fun crafty supplies.

Check out the boy’s video and the July Orange Art Box.  

(I’m starting to wonder if I should include their bloopers.  Never a dull moment.)

The Orange Art Box is a subscription art box for kids.

*Disclosure:  “This is a sponsored post.  I have been provided product in exchange for my creative ideas.  The views and opinions are my own.”  

Dream Create Inspire Wall Decor

Dream Create Inspire Wall Décor

I have been working diligently for the last couple of months on my new craft room.

Moving, purging, organizing and very slowly decorating.  (so much stuff!)

I’m almost ready for a “craft room reveal” but not quite yet.

This past week-end I decided to add a little inspiration to my freshly painted closet doors.

I like the look of inspirational quotes on walls and decided to create one of my own.

With the help of my Silhouette Cameo Wireless Cutting Machine* and

Matte Removable Adhesive Vinyl* from Styletechcraft the project was real easy to create.

(getting a good picture of the final project not so easy)

*Disclosure:  This blog uses ads and affiliate links.  If you choose to make a purchase using one of the links, I receive a small commission (at no additional cost to you) that helps offset the costs of maintaining this blog.  Thanks for your support!

  • I measured the space on the door where I wanted the words to go and decided where the best spacing would be for all three words.
  • I cut the Gridded Vinyl Transfer Tape* to fit inside the space.
  • I used the bottom line of the grid and line on the door inset to line up my words.
  • Once you place your word onto your surface, smooth over word with the vinyl tool.

  • I found it easier to place the words Dream and Inspire first and then center the word Create in between the two.

  • I cut two small flowers using dark red removeable vinyl and placed them in between the words.

Did you know that Matte Removable Vinyl will remove cleanly for up to two years?

This vinyl  film is great for decorating a kid’s room, a classroom or just about anywhere

you just  need a temporary graphic.

“This is a sponsored post.  As a member of the StyleTechCraft Design Team I have been provided product and compensation in exchange for my creative ideas.  The views and opinions are my own.

You can now find the full line of StyletechCraft online at ATSM.

Shop Your Fav Brands at Scrapbook.com

Creating a Summertime Essentials Bag

 With Summer and Vacation time here…

it’s a good idea to make a Safe Travels Essentials Bag to pack in the car.

There are so many things to remember when taking a vacation.

So…whenever we take a road trip I like to pack a few essentials to have handy.

When you have kids you never know what can happen.

For my Safe Travels Bag I used:

  1. If you use a fabric bag… cover with a soft clean cloth and iron on cotton settings for 30 seconds. Turn bag inside out and iron for an additional 30 seconds.
  2. Because I used a leather bag… I glued the letters onto the bag using a craft glue.

There are so many items that you might need to have on hand this summer.

These are just a few:

  • band-aids or first aid kit
  • sunscreen
  • anti itch spray
  • bug spray
  • rain poncho
  • scissors
  • small sewing kit
  • tweezers
  • toilet paper?


“This is a sponsored post.  As a member of the Joy® Design Team I have been provided product and compensation in exchange for my creative ideas.  The views and opinions are my own.

Look for Joy® iron-on embroidered alphabet letter sheets at your local craft store.

Shop Your Fav Brands at Scrapbook.com

*Disclosure:  This blog uses ads and affiliate links.  If you choose to make a purchase using one of the links, I receive a small commission (at no additional cost to you) that helps offset the costs of maintaining this blog.  Thanks for your support!

Simple Summer Vase

Create a Simple Summer Vase using Transparent Adhesive Vinyl from StyleTechCraft.

Transparent vinyl is great when you just want to add a subtle touch of color.

It’s great for using on windows, glassware and just about anywhere else you want a unique look.

To create my Simple Vase I used:       (*affiliate links)

Directions:

  1. Cut several flower shapes using the Silhouette Cameo* and the Sky-Blue Transparent Vinyl.  Don’t have a electronic die cutter?  The transparent vinyl can be cut using various metal dies.
  2. Cut leaves out of the teal vinyl.
  3. Using the weeding tool, I carefully removed the negative spaces in and around the flowers and leaves.
  4. Place a piece of Vinyl Transfer Tape* over the flower image.  Apply transfer tape onto the cylinder vase and rub over the vinyl using a vinyl scraper tool to eliminate bubbles.
  5. Remove transfer tape.
  6. Repeat with the leaves.

Allow vinyl to cure for several days.  (Hand washing is recommended.)

I added a piece of white paper inside the vase so you can see the pattern better.

It’s hard to see in this picture the variation between the sky blue and teal vinyl.

“This is a sponsored post.  As a member of the StyleTechCraft Design Team I have been provided product and compensation in exchange for my creative ideas.  The views and opinions are my own.

You can now find the full line of StyletechCraft online at ATSM.