Spring Care Basket

With so many people stuck at home, share a little love and kindness with a Spring Care Basket.

Hang the basket on the front door of an older relative or neighbor to brighten their day.

I created the care basket with extra essentials and re-purposed items I already had at home.

Here’s what I used to create the Spring Care Basket:

*Disclosure:  This blog uses affiliate links.  If you choose to make a purchase using one of the links, I receive a small commission (at no additional cost to you) that helps offset the costs of maintaining this blog.  Thanks for your support!

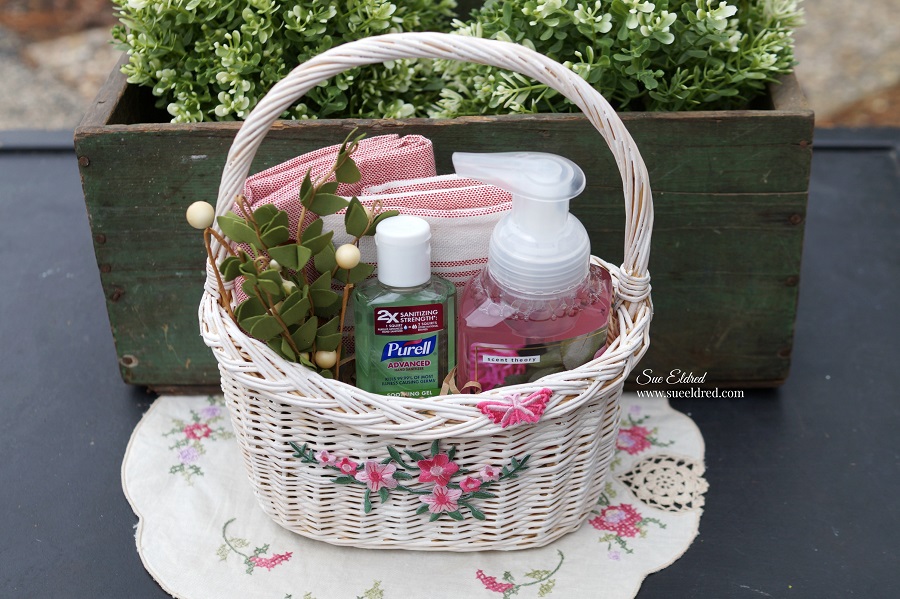
I refreshed the look of the basket with a new coat of paint using a white color stain.

I glued the floral applique to the front of the basket with craft glue.

After adding a little paper shred to the bottom of the basket, I filled it with useful essential items.

A little chocolate might be a nice touch too.  (if you’re willing to share)

“This is a sponsored post.  As a member of the Joy® Design Team I have been provided product and compensation in exchange for my creative ideas.  The views and opinions are my own.

Lucky Number 3

Lucky Number 3

When you’re as cute as this kid…

When you’re the third brother, the third grandkid, the third grandson and…

it’s  your birthday and you’re turning three.  (it’s a really big deal)

You’re “Lucky Number 3”.

I decided to make him a special shirt for his birthday.

Making a special shirt for a special occasion is really easy when you have iron-on

embroidered letters from Joy.

Directions:

  1.  Set iron to cotton setting, approx. 350°, or follow garment care label.
  2. Remove letters from sheet.  Position letters with shiny side down onto the t-shirt.
  3. Cover letters with a fine cloth.  With firm pressure, iron cloth over the letters for 30 seconds.
  4. Turn t-shirt inside out and iron the back of the letters for 30 seconds.
  5. Allow to cool for 1 minute before handling.
  6. Turn shirt inside out when washing.

“This is a sponsored post.  As a member of the Joy® Design Team I have been provided product and compensation in exchange for my creative ideas.  The views and opinions are my own.

*Disclosure:  This blog uses affiliate links.  If you choose to make a purchase using one of the links, I receive a small commission (at no additional cost to you) that helps offset the costs of maintaining this blog.  Thanks for your support!

Random Letter Art

You don’t need to be perfect, you are awesome.

I’ve been on the Creating with Joy Design Team for the past 5 years.

During that time I’ve created all kinds of projects using a large variety of Embroidered Iron-On

letters.  And because I occasionally change my mind of what I want my projects to say,

I have a bag of random letters.

For this month’s Design Team project I decided to use from that bag of random letters.

I gathered my letters together to see what I could spell.

Doesn’t it look like a colorful bowl of Alphabet Soup?

Supplies Needed:

To make a Framed Word Art…

  • Measure and cut a 8″ x 10″ piece of Kraft cardstock* to fit inside frame.
  • Cut a 5 1/2″ x 7 1/2″ piece of white heavyweight cardstock.
  • Arrange letters on white cardstock to play with the random letter placement.
  • Use a piece of removable painters tape to keep the letters in line.  (just because it’s not perfect doesn’t mean it can’t be straight.)
  • Apply fabri-tac glue* to the back of the letters before adhering them to the paper.  (I used my finger tip to rub the glue to the letters.)
  • Cut a piece of black cardstock 5 3/4″ x 7 3/4″, adhere finished letter art onto the black cardstock.  Adhere white and black layers onto Kraft cardstock and place inside frame.
  • Optional:  Glass in or Out?  I left the glass out of the frame for photography purposed.  I added the glass back in after I was finished taking the picture.

*Disclosure:  This blog uses affiliate links.  If you choose to make a purchase using one of the links, I receive a small commission (at no additional cost to you) that helps offset the costs of maintaining this blog.  Thanks for your support!

A little matting and a frame and I have a fun inspirational piece of  Random Letter Art.

“This is a sponsored post.  As a member of the Joy® Design Team I have been provided product and compensation in exchange for my creative ideas.  The views and opinions are my own.

2020 I can see it now!

Twenty Twenty is “clearly” going to be a year of stupid puns and silly memes.

We might as well get used to it.

So, if you can’t beat them, you might as well join them.

Joy Iron-on Embroidered Letters are great for making creative and funny t-shirts,

they’re also great for making creative and funny signs.

Here’s what I used to make my 2020 Canvas:

*Disclosure:  This blog uses affiliate links.  If you choose to make a purchase using one of the links, I receive a small commission (at no additional cost to you) that helps offset the costs of maintaining this blog.  Thanks for your support!

Directions:

  • Paint the entire canvas with a generous amount of white acrylic paint.  While the white paint is still wet, softly blend the navy blue paint.

  • Once the canvas has dried.  Position the Jacobean Floral Stencil* onto the corner of the canvas and tape down the edges with removable painter’s tape to keep the stencil from moving.
  • Use a  stipple brush to lightly apply white acrylic paint inside open stencil areas.

  • The stenciling creates a nice subtle background.
  • Stencil all four corners of the canvas.

  • To keep the numbers and letters straight, use a piece of blue painters tape on the canvas.
  • Glue letters and numbers onto the canvas using Fabri Tac Adhesive.

  • To make it a little more “Punny”…I created glasses out of cardstock using my Silhouette Cameo Electronic Die Cutting Machine*.  To make the glasses more sturdy, I made three of each size and stacked and glued them together.
  •  Glue glasses and flower embellishments onto canvas.

You can find a wide selection of Joy® embroidered iron-on letters and alphabet sheets in different sizes at your local craft stores!

“This is a sponsored post.  As a member of the Joy® Design Team I have been provided product and compensation in exchange for my creative ideas.  The views and opinions are my own.

Plaid Tidings Embroidery Hoop Ornament

How to make a Plaid Tidings Embroidery Hoop Ornament

I guess you might say I’ve gone a little overboard on the Buffalo Plaid this year.

How can I help myself, I just love it all.

I got a little inspired by a Christmas ad I saw for clothes and decided to make this ornament.

It’s another quick and easy Holiday Ornament to make.

A perfect little gift for your Plaid Loving friends like me.

Supplies Needed:                 (*affiliate link)

Disclosure:  This blog uses affiliate links.  If you choose to make a purchase using one of the links, I receive a small commission (at no additional cost to you) that helps offset the costs of maintaining this blog.  Thanks for your support!

Directions:

  • Paint the embroidery hoop with black acrylic paint.
  • Cut a piece of flannel that is larger than the hoop.
  • Arrange the Joy® Baby Monogram Embroidered Iron On Letters shiny side down onto the flannel and inside the hoop to make sure they fit.
  • Set iron to cotton setting, approx. 350° or follow fabric care label.
  • Cover letters with a fine cloth.  With firm pressure iron cloth over the letters for 25 seconds.
  • Turn flannel over and iron the back of the letters for 25 seconds.
  • Allow 1 minute to cool before handling.

  • Insert the flannel into the embroidery hoop and tighten.
  • Trim the excess flannel from around the embroidery hoop.
  • Glue pine craft stem around the outside edge of the hoop.
  • Embellish the hoop with ribbon and jingle bell.
  • Add a piece of red twine to hang.

You can find a wide selection of Joy® embroidered iron-on letters and alphabet sheets in different sizes at your local craft stores!

“This is a sponsored post.  As a member of the Joy® Design Team I have been provided product and compensation in exchange for my creative ideas.  The views and opinions are my own.

Give the Gift of Amazon Prime*

Simple Country Christmas Vase

Simple Country Christmas Vase

Create a sweet Country Christmas Vase with a little help using Joy Iron On Embroidered Letters.

Supplies Used:

Shop Your Fav Brands at Scrapbook.com

*Disclosure… This blog uses ads and affiliate links.  If you choose to make a purchase using one of the links, I receive a small commission (at no additional cost to you) that helps offset the costs of maintaining this blog.  Thanks for your support!

Directions:

  1.  Spray the mason jar with a couple coats of ivory colored spray paint.

2.  After the paint has dried, lightly sand the jar to remove the paint off the letters.

3.   Drill a hole on the top of a small wood slice and paint the center with red acrylic paint.
4.  Glue the embroidered letters and wood star onto the wood slice with craft glue.
5.  Tie ribbon around the neck of the jar and add embellished wood slice.

You can find a wide selection of Joy® embroidered iron-on letters and alphabet sheets in different sizes at your local craft stores. 

“This is a sponsored post.  As a member of the Joy® Design Team I have been provided product and compensation in exchange for my creative ideas.  The views and opinions are my own.

Give the Gift of Amazon Prime*

Buffalo Plaid Potholders

Crisp air, falling leaves, and a big pot of soup to warm you up…

Just a few of the reasons I love Fall.

So while you’re warming things up…

Warm up your plain potholder and add a little personality with Joy Iron-On Embroidered letters.

Supplies needed:

  • Joy Iron-On Embroidered Letters
  • Cotton Potholders
  • Iron
  • Pressing Cloth

Directions:

  1. Remove letters from the sheet.
  2. Position letters shiny side down on potholder.
  3. Cover letters with a clean cloth.
  4. With firm pressure iron cloth over the letters for 30 seconds.
  5. Turn potholder over and iron the reverse side for an additional 30 seconds.
  6. Allow to cool 1 minute before using.

 You can find a wide selection of Joy® embroidered iron-on letters and alphabet sheets in different sizes at your local craft stores!

“This is a sponsored post.  As a member of the Joy® Design Team I have been provided product and compensation in exchange for my creative ideas.  The views and opinions are my own.

Shop Your Fav Brands at Scrapbook.com

*Disclosure:  This blog uses ads and affiliate links.  If you choose to make a purchase using one of the links, I receive a small commission (at no additional cost to you) that helps offset the costs of maintaining this blog.  Thanks for your support!

Faux Barn Wood Pumpkin

Add a little Joy to your Fall Home Décor with this quick and easy Fall Centerpiece.

I wanted to make something new to decorate my mantel for fall this year.

So…I made a quick (or not so quick) trip to my local Hobby Lobby.

While there, I found this unfinished wood pumpkin and a fall floral pick (among other things).

It went together really quick.   I had it painted and put together in no time.

To be honest, the project didn’t turn out exactly how I envisioned in my head,

I think it turned out better.  (my original thought was to paint it in soft muted fall colors)

The best part of the whole process was…

this simple wood painted pumpkin inspired my son to spend the next few hours arranging

and rearranging my mantels until he got them just perfect.  (and that makes me happy!)

Faux Barn Wood Pumpkin Supplies Needed:

Shop Your Fav Brands at Scrapbook.com

*Disclosure… This blog uses ads and affiliate links.  If you choose to make a purchase using one of the links, I receive a small commission (at no additional cost to you) that helps offset the costs of maintaining this blog.  Thanks for your support!

Create the look of old barn wood using a wood pumpkin cut-out and acyrlic paint.

Directions:

  • Paint the wood pumpkin with brown acrylic paint.  Make sure to get down into the grooves.
  • After the brown paint has dried paint the sections of the pumpkin with alternating colors.
  • Sand the pumpkin with a fine grit sandpaper* to distress and smooth the wood.

Glue the embroidered letters and floral pick onto the wood pumpkin with Beacon 3 in 1 Glue*.

Faux Barn Wood Pumpkin

  • Create a bow with sheer ribbon tied in the center with twine and glue onto the top of the pumpkin for the finishing touch.

A quick and easy Fall Centerpiece for my mantel.  

You can find a wide selection of Joy® embroidered iron-on letters 

and alphabet sheets in different sizes at your local craft stores.  

“This is a sponsored post.  As a member of the Joy® Design Team I have been provided product and compensation in exchange for my creative ideas.  The views and opinions are my own.

Pin Me

Nick’s New Swim Team Jacket

Nick joined the swim team this summer and I couldn’t be more proud of him.

I got to watch him at a few of the swim meets and was so impressed on his abilities.

He’s always loved being in water and has really become quite the swimmer.

I’m not sure I’d make it across the width of the pool let alone the length.

He even swims the 100 meter race.  (4 lengths of the pool for us non-swimmers)

Not bad for an 8 year old.

He’s so proud of his swim gear.  (Isn’t he handsome?)

But…his new Super Cool Swim Team Jacket didn’t come with the option for personalization.

Joy® Embroidered Iron-On Monogram letters to the rescue.

For his Swim Team Jacket we used:

  • One Super Cool New Swim Team Jacket

  • Joy® Baby Monogram Iron On Embroidered Letters

  • Iron and pressing cloth

Directions:

  1. Check Garment care label before choosing which setting to set your iron.

  2. Remove letters from sheet.  Position letters with shiny side down on jacket.

  3. Cover letters with fine cloth.  With firm pressure iron cloth over the letters for 25 seconds.

  4. Turn jacket inside out and iron the back of the letters for 25 seconds.

  5. Allow to cool for 1 minute before handling.

Joy® iron-on embroidered letters and appliqués can be found at your local craft stores!

“This is a sponsored post.  As a member of the Joy® Design Team I have been provided product and compensation in exchange for my creative ideas.  The views and opinions are my own.

Shop Your Fav Brands at Scrapbook.com

*Disclosure:  This blog uses ads and affiliate links.  If you choose to make a purchase using one of the links, I receive a small commission (at no additional cost to you) that helps offset the costs of maintaining this blog.  Thanks for your support!

Quick and Easy Golfer Gift

Monogram Golf Towel

Make something special for your favorite golfer using

Joy® embroidered iron-on monogram letters!

To make the Monogram Towel you will need:
  • Joy® Monogram Left Letter
  • Joy® Monogram Center Letter
  • Joy® Monogram Right Letter
  • Plain Golf Towel
  • Iron and pressing cloth

Instructions:
  1. Check care label of towel to check heat tolerance.
  2. Heat iron to cotton setting 300-350°.
  3. Position letters onto towel, heat seal side down, threads up.
  4. Carefully cover letters with a clean cloth.
  5. Using firm pressure, iron over the letters in a circular motion for 30 seconds.
  6. Turn towel over and iron the back for another 30 seconds.
  7. Let cool for a minute before handling.
Joy® iron-on embroidered letters and appliqués can be found at your local craft stores!

“This is a sponsored post.  As a member of the Joy® Design Team I have been provided product and compensation in exchange for my creative ideas.  The views and opinions are my own.

Shop Your Fav Brands at Scrapbook.com

*Disclosure:  This blog uses ads and affiliate links.  If you choose to make a purchase using one of the links, I receive a small commission (at no additional cost to you) that helps offset the costs of maintaining this blog.  Thanks for your support!