Art Play Paintables

The other day while I was procrastinating…

I decided to get out my Art Play Paintables and do a little water coloring.

I love these fun sheets from Adorn It call Art Play Paintables.

So many wonderful images to fill in.

Great for watercolors, color pencils and markers.

You know… I think I need to take more time to just play.

Happy Friday!

DIY Graduation Frame with Tassel

DIY Graduation Frame 5398

Some years I don’t have any Graduations to celebrate. 

This year there are three.  One from High School, Two from Junior High.  (not mine!)

I decided to make a Graduation Frame to use as one of the gifts.

After the ceremony the Graduate can take out the greeting and add a picture.

DIY Graduation Frame Collage

For my frame I used:                                                                                    (*affiliate link)

  1. To make the tassel:  Wrap the red twine around a piece of chipboard several times.  The size of the chipboard determines the length of the tassel.
  2. Cut a piece of twine to gather and tie tightly around the twine at the top of the wrapped chipboard.
  3. Cut open the bottom loops from the chipboard.
  4. Wrap thin gold wire around the top of the tassel to imitate the look of a gold band.
  5. Trim the bottom of the tassel to even the length.
  6. Create computer generated greeting and insert inside the frame.
  7. Ink white chipboard numbers gray using the ink applicator.  Stick on front of the frame.
  8. Make a small garland from small 1/2″ strips of paper adhered to a piece of red twine.
  9. Adhere the tassel to the back of the frame with a small piece of tape.  That way the Graduate can reposition the tassel if needed after adding photo.

FYI:  When my oldest graduated from High school his younger sister also graduated from Junior High.  Four years later when it was time for her to graduate High School he was graduating from College.

SO….for all you young people thinking of starting a family. 

Don’t space your kids 4 years apart.  (The magic number is three.)  Just saying!

“This is a sponsored post. As a member of the Deflecto Design Team I have been provided product in exchange for my creative ideas, views and opinions.”

Shop Your Fav Brands at Scrapbook.com

*Disclosure:  This post uses ads and affiliate links.  If you choose to make a purchase using one of the links, I receive a small commission (at no additional cost to you) that helps offset the costs of maintaining this blog.  Thanks for your support!

Block Stamping on Canvas with Smoothfoam

Both Canvas' 4913

I had this great idea to make stamps using Smoothfoam so that I could do sidewalk stamping with my

Grandsons.  After one messy (but fun) try, I decided it really wasn’t going to work the way I wanted.

So… I decided to use the stamps on a canvas instead.

(See Wednesday’s post:  The Good, the Bad and the Messy)

Handmade Smoothfoam Stamps 4837

I created the stamps using a Hotwire Foam Cutter.  You could also use a craft knife.

Because the original plan was to use them with the kids, I glued handles on the back.

I made flower shapes, leaves, squares and triangles.

Block Stamping Collage

Supplies Used:

  1. Prime canvas with acrylic paint.
  2. Sponge acrylic paint on the back of the Smoothfoam pre-cut square, stamp onto the canvas.  You may need to press the back of the canvas with your remaining hand to get crisper image.  Repeat three more times to create square background.
  3. Stamp flower and leaves.  Using a small Smoothfoam ball cut in half, stamp center of flower.
  4. Stencil words on Canvas.

Block Stamping on Canvas with Smoothfoam

Disclaimer:  This project was created for and sponsored by Smoothfoam.

Creating a Keepsake Memory Box with Decorative Trimmings

Sue Eldred's Keepsake Memory Box

I recently got a beautiful assortment of ribbons and trims from Decorative Trimmings to use

on a special project.  It was hard choosing which trims I wanted to use, because their selection

is wonderful.  I decided to Create a Keepsake Memory Box.

You know… for all those special little things that you want to keep and remember forever.

A perfect little box to fill with small gifts for Weddings, Mother’s Day, Bridal or Baby Showers.

Or maybe old love letters from your husband.   (Hmmm… I’d need a bigger box.)

Keepsake Box and Tag Close Up 4973

For my Keepsake Memory Box and Tag I used three of the trims.

  • 1/2″ Pink & White Mini Polar Puff
  • 3/4 Inch Pink Rose Tulle Trim
  • Chinese Braid White
  1. Paint a large papier mache box with white acrylic paint.
  2. Cover it with scrapbook paper.   (I purchased mine from Michael’s.)
  3. Glue the Decorative Trimmings using Beacon Fabri-Tac Permanent Adhesive* (affiliate link)
  4. Stamped greeting is from Serendipity Stamps.

Tea Cup and Tag 4969

Today’s post is part of a blog hop hosted by Decorative Trimmings.

Shop Handmade – The Wedding Store

Disclaimer:  This blog uses ads and affiliate links.  If you choose to make a purchase using one of the links, I receive a small commission (at no additional cost to you) that helps offset the costs of maintaining this blog.  Thanks for your support!

Grandma Merritt’s Cheesecake Recipe

Grandma Merritt's Cheesecake Recipe

There’s nothing like one of Grandma’s recipes to bring back fond childhood memories.

Large family dinners around a loud and crowded table (or two).

Crock Pot Roast, Mashed Potatoes, Gravy, Green Beans, Rolls and one of Grandma Merritt’s Deserts.

Mom would put the roast on before church and Grandma would bring the desert.

Soda Pop Cake, Cheesecake, Hobo Cake with Chocolate Fudge Icing (Yumm!) just to name a few.

With our large and ever expanding group of family and friends,

Grandma usually made a double batch of whatever desert she brought up.

And…us kids would still argue over who deserved the last piece.

Good Times, Good Times!   Makes my mouth water just thinking about it.

If you’re a Cheesecake Snob, you probably won’t enjoy this wonderfully, light fluffy desert.

But to us kids, it’s heavenly.

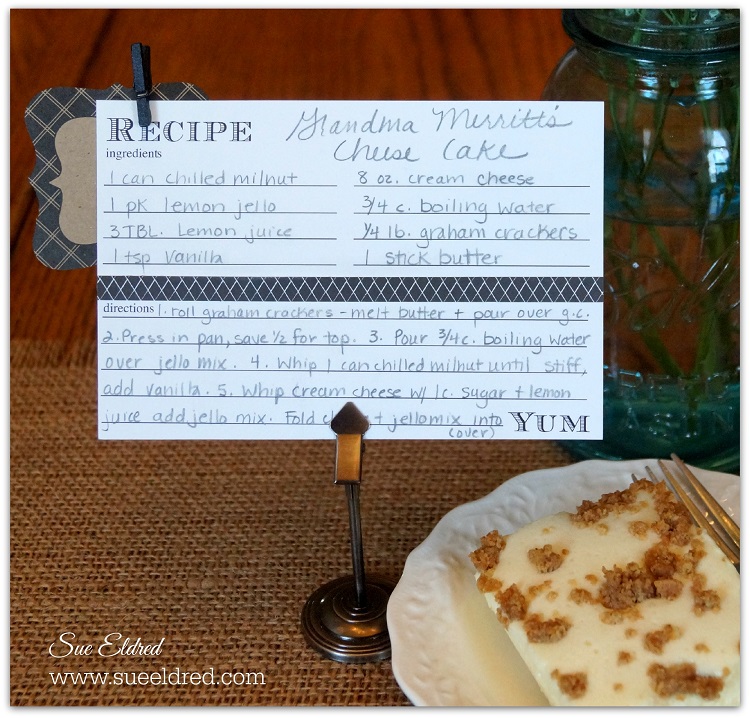
Grandma Merritt’s Cheesecake recipe has been around our family for probably 40 years.

I’m pretty sure she clipped it out of the newspaper somewhere down the line.  (she was a clipper)

Since today would of been her birthday, I thought it’d be a great day to share.

Here’s her recipe, I actually have two (one just slightly different)

Grandma Merritt’s Cheesecake:

  • 1 can chilled Milnut
  • 2 packages of Lemon Jello
  • 3 TBL Lemon Juice (optional)
  • 1 tsp. Vanilla
  • 1/4 lb. Graham Crackers
  • 1 package softened Cream Cheese 8 oz.
  • 1 Stick Oleo (butter or margarine)
  • 1 1/2 c. Boiling Water
  • 1 c. Sugar
  1. Roll graham crackers until fine.
  2. Melt oleo and pour over graham crackers, mix.  Press into pan.  Save 1/2 c. to put on top.
  3. Pour boiling water over Jello mix.
  4. Whip can of milnut until real stiff and add vanilla.
  5. Whip cream cheese and sugar together.  Add lemon juice and jello mix and blend.
  6. Fold cheese and jello mix into whipped cream.  Pour into pan.  Sprinkle top with reserved graham cracker mix.
  7. Chill overnight.

recipe card and standing clip 4505

FYI:  The recipe card and standing clip are both available from Canvas Corp Brands.

Disclaimer:  This project was created for and sponsored by Canvas Corp Brands.

How to Make a Garden Butterfly Sign

Welcome to My Garden Butterfly Sign 4758

How to make a Garden Butterfly Sign.

A fun technique using Black Sign Tags from Deflecto Craft Solutions.

According you my you tube account it’s been 4 years since I made my first video.

I guess it was finally time for my second one.  (let me know what you think)

“This is a sponsored post. As a member of the Deflecto Design Team I have been provided product in exchange for my creative ideas, views and opinions.”

Home Sweet Home Cookbook

Sue Eldred's Graphic 45's Home Sweet Home Cookbook with Deflecto Pouches 4737

There’s something about good old family recipes that’ll bring a smile to your face. 

Warm, Comforting, a little piece of Home.

So… When I saw the Home Sweet Home Collection from Graphic 45, I knew a cookbook was in order.

I paired the Home Sweet Home collection with the new 5″ x 7 1/4″ flexible pouches from

Deflecto Craft Solutions.  Using the pouches not only helps protect your recipes from stains and spills

but they also make it easy to swap recipes in and out.

Deflecto Flexible Pouches 4699

  • My cookbook album was put together by covering chip board with the scrapbook paper and distressing the edges with Vintage Photo Distress Ink.
  • I made the stickers dimensional by adding each one to chipboard and cutting them out.
  • The circle stickers that spell the word “recipes” were stuck on round buttons and then glued onto the book.
  • The pouches were punched and the book bound using the Cinch Binding Machine.

Graphic 45 Home Sweet Home Cookbook with Deflecto Pouches 4744

Products used:


  Product Ordering Information through Amazon*  (see disclosure policy)

“This is a sponsored post. As a member of the Deflecto Design Team I have been provided product in exchange for my creative ideas, views and opinions.”

More Eco Friendly Projects

Walnut hollow earth day hop

My project yesterday was part of a Blog Hop sponsored by Walnut Hollow and Kunin Group.

Our teams are sharing projects that pair both Kunin Group felt and Walnut Hollow wood products to create practical and beautiful home decor, organizing solutions, and entertaining items. You can make these projects all year long, not just for Earth Day. To see more inspiring projects, continue on the hop using the list below:

Walnut Hollow

Kunin Group Felt

Sue Eldred  (that’s ME!)

Beth Watson

Debra Quartermain

Sabrina Alery

Abby Davis

Jennifer Priest

Marilyn Gossett

Laura Kelly

Steph Ackerman

Laura Bray

walnut hollow earth widget

Eco Friendly Projects with Walnut Hollow and Kunin Felt

Eco Friendly Projects with Walnut Hollow and Kunin Felts

Today, I’ve teamed up with Walnut Hollow and Kunin Felt, both eco friendly companies,

with some fun projects for Spring.

For my projects I used Walnut Hollow’s:     (*affiliate links)

Earth Day Step Out Collage

Earth Day Projects Collage

Walnut Hollow Earth Day Project 04385

I added Eco-Friendly tableware consisting of Bio-degradable cutlery and Bamboo plates.

Did you know?

Walnut Hollow has always been a huge advocate of environmental sustainability within the art, craft and hobby industry. Walnut Hollow has a strong commitment to environmental initiatives by preserving natural resources through their raw material consumption practices, production processes and recycling activities as well as maintaining an active involvement in the community.

Kunin Felt is made from Eco-fi,® a high-quality fiber made from 100% post-consumer recycled and BPA-free plastic bottles.

Earth Day is April 22nd.  Let’s make a difference.

Disclaimer:  This blog uses ads and affiliate links.  If you choose to make a purchase using one of the links, I receive a small commission (at no additional cost to you) that helps offset the costs of maintaining this blog.  Thanks for your support!

Join Amazon Kindle Unlimited 30-Day Free Trial

Simply Beautiful Handmade Flower

Learn how to make a Simply Beautiful Handmade Flower in a few easy steps.

To make the flower you’ll need:      (*affiliate link)

Disclosure:  This blog uses affiliate links.  If you choose to make a purchase using one of the links, I receive a small commission (at no additional cost to you) that helps offset the costs of maintaining this blog.  Thanks for your support!

Directions:

  1. Punch 3 daisies from each one of the punches for a total of 12 punch outs.
  2. Using the end of a pencil or skewer, round each of the petals up.
  3. Turn the punched shaped over and press down into the center.
  4. Glue two of the largest flowers together slightly off centered.  Add the third flower.
  5. Continue adding and gluing the next size flower and glue on top.  Repeat with the third size.
  6. Pinch the smallest flowers up tight and stagger and glue onto the center of the flower.
  7. Spray the finished flower with Glimmer Mist until you get the desired shade of color.
  8. Once the flower is dry add a small adhesive pearl in the center of the flower.
  9. Create card using Captivating Squares shapes and layers misted with Glimmer Mist

*FTC Disclosure… “This is a sponsored post.  I have been provided product in exchange for my creative ideas.  The views and opinions are my own.”