How to make a Happy Haunts Pop Up Card

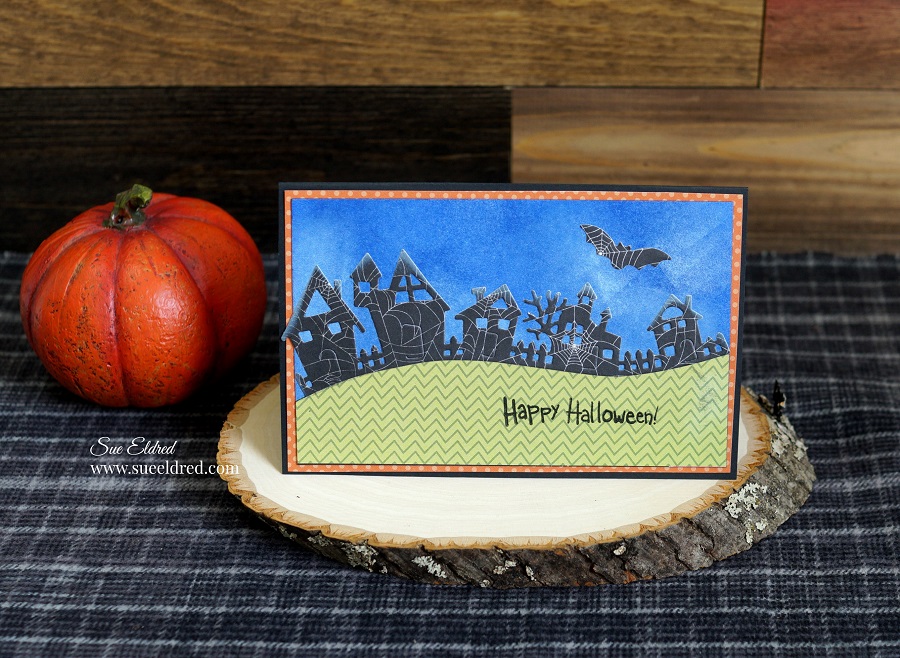
Happy Haunts Pop-Up Card

Add a little dimension to your Halloween season with this sweet and simple pop up card.

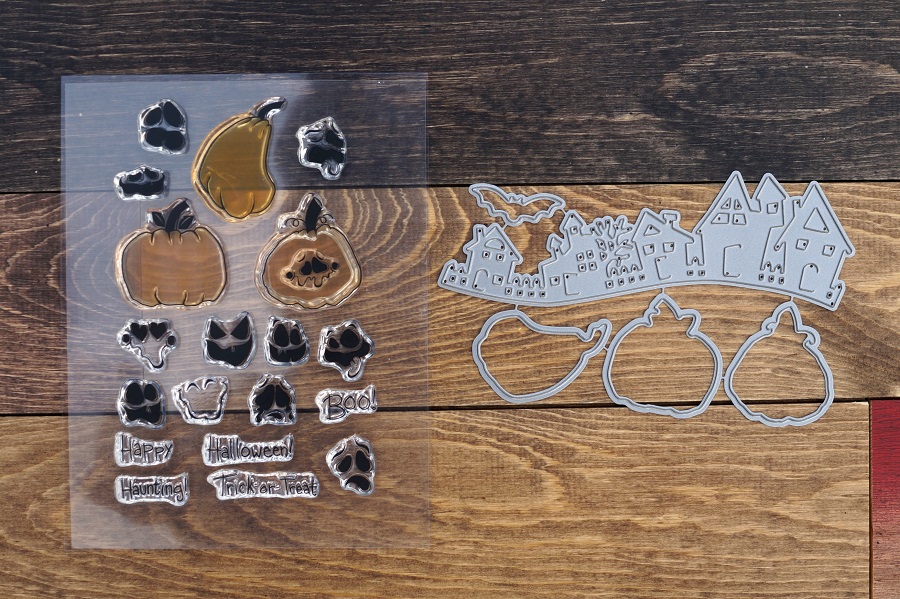
The Happy Haunts stamp and die set from Maker’s Movement.

The stamp set comes with three adorable pumpkin stamps and 12 spooky and sweet faces

to match any Halloween mood.  The die set comes with a whimsical Halloween neighborhood,

a cute little bat and three perfect pumpkin dies to cut out your stamped pumpkins.

A HALLOWEEN STAMP AND DIE SET THIS FUN DESERVES A PLAYFUL CARD. 

*Disclosure… “This is a sponsored post.  I have been provided product and compensation in exchange for my creative ideas.  The views and opinions are my own.”

Happy Haunts Pop-Up Supplies Used:

Shop Your Fav Brands at Scrapbook.com

*Disclosure… This blog uses ads and affiliate links.  If you choose to make a purchase using one of the links, I receive a small commission (at no additional cost to you) that helps offset the costs of maintaining this blog.  Thanks for your support!

How to make a Happy Haunts Pop Up Card:

  • First, pick out some fun patterned paper.  There are so many cute patterns available to choose from it really doesn’t matter if it’s the same as mine.
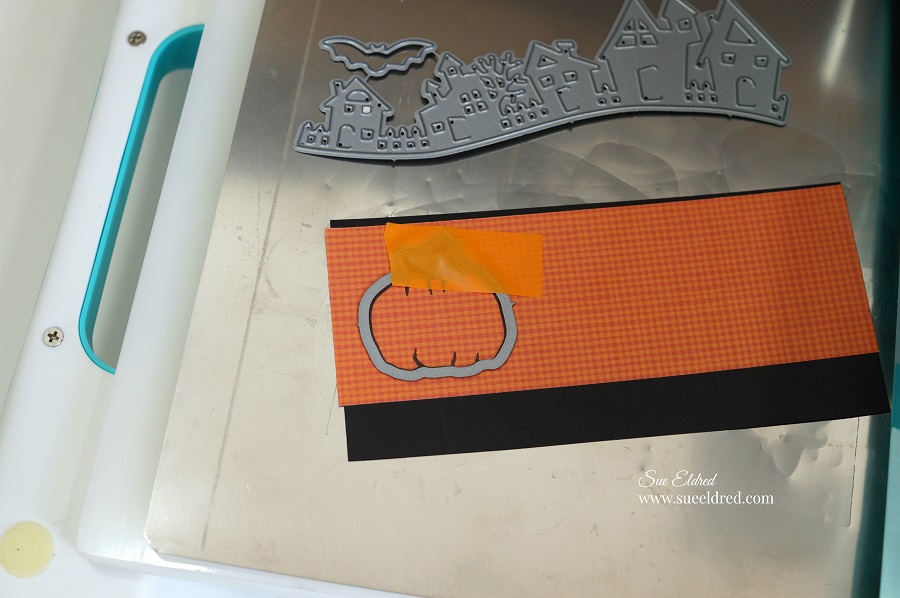
  • Stamp your pumpkins on orange patterned paper.  If your paper is thin, run the strip of orange paper through the Xyron Create a Sticker Mini* and place it onto black cardstock.

  • One pumpkin stamp has a hole in the center with space to add a face.  Perfect for stamping multiples.
  • You’ll need to stamp 7 pumpkins.

  • Cut two 2 1/2″ x 6 strips of black patterned paper.
  • Tip:  Run both pieces of paper, pattern side up, through the Xyron Create a Sticker Mini*  to add adhesive to the back of the paper.  This is really helpful when die-cutting intricate shapes.
  • Adhere one strip onto a piece of black cardstock before die-cutting.  (this will be used for the inside of card.)
  • Die-cut both strips of paper using the house die.  (one is a sticker for the front of the card.)
  • Add thin foam mounting squares* to the back of the die-cut houses with the black cardstock.  (Tip:  cut a few foam mounting squares in half before applying.)

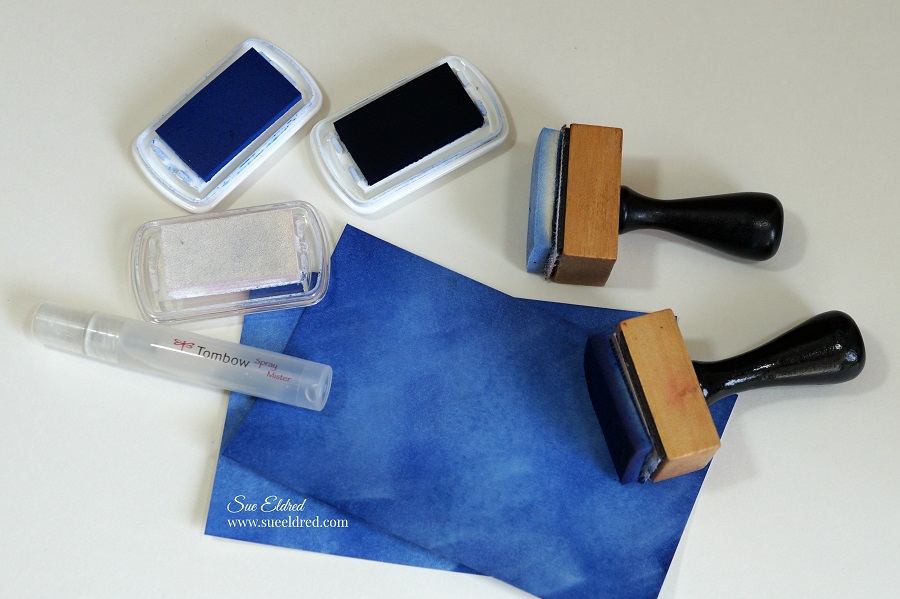
I couldn’t find the perfect night sky background for my card so I created my own.  

  • Cut a 3 3/4″ x 5 3/4″ piece of watercolor paper.
  • Using an ink applicator, rub blue dye ink onto the surface of the paper.
  • Add a few swirls of white ink onto the paper.
  • Using a mini spray bottle, lightly mist the paper with water.  The water will allow the inks to blend leaving a soft speckled appearance on the paper.
  • Dry with hair dryer.

If you have the perfect background paper, you can eliminate these steps.↑

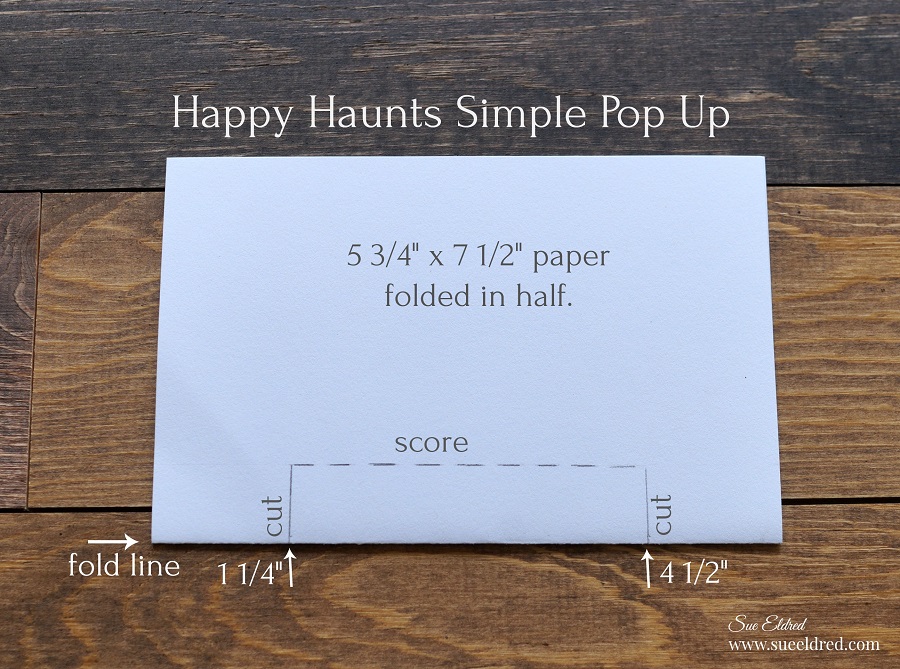
  • Cut a piece of green patterned paper 5 3/4″ x 7 1/2″ and fold in half lengthwise.
  • Cut a piece of patterned paper (mine was woodgrain) 3 3/4″ x 5 3/4″.  Adhere this paper onto one half of the green patterned paper.
  • On the outside folded edge, make a pencil mark at 1 1/4″ and 4 1/2″.  (see diagram)
  • Cut a 3/4″ line up on each measurement.
  • Score and fold paper between cuts.  (Use a bone folder for crisper folds.)

  • Open card and push folded and scored section into middle of the card.

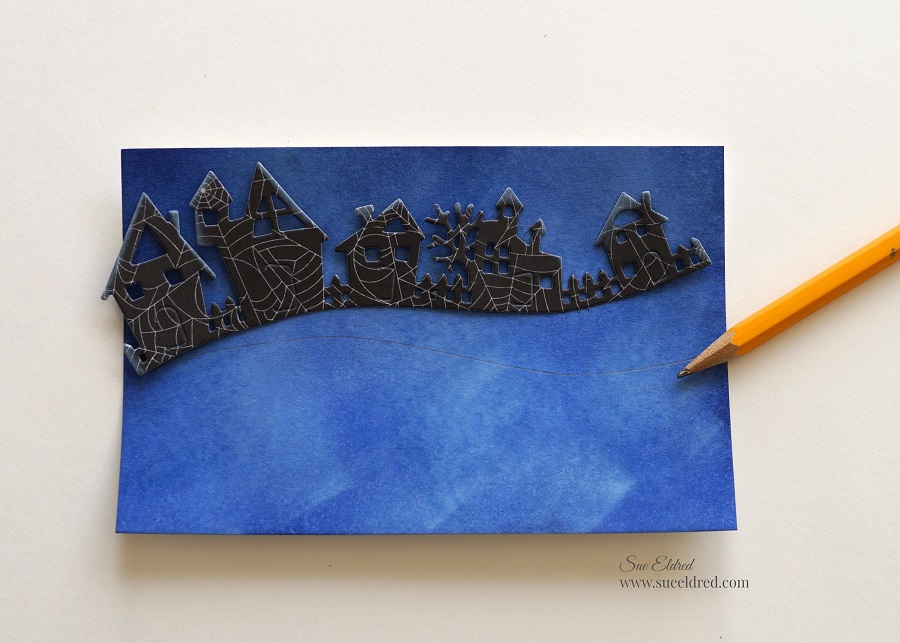
  • Lay the neighborhood die-cut onto your blue background.  Use a pencil to trace the bottom swirl of the die-cut.
  • Cut paper along pencil line.
  • Adhere the cut top of the blue background paper onto the top of the brown woodgrain paper on the inside of your card.
  • Using the house die-cut with the black cardstock and foam mounting squares, adhere the neighborhood over the edge of the blue background paper.

  • Add three pumpkins to the front of the center pop-up.  On the middle pumpkin add a foam mounting square for extra dimension.
  • Adhere a couple pumpkins to the background.

  • Add black die-cut bat with a foam mounting square to the sky background.
  • Add an extra pumpkin or two and stamp the words “Trick or Treat” to finish off the inside.
  • Cut a piece of black cardstock 6″ x 7 3/4″.  Fold in half to create outside card.
  • Center and adhere the pop-up section into the center of the black card.  Adhere one half section at a time.)

  • Decorate front of the card similar to the inside of the card.

For a completely different look, a simple water colored card made with the same pumpkins.

Shop Amazon Scrapbooking Supplies*

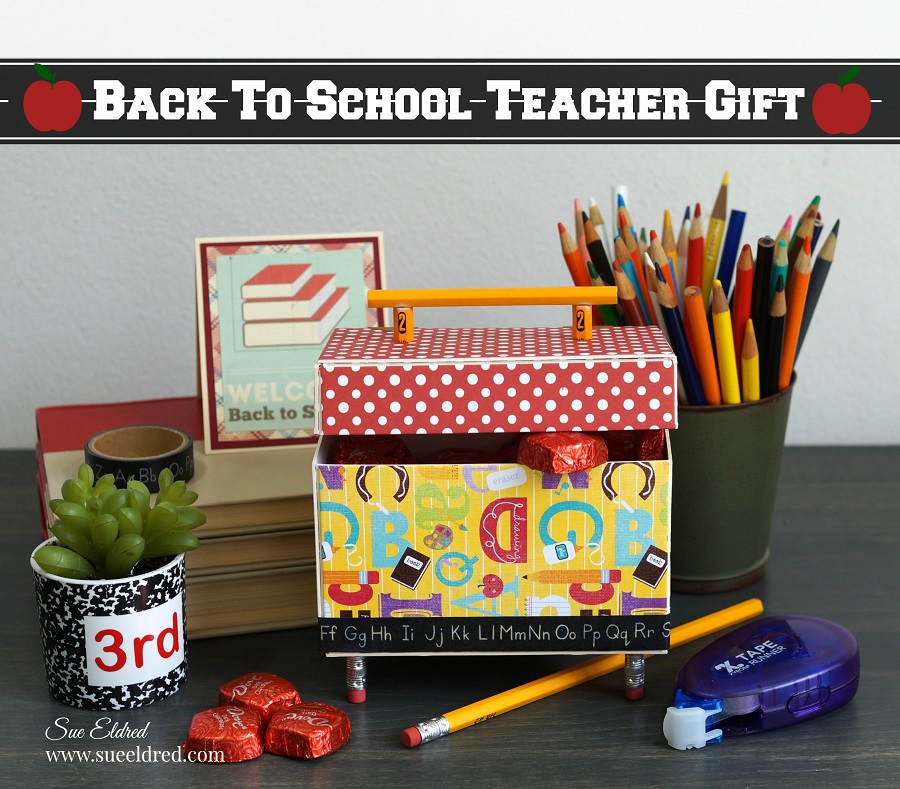
Back to School Teacher Gift

As the new school year begins…

Don’t forget about the teachers in your life.

We all know your child’s teacher is over the moon to have your wonderful child in her class,

but just remember, she still has to deal with “you know who’s” kid.

And while she may “need” school supplies…

what she really wants is CHOCOLATE.  (and maybe wine)

Believe me…she’s not ready for summer to be over either.

To bribe entice your child’s teacher…

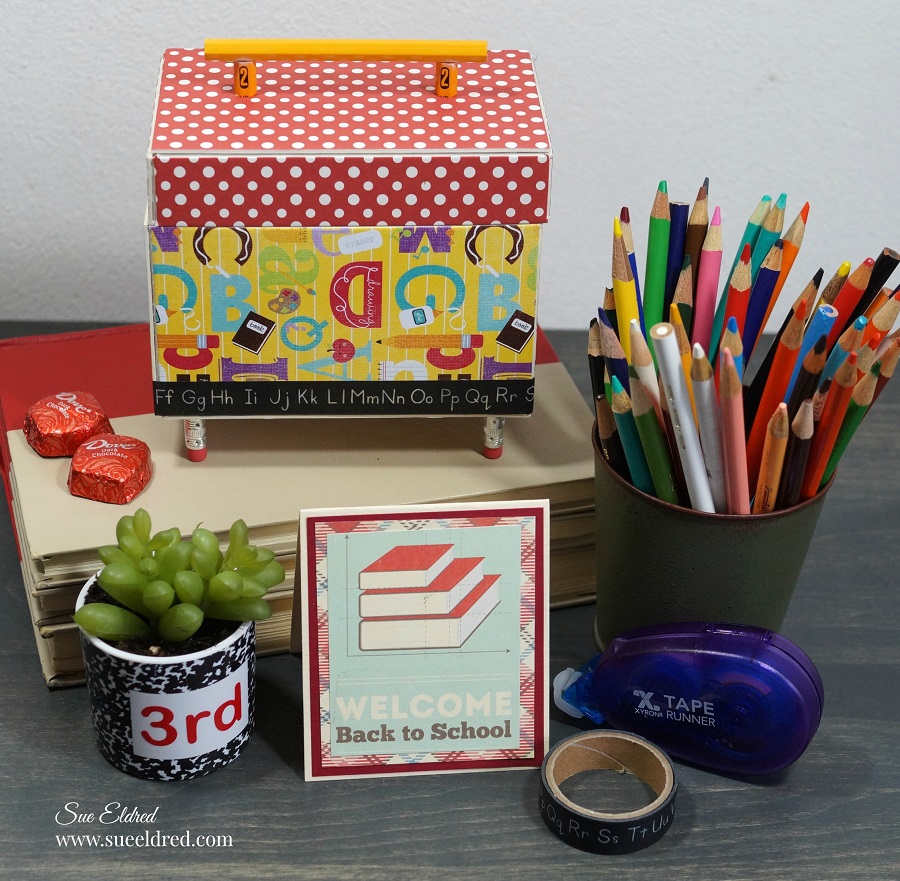
You might want to create a Back to School Teacher’s Gift Box using the

Xyron 9″ Creative Station* and the Eileen Hull Treasure Box Die*.   


Back to School Teacher Gift Box Supplies Used:

*Disclosure:  This blog uses ads and affiliate links.  If you choose to make a purchase using one of the links, I receive a small commission (at no additional cost to you) that helps offset the costs of maintaining this blog.  Thanks for your support!

To Create the Back to School Teacher Gift Box:

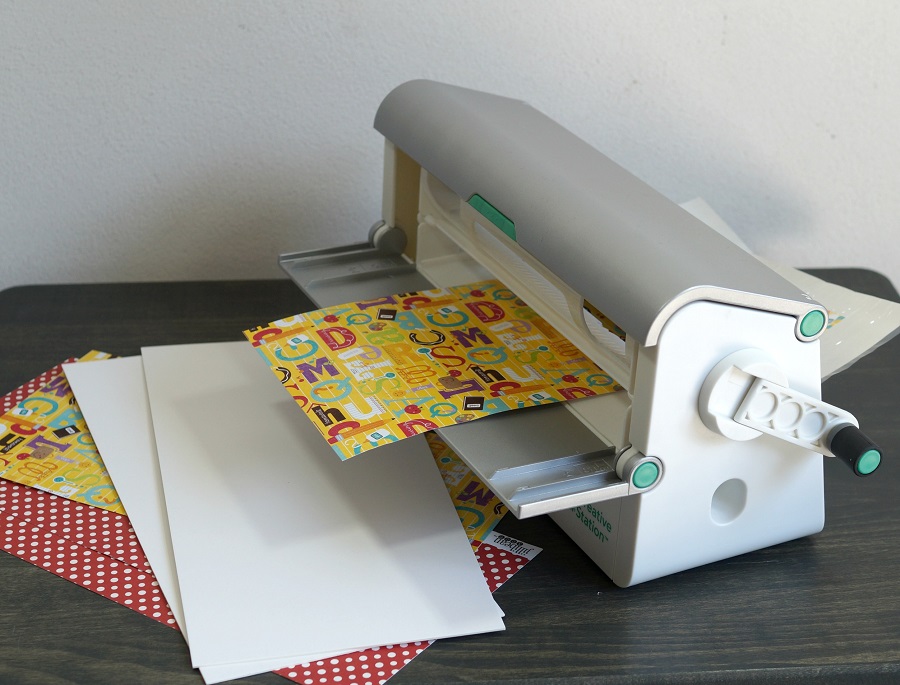
  • Lay decorative scrapbook paper (design side up) on the  Xyron 9″ Creative Station* crank the handle to run the paper through the machine.  As it moves through the Xyron Creative Station it adds adhesive to the back side of the paper.  The Xyron Creative Station is easy to use and it doesn’t need electricity.
  • Adhere the paper onto the chipboard.  If you would like a design on the inside of the box, adhere coordinating paper on the other side of the chipboard.

I love using the Xyron Creative Station* when making larger projects like this because you get complete coverage, great adhesion, no wrinkling and no bubbles!

  • Lay the covered mat board over the Treasure Box Die* sandwiched between two cutting plates.  (for larger dies use the Sizzix Extender Cutting Plates)
  • Crank the handle of the Sizzix Big Shot Die Cutting Machine*and run the die through the machine.  The Big Shot will cut and score the mat board.

  • You will need to cut two of each piece to create the treasure box.

  • Fold chipboard along creased lines and attach matching pieces together.  Because the  chipboard is thick, you will need a strong adhesive to bond the pieces together.
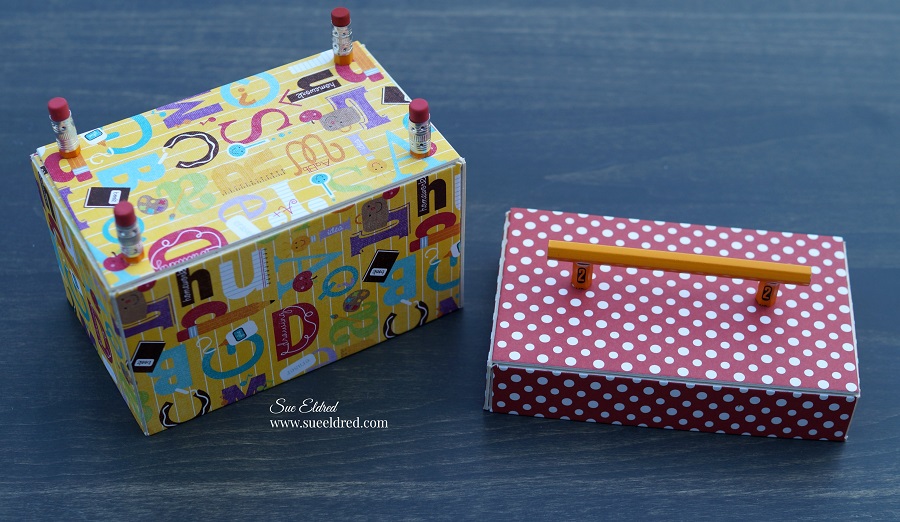
  • Glue the two rectangle pieces on the top and bottom of the box and lid.

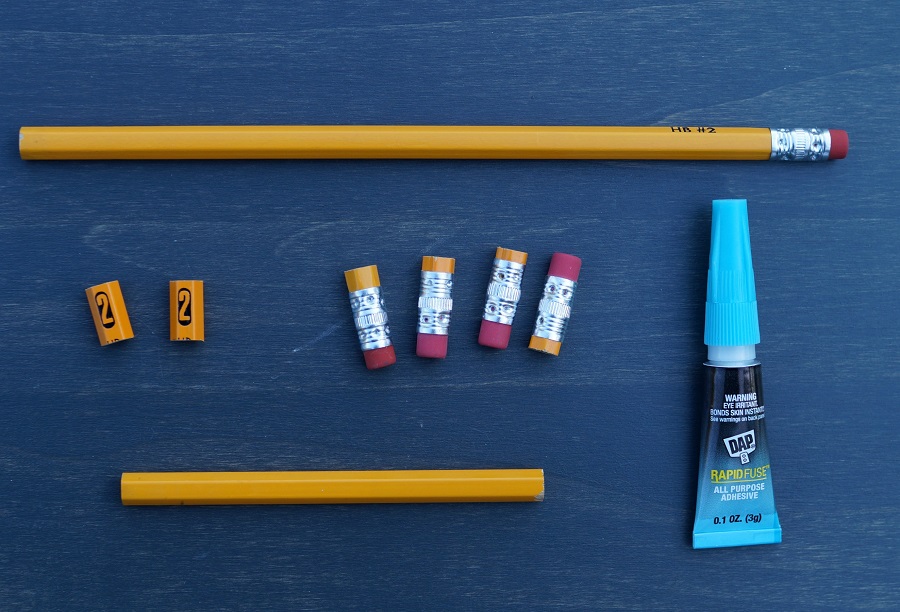
  • Cut the tops off 4 pencils approx. 3/4″.
  • Cut one long 3-3/4″ pencil piece.
  • Cut two pieces of pencil 1/2″.

  • Glue the 4 pencil tops to the bottom of the box to create feet.
  • Glue the two small pencil pieces onto the larger pencil piece to create a handle.

To create the hinges…

  • Add adhesive on a piece of faux leather paper by running it through the Xyron Creative Station.
  • Adhere it to a second piece of faux leather paper so that it’s double sided.
  • Die cut two hinges using  the hinge part of the Treasure Box die.
  • Adhere onto back of the box.

Fill the box with chocolates or other goodies and give to your favorite teacher.

“This is a sponsored post.  As a member of the Xyron Makers Program I have been provided product and compensation in exchange for my creative ideas.  The views and opinions are my own.
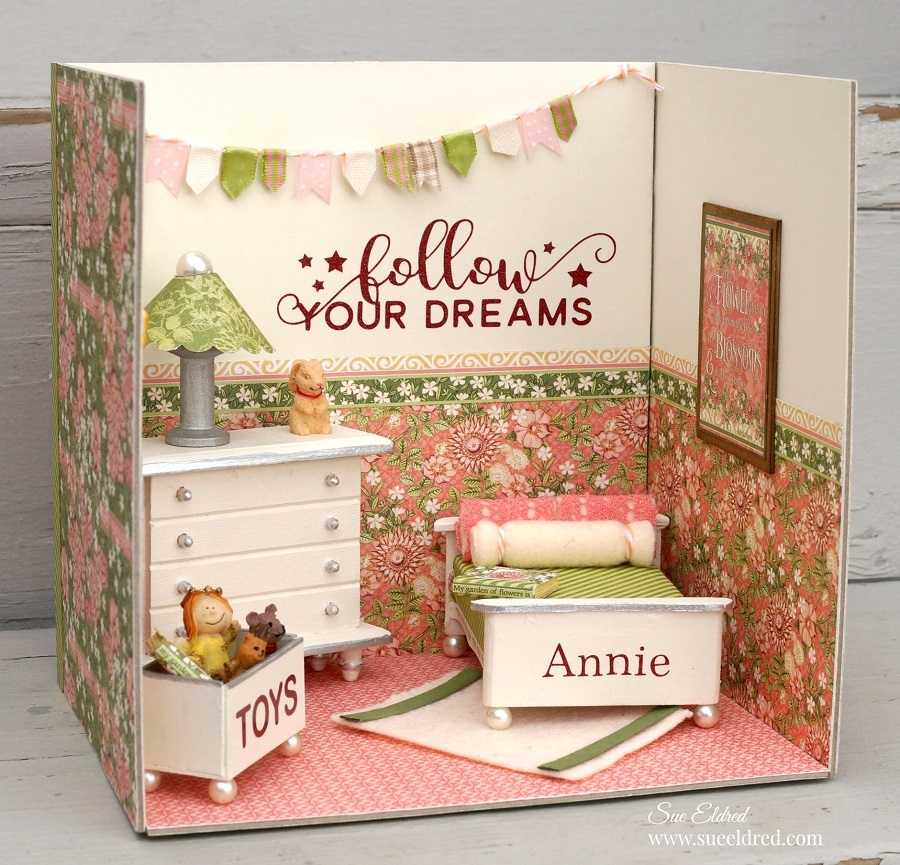
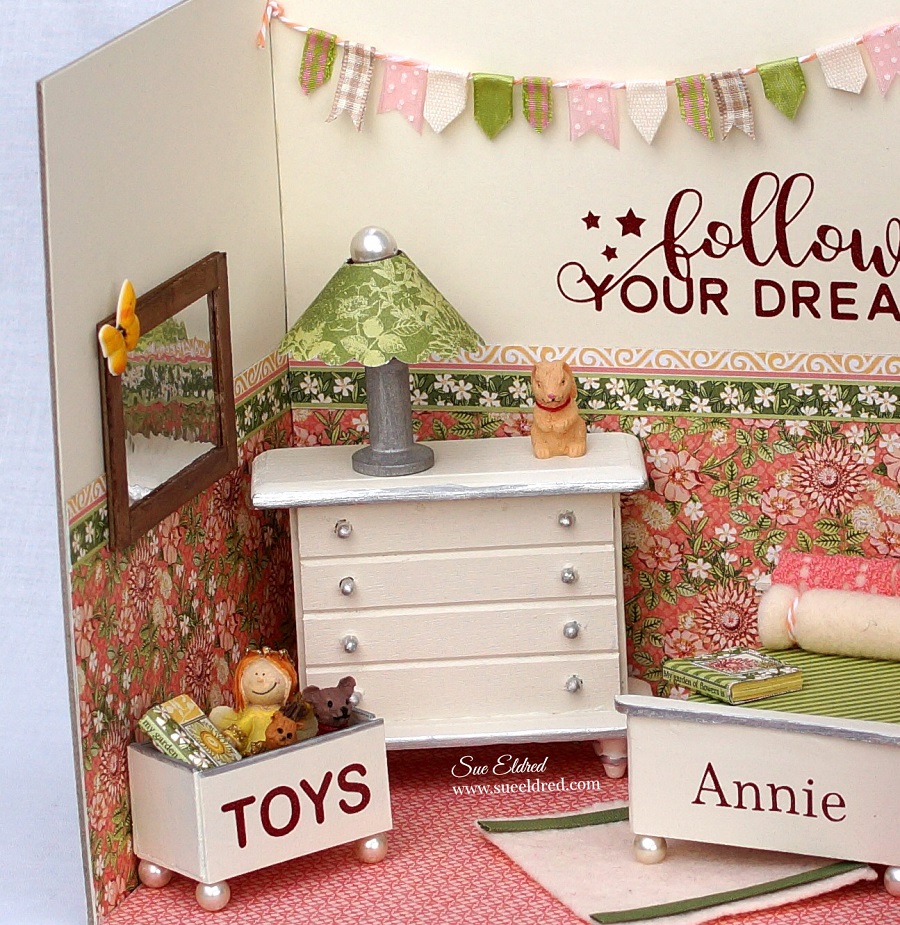
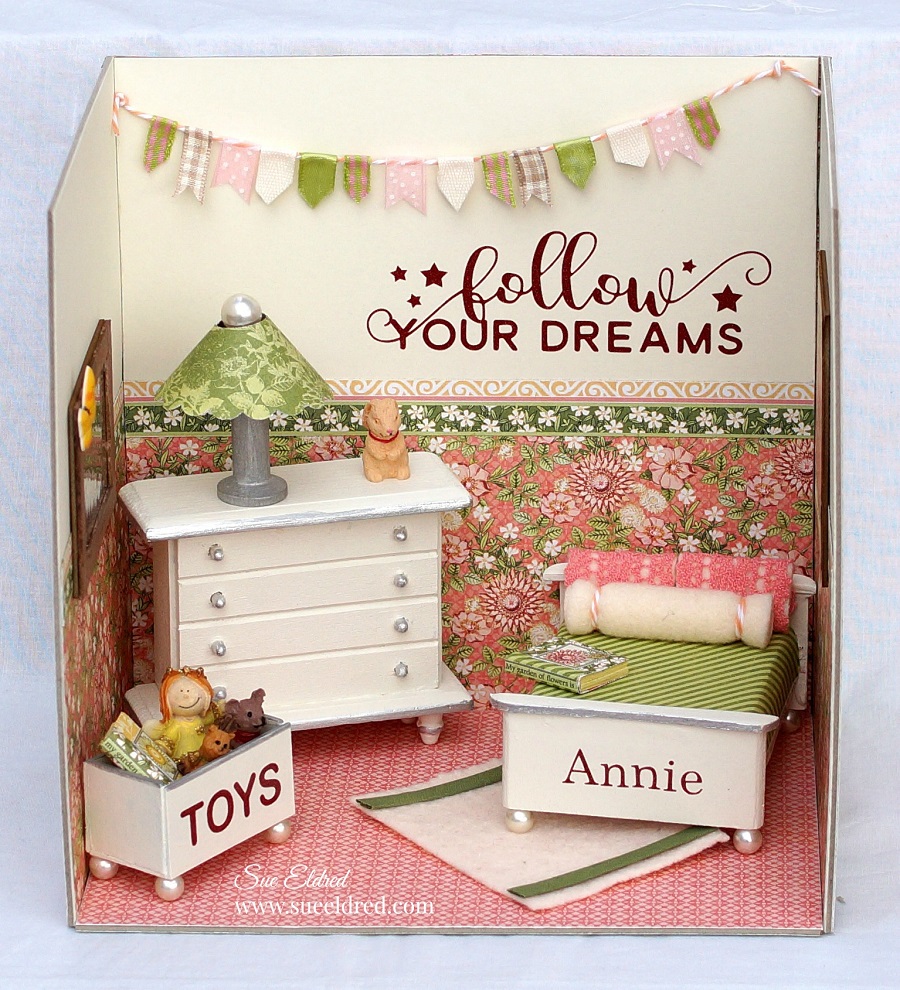
Annie’s Sweet Dreams Bedroom

Annie’s Sweet Dream Bedroom

I love working with miniatures and creating little rooms.

I guess…I’m creating the doll house I always imagined as a kid.

For this room, I wanted to create a “mini makeover” for Annie’s Bedroom.

This little room won me third place in the 2019 Fave Crafts Best Blogger Contest.

And now, I can finally share it all with you.

“This is a sponsored post.  I have been provided product and compensation in exchange for my creative ideas.  The views and opinions are my own.”

Annie’s Sweet Dreams Bedroom Products Used:                 (*Affiliate Links)

*Disclosure:  This blog uses affiliate links.  If you choose to make a purchase using one of the links, I receive a small commission (at no additional cost to you) that helps offset the costs of maintaining this blog.  Thanks for your support!

How to make Annie’s Sweet Dreams Bedroom…

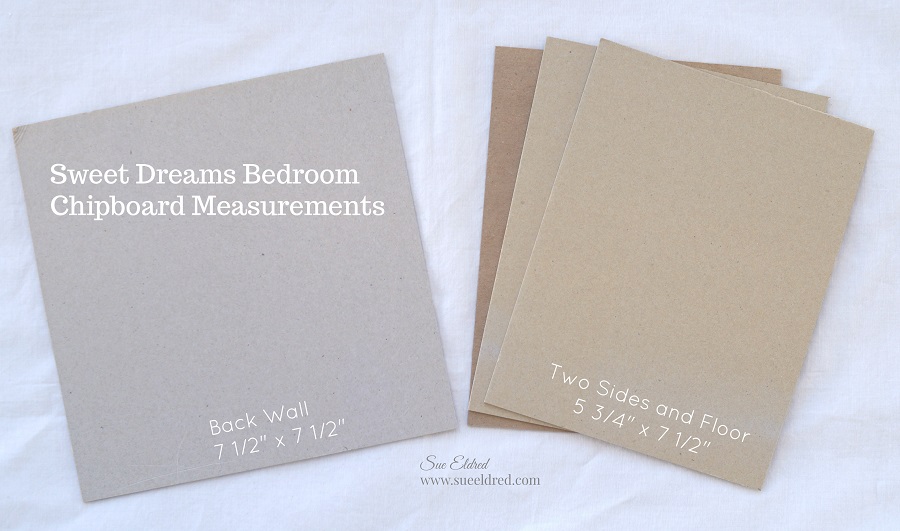
The Bedroom measures 7 1/2″ wide, 7 1/2″ tall and 5 1/2″ deep. 

  • Cut 3 pieces of chipboard 5 3/4″ x 7 1/2″.
  • Cut 1 piece of chipboard 7 1/2″ x 7 1/2″ to use as the back wall.

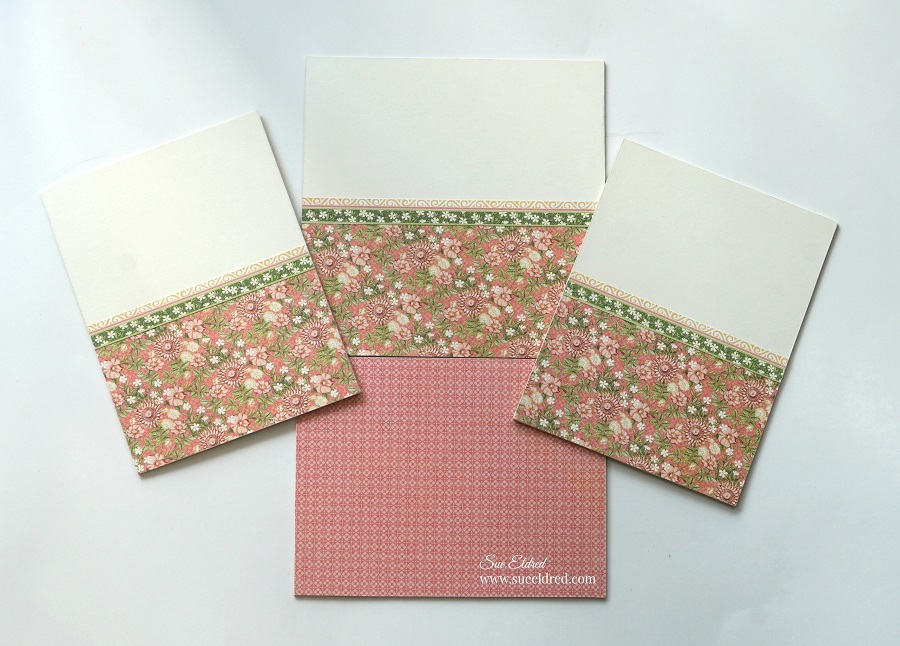
  • Cut decorative scrapbook paper from the Graphic 45 Garden Goddess 8×8 Paper Pad* to use on the floor, walls and outside walls of the room.  I like to cut my paper slightly wider than I need so I can trim the edges with a craft knife.
  • I used both cardstock and scrapbook paper to cover my walls.  For my walls…cut both papers into 3 3/4″ strips.
  • I cut a small strip of paper from the paper pad for a decorative border.
  • I ran each of my strips through the Xyron Creative Station*.
  • Adhere paper to the chipboard.
  • Cover back of the chipboard with coordinating scrapbook paper.

The Xyron Creative Station* is perfect for projects like this.  I wanted complete adhesive coverage on every corner and edge of the paper.  (No wrinkles, no bubbles, easy to use.)

Finished Inside Walls

For the Mural on the Wall…

  • I used an SVG file and my Silhouette Cameo Wireless Cutting Machine* to cut and create the words “follow your dreams” using StyleTechCraft Dark Red Ultra Metallic Glitter Vinyl.
  • Using the weeding tool, I carefully removed the negative spaces in and around the letters.
  • Place a piece of Vinyl Transfer Tape* over the letters.
  • Apply words onto the back wall.
  • Remove transfer tape.

  • Glue the walls together using a good craft glue. I like to use Beacon 3 in 1 Glue*.  I used wood boxes to hold my wall up while the glue dried.

  •  I added small strips of paper on the back corners for added support.

  • To make a mini lamp shade…punch a 3″ scallop circle.
  • Trace around a button in the center of the circle.
  • Cut out the small circle as shown in the above picture.
  • Glue ends of the circle together to form shade.
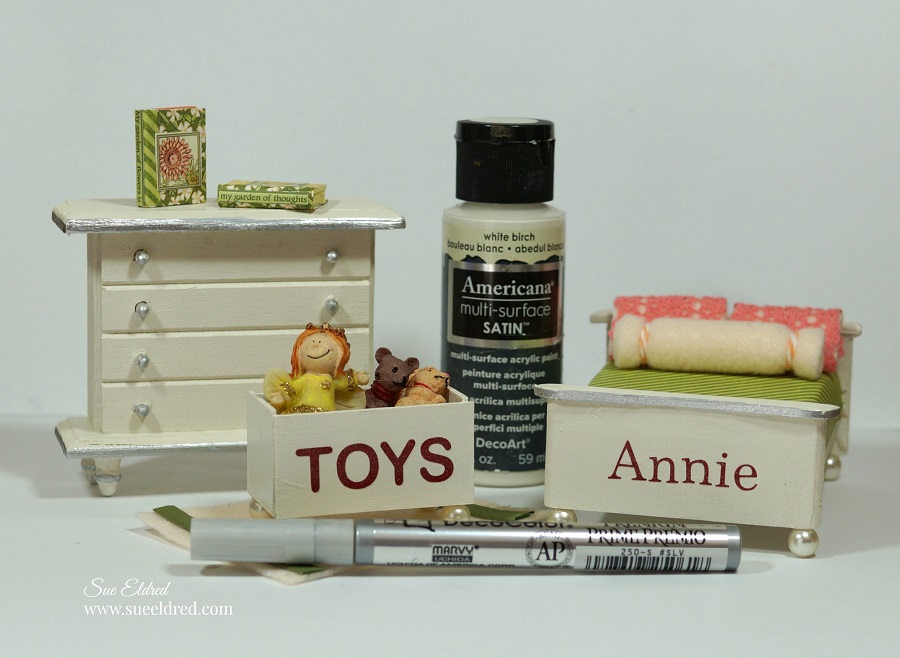
  • Glue shade onto a small painted wood spool.

  • Cut small pieces of ribbon and glue them onto a piece of twine to create a small ribbon banner to hang onto the wall.
  • Glue Banner onto back wall.
  • The Deflecto Ribbon Dispenser* is great for organizing my ribbon spools.

  • The mirror was made using a small piece of StyleTechCraft Chrome Metallic Vinyl* I placed onto a small piece of chipboard.
  • Cut 1/4″ strips of chipboard and paint brown.
  • To create a wood look, ink to the edges of the chipboard with vintage photo distress ink. 
  • Glue strip onto the front of the Chrome Metallic Vinyl* to create the frame.
  • I used small Christmas ornaments for the toys.

Creating Annie’s Sweet Dreams Bedroom was a labor of love.

With a little imagination and some basic construction, it’s really not hard to do.

Nick’s New Swim Team Jacket

Nick joined the swim team this summer and I couldn’t be more proud of him.

I got to watch him at a few of the swim meets and was so impressed on his abilities.

He’s always loved being in water and has really become quite the swimmer.

I’m not sure I’d make it across the width of the pool let alone the length.

He even swims the 100 meter race.  (4 lengths of the pool for us non-swimmers)

Not bad for an 8 year old.

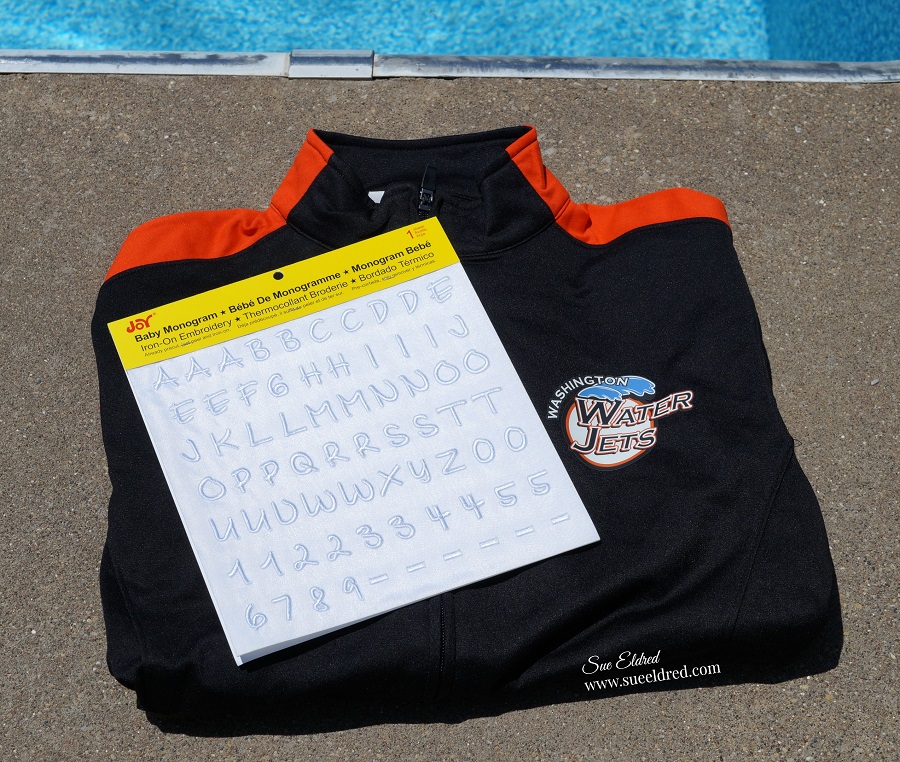
He’s so proud of his swim gear.  (Isn’t he handsome?)

But…his new Super Cool Swim Team Jacket didn’t come with the option for personalization.

Joy® Embroidered Iron-On Monogram letters to the rescue.

For his Swim Team Jacket we used:

  • One Super Cool New Swim Team Jacket

  • Joy® Baby Monogram Iron On Embroidered Letters

  • Iron and pressing cloth

Directions:

  1. Check Garment care label before choosing which setting to set your iron.

  2. Remove letters from sheet.  Position letters with shiny side down on jacket.

  3. Cover letters with fine cloth.  With firm pressure iron cloth over the letters for 25 seconds.

  4. Turn jacket inside out and iron the back of the letters for 25 seconds.

  5. Allow to cool for 1 minute before handling.

Joy® iron-on embroidered letters and appliqués can be found at your local craft stores!

“This is a sponsored post.  As a member of the Joy® Design Team I have been provided product and compensation in exchange for my creative ideas.  The views and opinions are my own.

Shop Your Fav Brands at Scrapbook.com

*Disclosure:  This blog uses ads and affiliate links.  If you choose to make a purchase using one of the links, I receive a small commission (at no additional cost to you) that helps offset the costs of maintaining this blog.  Thanks for your support!

Crossover II Fabric & Paper Cutting System

Recently, I was asked by The Maker’s Movement to try out the Crossover II Fabric & Paper Cutting System* to see how I liked it.  (Always anxious to try something new, I quickly agreed.)

*Disclosure… “This is a sponsored post.  I have been provided product in exchange for my creative ideas.  The views and opinions are my own.”

The machine is compact and portable.  Easy to store and carry.

You can use the Crossover II* with thin metal paper dies, fabric dies and steel rule dies.

The Crossover II Fabric and Paper Cutting System*is similar to other manual cutting systems and uses a “sandwich” configuration with three plates.  (included with the machine)

  • White Base Plate
  • Metal Adapter Plate
  • Clear Top Plate

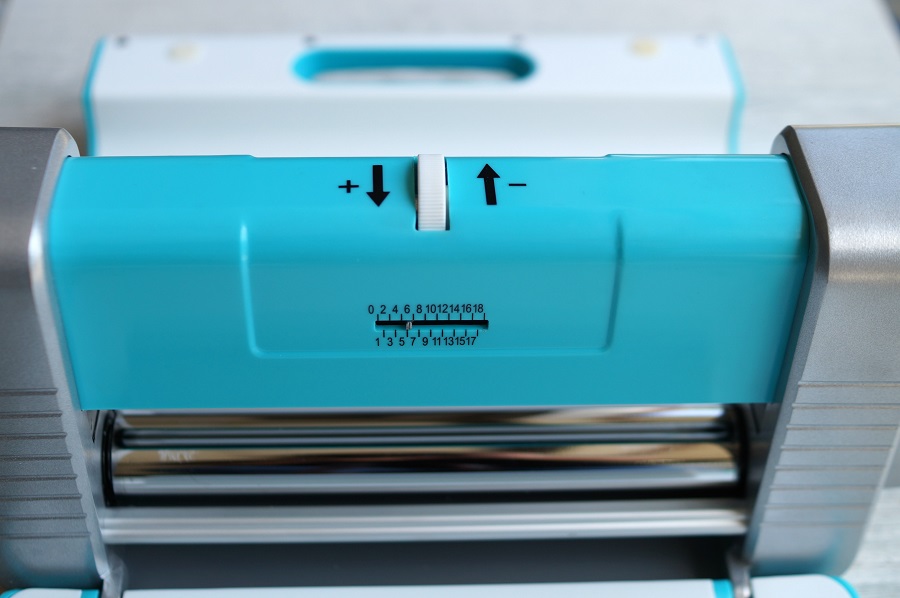
This is my favorite part of the machine, the adjustable rollers and pressure settings. 

This was the real game changer for me.

It adjusts for multiple layers and allows you to be able to cut a variety of thicknesses.

Not just for paper…

the Crossover II Fabric & Paper Cutting System* can cut fabric, faux leather, craft foam,

chipboard, felt and several other materials.

Here’s a quick little video showing the Crossover II Fabric & Paper Cutting System*in action.

Along with the Crossover II Fabric & Paper Cutting System* I received a few dies from

Maker’s Movement to play with as well.

  • MSD205  Hello Spring Stamp & Die Set
  • MOD203  Stitched Rectangles Nested Essentials Die Set
  • SF6  Stacker Flower 6

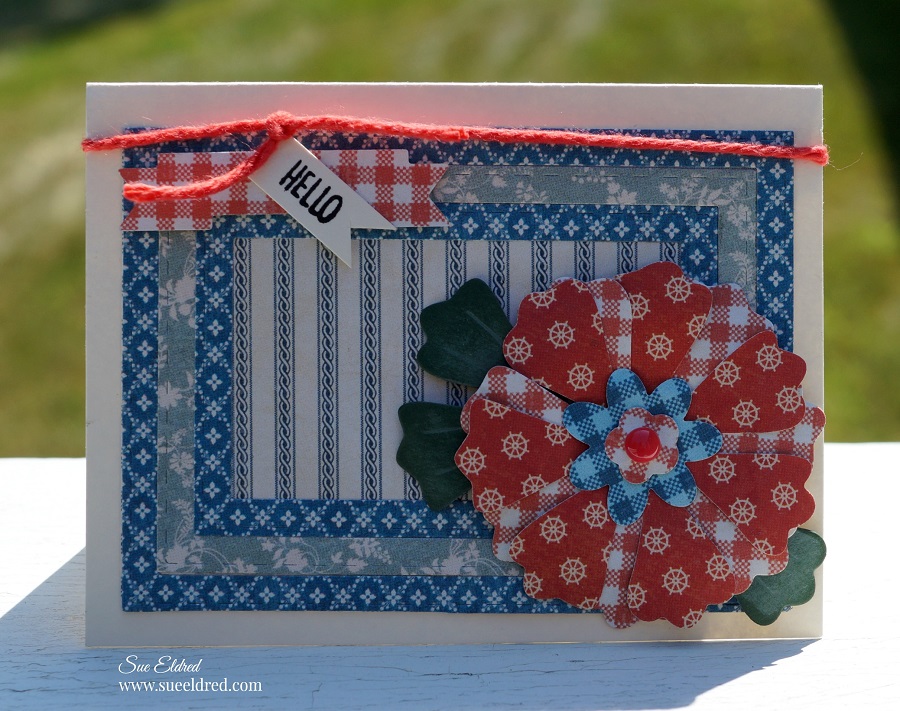
I created this quick card using paper scraps from Graphic 45 and a combination of the dies

I received from The Maker’s Movement.   I love the tiny foliage stamp I used on the background.

It’s from the Hello Spring Collection.

I liked using the Crossover II Fabric & Paper Cutting System*especially it’s versatility.

Indigo Shibori Dyeing

Indigo Shibori Dyeing

We had a little fun this past week-end and tried something new….

My daughter asked me to purchase a Indigo Dye Kit* for her birthday.

She wanted to use it when she came home.  (I’m always up for trying something different.)

Shibori is a Japanese term for methods of dyeing cloth.  Similar to tie-dyeing you create patterns by binding, stitching, folding, twisting, and compressing.  In Japan, the earliest known example of cloth dyed with the shibori technique dates back to the 8th century where indigo was the main dye used.

Shibori Indigo Dye Kit from Made Kits by One-OneThousand*

The kit came with everything we would need:

  • Thiox
  • Soda Ash
  • Pre-reduced Indigo
  • Rubber Gloves
  • Rubber Bands
  • Acrylic Plates
  • Great Instructions

Everything except a very large bucket and items to dye.

It said right on the front of the box…”no chemistry degree needed”.

*Disclosure:  This blog uses ads and affiliate links.  If you choose to make a purchase using one of the links, I receive a small commission (at no additional cost to you) that helps offset the costs of maintaining this blog.  Thanks for your support!

My daughter had purchased a few new items to dye and we quickly added other items like…

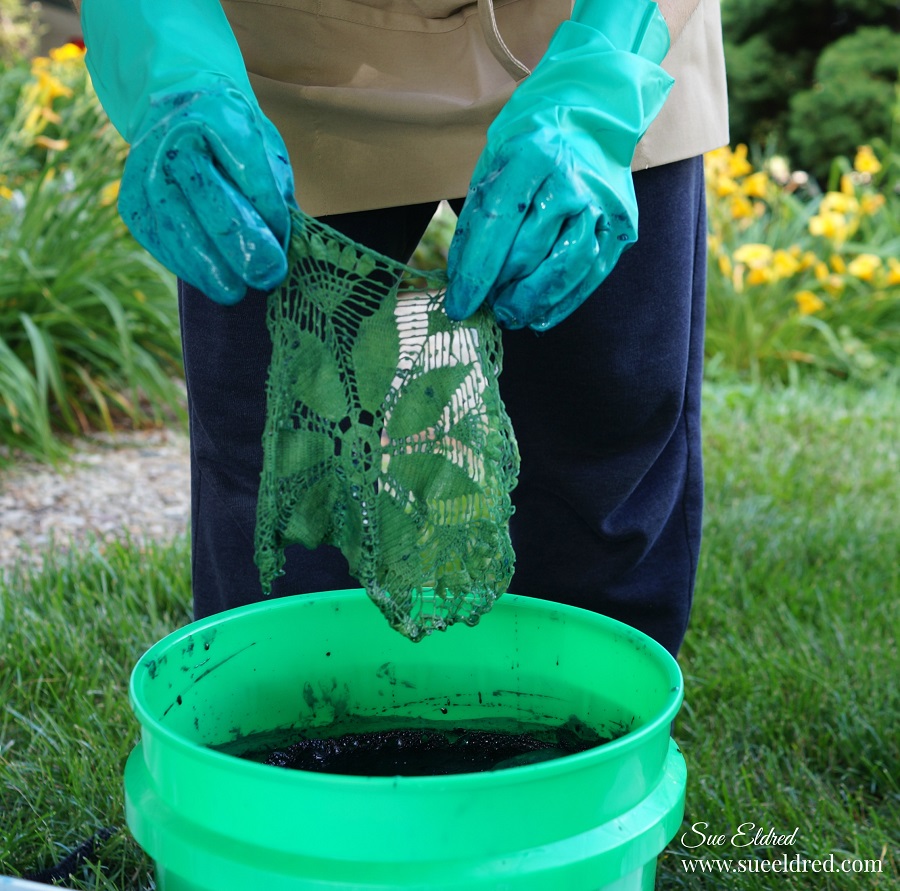
pillowcases, old doilies, vintage linens, old jeans and other miscellaneous items.

The kit comes with great instructions on how to mix the Thiox, Indigo and Soda Ash with water.

It is recommended to use a 5 gallon bucket with lid.

After everything is mixed cover the bucket tightly with the lid and let it rest for one hour.

When you are ready to start dyeing, remove the cover.

The liquid will be a greenish-yellow in color and you will see a cluster of bubbles called

“the flower” and a film on top.  (It will have a smell, that’s normal, they said)

Carefully scoop out the bubbles “the flower” and set aside with a little of the dye liquid.

The instructions say that you can put “the flower” back in the bucket after your done

dyeing to keep the dye bucket going for future dye projects.  (hmmm.)

The dye can be used for several dye sessions if carefully stored.

It’s always a good idea to pre-wash new items with a mild detergent.

We used several different twisting and rubber banding techniques on the fabric.

FYI…The dye reacts best if your item is wet first.

When you lift your item out of the dye mixture it will be a yellow greenish color.  

As the air hits the dyed item, the indigo will gradually oxidize and the dyed item will turn blue.

The longer the item is in the dye, the darker it becomes once it hits the air.

They suggest ringing the item and letting it sit for 15 minutes and then re-dipping the item

in the dye for deeper hues.

Creating a Wax Resist

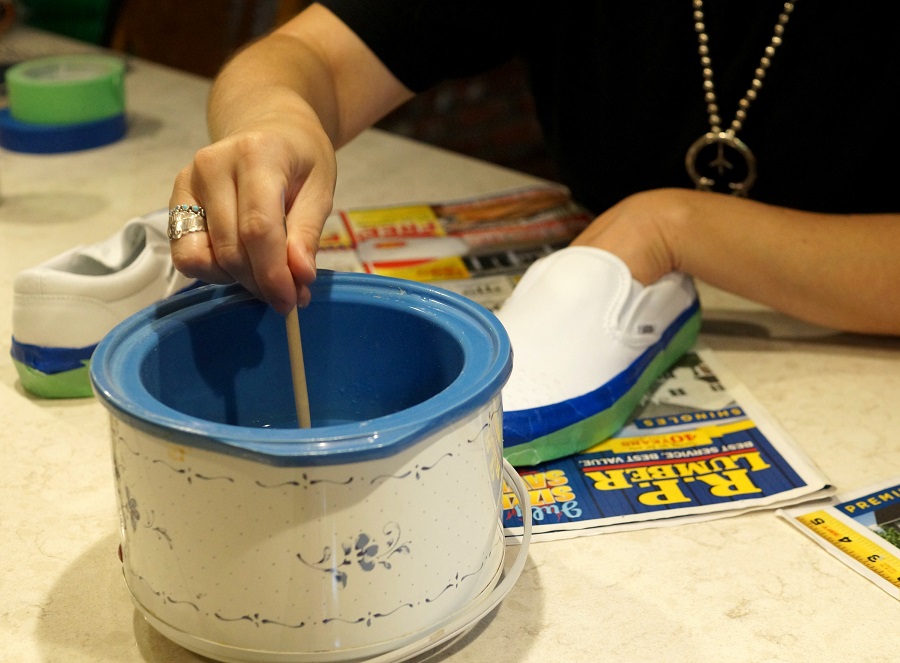
My daughter and her husband created dots on their shoes by using melted wax and the end

of a paintbrush.  (We kept the melted wax hot in a old mini crock pot.)

The melted wax creates a resist that will repel the dye.

They covered the souls of the shoes with removable painters tape to protect it from the dye.

A large brush was used to paint the dye on the shoes instead of dipping them.

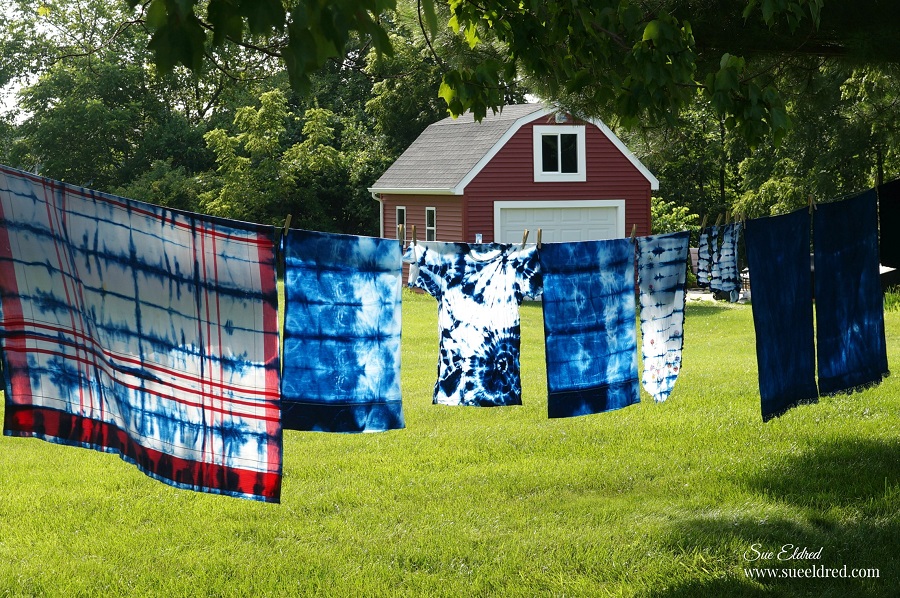
Once dyed…we hung the items on a clothesline tied between two trees in the front yard.

My husband said it looked real classy.  I thought it looked beautiful.

We left them hanging overnight as they need 24-48 hours to dry and oxidize.

As with a lot of new techniques…there is a little bit of a learning curve.

We were pleased with the results and can’t wait until she’s home again to dye some more.

FYI…We used Shibori Indigo Dye Kit from Made Kits by One-OneThousand*


A Kid Sized Makeover

Mini Park Bench before

Mini Park Bench Makeover

Tucked away beside my porch, next to my hydrangeas, was a wobbly, forgotten little park bench.

It had been left out all winter and hadn’t weathered very well.

I picked up the little bench a few years ago at a yard sale when it was still in good shape.

The bench has nice metal frame and a cute jungle theme inset. 

I knew with a little tender loving care the bench could be almost as good as new.

I carefully took the bench apart and gave it a light sanding to get rid of the rust and grim.

I painted the frame with Rust-Oleum Dark Gray Paint and Primer*.

*Disclosure:  “This is a sponsored post.  I have been provided product in exchange for my creative ideas.  The views and opinions are my own.”  This blog uses ads and affiliate links.  If you choose to make a purchase using one of the links, I receive a small commission (at no additional cost to you) that helps offset the costs of maintaining this blog.  Thanks for your support!

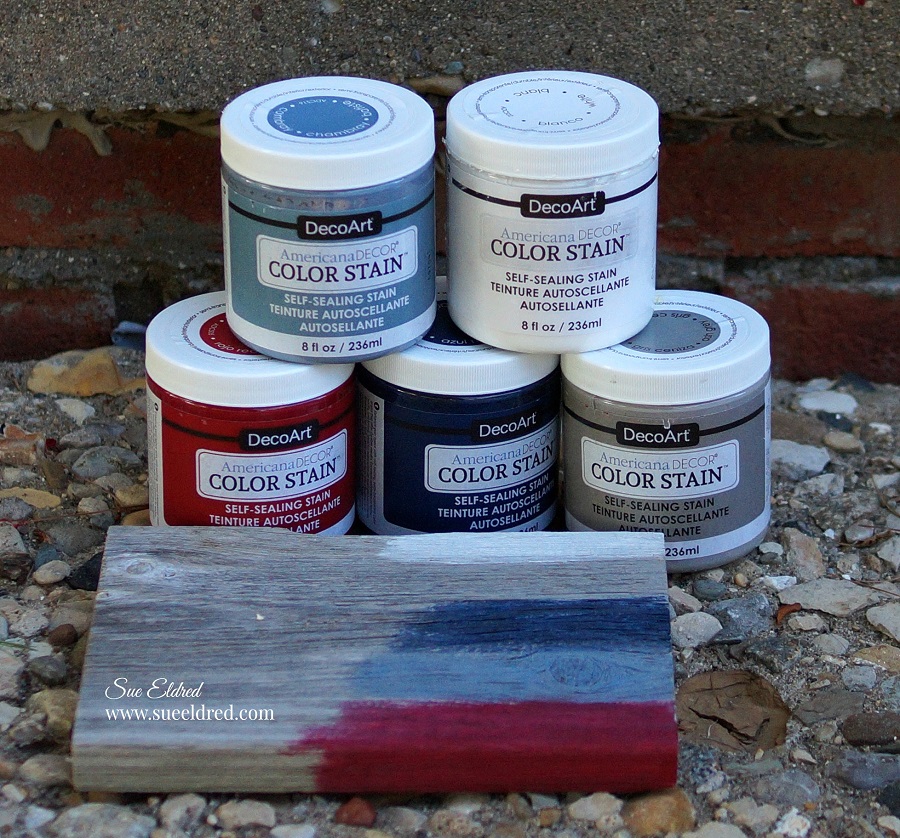
DecoArt Color Stain

I had a difficult time choosing which color I wanted to use so I created a color sample board.

In the end I went with white.    (bird poop doesn’t show up as much on white)

The wood slats were painted with DecoArt White Americana Decor Color Stain*.

DecoArt Color Stain has a semi-transparent, satin sheen for enhancing wood, concrete, terra cotta, and other surfaces that can be displayed indoors or out. Once cured, there is no reason to add an additional polyurethane or other sealant on top. The water-based formula makes cleanup simple while still offering a durable finish.

And because little details count…I also painted the screws.

Do you like how I used a long reach hole punch to make holes in my box for the screws to sit?

Finished Park Bench  (well almost)

The white color stain paint* allows the wood grain to show through giving my bench

a “worn look” with out being worn out.   (It’s hard to see by the pictures.)

When my husband got home and looked at the bench he thought the animals looked a little flat.

So…I rubbed DecoArt Champagne Ice Metallic Lustre™ Wax* on the metal to make them stand

out.  I added a little metallic lustre™ wax* on the bench frame as well.

DecoArt generally recommends using a Multi-Purpose Spray Sealer* if you plan to keep a piece

with Metallic Lustre outside.

Shop Your Fav Brands at Scrapbook.com

He was right, it really makes a difference.

I placed the bench in the shade under the maple tree in the front yard.

All I need is a couple pint sized buddies to come over and enjoy it with me.


Don’t Miss a Thing…Make Sure to Follow me

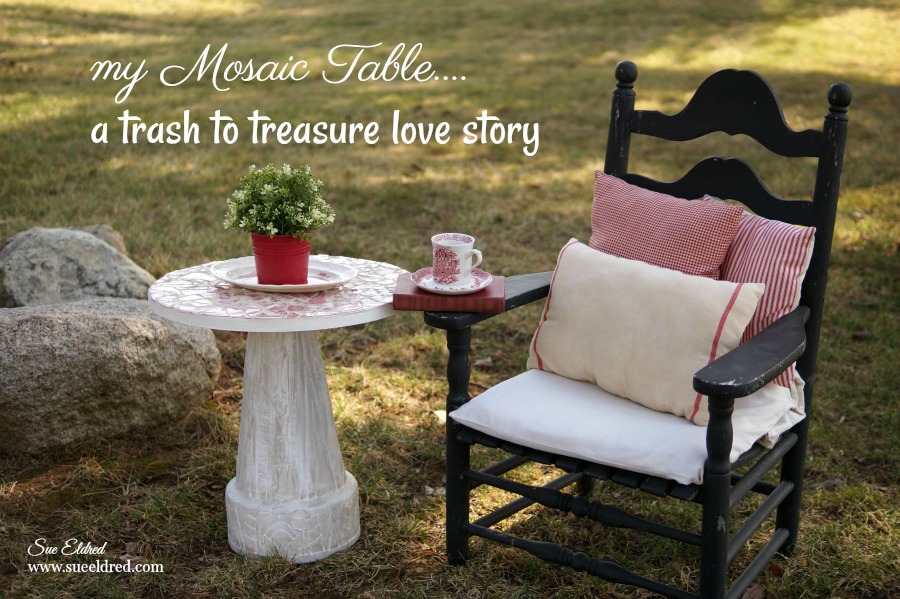
If you liked this post you might like to read  A Trash to Treasure Love Story

Shop Your Fav Brands at Scrapbook.com

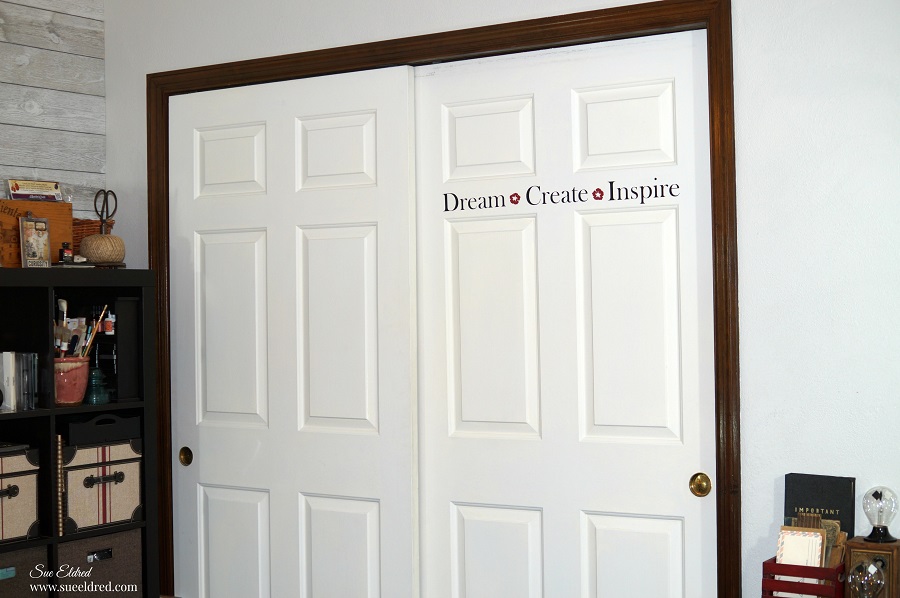
Dream Create Inspire Wall Decor

Dream Create Inspire Wall Décor

I have been working diligently for the last couple of months on my new craft room.

Moving, purging, organizing and very slowly decorating.  (so much stuff!)

I’m almost ready for a “craft room reveal” but not quite yet.

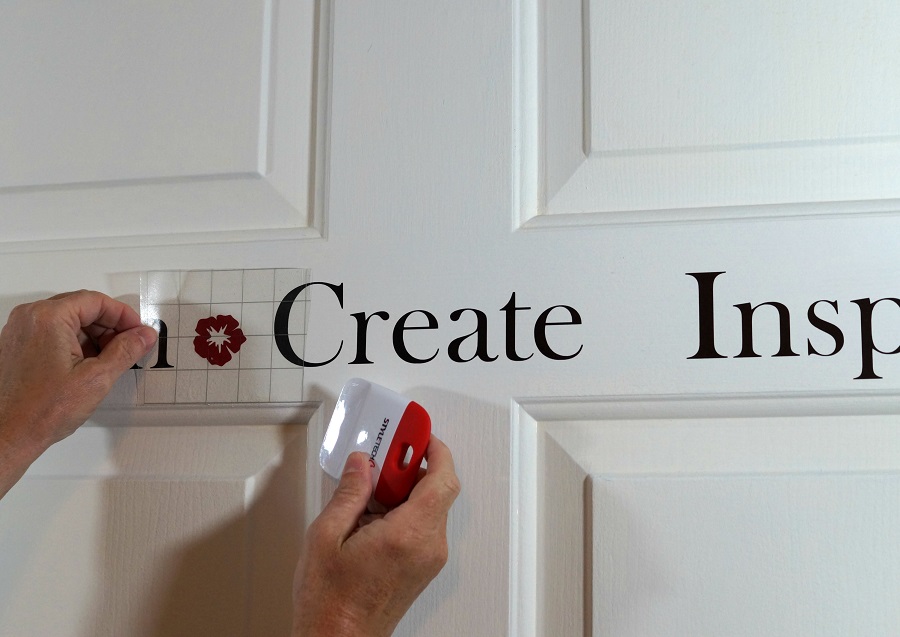
This past week-end I decided to add a little inspiration to my freshly painted closet doors.

I like the look of inspirational quotes on walls and decided to create one of my own.

With the help of my Silhouette Cameo Wireless Cutting Machine* and

Matte Removable Adhesive Vinyl* from Styletechcraft the project was real easy to create.

(getting a good picture of the final project not so easy)

*Disclosure:  This blog uses ads and affiliate links.  If you choose to make a purchase using one of the links, I receive a small commission (at no additional cost to you) that helps offset the costs of maintaining this blog.  Thanks for your support!

  • I measured the space on the door where I wanted the words to go and decided where the best spacing would be for all three words.
  • I cut the Gridded Vinyl Transfer Tape* to fit inside the space.
  • I used the bottom line of the grid and line on the door inset to line up my words.
  • Once you place your word onto your surface, smooth over word with the vinyl tool.

  • I found it easier to place the words Dream and Inspire first and then center the word Create in between the two.

  • I cut two small flowers using dark red removeable vinyl and placed them in between the words.

Did you know that Matte Removable Vinyl will remove cleanly for up to two years?

This vinyl  film is great for decorating a kid’s room, a classroom or just about anywhere

you just  need a temporary graphic.

“This is a sponsored post.  As a member of the StyleTechCraft Design Team I have been provided product and compensation in exchange for my creative ideas.  The views and opinions are my own.

You can now find the full line of StyletechCraft online at ATSM.

Shop Your Fav Brands at Scrapbook.com

The Ugly Planter Box

It’s true…I have a soft spot in my heart for sweet old gentlemen. 

(and apparently, so does my husband)

While on a call, my husband met this nice older gentleman.

The two began to talk and one thing leads to another and my husband walks away

with this wood planter box that the gentleman had made.

“This is a sponsored post.  I have been provided product from Wagner and DecoArt in exchange for my creative ideas.  The views and opinions are my own.

Stenciled Wood Planter Box

As he unloaded it from the car he actually apologized.   (it’s like he doesn’t know me at all)

It was a little unique with the hand drawn pictures on the side.

But, I thought it was great.

All it needed was a couple coats of Farmhouse White Curb Appeal Paint from DecoArt*.

Shop Your Fav Brands at Scrapbook.com

*Disclosure:  This blog uses ads and affiliate links.  If you choose to make a purchase using one of the links, I receive a small commission (at no additional cost to you) that helps offset the costs of maintaining this blog.  Thanks for your support!

Earlier this year… I received the HomeRight Super Finish Max Extra Power Painter*

along with the HomeRight Large Spray Shelter* from the awesome folks at Wagner.

I’ve been wanting these for a while now and have been eagerly waiting for the weather to turn

nice and the rain to stop so that I could use them.

With the exception of trying the sprayer at the Creativation Trade Show,

it was the first time I’d used a power sprayer.  It was super easy to use and clean up.

And…it comes with three sprayer tips for different uses.

The portable spray tent is great to use on days with a little breeze or even indoors.

I can’t wait to use it on even bigger projects.

Ok, I’ll admit, because of the marker drawings on the side it took more than a couple coats.

It really was easy to use and the Curb Appeal Paint dried really quick.

After all the coats of paint were dry I gave the box a light sanding to make it smooth.

The box looked a little too plain, so I decided to stencil a design on the sides.  

To stencil the design…

  • Position the stencil onto the box and tape down the edges with removable painter’s tape to keep the stencil from moving.  Use stipple brush to apply paint inside open stencil areas.
  • Carefully remove stencil from box.  Make sure there is no excess paint that’s seeped under the stencil before moving the stencil to the next area on the box.

  • I painted the edges of the box with a thin layer of “dolphin” paint.
  • After everything was completely dry I lightly sanded the box with a piece of extra fine sand paper.  The sand paper gives the box the worn and weathered look I was going for.

Now onto the fun part, the fruits of my labor.

I picked soft pink geraniums, vincas, pink coleus and vinca vines to fill my flower box.

I put the box on an old white bench and sat it in front of my window.

It’s one of the first things I see as I come down the stairs in the morning.

I love how soft and delicate the flowers look inside the box.

It’s a great addition to my front porch.  

And to think my husband apologized for bringing it home.  (I think it’s lovely.)

If you liked this post you might like to read  A Trash to Treasure Love Story

Simple Summer Vase

Create a Simple Summer Vase using Transparent Adhesive Vinyl from StyleTechCraft.

Transparent vinyl is great when you just want to add a subtle touch of color.

It’s great for using on windows, glassware and just about anywhere else you want a unique look.

To create my Simple Vase I used:       (*affiliate links)

Directions:

  1. Cut several flower shapes using the Silhouette Cameo* and the Sky-Blue Transparent Vinyl.  Don’t have a electronic die cutter?  The transparent vinyl can be cut using various metal dies.
  2. Cut leaves out of the teal vinyl.
  3. Using the weeding tool, I carefully removed the negative spaces in and around the flowers and leaves.
  4. Place a piece of Vinyl Transfer Tape* over the flower image.  Apply transfer tape onto the cylinder vase and rub over the vinyl using a vinyl scraper tool to eliminate bubbles.
  5. Remove transfer tape.
  6. Repeat with the leaves.

Allow vinyl to cure for several days.  (Hand washing is recommended.)

I added a piece of white paper inside the vase so you can see the pattern better.

It’s hard to see in this picture the variation between the sky blue and teal vinyl.

“This is a sponsored post.  As a member of the StyleTechCraft Design Team I have been provided product and compensation in exchange for my creative ideas.  The views and opinions are my own.

You can now find the full line of StyletechCraft online at ATSM.