Gumball Machine Birthday Card

What kid doesn’t love Gumballs?

Create an adorable Gumball Machine Birthday Card using the New Gumball Stamp

and Die set from The Maker’s Movement.

Disclosure:  This is a sponsored post  for the Maker’s Movement.  I have been provided product
and compensation in exchange for my creative ideas.  The view and opinions are my own.

Materials Used to Create the Gumball Machine Birthday Card:    (*affiliate link)

*Disclosure:  This blog uses affiliate links.  If you choose to make a purchase using one of the links, I receive a small commission (at no additional cost to you) that helps offset the costs of maintaining this blog.  Thanks for your support!

The Gumball Machine Stamp & Die Set features all the pieces you need to create an adorable

gumball machine. The two coordinated globe glass container shapes let you make perfect

shapes for shaker cards. You can add sequins, shaker sprinkles, and other embellishments to

add more fun to your craft project. This set is great for making birthday cards, greeting cards,

and gift tags.

  • TIP…When I am die-cutting small pieces, I like to run the paper through the Xyron Create-A-Sticker Machine* to add adhesive to the back before cutting them out.  It makes all the little pieces stickers and makes assembling the card a breeze.
  • I used the Mini Maker Die-Cutting Machine to die-cut out the pieces.  While you won’t use it for all your die-cutting needs, I love the compact size on my workspace.

I’ve been struggling lately with lighting, and the winter grays don’t help.

I used the newly fallen snow as my white background.

If you look closely, you may notice the snow crystals underneath the wood slice.

I can’t wait until Spring!

Cute Valentine/Spring Décor with Vinyl

Creating Cute Valentine/Spring Décor with StyleTechCraft Vinyl.

Did you ever get a song stuck in your head while working on a project?

I’m showing my age here, but this Karen Carpenter song kept going through my mind while

I was putting together the Bird on the Branch and, I just had to create the words to go with it.

“This is a sponsored post.  As a member of the StyleTechCraft Design Team I have been provided product and compensation in exchange for my creative ideas.  The views and opinions are my own.

I love creating projects for my home using vinyl. 

My favorite vinyl is the Glossy Craft Vinyl from StyleTechCraft.

There are so many great color choices to choose from.

Materials Used to make the Valentine Projects:              (*affiliate links)

*Disclosure:  This blog uses affiliate links.  If you choose to make a purchase using one of the links, I receive a small commission (at no additional cost to you) that helps offset the costs of maintaining this blog.  Thanks for your support!

Project Details:

  • I used a 5″ x 7″ decorative piece of chipboard that I’d had around for a while.
  • I cut a piece of woodgrain paper a little larger than the chipboard.  
  • Place the paper in the Xyron Creative Station* design side up through. As you turn the handle, it runs through the machine and adds a complete layer of adhesive onto the back of the paper.

  • Adhere the paper to the chipboard and cut away the excess using a craft knife and cutting mat.
  • Use a fine Sanding Block* to smooth out the edges of the chipboard.

  • I used my Silhouette Cameo Electronic Die Cutting Machine* and the “Bird on the Branch” SVG file to create my design.
  • I sized the image to fit onto my chipboard and cut the various layers of the red in three shades to make a cardinal.  
  • After weeding the excess vinyl from around my images, I transferred them onto the chipboard using the Clear Transfer Tape*.
  • After having the song stuck in my head, I decided to create a few words for my sign.
  • For added detail, I went around the edge of my sign with a Silver Leafing Pen*.

  • I cut an extra little cardinal to fit inside a small circle frame and added small red hearts on the top and bottom.
  • To complete my decorations, I added my small faux heart topiary to a reddish metal and added the words “choose happy” in Olive vinyl.

I have Cute Valentines Decorations that will take me into Spring.  (and maybe longer)

You’re my Jam Valentine Shaker Card

Don’t you just love cheesy Valentines?

The “You’re My Jam” stamp and die set from The Maker’s Movement is one of the cutest sets

from the New Spring Release.  And it makes the perfect Cheesy Valentine’s Day Shaker Card.

Disclosure:  This is a sponsored post  for the Maker’s Movement.  I have been provided product
and compensation in exchange for my creative ideas.  The view and opinions are my own.

Materials Used:        (*affiliate link)

Shop Tombow

*Disclosure:  This blog uses affiliate links.  If you choose to make a purchase using one of the links, I receive a small commission (at no additional cost to you) that helps offset the costs of maintaining this blog.  Thanks for your support!

Directions:

  • Cut a piece of double-sided craft foam approx. 4″ x 5.
  • Using the jar outline die, die-cut the jar shape into the lower section of the craft foam.
  • Cut a piece of the wood grain scrapbook paper approx. 4 1/2″ x 5 1/2″.  Die-cut the jar shape into the lower section of the scrapbook paper.
  • Cut a small piece of acetate to cover the opening of the jar.
  • Remove protective coating off the acetate.
  • Remove the protective liner off the top side of the adhesive craft foam.  Stick the acetate over the opening.
  • Line up and stick the scrapbook paper over the jar opening of the craft foam and acetate.
  • Center a round rectangle die over the jar and craft foam and die-cut using the Crossover II die cutting machine.

TIP...I like to do when working with small die-cut pieces, is to run the paper through the Xyron Sticker Maker before die-cutting. It makes all the pieces stickers and makes assembling a breeze.

  • Die-cut all the jar pieces and assemble them onto the front of the foam.
  • Cut a piece of heart scrapbook paper slightly larger than the opening.
  • Turn the foam over and fill the opening with heart shaker sprinkles. Make sure not to overfill. You need to leave enough room for the Sprinkles to shake.
  • Remove the protective coating from the back of the foam and place the heart paper over the opening.
  • Cut a large layer using the round rectangle dies and stick onto an off-white cardstock base.
  • Adhere the die-cut foam layer onto the front of the card.
  • Randomly glue a few heart sprinkles to the front of the card.

Decking the Halls with Comfort and Joy Christmas Album

Comfort & Joy Christmas Album

Christmas is going to feel a lot different this year.

Instead of large family gatherings, we’ll be keeping it simple.

Sharing a little Holiday Encoragement

This year, the Eileen Hull teams got together and decided to celebrate the Holidays by creating

Comfort and Joy Albums and asked the Eileen Hull Facebook Fan Club to join along.

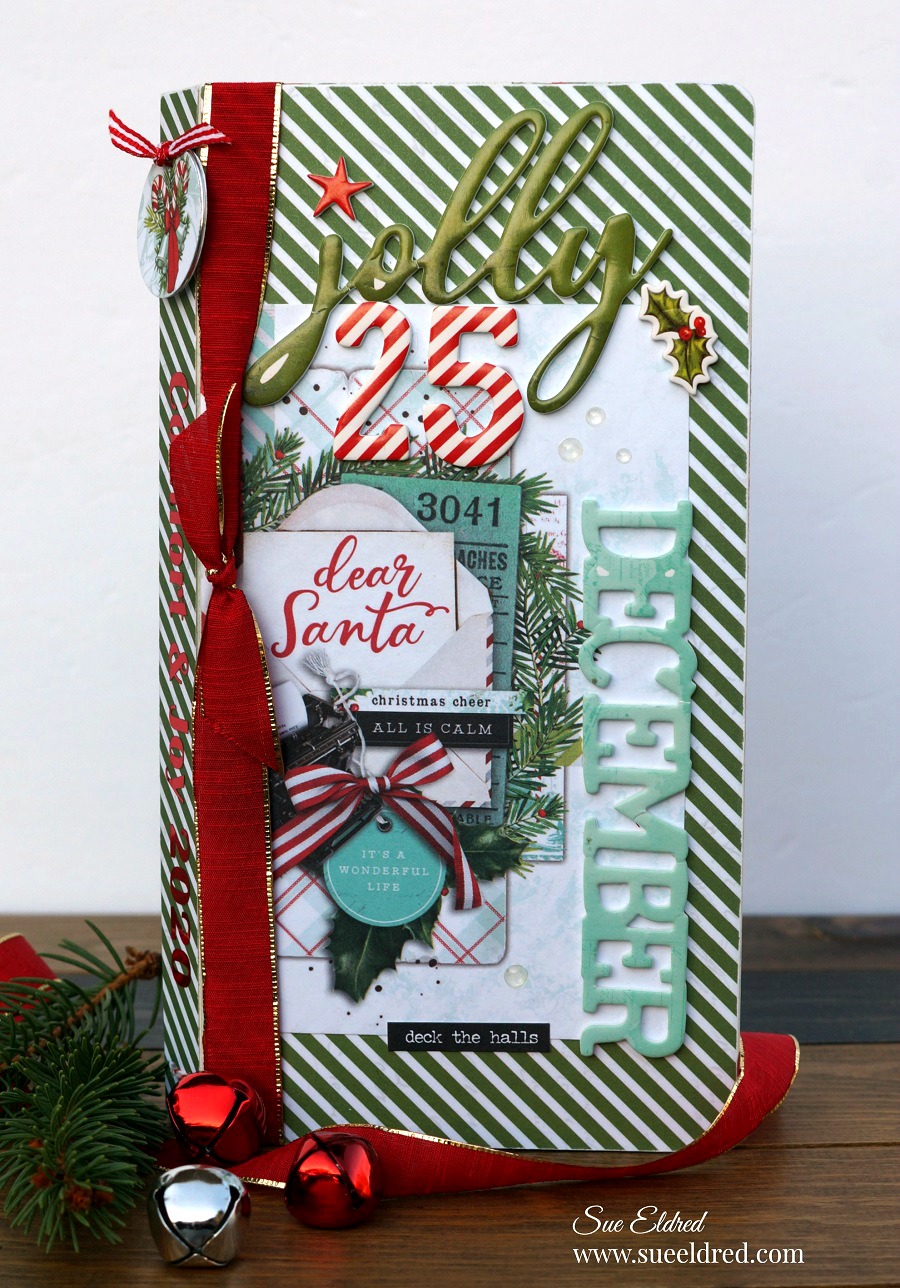
For my album, I choose the theme Decking the Halls.

You can find the Eileen Hull Facebook Fan Club Page here.

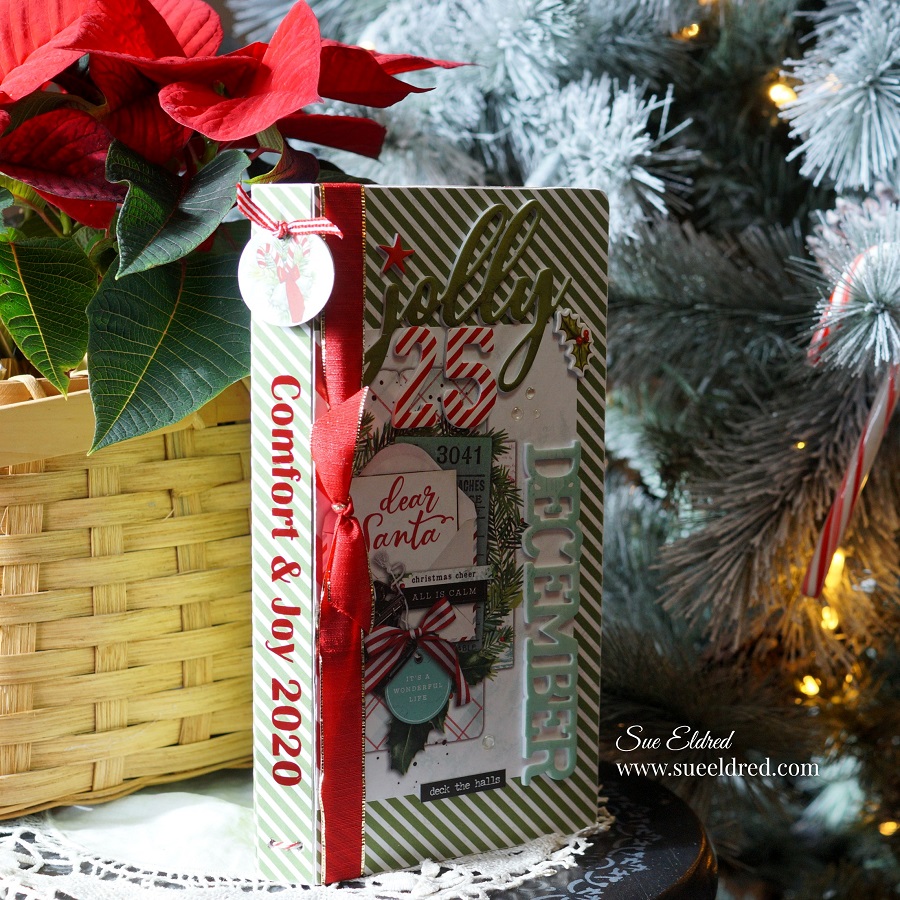
My Comfort and Joy Album uses the Eileen Hull Journal Die* and papers and embellishments

from Simple Stories Simple Vintage North Pole Collection*.

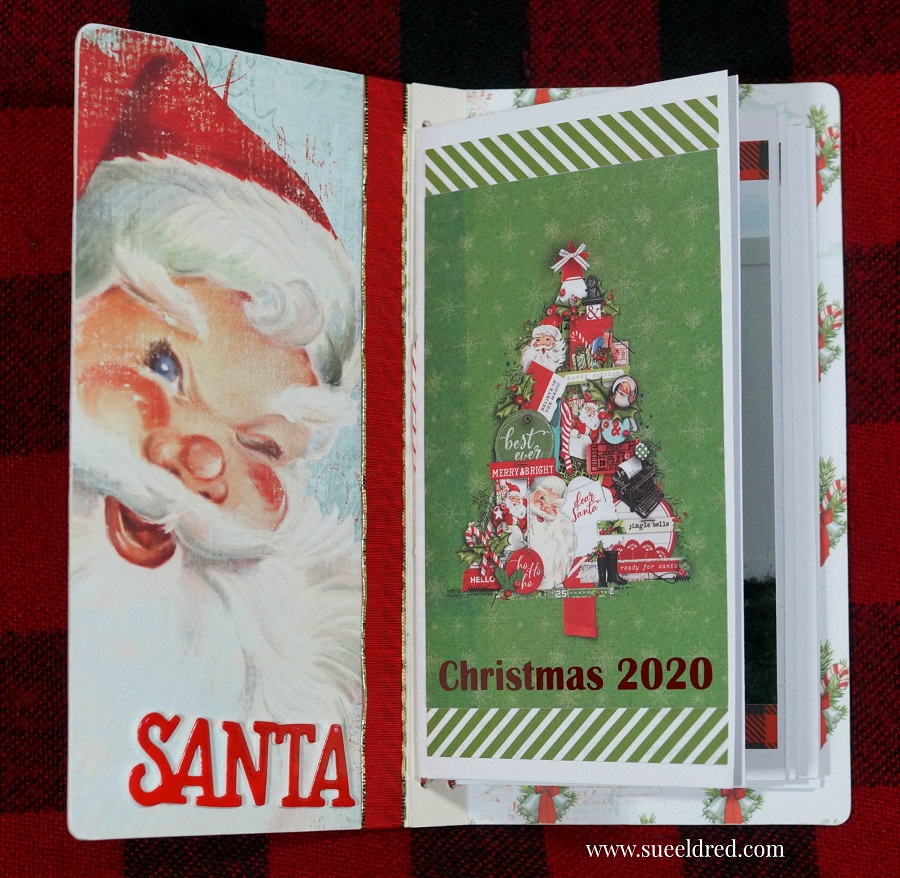
Instead of giving you a tutorial on how I made the album, I’ve decided to explain the inspiration

behind the album and share with you how I decorate my home for Christmas.

Materials Used:                  (*affiliate link)

*Disclosure:  This blog uses affiliate links.  If you choose to make a purchase using one of the links, I receive a small commission (at no additional cost to you) that helps offset the costs of maintaining this blog.  Thanks for your support!

Because my family won’t be together this Christmas, I’ve asked my daughter and daughter in law to send me Christmas pictures for my album.  I will have a family album filled with Christmas Memories.

I also come from a large extended family, which usually gets together for a big Christmas party.  I’ll be honest, the thought of missing all these celebrations makes me a little sad.

While making my album, I got the inspiration to take this weekend and drop off small gifts to my siblings.  I’ll be able to take a few porch pictures of the families and get my much-needed family fix.

Decking the Halls

When it comes to decorating the outside, I like to keep it simple.  We wrap twinkle lights around the large bush by our lamp post and hang icicle lights on the upper balcony.

Sprucing Up with Holiday Greens

I cut pine branches from the large pine tree in the yard and spruce up my pots with Holiday greens.

The Front Door

The front door has a simple wreath and a decorated sled.

The Christmas Tree

A few years ago, I got this frosted tree and absolutely love it.  I keep it simple with a red and white theme.  (I only use a fraction of the ornaments I’ve collected throughout the years)

Bookish Gnomes

While working on the decorations, I moved these gnomes on top of the books because my little pup thought they were dog toys.  I liked the way they looked, so I kept them there.

The Mantle

In my Dining Room, I have a large fireplace, which I decorated the mantle with a few of my Santa’s from my Santa Collection.

My Santa Collection

I’ve got Vintage Santas, Skiing Santas, Golfing Santas, and Toymaking Santas.  I scatter them randomly around the house.
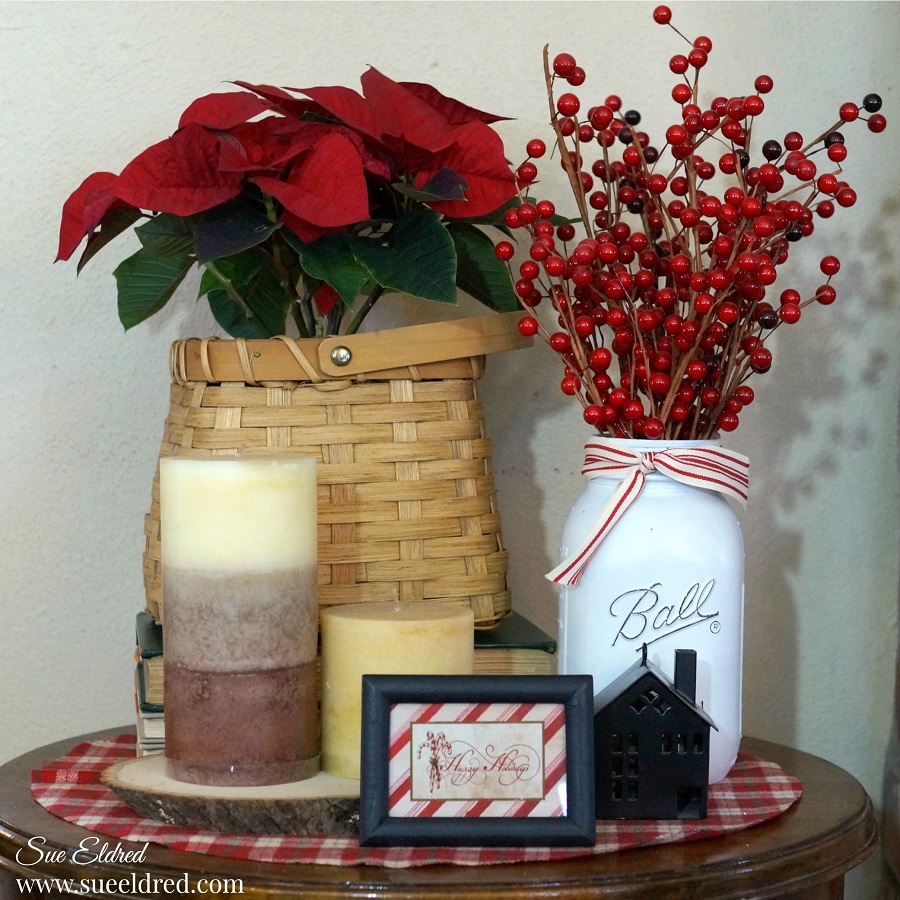
Keeping it Simple

I would love to one day have a fully styled house for the Holidays.  Instead, I keep it simple.

I create small vignettes around the house to make it feel festive and homey.

Dexter

Even my sweet little pup, fresh from the groomers, matches my decorations.

Dexter and I would like to wish you all a Happy Holidays filled with Comfort and Joy.

Amazon FreeTime Unlimited Free Trial 

Elegant and Easy Holiday Card

How to Make an Elegant and Easy Monochromatic Holiday Card.

When it comes to making cards for the Holidays, two words come to mind, elegant and easy.  This Merry little card is both.  With a few simple tricks and tips, this card is a snap to make.

Disclosure:  This is a sponsored post  for the Maker’s Movement.  I have been provided product
and compensation in exchange for my creative ideas.  The view and opinions are my own.

Materials Used:                        (*affiliate links)

*Disclosure:  This blog uses affiliate links.  If you choose to make a purchase using one of the links, I receive a small commission (at no additional cost to you) that helps offset the costs of maintaining this blog.  Thanks for your support!

Directions:

  • Choose several different shades of red cardstock.  (I used four.)  Cut into 2 1/2″ x 4 1/2″ strips.
  • To make assembly easy.  I used the Xyron Create a Sticker to add adhesive to the back of the strips of cardstock.
  • Trim the larger strips into 1/2″ x 4 1/2″ smaller strips.
  • Cut a 4 1/2″ x 6 1/2″ piece of red cardstock to use as the base.  Starting at the top, add the strips of red cardstock to the base.
  • Die-cut two branches using the Winter Foliage Die Set and Gold Chrome Vinyl.
  • Die-cut small snowflakes using the gold chrome vinyl and the snowflakes found in the Snow Globe Die Set.
  • Die-cut the words “Be Merry” using gold chrome Vinyl and the Be Merry Die Set.
  • Remove the white protective backing from the vinyl and use as stickers to decorate the front of the card.  I used the edge of the cardstock strip to help me line up the words.
  • Add red metal nailhead sticker embellishments onto the branch.
  • Cut a 4 3/4″ x 6 3/4″ piece of Chrome Adhesive Vinyl and adhere to a white 5″ x 7″ card.
  • Adhere the striped card front to the card base.

Xyron Holiday Bundle Winner

Congratulation goes out to Denise B of England,

You are the Winner of the Xyron 2020 Holiday Bundle.

Thanks to Everyone who entered into the contest.

And a Special Thanks to Xryon for giving me the Holiday Bundle to Give Away.

You all know how much I love my Xyron Products.

Be Merry Poinsettia Card

How to Create a Beautiful Poinsettia Christmas Card using Distress Ink.

I like making clean and simple cards.

But everyone once in a while, a card just calls out to be inked.

This card was one of those projects.   (It’s still kind of clean and simple.)

Disclosure:  This is a sponsored post  for the Maker’s Movement.  I have been provided product
and compensation in exchange for my creative ideas.  The view and opinions are my own.

Materials Used:        (*affiliate link)

Directions:

  • Run several strips of 3″ cream cardstock through the Xyron Sticker Maker*. The sticker maker adds an even layer of adhesive to the back of the cardstock. Do this before die-cutting to make each small piece a sticker. (it makes assembly so much easier)
  • Using the Winter Foliage Die Set and the Crossover II Die-Cut Machine*, die-cut the pieces out of cream cardstock. You will need 8-smooth leaves for the flower, 4-pointed leaves for the foliage, 4-pine branches, and 2-small leaf die-cuts.

  • Ink the edges of the leaves using an Ink Blending Tool* and the Distress Inks.
  • For the base of the card, cut 4 3/4″ x 6 3/4″ piece of woodgrain scrapbook paper. Adhere the woodgrain paper onto a 5″ x 7″ gold cardstock layer. Adhere both layers onto a 5 1/4″ x 7 1/4″ cream card base.
  • Start with 4 of the smooth leaves inked with the Barn Door Red Ink and place onto the front of the top of the card. Place them so that they line up opposite of each other.
  • Place and stager the four additional red leaves on top of the first layer of leaves.
  • Adhere the leaves, foliage and, pine stem under the poinsettia flower.

  • Die-cut three small circles (from the Winter Foliage Die Set) out of gold cardstock and adhere to the center of the flower.
  • Die-cut the words “Be Merry” out of cream cardstock ran through the Xyron Sticker Maker* and place the stickered “Be Merry” onto the front of the card.

*Disclosure:  This blog uses affiliate links.  If you choose to make a purchase using one of the links, I receive a small commission (at no additional cost to you) that helps offset the costs of maintaining this blog.  Thanks for your support!

Xyron Holiday Bundle Giveaway

My friends at Xyron has generously given me a New Xyron 2020 Holiday Bundle to giveaway to one lucky person.

This limited-edition holiday bundle is perfect for gift wrapping over the holidays or anytime. The Xyron Mega Runner lets you wrap packages beautifully, without the messy tape. Have fun making your own labels for any occasion with the Xyron 3” Disposable Sticker Makers. Let Xyron help make your holidays easier!

The Xyron Holiday Bundle Includes:

  • Red Xyron Mega Runner
  • Two Xyron 3″ Disposable Sticker Makers with a Blue Snowflake Pattern.
  • 40 Holiday Labels

There are several ways to enter.  

  • Leave a comment on this post telling me you’d like to win.
  • Follow, Like and Comment on my Facebook Page
  • Follow, Like and Comment on my Instagram Page.
  • Follow Xyron’s Instagram Page and leave a comment on either this post or one of my other posts to let me know you followed them.

Winner will be chosen:  Sunday, November 15, 2020

Even if you don’t win you can get your own Xyron Holiday Bundle here.

Holiday Joy Christmas Card

A little Holiday Joy Christmas Card to brighten up your day.

If you like making your own Christmas cards and have a lot to make,

this quick and easy card might be a great choice.

I’m thinking, this simple little card is the one I’ll send this year.

Disclosure:  This is a sponsored post  for the Maker’s Movement.  I have been provided product
and compensation in exchange for my creative ideas.  The view and opinions are my own.

Supplies Used:             (*affiliate links)

*Disclosure:  This blog uses affiliate links.  If you choose to make a purchase using one of the links,  I receive a small commission (at no additional cost to you) that helps offset the costs of maintaining this blog.  Thanks for your support!

Card Details….

  • To make my snowflake stand out more. I took a small piece of white ultra metallic glitter vinyl and adhered it to a piece of cream cardstock before die-cutting the snowflake. You can’t tell by the picture, but the snowflake has a glittery shimmer.
  • I like to use the Xyron Create-A-Sticker*to add adhesive on the back of the gold cardstock before die-cutting the letters.  It makes assembling the card a breeze.
  • The finished card size is 4 1/4″ x 5 1/2″.

Hey, it’s a Pumpkin Pie Card

I’ll take a slice of pumpkin, please. 

My favorite Fall Pie hands down is a good slice of Pumpkin Pie with lots of whipped cream.

My grandma used to make the Pumpkin pies every year for Thanksgiving.

And because my husband would carry on about how it was the very best pumpkin pie,

she would bake an extra pie for him and drop it off at his work.

It was our little secret because she never wanted to be accused of having any favorites.

My pumpkin pie card was made with the “Hey, Pumpkin” stamp and die set from The Maker’s Movement.

Supplies Used:         (*affiliate link)

*Disclosure:  This blog uses ads and affiliate links.  If you choose to make a purchase using one of the links, I receive a small commission (at no additional cost to you) that helps offset the costs of maintaining this blog.  Thanks for your support!

Directions:

  • Cut out the “our fall favorites” journal card from the scrapbook paper sheet.
  • Use mini maker die cut machine and the scalloped heart-shaped die to cut out the pieces for the pie out of cream and burnt orange cardstock.
  • Cut a white swirl using the small swirl die and the white cardstock.

Tip…I like to run the small pieces of cardstock through the Xyron Create-A-Sticker* before I die cut them.  It makes it so much easier to adhere the small pieces onto the card.

  • Put the finished pie pieces together, and using the small “v ” shaped die, cut a small pie-shaped piece out of the pie.

  • Adhere the pie pieces onto the “our fall favorites” journaling card.  I added a small thin foam mounting square to add the whipped cream onto the pie.
  • Stamp the words “Hey, Pumpkin” onto the bottom of the card.
  • Layer the card onto a piece of gold textured card.

Disclosure:  This is a sponsored post for Maker’s Movement.  I have been provided product and compensation in exchange for my creative ideas.  The view and opinions are my own.