Snowball Fight

Snowball Fight 2

Ready for some good old fashioned fun?

How about a snowball fight?

Snowball Fight 3249

If you’re not loving the cold…

Here’s a snowball fight you can have while snuggling up inside.

Snowball Fight Supplies

Here’s what’s you’ll need:                            (*amazon affiliate link)

Directions:

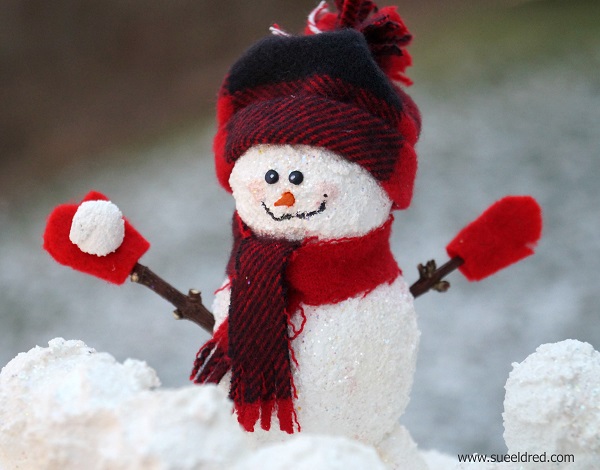
  1. Cut the 2″ Smoothfoam ball in half.  Cut the top off the rounded side of one of the balls.
  2. Poke two holes into the bottom of the Snowman body using the craft pick.  Break a toothpick in half, dip ends into craft glue and insert in holes.  Attach the sliced ball onto the Snowman body.
  3. Apply Snow-tex with palette knife over the newly formed Snowman and the 6″ disc.  Allow both to dry fully.
  4. To Create a Snowball Wall… Poke holes into the 1″ balls with the craft pick.  Insert toothpick halves with craft glue on the ends into balls.   Build wall by sticking the balls together.
  5. Apply Snow-tex onto wall using the palette knife.  (Allow to dry.)
  6. Create scene by attaching snowman and wall onto the disc.  Reinforce the pieces with toothpicks and craft glue.
  7. For a shimmery snowy glow…paint all the pieces with Crystal Craft Twinkles paint.  (Allow to fully dry.)
  8. Add shadows to the snowman and snowballs by gently applying vintage photo ink using a stipple brush.
  9. To Create the Snowman Hat… Measure and cut fabric to fit around snowman head.  Fold over and glue one of the long edges of the fabric to create a brim.  Glue fabric ends together to create a tube.  Tie top of the tube with a piece of string, cut excess fabric off top of the tube and fray the ends by making small cuts with the scissors.  Glue to the top of the Snowman head.
  10. Add arms to the Snowman using small twigs.  Warm him up with a fabric scarf and mittens cut from the fabric scraps.
  11. For the Snowman’s Face… Use two small black micro brads inserted into the snowman face for the eyes.  Paint the tip of a bamboo skewer with orange paint, cut and insert into the face for the nose.  Add a smile to the snowman’s face using a extra fine black paint marker.
  12. Make a small snowball using a small pieced of paper wadded up and covered with Snow-tex.  Glue finished and dried snowball onto mitten.

Snowball Fight Close Up 3194

This project was created for and sponsored by Smoothfoam the crafter’s foam.

Shop Amazon Scrapbooking Supplies*

Disclaimer:  This blog uses ads and affiliate links.  If you choose to make a purchase using one of the links, I receive a small commission (at no additional cost to you) that helps offset the costs of maintaining this blog.  Thanks for your support!

CardMaker Magazine Spring 2016

CardMaker Magazine Spring 2016 pg. 76

I just got my copy of CardMaker Magazine’s Spring 2016 Issue…

and I still get a kick every time I see one of my cards featured.

My “be yourself card” uses a simple watercolor technique that uses ink from markers and inkpads.

Image is from Adornit’s Be Awesome Art Play Paintables.

For some really great card-making inspiration make sure to pick up a copy for yourself…

and be sure to check out page #76.

Paper House Productions 2016 Design Team

Seriously…

I had just checked their website to see if they’d posted the team

when I got the email letting me know I was chosen.  (Insert Happy Dance!)

Paper House Productions 2016 Design Team

I am happy to announce that I am now part of The Paper House Production’s 2016 Design Team.

I’ll be still be making all my crafty DIY projects, but in addition, I’ll be making more.

More cards, more layouts, more fun paper projects, more inspiration.

So for those of you who love “paper-crafting”.  This ones for you.  (and me of course)

I can’t wait to get started.


Cupcake Stand or Craft Supply Storage?

Cupcake Stand or Craft Supply Storage 3310

Deflecto Craft Solutions has several new items debuting at CHA this week in Anaheim, California.

(CHA being the annual Craft and Hobby Association Trade Show.)

One of my favorites products being shown is this Three Tier Desert Stand.

Acrylic Stand and Supplies

The stand features adjustable heights and a easy knock down compact design for storage.

It is perfect for holding cupcakes and even comes with little holes to insert cake pops.  (Pretty Clever.)

The Cupcake Stand will be available January 2016 through local art, craft and educational stores.


Because I don’t make a lot of cupcakes, I decided to use mine for storage instead.

tracing circles

This is what I used to personalize the stand:

  1. Trace each of the tiers onto the back of the kraft paper.
  2. Loosely cut around each circle.
  3. Liberally apply the glue-stick onto the back of the paper around and inside the circle.
  4. Lay tier onto the glued circle and trim excess paper with craft knife.
  5. Smooth paper onto tier.
  6. Cut out the center channels of the tiers with a craft knife.

Washi Tape Border

Apply washi tape around the outside lip.

decorated stand with out paint

Assemble stand and fill craft supplies.  (or maybe even your favorite cupcakes)


“This is a sponsored post. As a member of the Deflecto Design Team I have been
provided product in exchange for my creative ideas, views and opinions.”

This post uses Amazon links if you choose to purchase from Amazon, I get a very small commission.

My 2016 Personalized Planner

Have you noticed how popular Specialized Planners have become?

You can find them all over in stores and online in almost any color or size…

with places to doodle, write scriptures, stay organized, you name it.

Sue's 2016 Planner

I am a planner, a list maker and a person who likes to stay organized.

I’ve used planners for years and I’m picky.  I know exactly what I want.

I’m also simple and don’t want or need a big fancy planner.

I need a month at a glance, thin, big enough space for writing, with lines planner.

The last couple of years, I have found this super cheap planner for $1.00 at Walmart.

My 2016 Planner

The color selection was bright, but, I knew that didn’t matter.

It was perfect for decorating.

And… better yet, it came with a clear protective cover.

So armed with my inexpensive planner and a few sheets of scrapbook paper and stickers.

I personalized my planner, just how I want it.  I now have the perfect planner.

From Drab to Fab, Cheap to Designer.  I love it and I couldn’t be happier!

Inside of Planner 2466

Plenty of space for notes.

(FYI:  I save my planners each year, it’s a handy reference to vacations and special occasions you might want to document in your scrapbooks)

Simple Stories Simple Set Collection Kit 12″X12″-You & Me

The Best of 2015

You know what?  Looking back, 2015 was a pretty good year.

Nothing too big or too small.  Just a good year.

So, In 2016… I look forward to improving my photography and blogging skills

and to keep sharing my creative endeavors with you.

So here how last year shaped up for Sue’s Creative Workshop.

In 2015, I posted 136 times on my blog. (an average of 2.6 times per week)

I created lots of Projects, Tutorials, DIY Make-Overs, Cards, Mini Albums and more.

I shared recipes, family pictures and gave a little bit of myself.


To make sure you don’t miss anything in 2016…

Sign Up to follow my Blog (see “follow” button on the right⇒)

After Christmas Family Fun Day

Christmas 2015 3109

I love getting the chance to be with the family on Christmas.  That in itself is a gift.

But… after all the Christmas Craziness is over, we like to take a day and have a little family fun.

I almost enjoy it more than Christmas.  (it’s more relaxed)

Stephanie and Zach Close Up

In my hometown we have a small town square and parked in the square was this cute decorated

wagon.  I knew it was the perfect spot for a family picture.  I just had to wait until everyone was home.

Nick and Bonnie Close Up

The weather was good.  (a little sunshine and a light snow would of been perfect)

It didn’t take much coaxing for me to get them to go.

They’re all good sports.  (they knew I’d pout if they didn’t.)

Stephanie and Zach 3106

Nativity on the Square

After a few pictures, we headed to the local bowling alley for a Family Bowling Night.

It’d been exactly a year since I’d bowled.

Warren Bowling

The kids even got in on the action.

Nicholas Bowling

Justin Stephanie and Zach Bowling

Bonnie and Warren Bowling

After spending such a nice and perfect day with the family, we woke to a winter ice and sleet storm.

So… today I will be staying in, relaxing and hopefully reading the new book I picked up.

Wishing you all a wonderful and relaxing start to the New Year.


Homespun Rag Ball Ornaments

This year, I wanted to do a small little tree for the dining room.

A simple homespun tree with strung cranberries and hand-made ornaments.

I had grand ideas and a galvanized pail.

But reality hit, a long with the cold and flu, which knocked me out for a week.

It took my creativity level down to a one.

And sad to say… My small little tree didn’t get done.

I did string the cranberries…  (a first for me)

They were so bright and colorful.  I loved the look and took lots of pictures.

After a week or so, the cranberries started getting a mushy.

So… I put them out on the tree in the front yard for the birds to eat.

It looks pretty out there too.

Next time, I’ll make them last minute.

For the Rag Ball Ornaments…

Instead of just wrapping the strips of fabric until it formed a ball,

I made the rag ball using a Smoothfoam 2-Inch ball*.

Supplies used:                     (*affiliate link)

Shop Your Fav Brands at Scrapbook.com

Directions:

  1. Lightly sand the ridge around the ball.
  2. Cut the fabric into 3/4″ strips.
  3. Apply Mod Podge onto the back of the fabric and adhere to the ball.
  4. Continue until the ball is fully covered.
  5. Add an additional coat of Mod Podge over the ball to finish and seal.
  6. Poke a hole on the top of the ball and add a dab or glue into the hole.
  7. Insert twine into the hole to use as the ornament hanger.
  8. Embellish ornament by gluing a bow on top.

Wouldn’t a whole bowl of rag balls would be cute?  (maybe next year)

Shop Amazon Scrapbooking Supplies*

*Disclosure:  This post is sponsored by Smoothfoam and uses ads and affiliate links.  If you choose to make a purchase using one of the links, I receive a small commission (at no additional cost to you) that helps offset the costs of maintaining this blog.  Thanks for your support!

Merry Christmas Gift Bag

Merry Christmas Gift Bag 1186

Make your Christmas Gift Bags a little more special with iron-on letters from Joy.

Merry Christmas Gift Bag Supplies

Start with a plain drawstring bag.  (Mine was from Canvas Corp.)

Replace the drawstring cording on the bag with red and white gingham ribbon and add iron-on

letters in red and neon yellow.  (in person the neon yellow looked lime to me)

Merry Christmas Gift Bag Flat 1140

Glue white lace, rick rack, buttons and a small wreath to the front of the bag.

For a truly personalized gift add a name instead of Merry Christmas.


This project was created for and sponsored by Joy SA.

Simple Felt Christmas Tree Ornament

Felt Christmas Tree

Every year I make a new Christmas Ornament or two.

As I was putting up the Christmas Decorations, I ran across this one.

The simple little felt Christmas Tree was one I made several years ago.

Still one of my favorites.

Put together using fabric glue.  (with a little stuffing inside)

Simple, Simple, Simple…