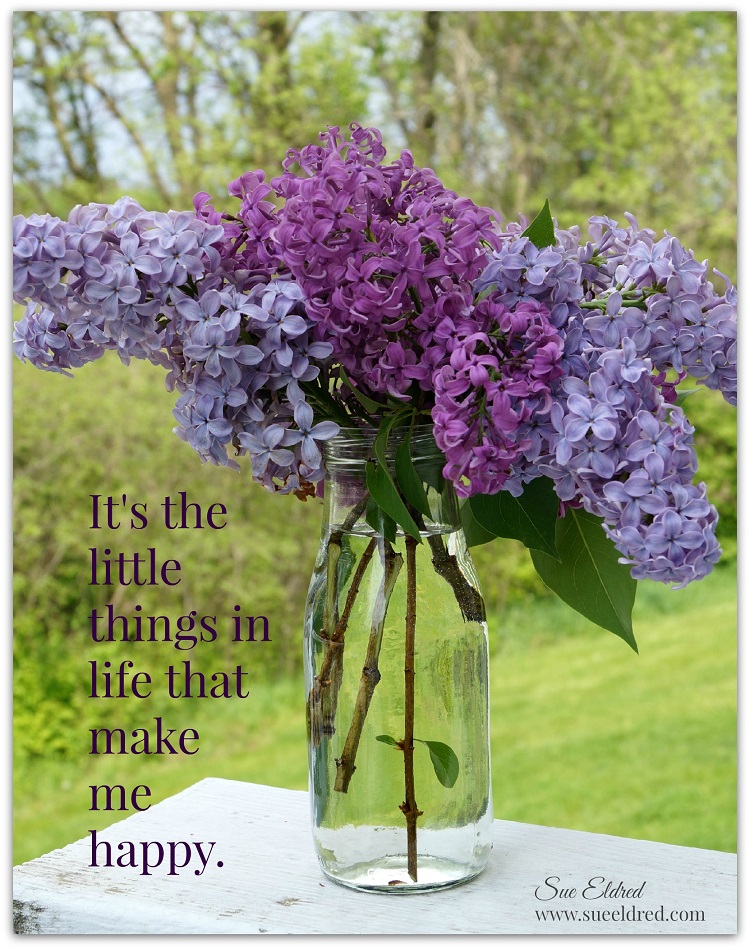
A kind word, a sweet smile, a warm hug…
It’s the little things in life that make me happy.
A simple act of kindness can change somebody’s day.
Have a great day. Make it a good one.
Oh… and DON’T FORGET TO SMILE!
A kind word, a sweet smile, a warm hug…
It’s the little things in life that make me happy.
A simple act of kindness can change somebody’s day.
Have a great day. Make it a good one.
Oh… and DON’T FORGET TO SMILE!

Some years I don’t have any Graduations to celebrate.
This year there are three. One from High School, Two from Junior High. (not mine!)
I decided to make a Graduation Frame to use as one of the gifts.
After the ceremony the Graduate can take out the greeting and add a picture.

For my frame I used: (*affiliate link)
FYI: When my oldest graduated from High school his younger sister also graduated from Junior High. Four years later when it was time for her to graduate High School he was graduating from College.
SO….for all you young people thinking of starting a family.
Don’t space your kids 4 years apart. (The magic number is three.) Just saying!
![]()
“This is a sponsored post. As a member of the Deflecto Design Team I have been provided product in exchange for my creative ideas, views and opinions.”

*Disclosure: This post uses ads and affiliate links. If you choose to make a purchase using one of the links, I receive a small commission (at no additional cost to you) that helps offset the costs of maintaining this blog. Thanks for your support!
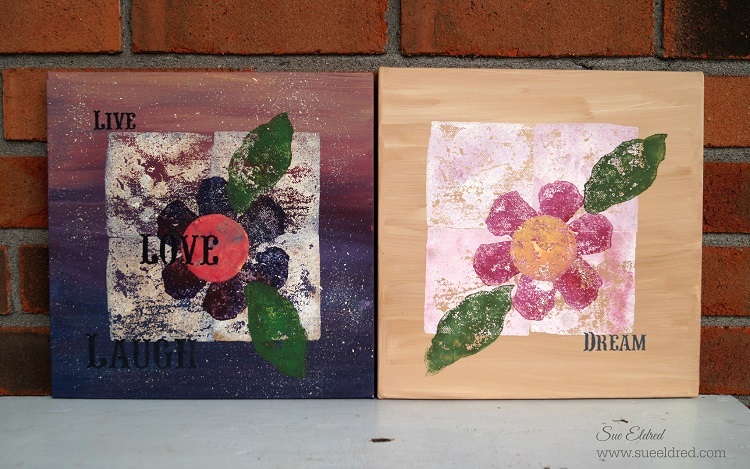
I had this great idea to make stamps using Smoothfoam so that I could do sidewalk stamping with my
Grandsons. After one messy (but fun) try, I decided it really wasn’t going to work the way I wanted.
So… I decided to use the stamps on a canvas instead.
(See Wednesday’s post: The Good, the Bad and the Messy)
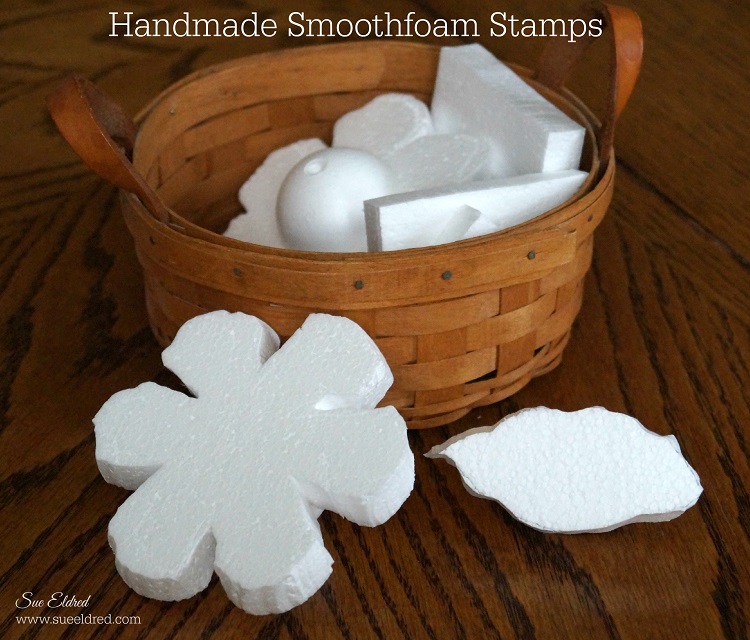
I created the stamps using a Hotwire Foam Cutter. You could also use a craft knife.
Because the original plan was to use them with the kids, I glued handles on the back.
I made flower shapes, leaves, squares and triangles.

Supplies Used:

Disclaimer: This project was created for and sponsored by Smoothfoam.
 A little Throwback Thursday:
Eight years ago, I got the chance to revisit Hawaii with my honey.
Hawaii is the place where I met this good-looking guy.
Oh how I’d love to be able to go back today.
Good Times, Good Memories.
I can’t believe how much younger and tanner I/we look. (not to mention how short my hair is)

Having a creative mind means having several project ideas swirling around your head…
being a Creative Blogger with a editorial calendar, means you times that amount times 2.
And then sometimes….(a lot of sometimes) you’ve got nothing at all.
I was brain-storming recently with a fellow Designer when I came up with this brilliant idea
of stamping on the sidewalk with homemade chalk paint.

I thought this would be a great project to do with my grandsons. (and a potential blog post)
I researched recipes and got my supplies together.
Darn you Pinterest with all your beautiful pictures and homemade recipes.
I created handmade stamps using a large Smoothfoam square and my Super Hotwire Foam Cutter.
I made a variety of shapes to use with the boys.

I made the chalk paint with a recipe I found using cornstarch, water and food coloring.
The problem was that the paint started drying right away.
And…the boys were having too much fun playing in the paint to start all over.
The chalk paint is non toxic and easily cleaned up once dried by brushing the boys off.
After a good rain, all the mess was gone.

I’m confident with a little more experimenting we could get the consistency just right.

After making a very fun mess, I decided it was just that…
and moved on to Plan B. (My post for Friday.)
Make sure to come back Friday for Block Stamping on Canvas with Smoothfoam.

Now that the weather has finally turned nice(ish), I’ve decided it’s safe to come out of hibernation.
So I was happy when I got the chance to go out and go treasure hunting.
My daughter was in town (on a Tuesday) and we decided to go visit our favorite Thrift Store.
This time, we let her hubby tag along, he actually spent more money than we did. So all was good.
When I’m hunting…I’m a pretty picky picker, so it’s got to be good. (and cheap)
Here’s what I got:
2 small baskets, 3 small rulers, 4 packages of mini rick rack, a small red toile dish and 3 red bound
classic books and a Maya Angelou book. All for around $7.00.
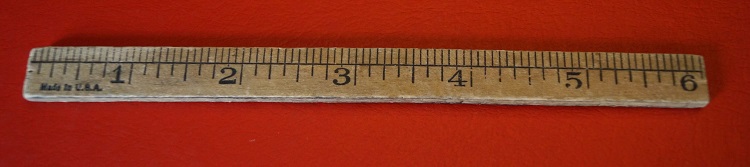
My favorite of all these treasures was the little wood ruler I picked up for a dime.
It will make a wonderful addition to a project. Or maybe I’ll just keep it for display.
What do you look for when you go treasure hunting?

I recently got a beautiful assortment of ribbons and trims from Decorative Trimmings to use
on a special project. It was hard choosing which trims I wanted to use, because their selection
is wonderful. I decided to Create a Keepsake Memory Box.
You know… for all those special little things that you want to keep and remember forever.
A perfect little box to fill with small gifts for Weddings, Mother’s Day, Bridal or Baby Showers.
Or maybe old love letters from your husband. (Hmmm… I’d need a bigger box.)

For my Keepsake Memory Box and Tag I used three of the trims.
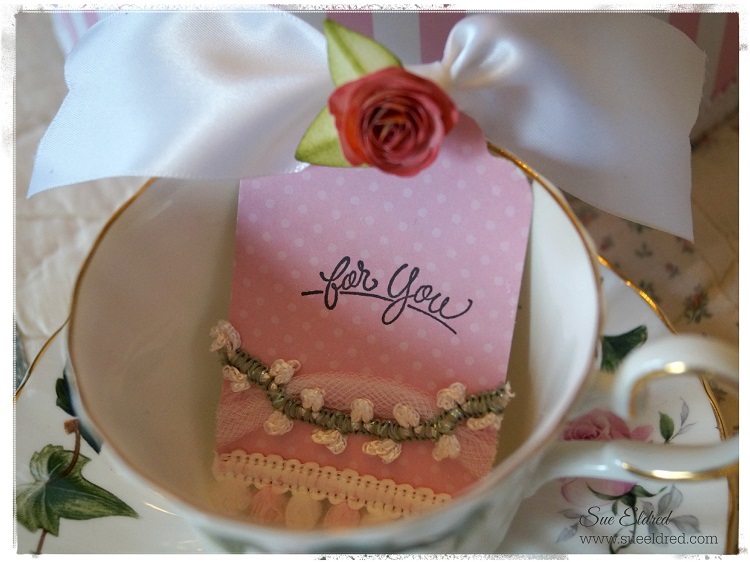
Today’s post is part of a blog hop hosted by Decorative Trimmings.

Shop Handmade – The Wedding Store
Disclaimer: This blog uses ads and affiliate links. If you choose to make a purchase using one of the links, I receive a small commission (at no additional cost to you) that helps offset the costs of maintaining this blog. Thanks for your support!


There’s nothing like one of Grandma’s recipes to bring back fond childhood memories.
Large family dinners around a loud and crowded table (or two).
Crock Pot Roast, Mashed Potatoes, Gravy, Green Beans, Rolls and one of Grandma Merritt’s Deserts.
Mom would put the roast on before church and Grandma would bring the desert.
Soda Pop Cake, Cheesecake, Hobo Cake with Chocolate Fudge Icing (Yumm!) just to name a few.
With our large and ever expanding group of family and friends,
Grandma usually made a double batch of whatever desert she brought up.
And…us kids would still argue over who deserved the last piece.
Good Times, Good Times! Makes my mouth water just thinking about it.
If you’re a Cheesecake Snob, you probably won’t enjoy this wonderfully, light fluffy desert.
But to us kids, it’s heavenly.
Grandma Merritt’s Cheesecake recipe has been around our family for probably 40 years.
I’m pretty sure she clipped it out of the newspaper somewhere down the line. (she was a clipper)
Since today would of been her birthday, I thought it’d be a great day to share.
Here’s her recipe, I actually have two (one just slightly different)
Grandma Merritt’s Cheesecake:
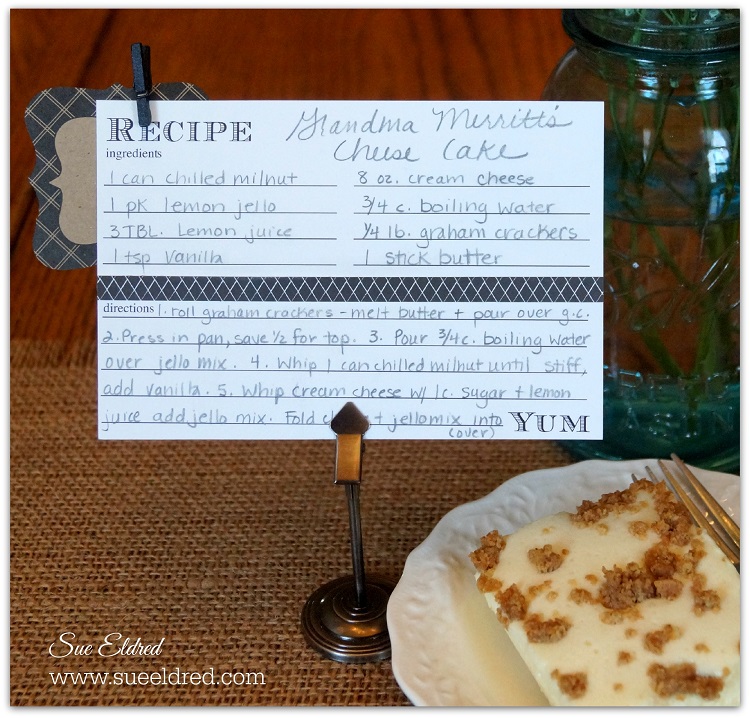
FYI: The recipe card and standing clip are both available from Canvas Corp Brands.
Disclaimer: This project was created for and sponsored by Canvas Corp Brands.
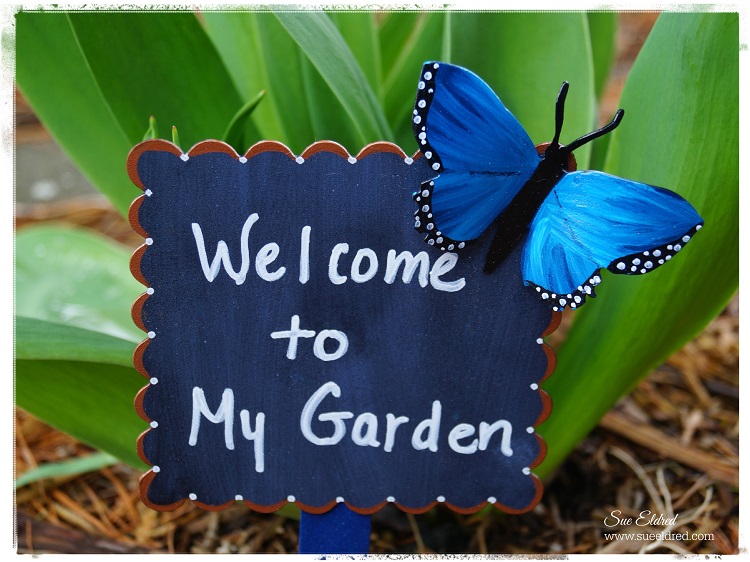
How to make a Garden Butterfly Sign.
A fun technique using Black Sign Tags from Deflecto Craft Solutions.
According you my you tube account it’s been 4 years since I made my first video.
I guess it was finally time for my second one. (let me know what you think)
“This is a sponsored post. As a member of the Deflecto Design Team I have been provided product in exchange for my creative ideas, views and opinions.”


There is still a few spots open for Saturday’s Captivating Squares class at The Paper Forest.
In the class we will be using Spellbinders dies and Kaisercraft’s Rustic Harmony Collection
to make these four cards.
The Paper Forest in Washington, IL
Saturday, April 18th from 1:00-3:00 p.m.
Cost of the Class: $22.00
Students Bring: tape runner, scissors, foam mounting squares, Vintage Photo Ink, Ink Applicator
Contact The Paper Fores to sign up.
