Organizing the Craft Cabinet

Organizing the Craft Cabinet with Deflecto Storage

I have been slowly working on creating my perfect workspace since last Spring

when I moved my craft room into my son’s old bedroom.

I’ve been taking my time, I want to get it right.

It’s coming along beautifully.  (I hope to share it soon.)

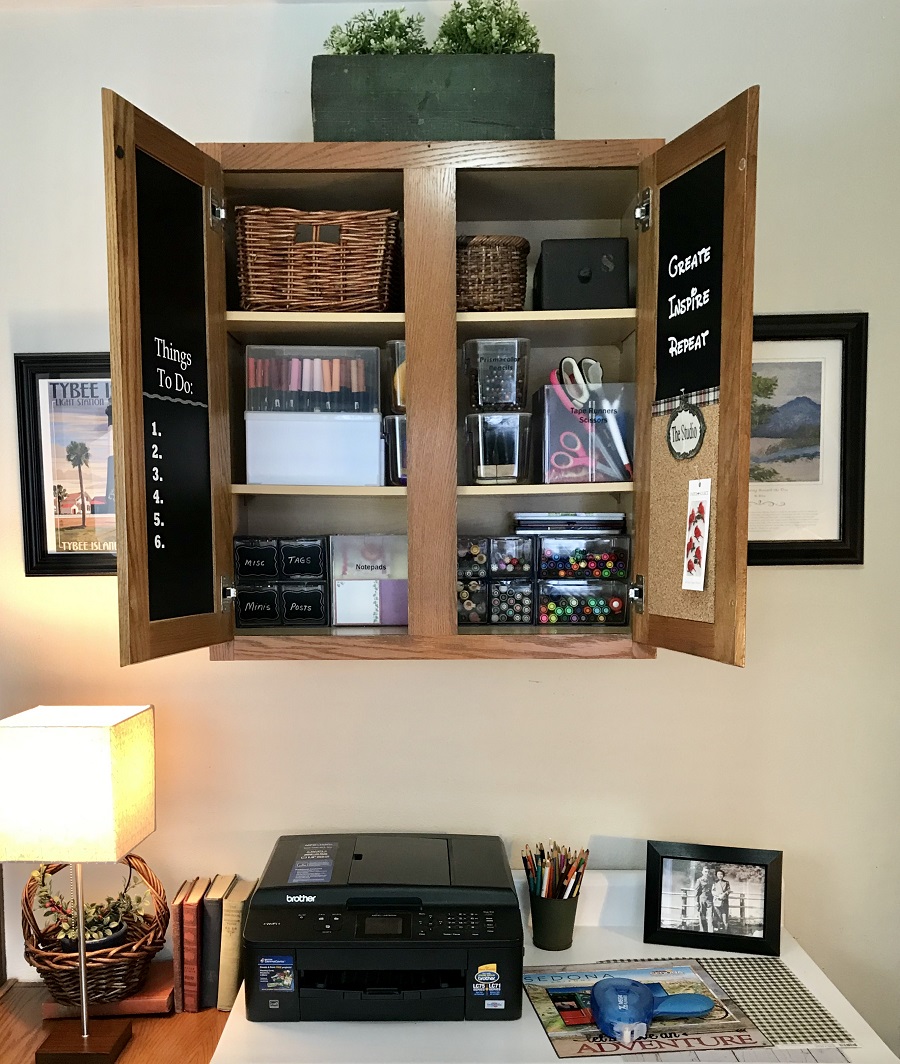
As crafter’s go, I’m a fairly neat and tidy person.

I’m also a fan of closed-door storage.

With closed-door storage, cabinets can easily get ignored and out of control.

I had one of those ignored craft cabinets.

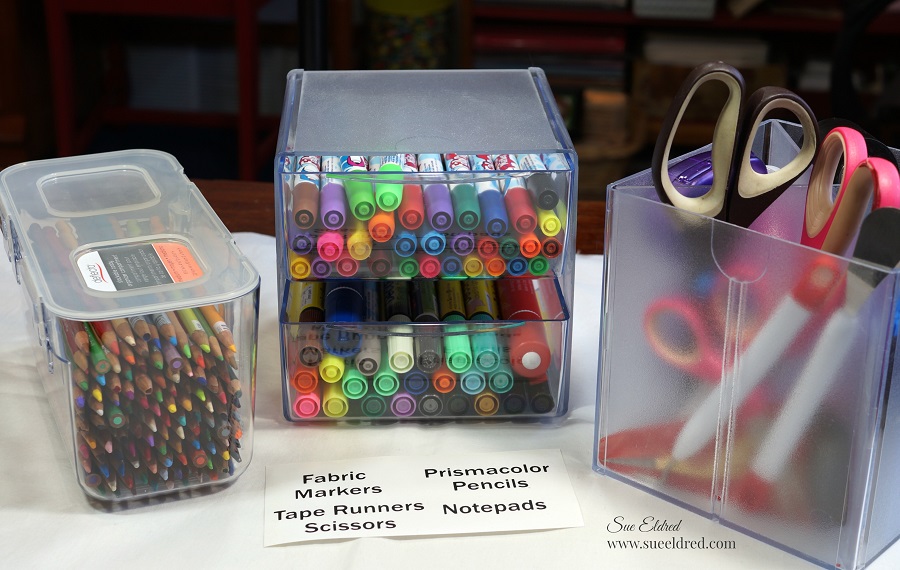
After clearing out the cabinet, I organized items into clear storage containers from Deflecto.

Because I’m such a nice person, I occasionally allow others to use my craft supplies.

Labeling the bins not only look good, but it’s helpful for those looking for supplies.

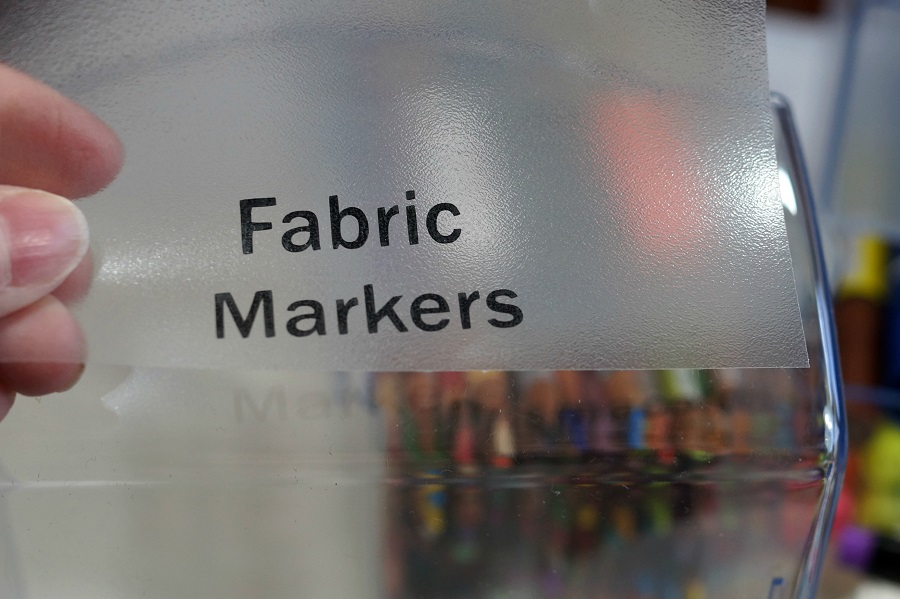
I used a  Silhouette Cameo Electronic Die Cutting Machine* to create and cut the words out of

StyleTechCraft black adhesive vinyl*.

I used transfer paper to apply the words onto the clear bins.

*Disclosure:  This blog uses affiliate links.  If you choose to make a purchase using one of the links, I receive a small commission (at no additional cost to you) that helps offset the costs of maintaining this blog.  Thanks for your support!

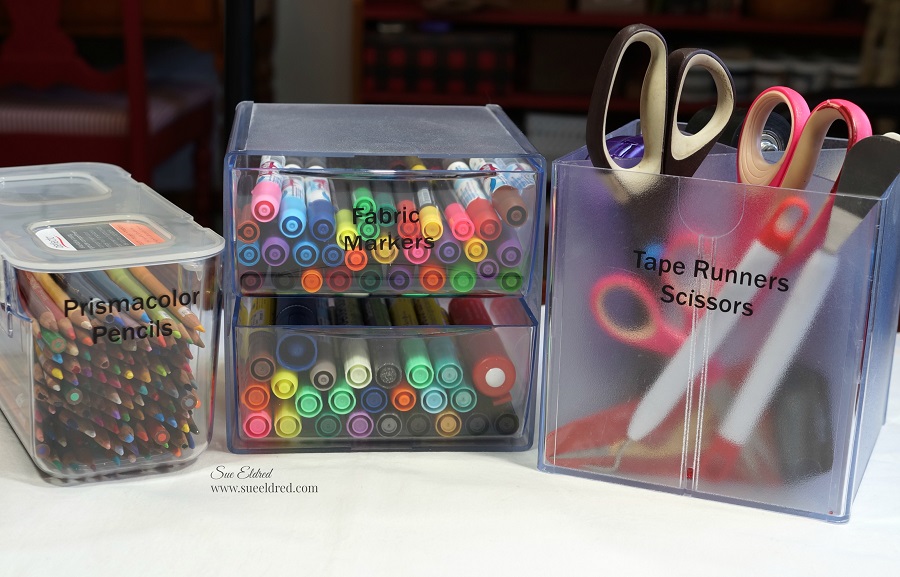
As a self proclaimed organizing nut, I find labeled bins extremely satisfying.

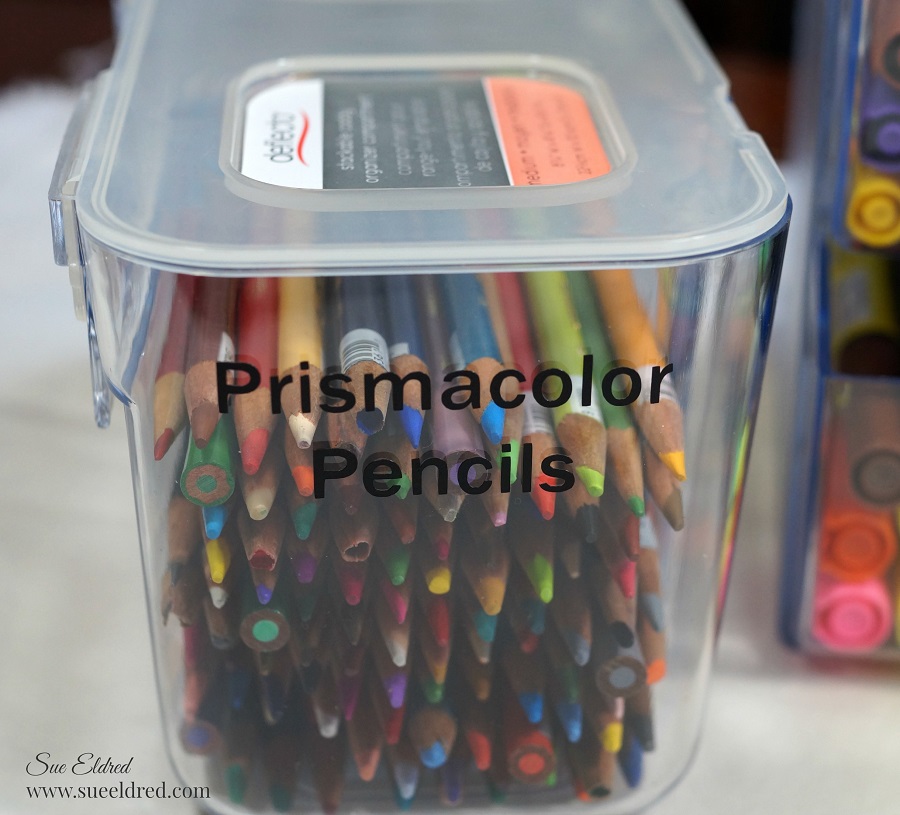
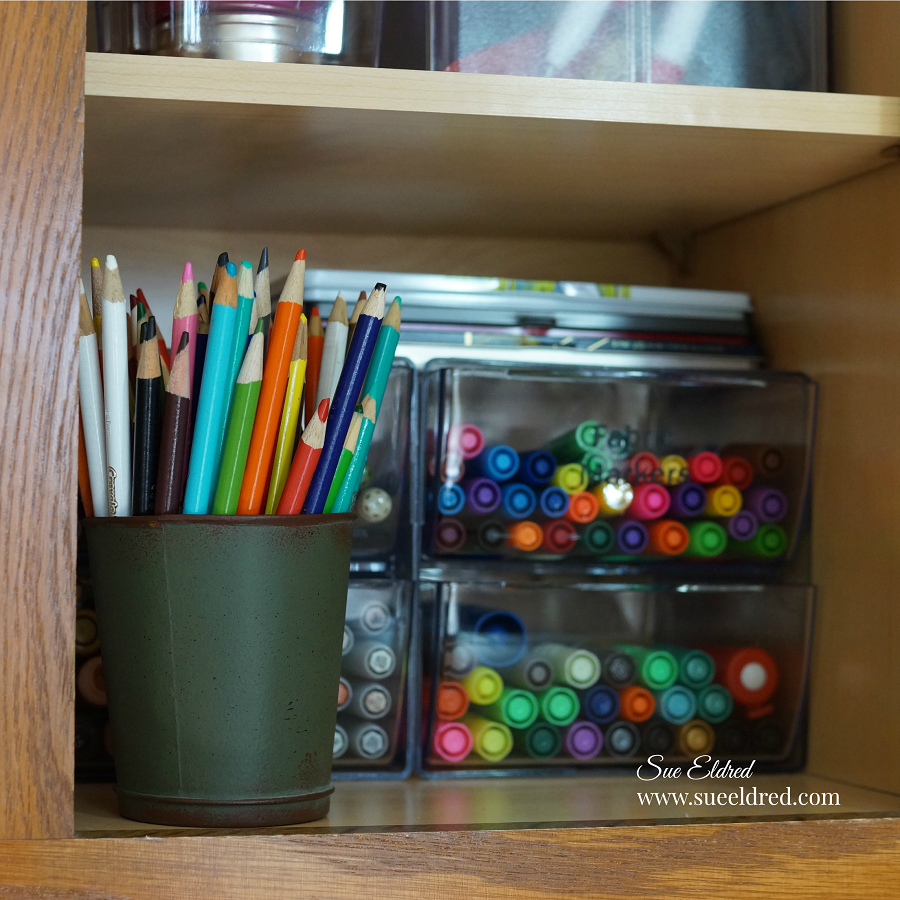
Clear bins make everything easier to find.

The bins are also easy to take with you when you need to work.

They keep your work space clutter-free and your supplies close at hand.

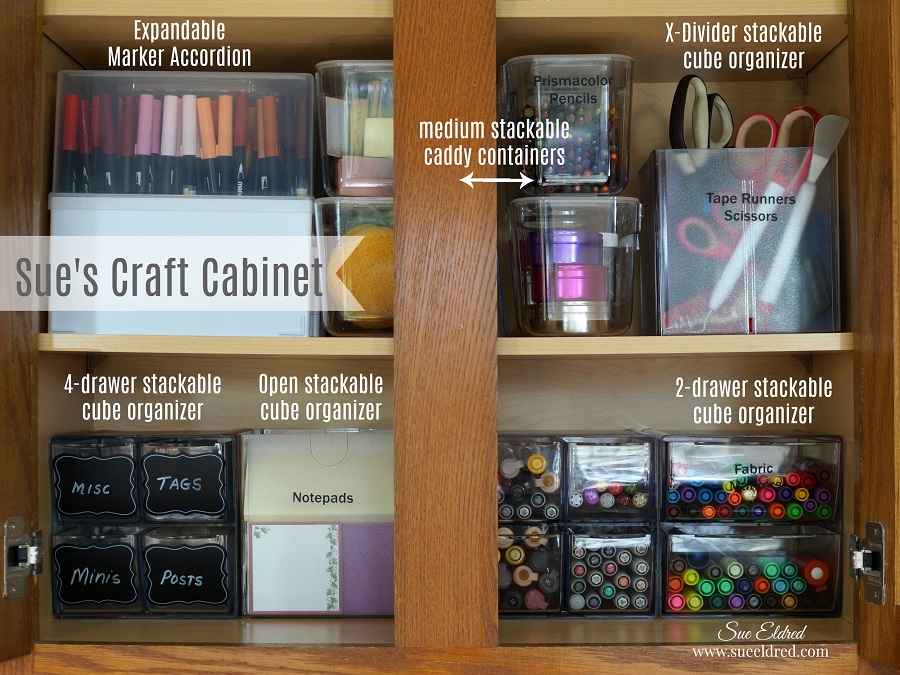
My newly Organized Craft Cabinet.  Everything fits so nice in this space.

Here’s what I used to organize my Craft Cabinet:    (*Amazon Affiliate Links)

Look for Deflecto products on Amazon, Scrapbook.com and at Michaels and Hobby Lobby.

“This is a sponsored post. As a member of the Deflecto Design Team I have been provided product in exchange for my creative ideas, views and opinions.” 

How to make a Red Buffalo Plaid Frame


How to Make a Red Buffalo Plaid Frame

Products Used:

Shop Your Fav Brands at Scrapbook.com

*Disclosure:  This blog uses affiliate links.  If you choose to make a purchase using one of the links, I receive a small commission (at no additional cost to you) that helps offset the costs of maintaining this blog.  Thanks for your support!

Directions:

  • Add strips of painter’s tape onto the frame to make stripes.  Rub your finger over the tape to make sure that the tape is securely on the frame and has no gaps.
  • Paint inside the stripes with black paint.  Be careful not to apply the paint too thick.   Only one thin coat of paint is needed.

  • Remove painter’s tape.
  • Allow black paint to fully dry before continuing to the next step.

  • Rotate the frame and apply the tape in the opposite direction.  Make sure the tape is securely on the frame.
  • Paint additional stripes.

  • Lightly sand the frame after dry.  Sanding brings out the woodgrain and helps to hide any little imperfection.
  • Wipe the frame smooth with a clean cloth.
  • Apply the Carta Bella Christmas Market Chipboard Accents to front of frame.

The Red Buffalo Plaid Frame was made in Sue’s 2019 Holiday Workshop.

 The Carta Bella Christmas Market Collection*

Give the Gift of Amazon Prime*

Gift Giving with Joy

A Blanket for Peyton…

Make a simple gift personal by adding a little “Joy” to your gift with iron-on embroidered letters.

You will need:

Directions:

  1. Set iron to cotton setting, approx. 350° or follow blanket care label.
  2. Remove letters from sheet.  Position letters with shiny side down on blanket.
  3. Cover letters with a fine cloth.  With firm pressure iron cloth over the letters for 25 seconds.
  4. Turn blanket over and iron the back of the letters for 25 seconds.  Allow to cool for 1 minute before handling.
Look for Joy® iron-on embroidered letters and floral appliqués at your local craft store.

“This is a sponsored post.  As a member of the Joy® Design Team I have been provided product and compensation in exchange for my creative ideas.  The views and opinions are my own.

Shop Your Fav Brands at Scrapbook.com

*Disclosure:  This blog uses ads and affiliate links.  If you choose to make a purchase using one of the links, I receive a small commission (at no additional cost to you) that helps offset the costs of maintaining this blog.  Thanks for your support!

Let’s Go Fly a Kite

Let’s Go Fly a Kite…

I’m so happy that Spring is finally here.

I’m ready to celebrate Spring with beautiful sunny skies and just enough breeze to fly a kite.

If you’re not into flying kites, you could always make a fabric one to hang up on the wall.

Kite Wall Hanging                                   (*affiliate link)

*Disclosure:  This blog uses ads and affiliate links.  If you choose to make a purchase using one of the links, I receive a small commission (at no additional cost to you) that helps offset the costs of maintaining this blog.  Thanks for your support!

How to make a Kite Wall Hanging:

  • Creating a kite pattern… Cut the white cardstock to 9″ x 12″.  Fold the cardstock in 1/2 lengthways.  On the two long sides make a mark at 4″.
  • For the top of the kite, draw a line from the top middle fold to the 4″ mark on each side.  For the bottom of the kite, draw a line from the 4″ mark to the bottom middle folds.
  • Cut out Kite pattern.
  • Trace and cut out the kite pattern on the backsides of both of the printed fabrics and the white felt.

  • Sandwich the white felt between the two patterned pieces.  Pin into place and top stitch around the kite.
  • Arrange the words “Let’s go fly a kite” onto the front of the kite with the shiny side down.
  • Cover with soft, clean cloth and iron on cotton settings for 30 seconds.  Turn kite over and repeat for an additional 30 seconds.

  • Cut the top flower and leaves off the floral applique.
  • Arrange the flowers on the kite and iron onto the kite the same way as the letters.
  • Glue rick rack around the edge of the kite.

  • Cut strips of fabric and tie onto a 14″ piece of twine.  Glue one end of the twine to the backside of the kite.
  • Make a small loop with a second piece of twine and glue to the top of the kite.

“This is a sponsored post.  As a member of the Joy® Design Team I have been provided product and compensation in exchange for my creative ideas.  The views and opinions are my own.


Don’t Miss a Thing…Make Sure to Follow me

Diamond Art…a new trend in crafting

Diamond Art by Leisure Arts 

This past week-end was a stormy, nasty, stay indoors kind of week-end.

The perfect time for crafting and learning/trying something different.

I’d been wanting to start the new Rose Diamond Art kit that I received from Leisure Arts.

I knew the kit was going to take a little time and I was just waiting for the perfect opportunity

to give it my full attention.

What is Diamond Arts?

It is a new trend in crafting.

It’s similar to cross stitching and paint by numbers.

“A little bit tedious, curiously addicting and extremely satisfying.”

It was so addicting that I didn’t want to stop…

I had to bring it down onto the kitchen counter so I could work on the it while cooking dinner.

Leisure Arts makes kits for beginners, intermediate and advanced.

They have a great selection of Diamond Arts Kits for both kids and adults.

The Rose Diamond Art kit includes:

  • One High Quality Printed Fabric
  • Gems Pre-sorted by Color
  • Stylus
  • Craft Tray
  • Wax Piece
  • Comfort Grip
  • Instructions

*Disclosure:  This blog uses affiliate links.  If you choose to make a purchase using one of the links, I receive a small commission (at no additional cost to you) that helps offset the costs of maintaining this blog.  Thanks for your support!

The rose design is pre-printed on the fabric with the symbols for the Diamond Art gems and

is coated with a special adhesive.  You pick the gem up using the stylus and place the gem

onto the corresponding symbol on the printed fabric.

It really is that easy.  Great for kids age 8 and up.

The kits comes with photos and great instructions.

If you’re a visual learner like me, check out the video below.

LeisureArts.com has a great selection of Diamond Arts kits that you can purchase online.

If you sign up for email updates you can get 15% off your first order.


THANK YOU Leisure Arts for providing this awesome Rose Diamond Art kit.

Color On The Go Series | Leisure Arts

Happy Holidays Chalkboard Sign

How to Create a Happy Holidays Chalkboard Sign with a Simple Button Bow.

I really enjoy working with vinyl and love coming up with simple Holiday DIY projects.

The Happy Holidays Sign was one of the projects we created in last month’s Holiday Workshop.

For my sign, I used Styletech Craft’s Ultra Metallic Glitter Adhesive Vinyl in red, green and

white.  The Ultra Metallic Glitter Vinyl has a white backing which ensures the colors stay bright

and true no matter what surface you apply it too.

To start my project…                                                                                 (*amazon affiliate links)

  • I used a piece of Wood Hardboard*.  (it’s like a hole-less peg board) I cut mine 5 1/2 x 7 1/2″.
  • Drill two small 3/8″ holes in the top of the board to use for hanging the sign.
  • Paint the board using DecoArt Black Chalkboard Paint*.
  • Lightly sand the board using 3M Sandpaper, 220-Grit*.  This smooths the board and allows a little bit of the brown board to show through for a vintage look.
  • Wipe the board with a clean soft cloth.

*Disclosure:  This blog uses ads and affiliate links.  If you choose to make a purchase using one of the links, I receive a small commission (at no additional cost to you) that helps offset the costs of maintaining this blog.  Thanks for your support!

  • I applied the words on the chalkboard using Styletech Clear Vinyl Transfer Tape*.
  • I applied the word “Holidays” first and lined the word “Happy” over top.
  • Cut a small white snowflake using white ultra metallic vinyl and add onto the sign above the word happy.
  • Create a “Button Bow”  for the top of your “Happy Holidays Chalkboard Sign”.
  • Directions for “button bow” below.
  • Add twine to the two top holes for hanging.
  • Glue Button Bow onto the top of the “Happy Holidays Chalkboard Sign” using craft glue*.

“This is a sponsored post.  As a member of the StyleTechCraft Design Team I have been provided product and compensation in exchange for my creative ideas.  The views and opinions are my own.

Shop Your Fav Brands at Scrapbook.com

How to Make a Holiday Button Bow…

  • Fold ribbon in thirds.  (like your getting ready to tie a tie.)
  • Gather and wrap twine around the center of the ribbon a couple of times and tie tightly.
  • Add a jump ring to the jingle bell and add onto one end of the twine and tie.
  • Add button to both ends of the twine and tie to the center of the bow.
  • Trim the ends of the ribbon and twine.

Ask for Styletech Craft vinyl at your local craft store

or online at ATSMCRAFT and limited availability on Amazon.

StyleTechCraft Christmas Colors Bundle on Amazon*


Shop Amazon Scrapbooking Supplies*