Fall Jenga Block Projects with Xyron

Fall Jenga Block Projects with Xyron

How to make Fall Jenga Block Projects with Xyron.

These projects are Quick and Easy and are a great way to use up small scraps of paper.

Fall Jenga Block Projects with Xyron

Xyron Logo

 This is a sponsored post for Xyron.  I have been provided product and compensation in exchange for my creative ideas.  The views and opinions are my own.

Fall Jenga Block Projects with Xyron

How to make a Jenga Block Pumpkin

Materials Used:    (*affiliate links)

*Disclosure:  This blog uses ads and affiliate links.  If you choose to make a purchase using one of the links, I receive a small commission (at no additional cost to you) that helps offset the costs of maintaining this blog.  Thanks for your support!

Fall Jenga Block Projects with Xyron

Directions:

  • Paint three Jenga Blocks* with orange acrylic paint.
  • Paint the small wood cube with brown acrylic paint
  • Cut six strips of fall scrapbook paper ¾” x 3”.
  • Place the strips of paper, design side up, into the Xyron Create a Sticker Mini*. Crank the handle to run the strips of paper through the Create a Sticker Mini. As the paper strips go through the Xyron Create a Sticker Mini*, it adds a complete layer of adhesive onto the back.

Fall Jenga Block Projects with Xyron

  • Place the strips of paper onto the front and back of the Jenga Blocks*.

Fall Jenga Block Projects with Xyron

Fall Jenga Block Projects with Xyron

  • Glue the small wood cube and the leaves to the top of the pumpkin.
  • Tie a small twine bow and glue it to the front of the pumpkin.
  • Adhere the word Thankful onto a small layer using the Xyron Mega Runner* and attach it to the front of the pumpkin.

Fall Jenga Block Projects with Xyron

The Jenga Block Pumpkin is a great way to use small scraps of your favorite Fall scrapbook paper.

Fall Jenga Block Projects with Xyron

Another simple Fall project is the Jenga Block Frame.

Fall Jenga Block Projects with Xyron

Directions:

  • Paint six Jenga Blocks* with brown acrylic paint.
  • Cut 12 strips of fall scrapbook paper ¾” x 3”.
  • Place the strips of paper, design side up, into the Xyron Create a Sticker Mini*. Crank the handle to run the strips of paper through the Create a Sticker Mini. As the paper strips go through the Xyron Create a Sticker Mini*, it adds a complete layer of adhesive onto the back.
  • Place the strips of paper onto the front and back of the Jenga Blocks*.
  • Hot Glue the blocks together to form a frame.
  • Adhere greeting or photo to the back of the frame.
  • Embellish the frame by gluing on a small fall flower and leaves*.

For a truly inexpensive Fall Craft, you can pick up the wood blocks at Dollar Tree.

Nuts for Fall Acorn Door Hanger

Nuts for Fall Acorn Door Hanger

A Fall Dollar Store Craft

As much as I love the summer weather, I do love Fall.

The cooler weather, the beautiful colors… 

I only wish it’d turn right back to summer when it was done.

“This is a sponsored post.  As a member of the StyleTechCraft Design Team I have been provided product and compensation in exchange for my creative ideas.  The views and opinions are my own.

Nuts for Fall Acorn Door Hanger

I found this cute Acorn Shape* and Faux Leather Leaves* at Dollar Tree* and knew it would be even cuter with a little StyleTechCraft Vinyl.

Materials Used:  (*affiliate links)

*Disclosure:  This blog uses ads and affiliate links.  If you choose to make a purchase using one of the links, I receive a small commission (at no additional cost to you) that helps offset the costs of maintaining this blog.  Thanks for your support!

Nuts for Fall Acorn Door Hanger

Directions:

  • Lightly sand the acorn shape using a sanding block*.
  • Paint the acorn with acrylic paint.
  • Trace around the top of the acorn to create a pattern for the acorn top. Fill in the bottom with a wavy line.  Trace the pattern onto plaid scrapbook paper and cut it out. 
  • There are different ways to adhere to the paper. My favorite way is to use the
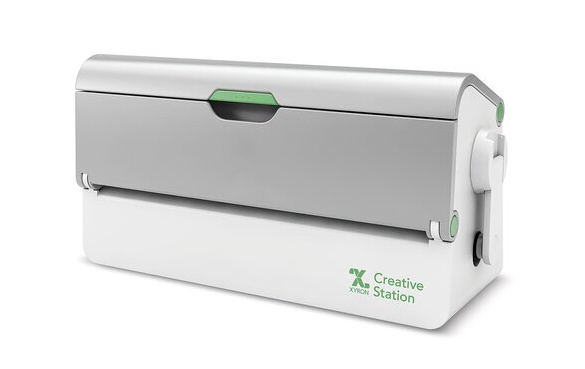
  • Xyron Creative Station* to add adhesive to the back of the scrapbook paper.  
  • Add the plaid paper to the top of the acorn. Use an extra fine point black sharpie* to add a border around the acorn top shape.

Nuts for Fall Acorn Door Hanger

  • Using a Silhouette Cameo Electronic Die Cutting Machine* and the Nuts for Fall SVG File, size the design to fit onto the bottom of the acorn shape. Cut the design using several colors of StyleTechCraft Luster Adhesive Vinyl.
  • Once you remove the area inside and around the cut vinyl, use transfer tape* to add the design to the acorn.
  • Decorate the top of the acorn with a big bow, faux leaves, and a small acorn embellishment.
  • Add a small piece of twine for hanging onto a door or add it to the center of a Fall Wreath.

StyletechCraft products brought to you by ATSM Craft*

Fall Floral Stained Glass Card

Fall Floral Stained Glass Card

Fall Floral Stained Glass Card made with the Sizzix Skinny Mini Elements Thinlet Die by Eileen Hull.

I was lying in bed the other night when I got the idea for this card.

(That’s when I get some of my best ideas.)

It was perfect for the Eileen Hull Card Bonanza Month over on her blog.

Eileen Hull Educator Logo

Disclosure:  This is a sponsored post.  As a member of the Eileen Hull Educator Team, I have been provided product in exchange for my creative ideas.  The view and opinions are my own. 

Xyron Creative Station

The Fall Floral Stained-Glass Card is a fairly simple card to make.

The one thing that made this card easy was using my Xyron Creative Station*

on the cardstock before die-cutting.

Fall Floral Stained Glass Card

Directions:

  • Cut a piece of gold cardstock slightly larger than the Skinny Mini Elements Die* to use as the base of the card.
  • Choose a dark gray cardstock for the outline and three pieces of fall-colored cardstock for the inside pieces.
  • Place the cardstock into the Xyron Creative Station* and crank the handle to run the paper through the machine. The Xyron Creative Station* adds a complete layer of adhesive to the cardstock making each little piece a sticker. That made assembling the card simple or “simple-ish.”
  • Place the die on the cardstock and die-cut the gray and the fall-colored paper using a Sizzix Big Shot Die-Cutting Machine*.
  • Trim the gray paper to the size of the die.  Remove and discard all the tiny inside pieces using a craft pick*.  Remove the protective liner from the back of the cardstock and center it onto the gold cardstock layer.
  • Use a craft pick* to place the inside flower pieces from the colored cardstock.

Materials Used:

*Disclosure:  This blog uses ads and affiliate links.  If you choose to make a purchase using one of the links, I receive a small commission (at no additional cost to you) that helps offset the costs of maintaining this blog.  Thanks for your support!

Fall Floral Stained Glass Card

  • Finish creating your flower pattern and add several cardstock layers to a cream card.
  • Add a sheer cream bow.

Fall Floral Stained Glass Card

There’s so much more that you could add to the card, like a greeting or a small tag.

But I decided to keep it simple. (or as I mentioned before…”simple-ish”.)

Fall Floral Stained Glass Card

I thought I was finished with this card.

But then again, sometimes things just evolve.  

A stained-glass card needed rhinestones.

I added Clear Enamel Dots from Hero Arts* to the center of each flower.

Fall Floral Stained Class Card

For another card idea using the Sizzix Skinny Mini Elements Die,

check out the Skinny Mini Christmas Poinsettia Card below.

Skinny Mini Elements Christmas Poinsettia Card.

Skinny Mini Elements Christmas Poinsettia Card

Shop Scrapbook.com

How to make a Welcome Autumn Pillow using craft vinyl to make the Stencil

Welcome Autumn Pillow

Welcome Autumn Pillow  

I have been wanting to use vinyl to create a stencil for a while now.

It was really simple to do and I’m in love with the results.

If you have craft vinyl and an electronic die-cutting machine*,

then you can make a stencil too.

“This is a sponsored post.  As a member of the StyleTechCraft Design Team I have been provided product and compensation in exchange for my creative ideas.  The views and opinions are my own.

HOW TO MAKE A WELCOME AUTUMN PILLOW USING CRAFT VINYL TO MAKE STENCILS

Materials Used:  (*affiliate link)

StyletechCraft products brought to you by ATSM Craft*

*Disclosure:  This blog uses ads and affiliate links.  If you choose to make a purchase using one of the links, I receive a small commission (at no additional cost to you) that helps offset the costs of maintaining this blog.  Thanks for your support!

How to make a Welcome Autumn Pillow using craft vinyl to make the Stencil

How to make a Welcome Autumn Pillow using a Craft Vinyl Stencil:

  • For my pillow, I used off-white fabric that I purchased at a garage sale several years ago. I cut two panels 15″ x 15″.
  • I created the stencil pattern using the “Welcome Autumn” SVG file and my Silhouette. I sized the image to fit onto my fabric panels.
  • I cut the image using StyleTechCraft Craft Vinyl*. (I originally tried using removable vinyl on my fabric, but it wasn’t quite tacky enough and a little hard to apply.)
  • To create the stencil, remove the letters and the leaves from the vinyl, leaving a reverse image.  
  • Use a low-tack transfer paper to transfer the vinyl onto the fabric.

How to make a Welcome Autumn Pillow using craft vinyl to make the Stencil

  • Make sure that the stencil is securely stuck to the fabric to eliminate paint seepage.
  • Place a piece of paper behind the fabric panel to protect your work surface.
  • Paint the leaves using a small paint brush and a variety of acrylic paint in Autumn colors.  
  • Paint the words “welcome Autumn using black acrylic paint.  

How to make a Welcome Autumn Pillow using craft vinyl to make the Stencil

  • After the paint has dried, carefully remove the stencil.  
  • I may have squealed a bit when I removed the stencil. It is perfectly imperfect, and I love how it turned out!
  • Iron over the fabric to set the design.  

How to make a Welcome Autumn Pillow using craft vinyl to make the Stencil

Welcome Autumn Door Hanger

Welcome Autumn Door Hanger

I liked how it turned out so much that I decided to make a Welcome Autumn Door Hanger.

You can find plain wood circles on Amazon* in a variety of sizes.

“I only have Pies for You” happy day tag

"I Only Have Pies for You" tag.

My sister-in-law loves to bake pies.

When it comes to Thanksgiving, there is almost a pie-per-person ratio.

It’s not just pumpkin, but peanut butter (my favorite),

cherry, and chocolate pies. (To name a few.)

So, when I saw the new “I only have pies for you” soap from Bath and Body,

I knew I needed to pick it up for her.

It’s not only perfect, but it smells wonderful too.

"I Only Have Pies for You" tag.

Since her birthday is right around the corner,

I thought I’d make her a special pie tag to go with it.

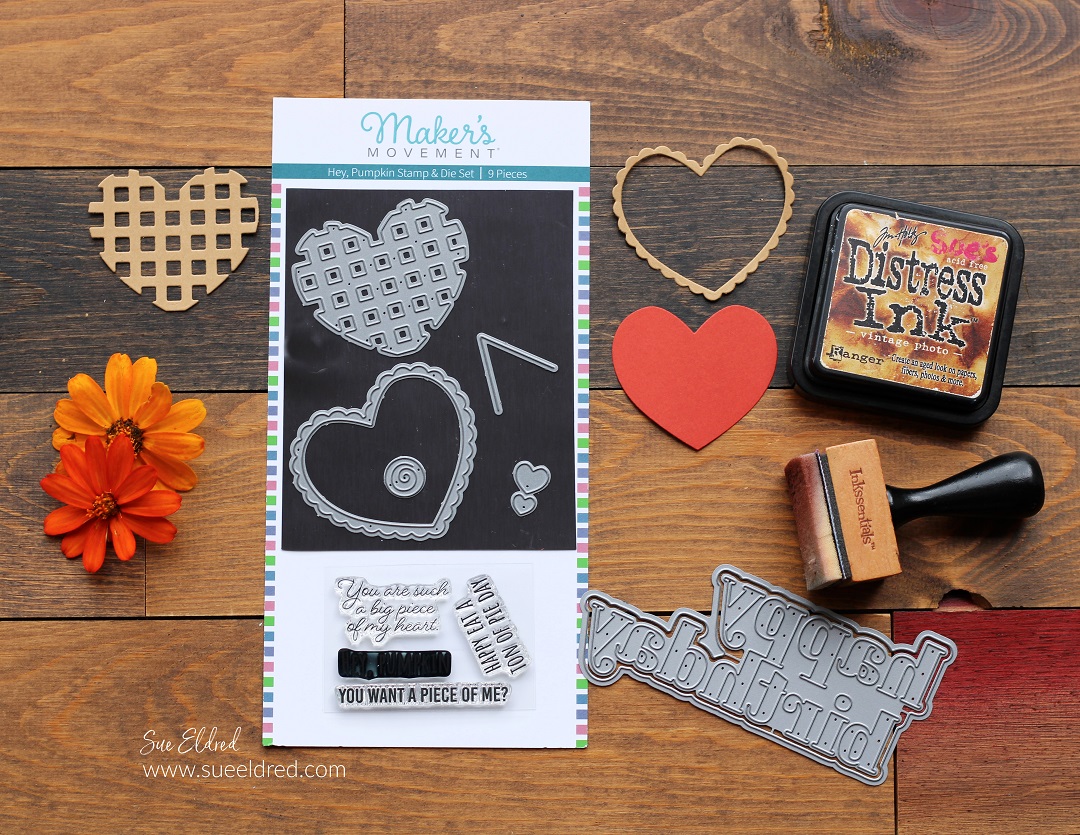
The Hey, Pumpkin Stamp & Die Set* from

The Maker’s Movement was just the die to make the tag.

Maker's Movement

Disclosure:  This is a sponsored post for The Maker’s Movement*.  I have been provided product and compensation in exchange for my creative ideas.  The view and opinions are my own. 

"I Only Have Pies for You" tag.

Materials Used:      (*Affiliate Links)

*Disclosure:  This blog uses ads and affiliate links.  If you choose to make a purchase using one of the links, I receive a small commission (at no additional cost to you) that helps offset the costs of maintaining this blog.  Thanks for your support!

"I Only Have Pies for You" tag.

Two of my favorite hardworking little machines.

  • Before I die-cut all the small pieces, I ran the cardstock through the Xyron Create a Sticker Mini*.  It makes all the die-cuts into stickers and that makes assembling the card easy.
  • The Mini Maker Die Cutting Machine* makes quick work of die cutting.  And it doesn’t take up a lot of space.

"I Only Have Pies for You" tag.

A special tag for my favorite pie maker.

Simple Vintage Fall Memories Album

Simple Vintage Fall Memories Scrapbook Album

The Simple Vintage Fall Memories Album is the perfect place for your Fall Memories.

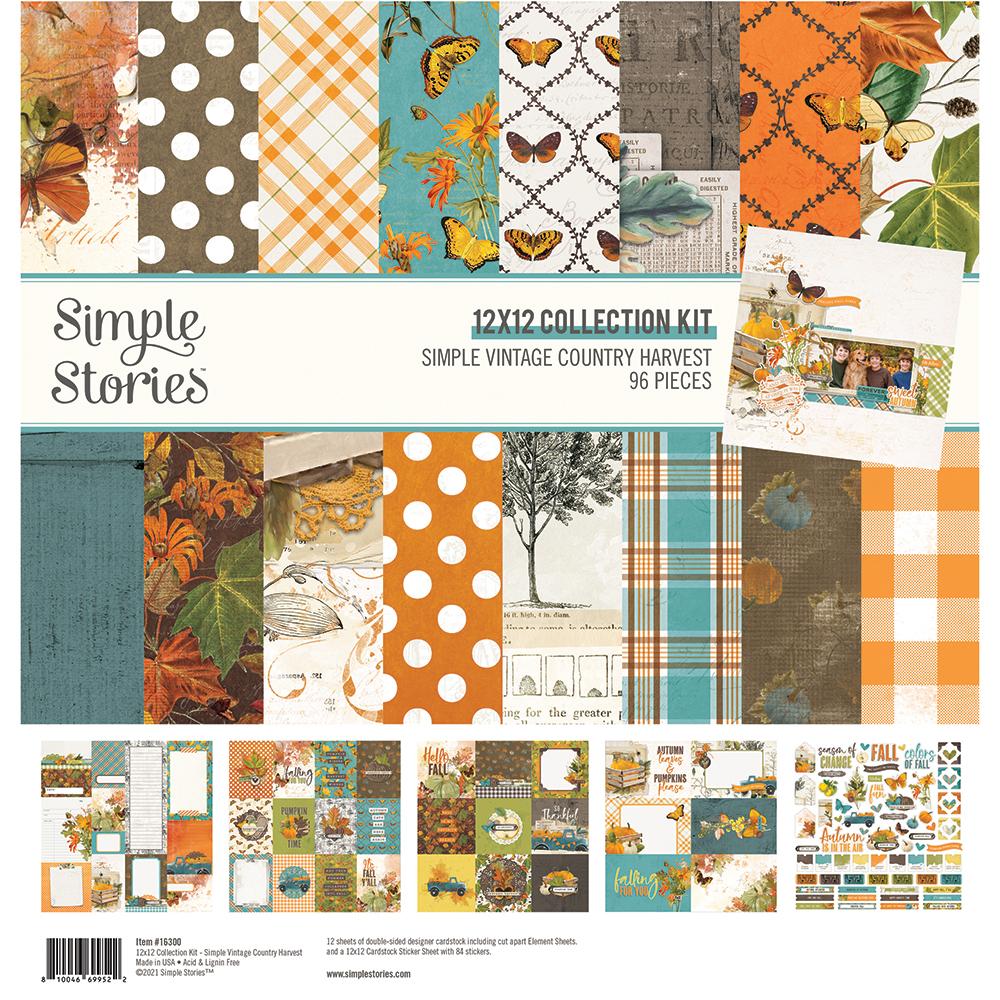
The album uses Simple Stories Simple Vintage Country Harvest Collection*

and the New Full-Sized Journal Die* from Eileen Hull and Sizzix.

Simple Vintage Fall Memories Album

Materials Used:     (*affiliate links)

*Disclosure:  This blog uses ads and affiliate links.  If you choose to make a purchase using one of the links, I receive a small commission (at no additional cost to you) that helps offset the costs of maintaining this blog.  Thanks for your support!

Simple Vintage Fall Memories Album

One Important Thing to Note…

Simple Stories Simple Vintage Country Harvest Collection Kit

Simple Vintage Fall Memories Album

  • I folded six 8 1/2″ x 11″ pieces of cardstock in half to create little “stories” to insert inside your album.  
  • I used thin twine to add my “stories” to the spine.

Simple Vintage Fall Memories Album

Simple Vintage Fall Memories Album

I’m happy with the way the album turned out…

and I love the size of the New Eileen Hull Full-Sized Journal. 

Now I’m off to take More Fall Photos.


Cozy Watercolor Leaves

Cozy Watercolor Leaves Card

I love fall, cooler weather, and changing leaves.

It makes me want to make everything in my home warm and cozy.

Grab a nice bowl of soup and a comfy sweatshirt, and it’s the perfect setting for just staying in.

M12623-Lets-Get-Cozy Die Set from The Maker's Movement

I also love the new Let’s Get Cozy Die Set from The Maker’s Movement.

A great cardmaking or scrapbooking die set for Fall or any time of the year.

Maker's Movement

Disclosure:  This is a sponsored post  for The Maker’s Movement.  I have been provided product and compensation in exchange for my creative ideas.  The view and opinions are my own. 

Cozy Watercolor Leaves

Materials Used:    (*affiliate links)

*Disclosure:  This blog uses ads and affiliate links.  If you choose to make a purchase using one of the links, I receive a small commission (at no additional cost to you) that helps offset the costs of maintaining this blog.  Thanks for your support!

Cozy Watercolor Leaves

Cozy Watercolor Leaves Cardmaking Tips…

  • One of my favorite tips for die-cutting small pieces is to run the paper through the Xyron Creative Station* to add a layer of adhesive to the back before I die-cut. The paper pieces become stickers which make adhering them to cards very easy.
  • Die-cut the leaves out of cream cardstock.
  • Watercolor the leaves using ink from an ink pad and a waterbrush. I applied the ink directly onto a lamented piece of paper (or use a non-porous surface) and picked up the ink with the waterbrush.

Cozy Watercolor Leaves

Cozy Watercolor Leaves Cardmaking Tips Continued

  • The card measures 5″ x 6 ½”.
  • Cut a moss green cardstock layer 4¾” x 6 ¼”.  
  • Using the large circle die from the die set, cut a hole in the center of the cardstock layer. Adhere the layer onto a cream cardstock base.
  • Cut the words “let’s get cozy” out of champagne luster adhesive vinyl. Remove backing from the vinyl and apply it to the center of the circle.
  • Build a layered wreath on the top and bottom of the circle. Add small dots using the small circles dies from the set to the top of the card.

Thankful & Blessed Fall Inspiration

Thankful and Blessed Framed Decoration

Thankful & Blessed DIY Framed Inspiration…

One of my favorite parts about decorating for the seasons is creating new decorations

to add to the mix. The Thankful & Blessed Framed Inspiration uses an inexpensive

Dollar Tree* frame, a few pieces of scrapbook paper, and StyleTechCraft Luster vinyl.

“This is a sponsored post.  As a member of the StyleTechCraft Design Team I have been provided product and compensation in exchange for my creative ideas.  The views and opinions are my own.

Thankful & Blessed DIY Framed Inspiration

Materials Used:     (*affiliate links)


Everything always $1 at Dollar Tree – Shop Now

*Disclosure:  This blog uses ads and affiliate links.  If you choose to make a purchase using one of the links, I receive a small commission (at no additional cost to you) that helps offset the costs of maintaining this blog.  Thanks for your support!

Thankful & Blessed DIY Framed Inspiration

Directions:

  • Choose three pieces of coordinating 12″ x 12″ scrapbook paper to use in the frame.  
  • Cut the background paper to fit inside of the frame opening.  (mine measured 11 ½” x 11 ½”)
  • Cut and adhere a 4″ strip of paper to go horizontally across the center of the background. 
  • Using an SVG File (from the Silhouette Store) and my Silhouette Cameo Electronic Die Cutting Machine*, cut the words “Thankful & Blessed” out of StyleTechCraft Champagne Luster Adhesive Vinyl*.  I sized my words to fit on a 4″ x 5 ½” piece of mat board*.

Thankful & Blessed DIY Framed Inspiration

  • Cover a 4″ x 5 ½” piece of mat board* with decorative scrapbook paper.
  • To cover the white core of the mat board, edge the mat board using a bronze chisel point paint marker.
  • Cut a 4 ¼” x 5 ¾” piece of Bronze Luster Vinyl*.  Apply the vinyl centered onto the strip
  • Adhere the covered mat board* centered over the Bronze Luster Vinyl*.

Thankful & Blessed DIY Framed Inspiration

Thankful & Blessed DIY Framed Inspiration

  • Rub over the vinyl words with the scraper tool to make sure the words have transferred to the mat board.

Thankful & Blessed DIY Framed Inspiration

  • Gently lift and remove the transfer paper.
  • Add to the frame with or without the glass.

Thankful & Blessed DIY Framed Inspiration

A Simple and Inexpensive Framed Fall Inspiration for my mantel.  

Another thought…after the Holidays, you could also add photos to the background

for a quick and easy scrapbook page.

Fall Woodland Friends Card

Fall Woodland Friends Card

How to make a Fall Woodland Friends Card.

I have another fun fall card to share with you today with warm fall colors

and sweet furry friends.

Fall Woodland Friends Card

I know I say this all the time, but I think the Fall Woodland Friends Stamp Set and the

coordinating die set from The Maker’s Movement are just about the cutest sets ever.

Mix it with the Autumn Breeze paper for a great combination.  (I love the colors in this pad.)

Maker's Movement

Disclosure:  This is a sponsored post  for The Maker’s Movement.  I have been provided product and compensation in exchange for my creative ideas.  The view and opinions are my own. 

Fall Woodland Friends Card

Materials Used:     (*affiliate links)

Shop Tombow

*Disclosure:  This blog uses ads and affiliate links.  If you choose to make a purchase using one of the links, I receive a small commission (at no additional cost to you) that helps offset the costs of maintaining this blog.  Thanks for your support!

Fall Woodland Friends Card

Details and Helpful Tips for making the Fall Woodland Friends Card…

  • When coloring stamped images with markers, I like to stamp my image on watercolor paper first. The watercolor paper helps when blending the inks.
  • It’s best to use a fast-drying permanent ink, like VersaFine Black Instant Dry Pigment Ink*. The Versafine ink keeps your stamped outline from bleeding when coloring the image.
  •  I like to stamp the images that I will be working with several times on watercolor paper to experiment with different color combinations.

Fall Woodland Friends Card

  • Start with a darker marker and color and bring shades to the outside edge of the image, do not fully color the stamped image.
  • Choose a second lighter marker to blend the darker colors.

Fall Woodland Friends Card

  • Align the coordinating die with the stamped image.  Place a small piece of washi tape (or a removable tape) to hold the die in place while die-cutting.
  • Run the stamped image and die through the Mini Maker Die-Cutting Machine to cut out the image.

Fall Woodland Friends Card

  • “Fussy-cut” a 1 1/2″ border using the “fall leaves” paper from the Autumn Breeze paper pad.
  • It helps when fussy cutting to use detail scissors.
  • To cover up the white core of the paper, I use a light gray marker to color the edges of the paper.

Fall Woodland Friends Card

  • Layer a strip of striped paper onto a 2″ plaid strip of paper. (both from the paper pad)
  • Adhere the “fall leaves” border and the “striped” layer onto the 6″ x 6″ turquoise leaves paper.
  • Cut the card front to 4″ x 6″.
  • I used 3D Foam Squares* to adhere the Woodland Friends to the front of the card.

Fall Woodland Friends Card

  • Adhere the card front onto a 4 1/4″ x 6 1/4″ turquoise cardstock layer and then onto a 4 1/2″ x 6 1/2″ pumpkin-colored cardstock layer.
  • My finished card is 5″ x 7″.
  • I didn’t have a top folding 5″ x 7″ card, so I made one. I used watercolor paper as my card base.
  • Adhere the card front to a 5″ x 7″ piece of watercolor paper.
  • Cut a second piece of watercolor paper 5″ x 8″. Score the paper at 1″ from the top and fold over.
  • Adhere the card front onto the folded tab.
  • Tie a piece of orange ribbon onto the front of the card. The ribbon hides the folded tab.

Fall Woodland Friends Card

The Fall Woodland Friends would look cut on tags, on a scrapbook layout, or in a pop-up card.

DIY Felt Pumpkin Banner

DIY Felt Pumpkin Banner

How to make a Felt Pumpkin Banner for Fall.

This past weekend in the middle of my Paper Crafting Fall Home Décor project,

I was inspired to sew up this cute felt pumpkin banner. It didn’t hurt that I already

had the sewing machine out (because I had to mend the dog bed, once again).

How to make a Felt Pumpkin Banner

Materials Used:       (*affiliate links)

*Disclosure:  This blog uses ads and affiliate links.  If you choose to make a purchase using one of the links, I receive a small commission (at no additional cost to you) that helps offset the costs of maintaining this blog.  Thanks for your support!

DIY Felt Pumpkin Banner

I used the Pumpkin Die from The Maker’s Movement to cut out the felt pieces.

The pumpkin die is used for cutting paper and not necessarily to cut fabric and felt.

While the die does not always cut through the felt, it did leave deep impressions.

I used the deep impressions as my guide to cut out the remainder of the shape.

(not recommended on smaller detailed pieces.)

DIY Felt Pumpkin Banner

Directions:

  • I used a pre-cut 9″ x 12″ Antique White Felt for the base of the banner.
  • On the bottom of the Felt, make a small mark at 4 1/2″ the center.  Measure and mark on both sides, starting from the bottom, at 3″.  Draw light lines from the 3″ mark to the center mark.  Cut along the lines to create the bottom point of the banner.
  • Die-cut pumpkin pieces.
  • Place the pumpkin pieces and the letters on the banner to decide on the correct placement.  (make sure to allow space up on top for the trim and the rod pocket)
  • Remove letters and set them aside.
  • Sew around pieces of the pumpkin using a sewing machine.  (if you’re good at hand stitching, that would be even better)
  • Place iron-on embroidered letters onto the banner, cover with a thin cloth, and iron according to directions on the packaging.
  • Sew a piece of decorative trim near the top of the banner.
  • Cut a second piece of Antique White Felt the same size as the first.
  • Sew the top closed, leave a small 1/4″ border.  Create a small rod pocket by sewing another seam at approx. 1 1/4″.
  • Sew around the remainder of the banner.
  • Create a small tassel using a wood bead and thin braided decorative trim.  Poke a small hole on the point of the banner and tie the tassel.  Because my Trim had a slick surface, I added a tiny bit of Fabri-Tac Adhesive* under the bead and at the knot that ties my tassel.


Shop $1 Fall Decor at Dollar Tree!