Home for Christmas Mini Album

Home for Christmas Mini Album

How to make a Holiday Mini Album…

I wanted to share with you a Simple little Christmas Album that I made for

the Eileen Hull Comfort & Joy Event over on Eileen’s Facebook Fan Page.

Sizzix Notepad Scoreboards Die by Eileen Hull

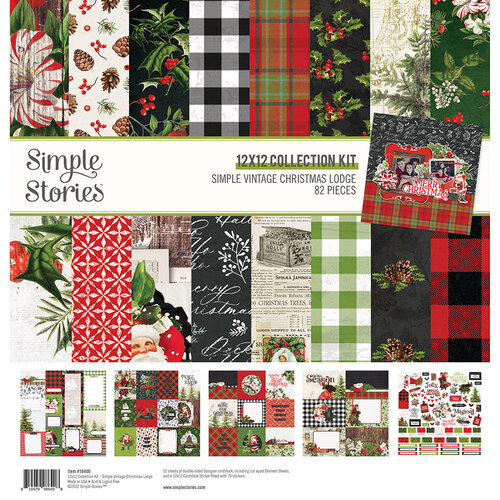
I used the Sizzix Notepad Scoreboard Die by Eileen Hull* and paper from

Simple Stories Simple Vintage Christmas Lodge Collection* to create the mini album.

Materials Used:  (*affiliate links)

*Disclosure:  This blog uses ads and affiliate links.  If you choose to make a purchase using one of the links, I receive a small commission (at no additional cost to you) that helps offset the costs of maintaining this blog.  Thanks for your support!

Home for Christmas Mini Album

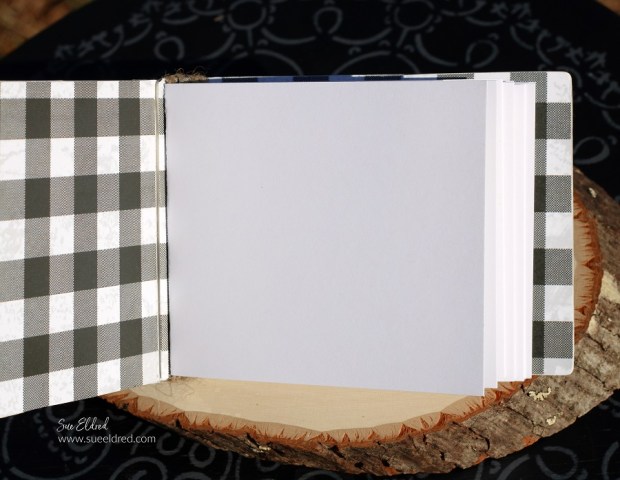
The album may be small, but it has plenty of room for Holiday pictures.

It measures approximately 3 1/2″ x 4 1/2″.

Home for Christmas Mini Album

Sue’s Tips for Making the Home for Christmas Mini Album:

  • I used the Xyron Creative Station* to add adhesive to the back of the paper before adhering it to the mat board and die-cutting the pieces to make the notepad.
  • I adhered the spine of the front and back cover using Rapid Fuse Adhesive*.
  • For the inside of the album, I created four small “signatures” to place inside the album.
  • To secure the “signatures” inside the album, wrap thin twine around the spine and the paper.

Home for Christmas Mini Album

Home for Christmas Mini Album

When it comes to family, Home is the best place to be.

Eileen Hull Educator Logo

Disclosure:  This is a sponsored post.  As a member of the Eileen Hull Educator Team, I have been provided product in exchange for my creative ideas.  The view and opinions are my own. 

Fall Jenga Block Projects with Xyron

Fall Jenga Block Projects with Xyron

How to make Fall Jenga Block Projects with Xyron.

These projects are Quick and Easy and are a great way to use up small scraps of paper.

Fall Jenga Block Projects with Xyron

Xyron Logo

 This is a sponsored post for Xyron.  I have been provided product and compensation in exchange for my creative ideas.  The views and opinions are my own.

Fall Jenga Block Projects with Xyron

How to make a Jenga Block Pumpkin

Materials Used:    (*affiliate links)

*Disclosure:  This blog uses ads and affiliate links.  If you choose to make a purchase using one of the links, I receive a small commission (at no additional cost to you) that helps offset the costs of maintaining this blog.  Thanks for your support!

Fall Jenga Block Projects with Xyron

Directions:

  • Paint three Jenga Blocks* with orange acrylic paint.
  • Paint the small wood cube with brown acrylic paint
  • Cut six strips of fall scrapbook paper ¾” x 3”.
  • Place the strips of paper, design side up, into the Xyron Create a Sticker Mini*. Crank the handle to run the strips of paper through the Create a Sticker Mini. As the paper strips go through the Xyron Create a Sticker Mini*, it adds a complete layer of adhesive onto the back.

Fall Jenga Block Projects with Xyron

  • Place the strips of paper onto the front and back of the Jenga Blocks*.

Fall Jenga Block Projects with Xyron

Fall Jenga Block Projects with Xyron

  • Glue the small wood cube and the leaves to the top of the pumpkin.
  • Tie a small twine bow and glue it to the front of the pumpkin.
  • Adhere the word Thankful onto a small layer using the Xyron Mega Runner* and attach it to the front of the pumpkin.

Fall Jenga Block Projects with Xyron

The Jenga Block Pumpkin is a great way to use small scraps of your favorite Fall scrapbook paper.

Fall Jenga Block Projects with Xyron

Another simple Fall project is the Jenga Block Frame.

Fall Jenga Block Projects with Xyron

Directions:

  • Paint six Jenga Blocks* with brown acrylic paint.
  • Cut 12 strips of fall scrapbook paper ¾” x 3”.
  • Place the strips of paper, design side up, into the Xyron Create a Sticker Mini*. Crank the handle to run the strips of paper through the Create a Sticker Mini. As the paper strips go through the Xyron Create a Sticker Mini*, it adds a complete layer of adhesive onto the back.
  • Place the strips of paper onto the front and back of the Jenga Blocks*.
  • Hot Glue the blocks together to form a frame.
  • Adhere greeting or photo to the back of the frame.
  • Embellish the frame by gluing on a small fall flower and leaves*.

For a truly inexpensive Fall Craft, you can pick up the wood blocks at Dollar Tree.

Halloween Shaker Jar Tags

How to make a Halloween Shaker Tag

How to Create Halloween Shaker Jar Tags.

A fun Halloween treat for kids of all ages.

How to make a Halloween Shaker Tag

I just received these cute Mason Jar Shaker Dies from The Maker’s Movement,

and of course, I had to hurry up and make a few Halloween Jar Shaker Tags.

These are also going to make super cute Christmas Shaker tags.  (I can’t wait!)

Maker's Movement

Disclosure:  This is a sponsored post for The Maker’s Movement*.  I have been provided product and compensation in exchange for my creative ideas.  The view and opinions are my own. 

How to make a Halloween Shaker Tag using the Shaker Jar Tag

Materials Used:  (*affiliate links)

*Disclosure:  This blog uses ads and affiliate links.  If you choose to make a purchase using one of the links, I receive a small commission (at no additional cost to you) that helps offset the costs of maintaining this blog.  Thanks for your support!

How to make a Halloween Shaker Tag

  • You will need Halloween paper from the Tricks or Treats paper pad, acetate, and craft foam.

How to make a Halloween Shaker Tag

  • Die Cut the pieces using the Mini Maker Die Cut Machine as shown.

How to make a Halloween Shaker Tag

A Tip for Easy Assembly…

  •  Place the striped paper, used for the top of the mason jar shaker tag, into the Xyron Create a Sticker Mini*. Crank the handle to run the paper through the machine. As it goes through the Xyron Create a Sticker Mini* it adds a layer of adhesive onto the back of the paper. Die-cut the paper using the Mason Jar Frame Die. Now the die-cut frame is a sticker, which makes placing it onto the acetate easy. 

How to make a Halloween Shaker Tag

  • Remove the blue protective liner from the acetate.  Place the mason jar frame onto the acetate.
  • Remove one side of the protective liner from the craft foam frame.  Place the foam frame onto the mason jar silhouette.
  • Add Halloween Shaker Sprinkles in the center of the foam.  Don’t overfill.  You want to make sure to leave for shaking.
  • Remove the liner from the craft foam and line up the mason jar frame (with acetate) over the
  • Die Cut two jar tops and adhere them to the top of the shaker jar.
  • Wrap with twine.  Glue the Halloween ribbon around the base of the shaker jar.

How to make a Halloween Shaker Tag

Tie the Halloween Shaker Tag onto a mason jar filled with Halloween Treats.

A Fun Halloween Treat.

Faux Stone Geometric Box

Faux Stone Geometric Box

Add a little dimension to your paper crafting projects this Holiday Season.

The Faux Stone Geometric Box was made with Eileen Hull New Geometric Box Die by Sizzix*,

Sizzix Matboard* and Deco Arts Dimensional Effects Texture Paste*.

*Disclosure:  This blog uses ads and affiliate links.  If you choose to make a purchase using one of the links, I receive a small commission (at no additional cost to you) that helps offset the costs of maintaining this blog.  Thanks for your support!

666046 Sizzix Geometric Box Die by Eileen Hull

How to make a Faux Stone Geometric Box:

  • The Geometric Box Die goes together really easily and is also expandable.
  • Die-cut the box* using mat board* and a Big Shot Die-Cutting Machine*
  • You will need to cut two pieces of the middle section of the box.  
  • Carefully fold the box on the score lines.
  • Assemble the box with the tabs on each side of the box. I like to use Rapid Fuse Adhesive* to glue the box. It dries and holds in 30 seconds.

DIY Faux Stone Geometric Box

How to make a Faux Stone Geometric Box

  • Use dark gray acrylic paint to paint the entire box. (inside and out)
  • Use a dry brush with a small amount of paint to apply lighter coats of paint over the outside of the box. I painted from dark to light. I used a combination of the dry brush technique with stippling to get my desired look.

How to make a Faux Stone Geometric Box

  • For my Holiday Embellishment, I used a 1″ gold pendant blank for jewelry making and a 1″ plaid scrapbook paper circle glued in the center.
  • Tie the gold pendant around the top of the box using a piece of braided twine.

How to make a Faux Stone Geometric Box.

Add a small faux Christmas Tree for a sophisticated Holiday Decoration.

Eileen Hull Educator Logo

Disclosure:  This is a sponsored post.  As a member of the Eileen Hull Educator Team, I have been provided product in exchange for my creative ideas.  The view and opinions are my own. 

Amazon Fall Rug Event

Materials Used:    (*affiliate links)

Nuts for Fall Acorn Door Hanger

Nuts for Fall Acorn Door Hanger

A Fall Dollar Store Craft

As much as I love the summer weather, I do love Fall.

The cooler weather, the beautiful colors… 

I only wish it’d turn right back to summer when it was done.

“This is a sponsored post.  As a member of the StyleTechCraft Design Team I have been provided product and compensation in exchange for my creative ideas.  The views and opinions are my own.

Nuts for Fall Acorn Door Hanger

I found this cute Acorn Shape* and Faux Leather Leaves* at Dollar Tree* and knew it would be even cuter with a little StyleTechCraft Vinyl.

Materials Used:  (*affiliate links)

*Disclosure:  This blog uses ads and affiliate links.  If you choose to make a purchase using one of the links, I receive a small commission (at no additional cost to you) that helps offset the costs of maintaining this blog.  Thanks for your support!

Nuts for Fall Acorn Door Hanger

Directions:

  • Lightly sand the acorn shape using a sanding block*.
  • Paint the acorn with acrylic paint.
  • Trace around the top of the acorn to create a pattern for the acorn top. Fill in the bottom with a wavy line.  Trace the pattern onto plaid scrapbook paper and cut it out. 
  • There are different ways to adhere to the paper. My favorite way is to use the
  • Xyron Creative Station* to add adhesive to the back of the scrapbook paper.  
  • Add the plaid paper to the top of the acorn. Use an extra fine point black sharpie* to add a border around the acorn top shape.

Nuts for Fall Acorn Door Hanger

  • Using a Silhouette Cameo Electronic Die Cutting Machine* and the Nuts for Fall SVG File, size the design to fit onto the bottom of the acorn shape. Cut the design using several colors of StyleTechCraft Luster Adhesive Vinyl.
  • Once you remove the area inside and around the cut vinyl, use transfer tape* to add the design to the acorn.
  • Decorate the top of the acorn with a big bow, faux leaves, and a small acorn embellishment.
  • Add a small piece of twine for hanging onto a door or add it to the center of a Fall Wreath.

StyletechCraft products brought to you by ATSM Craft*

Preserving Flower Seeds in Fall

Preserving Flower Seeds in Fall

Sue’s Garden Tip…  

Preserve Flower Seeds in Fall for a Beautiful Garden Next Summer.

Fall is a great time to harvest flower seeds.

Now that the weather has started getting a little cooler, it’s a great time

to start thinking about harvesting your flower seeds for next year’s garden.

Preserving Flower Seeds in Fall

My dad enjoyed gardening…

and I think a little of his love may have rubbed off on me.

In the past, I’ve spent a lot of money at the garden shop purchasing flowers to fill

my flower beds.  As you know, it can be very costly.

In the Spring of 2020, not knowing if I would be able to visit my favorite garden shops,

I purchased seeds for planting and started them in early Spring.

I was pleased with the results.

And at the end of that Summer, I started collecting seeds for the following year.

DIY-Mini Greenhouse for Starting Seeds-Sue's Creative Workshop www.sueeldred.com

I even wrote a post called Creating a Mini Greenhouse for Starting Seeds.

Preserving Flower Seeds in Fall

When the cooler weather starts setting in…

and the summer blooms begin to fade,

I like to snip off the spent flowers to save for seeds.

It’s best to gather the seeds on a bright, dry, sunny day. 

If they’re not completely dry,

I put them in little glass jars until they finish drying.

I put a little paper bag in each jar with the color and type of flower inside.

Preserving Flower Seeds in Fall

Separate the seeds from the center of the flower and remove as much debris as possible.

I put the seeds in labeled bags until I can plant them next year.

(You can purchase mini bags on Amazon*.)

*Disclosure:  This blog uses ads and affiliate links.  If you choose to make a purchase using one of the links, I receive a small commission (at no additional cost to you) that helps offset the costs of maintaining this blog.  Thanks for your support!

Preserving Flower Seeds in Fall

Make sure to watch out for these little guys.  (Bees are bad in the fall.)

Preserving Flower Seeds in Fall

And while you are at it, don’t forget to put a few flowers in a vase to enjoy.

Preserving Flower Seeds in Fall

This is only one of my flower beds.

I have flowers in several locations around the house.

I get a lot of satisfaction from knowing that 90% of my flowers,

except for perennials and a few other summers favorites were all started by seed.

Fall Floral Stained Glass Card

Fall Floral Stained Glass Card

Fall Floral Stained Glass Card made with the Sizzix Skinny Mini Elements Thinlet Die by Eileen Hull.

I was lying in bed the other night when I got the idea for this card.

(That’s when I get some of my best ideas.)

It was perfect for the Eileen Hull Card Bonanza Month over on her blog.

Eileen Hull Educator Logo

Disclosure:  This is a sponsored post.  As a member of the Eileen Hull Educator Team, I have been provided product in exchange for my creative ideas.  The view and opinions are my own. 

Xyron Creative Station

The Fall Floral Stained-Glass Card is a fairly simple card to make.

The one thing that made this card easy was using my Xyron Creative Station*

on the cardstock before die-cutting.

Fall Floral Stained Glass Card

Directions:

  • Cut a piece of gold cardstock slightly larger than the Skinny Mini Elements Die* to use as the base of the card.
  • Choose a dark gray cardstock for the outline and three pieces of fall-colored cardstock for the inside pieces.
  • Place the cardstock into the Xyron Creative Station* and crank the handle to run the paper through the machine. The Xyron Creative Station* adds a complete layer of adhesive to the cardstock making each little piece a sticker. That made assembling the card simple or “simple-ish.”
  • Place the die on the cardstock and die-cut the gray and the fall-colored paper using a Sizzix Big Shot Die-Cutting Machine*.
  • Trim the gray paper to the size of the die.  Remove and discard all the tiny inside pieces using a craft pick*.  Remove the protective liner from the back of the cardstock and center it onto the gold cardstock layer.
  • Use a craft pick* to place the inside flower pieces from the colored cardstock.

Materials Used:

*Disclosure:  This blog uses ads and affiliate links.  If you choose to make a purchase using one of the links, I receive a small commission (at no additional cost to you) that helps offset the costs of maintaining this blog.  Thanks for your support!

Fall Floral Stained Glass Card

  • Finish creating your flower pattern and add several cardstock layers to a cream card.
  • Add a sheer cream bow.

Fall Floral Stained Glass Card

There’s so much more that you could add to the card, like a greeting or a small tag.

But I decided to keep it simple. (or as I mentioned before…”simple-ish”.)

Fall Floral Stained Glass Card

I thought I was finished with this card.

But then again, sometimes things just evolve.  

A stained-glass card needed rhinestones.

I added Clear Enamel Dots from Hero Arts* to the center of each flower.

Fall Floral Stained Class Card

For another card idea using the Sizzix Skinny Mini Elements Die,

check out the Skinny Mini Christmas Poinsettia Card below.

Skinny Mini Elements Christmas Poinsettia Card.

Skinny Mini Elements Christmas Poinsettia Card

Shop Scrapbook.com

How to make a Welcome Autumn Pillow using craft vinyl to make the Stencil

Welcome Autumn Pillow

Welcome Autumn Pillow  

I have been wanting to use vinyl to create a stencil for a while now.

It was really simple to do and I’m in love with the results.

If you have craft vinyl and an electronic die-cutting machine*,

then you can make a stencil too.

“This is a sponsored post.  As a member of the StyleTechCraft Design Team I have been provided product and compensation in exchange for my creative ideas.  The views and opinions are my own.

HOW TO MAKE A WELCOME AUTUMN PILLOW USING CRAFT VINYL TO MAKE STENCILS

Materials Used:  (*affiliate link)

StyletechCraft products brought to you by ATSM Craft*

*Disclosure:  This blog uses ads and affiliate links.  If you choose to make a purchase using one of the links, I receive a small commission (at no additional cost to you) that helps offset the costs of maintaining this blog.  Thanks for your support!

How to make a Welcome Autumn Pillow using craft vinyl to make the Stencil

How to make a Welcome Autumn Pillow using a Craft Vinyl Stencil:

  • For my pillow, I used off-white fabric that I purchased at a garage sale several years ago. I cut two panels 15″ x 15″.
  • I created the stencil pattern using the “Welcome Autumn” SVG file and my Silhouette. I sized the image to fit onto my fabric panels.
  • I cut the image using StyleTechCraft Craft Vinyl*. (I originally tried using removable vinyl on my fabric, but it wasn’t quite tacky enough and a little hard to apply.)
  • To create the stencil, remove the letters and the leaves from the vinyl, leaving a reverse image.  
  • Use a low-tack transfer paper to transfer the vinyl onto the fabric.

How to make a Welcome Autumn Pillow using craft vinyl to make the Stencil

  • Make sure that the stencil is securely stuck to the fabric to eliminate paint seepage.
  • Place a piece of paper behind the fabric panel to protect your work surface.
  • Paint the leaves using a small paint brush and a variety of acrylic paint in Autumn colors.  
  • Paint the words “welcome Autumn using black acrylic paint.  

How to make a Welcome Autumn Pillow using craft vinyl to make the Stencil

  • After the paint has dried, carefully remove the stencil.  
  • I may have squealed a bit when I removed the stencil. It is perfectly imperfect, and I love how it turned out!
  • Iron over the fabric to set the design.  

How to make a Welcome Autumn Pillow using craft vinyl to make the Stencil

Welcome Autumn Door Hanger

Welcome Autumn Door Hanger

I liked how it turned out so much that I decided to make a Welcome Autumn Door Hanger.

You can find plain wood circles on Amazon* in a variety of sizes.

Fall Sunflower Get Well Card

Fall Sunflower Get Well Card

A Bright and Cheery Card to brighten someone’s day.

This simple Get-Well card uses dies and paper from The Maker’s Movement.

Maker's Movement

Disclosure:  This is a sponsored post for The Maker’s Movement.  I have been provided product and compensation in exchange for my creative ideas.  The view and opinions are my own. 

Fall Sunflower Get Well Card

Materials Used:  (*affiliate links)

*Disclosure:  This blog uses ads and affiliate links.  If you choose to make a purchase using one of the links, I receive a small commission (at no additional cost to you) that helps offset the costs of maintaining this blog.  Thanks for your support!

Fall Sunflower Get Well Card

Directions:

  • Die-cut the pieces for the flower out of cardstock. You will need two flowers cut from the large flower die.
  • Ink the cardstock flower with yellow ink to give the petals a little color variation and depth.

Fall Sunflower Get Well Card

  • Use the side of a pencil to gently round the edges of the petals.

Fall Sunflower Get Well Card

  • Glue the center of the flowers together using Tombow Mono Aqua Liquid Glue*.
  • Instead of a brown center for the sunflower, I cut a circle using polka dot paper from the Autumn Breeze Paper Pad.

Fall Sunflower Get Well Card

  • Die-cut the words “get better” using StyleTechCraft Gold Chrome Adhesive Vinyl*and the Get Better Die Set.
  • The card uses simple layers using the Autumn Breeze Paper Pad.
  • Finished Card Size 4 1/4″ x 5 1/2″.

StyletechCraft products brought to you by ATSM Craft*

Sending Sunshine on a Cloudy Day

Sending Sunshine on a Cloudy Day

Everyone can use a little Sunshine on a cloudy day.

This simple card is made with stamps and dies from The Maker’s Movement.

The card uses a little subtle play with different patterns.

Maker's Movement

Disclosure:  This is a sponsored post for The Maker’s Movement.  I have been provided product and compensation in exchange for my creative ideas.  The view and opinions are my own. 

Sending Sunshine on a Cloudy Day

Materials Used:       (*affiliate links)

*Disclosure:  This blog uses ads and affiliate links.  If you choose to make a purchase using one of the links, I receive a small commission (at no additional cost to you) that helps offset the costs of maintaining this blog.  Thanks for your support!

Sending Sunshine on a Cloudy Day

  • I die-cut pieces using the Stacking Flowers Die out of yellow patterned paper from the Cloudy Day paper pad.
  • The flower was assembled using 3D Thin Foam Squares*.

Sending Sunshine on a Cloudy Day

  • I used the “Hello Sunshine Stamp & Die Set” for the sunshine layers on the bottom of the card.
  • I also used the “Hello Sunshine Stamp & Die Set for the small banner with the stamped words “sending you”.
  • My favorite tip for die-cutting small or thin pieces is to add a layer of adhesive using a Xyron Creative Station®* before die-cutting.

Sending Sunshine on a Cloudy Day.

This card was fast and easy to assemble and is sure to brighten up anyone’s day.